Monacaで使用するユーザーCordovaプラグインを作成する(ハンズオン)
※この記事は、以下のURLを参考に作成しています。
https://docs.monaca.io/ja/products_guide/monaca_ide/dependencies/custom_cordova_plugin/
MonacaのユーザーCordovaプラグイン(LTVibrationPlugin)のファイル構成
以下のサンプルのプラグインもそうですが、大きく分けて、
- プラグインとしての設定ファイル --- plugin.xml, package.json, js-module
- Androidのネイティブコード
- iOSのネイティブコード
の3つで構成されています。
プラグインの構成例
- src/
- android/
- mobi/
- monaca/
- LTVibrationPlugin.java
- monaca/
- mobi/
- ios/
- LTVibrationPlugin.swift
- www/
- vibration.js
- plugin.xml
- package.json
- android/
※このファイル構成のzipファイルを用意しましたので、こちらからダウンロードしてください。
Sampleファイル
設定用xml(plugin.xml)
plugin.xml
<?xml version="1.0" encoding="UTF-8"?>
<plugin xmlns="http://apache.org/cordova/ns/plugins/1.0"
  id="jp.co.lateralt.vibration"
  version="0.0.6">

    <!-- プラグイン全体設定 -->
    <name>LTVibrationPlugin</name>
    <description>LT Vibration Plugin</description>
    <author>Lateral Thinking</author>
    <license>Apache 2.0 License</license>
    <engines>
        <engine name="cordova" version=">=3.5.0" />
    </engines>
    <js-module src="www/vibration.js" name="vibration">
        <clobbers target="Vibration" />
    </js-module>

    <!-- iOS用設定 -->
    <platform name="ios">
        <config-file target="config.xml" parent="/*">
            <feature name="LTVibrationPlugin">
                <param name="ios-package" value="LTVibrationPlugin"/>
            </feature>
    </config-file>
    <source-file src="src/ios/LTVibrationPlugin.swift" target-dir="src/ios" />
    </platform>

    <!-- Android用設定 -->
    <platform name="android">
        <config-file target="res/xml/config.xml" parent="/*">
            <feature name="LTVibrationPlugin">
                <param name="android-package" value="mobi.monaca.LTVibrationPlugin"/>
            </feature>
        </config-file>
        <config-file target="AndroidManifest.xml" parent="/*">
          <uses-permission android:name="android.permission.VIBRATE" />
        </config-file>
        <source-file src="src/android/mobi/monaca/LTVibrationPlugin.java" target-dir="src/mobi/monaca" />
    </platform>

</plugin>
AndroidManifest.xmlに追加するプラグイン用のuses-permissionはplugin.xmlに記述する。
package.json
package.json
{
    "version": "0.0.6",
    "name": "cordova-plugin-lt-vibration",
    "description": "Cordova LT Vibration Plugin",
    "cordova": {
        "id": "cordova-plugin-lt-vibration",
        "platforms": [
            "android",
            "ios"
        ]
    },
    "keywords": [
        "cordova",
        "vibration",
        "cordova-android",
        "cordova-ios"
    ],
    "engines": []
}
注)サンプルPluginの中にもpackage.jsonが含まれていないケースがありましたが、現在のCordova7.1では、package.jsonがないとビルドに失敗するようですので、別途追加する必要があります。
参考URL: https://qiita.com/keeey/items/51321b8ed645c816b26b
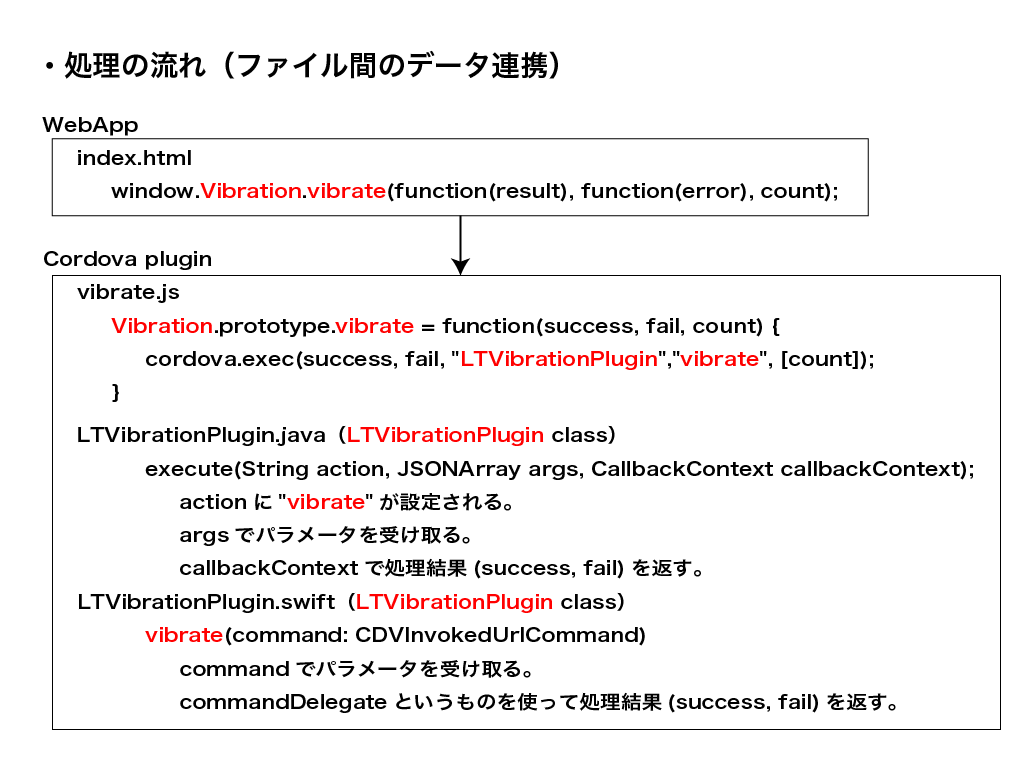
js-module
vibration.js
var Vibration = function() {};

// バイブレーション鳴動
// success: 成功時のCallback
// fail: 失敗時のCallback
// count: バイブレーション鳴動回数(パラメータとしてネイティブ処理に渡す)
Vibration.prototype.vibrate = function(success, fail, count) {
    cordova.exec(success, fail, "LTVibrationPlugin","vibrate", [count]);
};

var vibration = new Vibration();
module.exports = vibration;
www/vibration.jsの中で、cordova.exec()を使用して、LTVibrationPluginにネイティブコードとして実装されたvibrateメソッドを呼び出します。
ネイティブコード実装
- Androidにおいては、
CordovaPluginを継承したclassとして実装されます。js-moduleのcordova.exec()が実装クラスのexecuteを動かす形になります。このケースの場合、第1引数のactionにvibrateという文字列が入ってきます。
LTVibrationPlugin.java
package mobi.monaca;

import org.apache.cordova.CallbackContext;
import org.apache.cordova.CordovaPlugin;
import org.json.JSONArray;
import org.json.JSONException;
import android.content.Context;
import android.os.Vibrator;

/**
 * バイブレーションを鳴動させるプラグイン
 */
public class LTVibrationPlugin extends CordovaPlugin {
    // バイブレーションの鳴動時間と間隔に使用
    final int MILLISECONDS = 500;

    @Override
    public boolean execute(String action, JSONArray args, CallbackContext callbackContext) throws JSONException {
        // パラメータとして受け取ったactionをチェック
        if (action.equals("vibrate")) {
            // バイブレーション鳴動回数をパラメータとして取得
            int count = args.getInt(0);
            Vibrator vibrator = (Vibrator)cordova.getActivity().getSystemService(Context.VIBRATOR_SERVICE);
            long[] pattern;
            if (count > 0) {
                pattern = new long[count * 2];
                for (int i = 0; i < count * 2; i += 2) {
                    // 500ms待って500ms鳴動するようにパターンを設定
                    pattern[i] = MILLISECONDS;
                    pattern[i + 1] = MILLISECONDS;
                }
            } else {
                pattern = new long[2];
                // 500ms待って500ms鳴動するようにパターンを設定(1回のみ)
                pattern[0] = MILLISECONDS;
                pattern[1] = MILLISECONDS;
            }
            vibrator.vibrate(pattern, -1);
            callbackContext.success(action + ": Execute Vibrate");
        } else {
            callbackContext.error(action + ": Not Execute Vibrate");
        }
        return true;
    }
}
- iOSにおいては、
LTVibrationPluginはCDVPluginを継承した、vibrateメソッドを含むクラスとして実装されます。
LTVibrationPlugin.swift
import Foundation
import UIKit
import AudioToolbox

// バイブレーションを鳴動させるプラグイン
@objc(LTVibrationPlugin) class LTVibrationPlugin: CDVPlugin {
    @objc(vibrate:)
    func vibrate(command: CDVInvokedUrlCommand) {
        // バイブレーション鳴動回数をパラメータとして取得
        let count: Int = (command.arguments[0] as! Int) ?? 0
        for loop in 1 ... count {
            // バイブレーション鳴動
            AudioServicesPlaySystemSound(SystemSoundID(kSystemSoundID_Vibrate))
            // 1.0秒休止
            Thread.sleep(forTimeInterval: 1.0)
        }
        let result = CDVPluginResult(status: CDVCommandStatus_OK,
                                     messageAs: String(count) + " count: Execute Vibrate.")
        self.commandDelegate!.send(result, callbackId: command.callbackId)
    }
}
ベースとするプロジェクトの作成
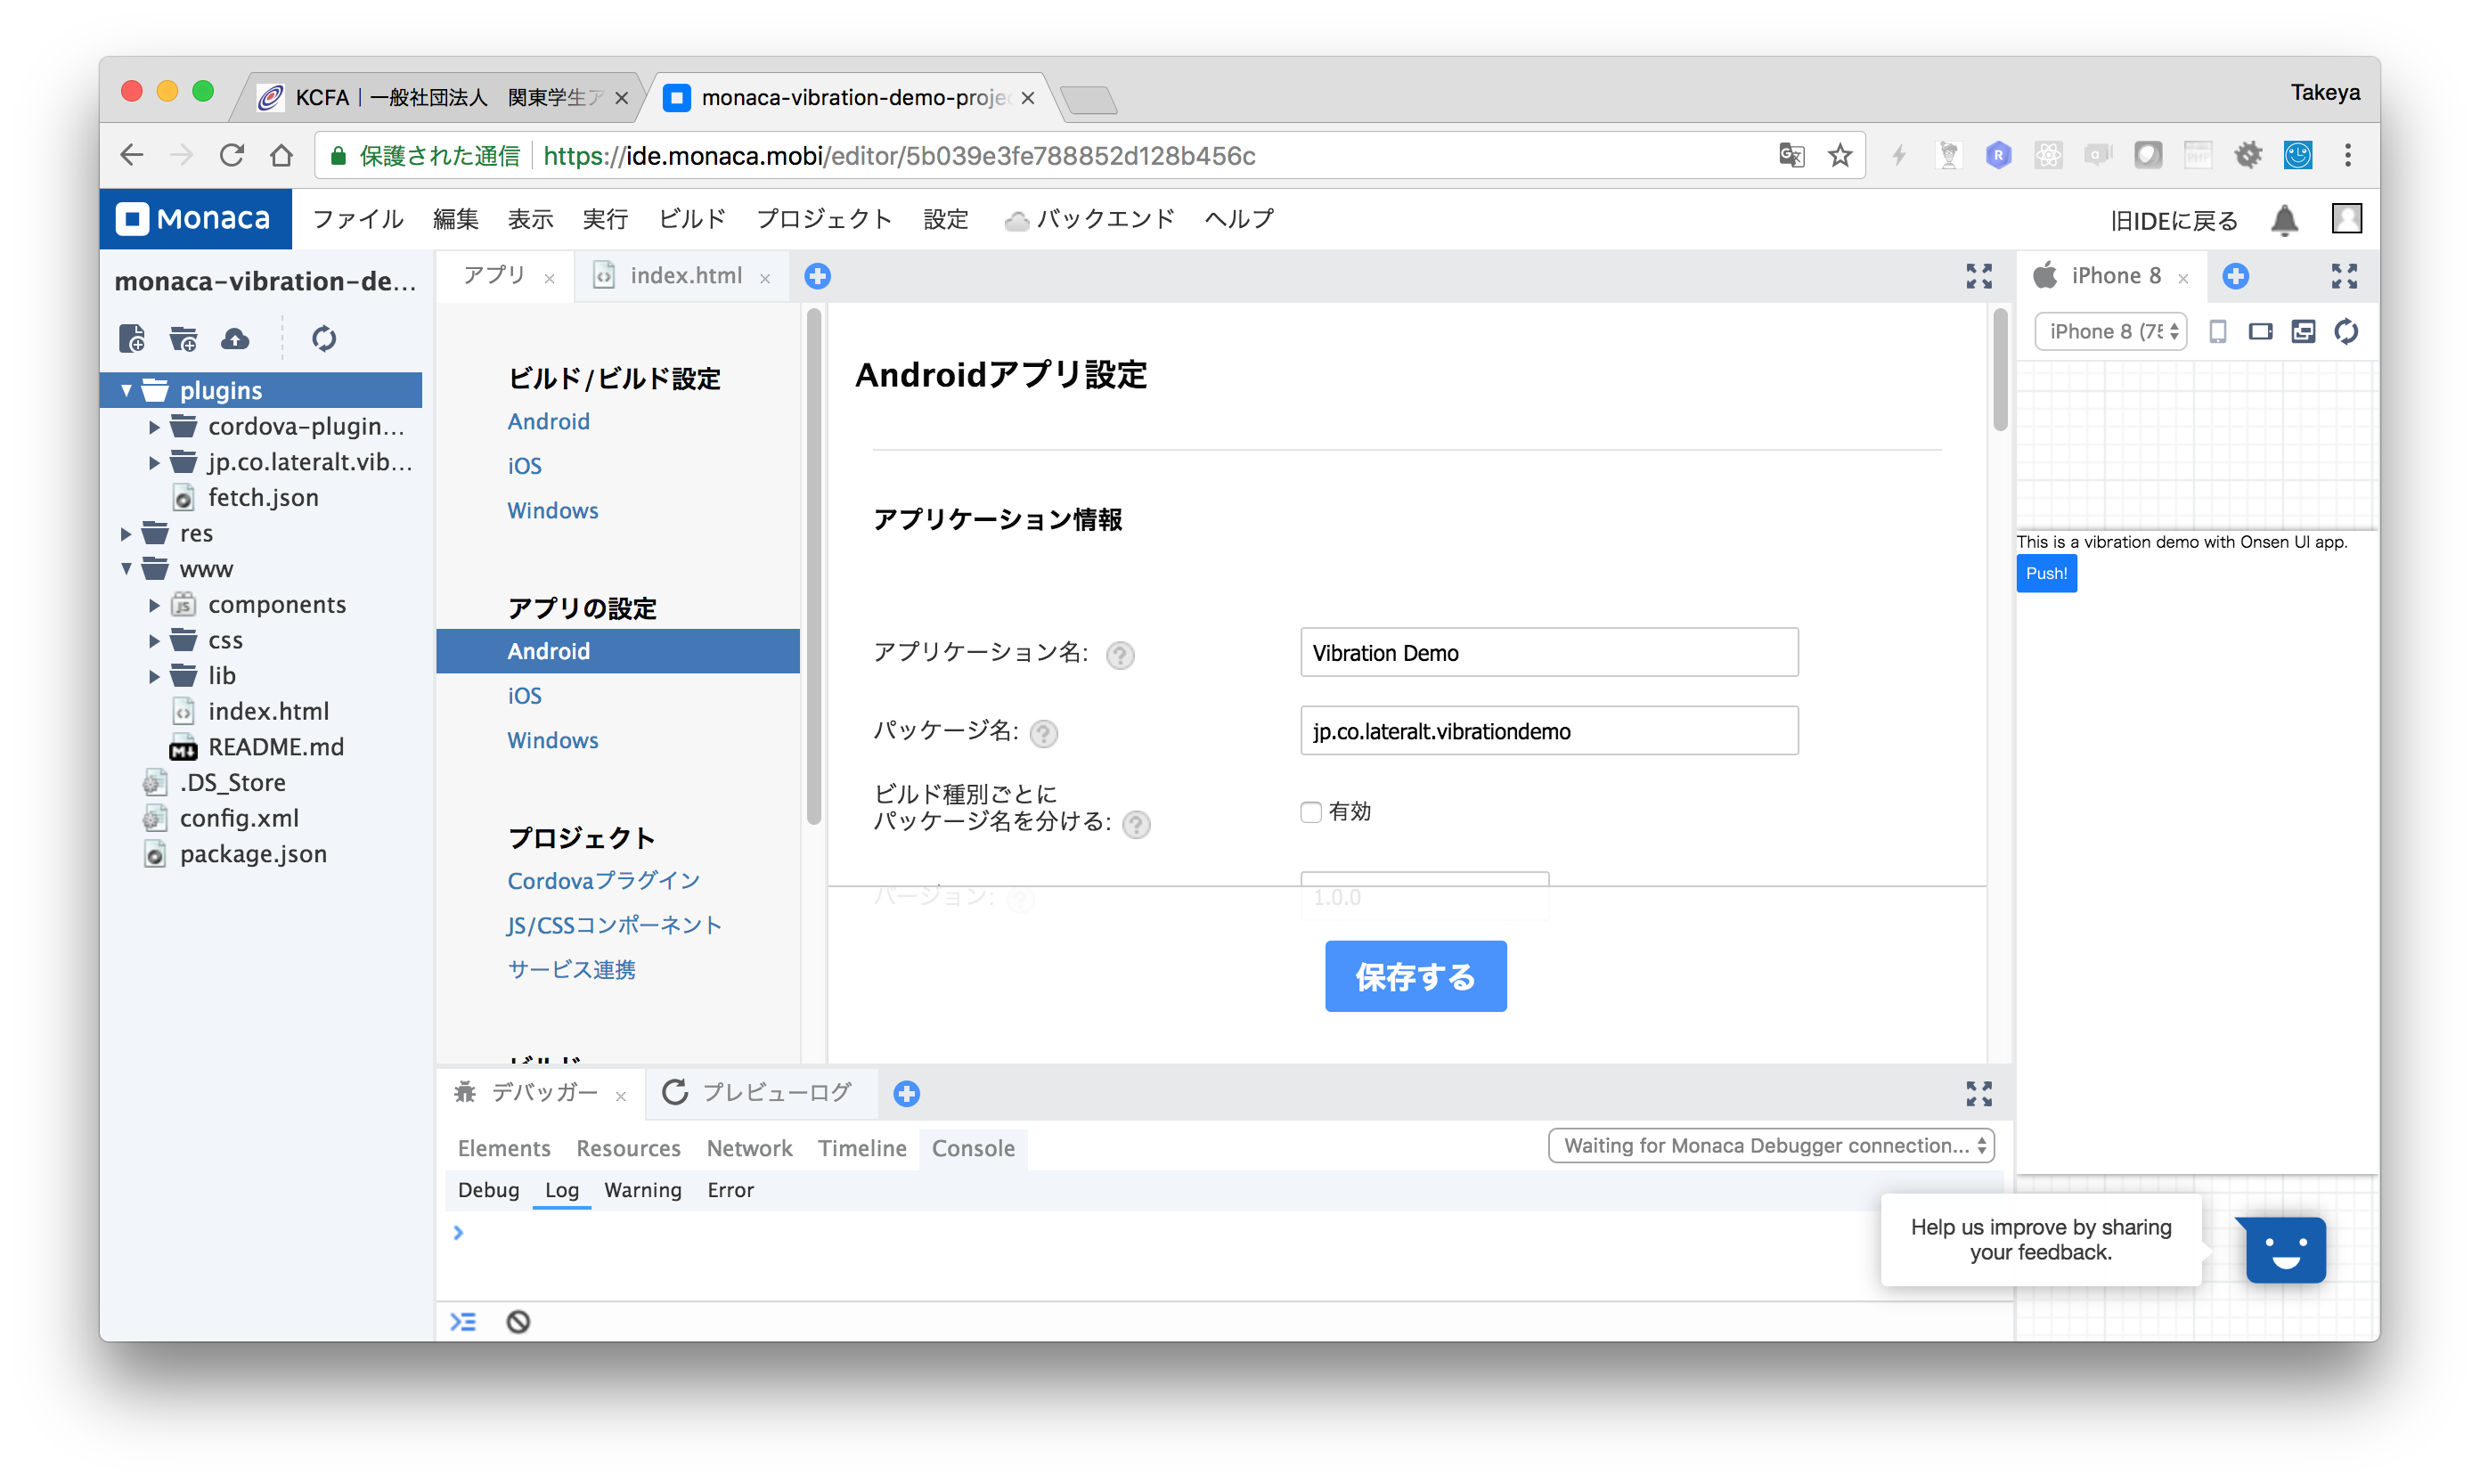
- 今回は、用意されているプロジェクトテンプレートのうち、「Onsen UI V2 JS Minimum」を使用します。

- 設定>Androidアプリ設定で、アプリケーション名とパッケージ名を設定します。
- iOSアプリを作成する場合は、設定>iOSアプリ設定も修正します。(今回は説明のみ)
 - ビルド設定(各種証明書・プロファイルの設定)を行います。(今回は説明のみ)

ユーザーCordovaプラグインのWeb IDEへのインポート方法
- プロジェクトのルートフォルダ(cordova-lt-vibration-plugin)を階層付きzipファイルの形で圧縮する。
- IDEの「設定>プロジェクト>Cordovaプラグイン」を選択する。
- 「Cordovaプラグインのインポート」で1で作成したzipファイルを選択してインポートを行う。
 ※このサンプルのプラグインの場合、iOS側のネイティブコードはSwiftで書かれているため、サードパーティー製プラグインである「cordova-plugin-add-swift-support」も使用しています。
https://github.com/akofman/cordova-plugin-add-swift-support
※このサンプルのプラグインの場合、iOS側のネイティブコードはSwiftで書かれているため、サードパーティー製プラグインである「cordova-plugin-add-swift-support」も使用しています。
https://github.com/akofman/cordova-plugin-add-swift-support
Pluginを呼び出す側のコードの実装(Onsen UI V2)
index.html
<!DOCTYPE HTML>
<html>
<head>
<meta charset="utf-8">
<meta name="viewport" content="width=device-width, initial-scale=1, maximum-scale=1, user-scalable=no">
<meta http-equiv="Content-Security-Policy" content="default-src * data: gap: https://ssl.gstatic.com; style-src * 'unsafe-inline'; script-src * 'unsafe-inline' 'unsafe-eval'">
<script src="components/loader.js"></script>
<script src="lib/onsenui/js/onsenui.min.js"></script>
<link rel="stylesheet" href="components/loader.css">
<link rel="stylesheet" href="lib/onsenui/css/onsenui.css">
<link rel="stylesheet" href="lib/onsenui/css/onsen-css-components.css">
<link rel="stylesheet" href="css/style.css">
<script>
ons.ready(function() {
console.log("Onsen UI is ready!");
});
// バイブレーション鳴動処理
var myVibrate = function() {
window.Vibration.vibrate(
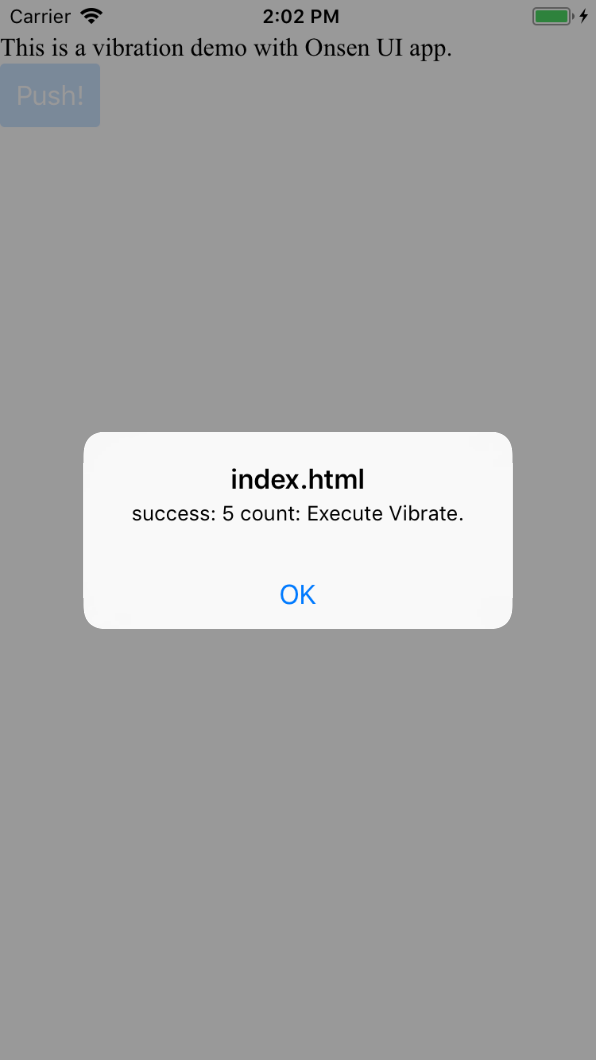
function(result) { alert( "success: " + result ); },
function(error) { alert( "error: " + error ); },
5 //バイブレーション鳴動回数(ネイティブ機能側にパラメータとして渡す)
);
}
</script>
</head>
<body>
This is a vibration demo with Onsen UI app.<br>
<ons-button onclick="myVibrate()">
Push!
</ons-button>
</body>
</html>
今回は「Onsen UI V2 JS Minimum」プロジェクトにボタンを追加し、ボタンをタップされたタイミングで、Pluginの処理が呼ばれるようにしています。
Pluginはjavascriptのwindowオブジェクトの要素として呼び出す事が可能です。
(Nativeアプリの機能として実装されているので、IDEのプレビューでは正しく動作しません)
| 起動時 | ボタンタップ時 |
|---|---|
 |
 |