pillowとは
画像処理ライブラリ、更新の停止したPILをforkして作成された。
https://pillow.readthedocs.io
目的
aws lambdaを使ってs3に置いた画像に文字を埋め込む処理を書いてみたので
※サンプルではaws関係なくpythonとpillowだけのコードになっています。
動作サンプル
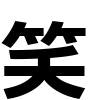
笑という文字を100x100のサイズに入る文字サイズになるまで調整してから描画しています。
from PIL import Image
from PIL import ImageDraw
from PIL import ImageFont

def main():
    # test
    pillow_char_offset(0, 0, 100, 100, u"笑", 150, "C:\hogehoge\meiryob.ttc")

def pillow_char_offset(x_pos: int, y_pos: int, x_end_pos: int, y_end_pos: int, char: str, init_font_size: int, fontfile_name: str):
    '''
    :param x_pos 文字を描画したい場所の[X]軸始点
    :param y_pos 文字を描画したい場所の[Y]軸始点
    :param x_end_pos 文字を描画したい場所の[X]軸終点
    :param y_end_pos 文字を描画したい場所の[Y]軸終点
    :param char 描画したい文字
    :param init_font_size フォントの初期値(最大サイズ)
    :param fontfile_name フォントファイル(otfやttf)のパス
    '''
    # ベースとなる画像の下地を作成する。複製した画像などをベースにする場合は Image.open で開く
    img = Image.new('L', (x_end_pos, y_end_pos), 'white')
    draw = ImageDraw.Draw(img)

    length = x_end_pos - x_pos
    height = y_end_pos - y_pos
    out_text_size = (length + 1, height + 1)
    font_size_offset = 0
    font = None

    # フォントの描画サイズが描画領域のサイズを下回るまでwhile
    while length < out_text_size[0] or height < out_text_size[1]:
        font = ImageFont.truetype(fontfile_name, init_font_size - font_size_offset)
        # draw.textsizeで描画時のサイズを取得
        out_text_size = draw.textsize(char, font=font)
        font_size_offset += 1

    draw.text((x_pos, y_pos), char, fill='#000', font=font)

    img.save('hogehoge.jpg')

if __name__ == "__main__":
    main()
