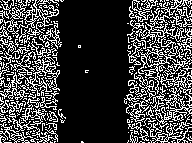
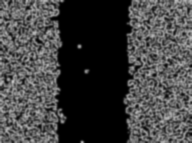
スクラッチアッセイの画像の解析をpythonでしました。
jupyter上で作業しました。
各ステップで処理された結果の画像は以下のコマンドで表示しながら進めました。
画像の表示コードについて
以下のコードを各処理後に実行して、都度画像の確認を行いました。
scratch.py
# データ解読 (hoge:各処理で返されるオブジェクト)
decoded_bytes = cv2.imencode(".png", hoge)[1].tobytes()
# Image関数
Image(decoded_bytes)
①ライブラリのインポート
scratch.py
import cv2
import math
import numpy as np
②画像の読み込み
scratch.py
(hoge:画像が入ってるフォルダ名)
img_src = cv2.imread("C:/Users/hoge/image.jpg", 1) #入力画像(カラー)の読み込み
# img_src = cv2.imread("C:/Users/hoge/image.jpg", 0) #入力画像(白黒)の読み込み
③エッジを検出 (canny法)
scratch.py
img_dst = cv2.Canny(img_src, 30, 100) #出力画像 = cv2.Canny(img_src, 閾値1, 閾値2)
④画像をぼかす (平滑化、blur)
とりあえず13回繰り返します
scratch.py
i=0
while i < 13:
    img_dst2 = cv2.GaussianBlur(img_dst, (11, 11), 1)
    i = i + 1
⑤収縮処理 (erode) と膨張処理 (dilate)
scratch.py
# 8近傍指定の行列を作成
element8 = np.array([[1, 1, 1], [1, 1, 1], [1, 1, 1]], np.uint8)

# 一回膨張処理
img_dst3 = cv2.dilate(img_dst2, element8, iterations = 1)

# 5回収縮処理
i = 0
while i < 5:
    img_dst3 = cv2.erode(img_dst3, element8, iterations = 1)
    i = i + 1

# 5回膨張処理
i=0
while i < 5:
    img_dst3 = cv2.dilate(img_dst3, element8, iterations = 1)
    i = i + 1
⑥2値化
scratch.py
thresh = 60
ret, img_dst4 = cv2.threshold(img_dst3, thresh, 255, cv2.THRESH_BINARY)
# 出力画像 = cv2.thresh(img_src, 閾値, 最大値、閾値処理の種類)
# 処理の種類(THRESH_BINARY_INV、THRESH_TRUNC、THRESH_TOZERO、THRESH_TOZERO_INV)
⑦白黒反転
img_dst5 = 255 - img_dst4
⑧面積算出パターン1
白い部分のピクセルをカウントするパターン
scratch.py
cv2.countNonZero(img_dst5)
結果
9895
⑨面積算出パターン2
輪郭を検出して、囲まれた部分の面積を全部計算して (すべてのエリアのラベルもされる) 合計または最大部分の面積を返すパターン
scratch.py
# findContours(入力画像、輪郭抽出モード、輪郭の近似手法)
# 輪郭抽出モード (RETR_EXTERNAL, RETR_LIST, RETR_CCOMP, RETR_TREE)
# 輪郭の近似手法 (CHAIN_APPROX_NONE, CHAIN_APPROX_SIMPLE)
contours = cv2.findContours(img_dst5, cv2.RETR_LIST, cv2.CHAIN_APPROX_SIMPLE)[0]

# 算出された全部の面積の数字をリストに放り込んで最大値(max)、または合計(sum)を返す
area = []
for i in contours:
    area.append(cv2.contourArea(i))
# sum(area)
max(area)
結果
9625.5
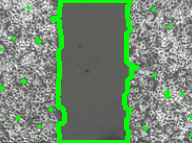
⑩面積算出パターン2で検出した輪郭をオリジナルの読み込み画像に合成
面積の算出対象エリアが正しいか確認したかった。
scratch.py
analyzed_img = cv2.drawContours(img_src, contours, -1, (0,255,0), 3)
最後に
スクラッチされたエリアに細胞が島を形成したとき(囲いの中に囲いができたとき)、今回の面積算出法では対処できないので、何かしら対応しなければいけないかと思います。もう考えるの疲れたのでこの辺で終わります。
次回、フォルダ内に入った画像全部を処理するバッチ処理のコードを書きます。


