概要
- Aurora PostgreSQL の何らかの検証を実施する際、サンプルデータが入っている DB と、 DB に繋がるための踏み台をサクッと用意したいケースがある
- それらをサクっと構築できる CDK Construct (TypeScript) を作った
はじめに
Aurora PostgreSQL (あるいはもっと普遍的な DB) の検証環境がサクっと欲しいこと、ありますよね?
その際に、サンプル DB も入っていてほしいし、ローカルの DB クライアントからサクっと繋げるようにもしたいですよね?
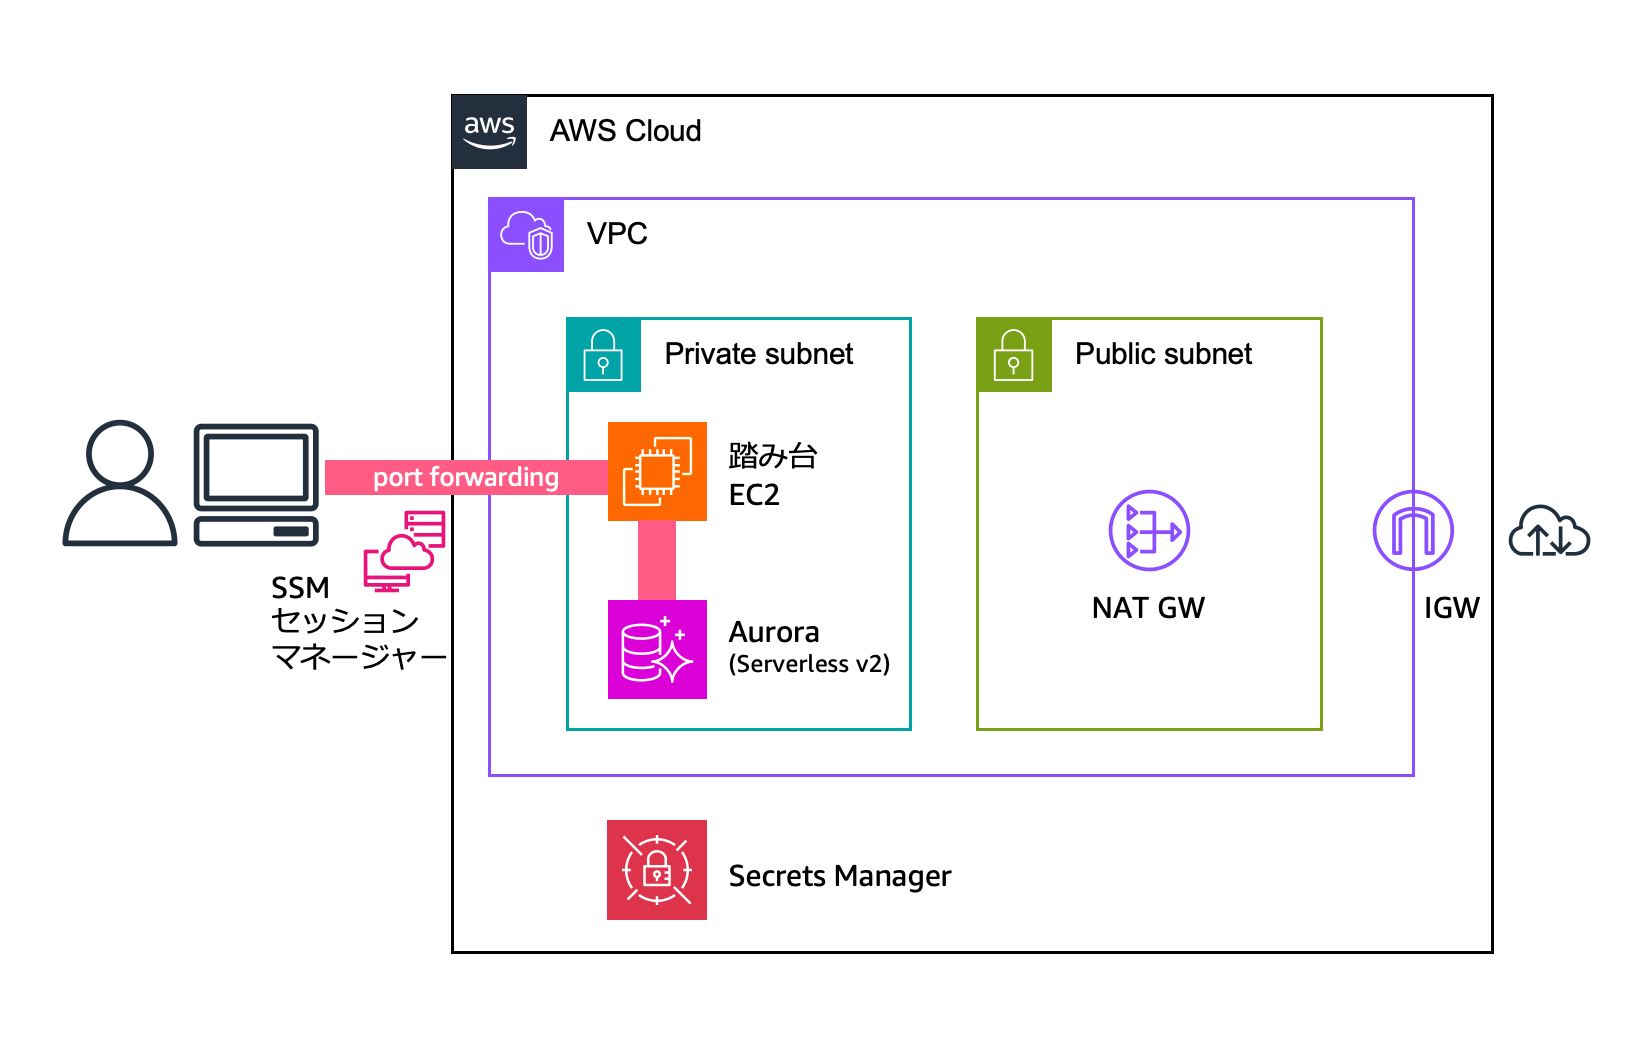
これを実現する CDK のコンストラクトを作りました。1 ファイルで収めているので、簡単に取り込んで使うことができます。中身には以下が含まれています。
- Aurora PostgreSQL Serverless v2
- SSM Session Manager で繋ぐ踏み台 EC2 インスタンス
- PostgreSQL Tutorial に含まれているサンプルデータベース(dvdrental)の自動セットアップ
- 必要なネットワークリソース一式
使い方
1. コンストラクトの準備
プロジェクトの lib/constructs ディレクトリに sample-db-env.ts を作成し、以下のコードをコピーします (長いので折りたたんでいます):
lib/constructs/sample-db-en.tsv (クリックして全文表示)
import * as cdk from 'aws-cdk-lib';
import * as ec2 from 'aws-cdk-lib/aws-ec2';
import * as iam from 'aws-cdk-lib/aws-iam';
import * as rds from 'aws-cdk-lib/aws-rds';
import { Construct } from 'constructs';

export interface SampleDbEnvProps {
  /**
   * VPCで使用するアベイラビリティゾーンの最大数
   * @default 2
   */
  maxAzs?: number;

  /**
   * VPCで使用するNAT Gatewayの数
   * @default 1
   */
  natGateways?: number;

  /**
   * 踏み台サーバーのインスタンスタイプ
   * @default t3.small
   */
  instanceType?: ec2.InstanceType;

  /**
   * リソースの削除ポリシー
   * @default RemovalPolicy.DESTROY
   */
  removalPolicy?: cdk.RemovalPolicy;

  /**
   * Serverless v2の最小キャパシティユニット
   * @default 0.5
   */
  minCapacity?: number;

  /**
   * Serverless v2の最大キャパシティユニット
   * @default 1
   */
  maxCapacity?: number;

  /**
   * Postgresのバージョン
   * @default VER_16_6
   */
  engineVersion?: rds.AuroraPostgresEngineVersion;
}

export class SampleDbEnv extends Construct {
  public readonly vpc: ec2.Vpc;
  public readonly cluster: rds.DatabaseCluster;
  public readonly bastionInstance: ec2.Instance;
  public readonly bastionSecurityGroup: ec2.SecurityGroup;
  public readonly databaseSecurityGroup: ec2.SecurityGroup;

  constructor(scope: Construct, id: string, props: SampleDbEnvProps = {}) {
    super(scope, id);

    // デフォルト値の設定
    const {
      maxAzs = 2,
      natGateways = 1,
      instanceType = ec2.InstanceType.of(ec2.InstanceClass.T3, ec2.InstanceSize.SMALL),
      removalPolicy = cdk.RemovalPolicy.DESTROY,
      minCapacity = 0.5,
      maxCapacity = 1,
      engineVersion = rds.AuroraPostgresEngineVersion.VER_16_6,
    } = props;

    // VPCの作成
    this.vpc = new ec2.Vpc(this, 'VPC', {
      maxAzs,
      natGateways,
      subnetConfiguration: [
        {
          cidrMask: 24,
          name: 'Public',
          subnetType: ec2.SubnetType.PUBLIC,
        },
        {
          cidrMask: 24,
          name: 'Private',
          subnetType: ec2.SubnetType.PRIVATE_WITH_EGRESS,
        },
      ],
    });

    // EC2のセキュリティグループ
    this.bastionSecurityGroup = new ec2.SecurityGroup(this, 'BastionSecurityGroup', {
      vpc: this.vpc,
      description: 'Security group for bastion EC2 instance',
      allowAllOutbound: true,
    });

    // Auroraのセキュリティグループ
    this.databaseSecurityGroup = new ec2.SecurityGroup(this, 'DatabaseSecurityGroup', {
      vpc: this.vpc,
      description: 'Security group for Aurora PostgreSQL',
      allowAllOutbound: true,
    });

    // EC2からAuroraへの通信を許可
    this.databaseSecurityGroup.addIngressRule(
      this.bastionSecurityGroup,
      ec2.Port.tcp(5432),
      'Allow PostgreSQL access from EC2'
    );

    // EC2のIAMロール
    const ec2Role = new iam.Role(this, 'EC2Role', {
      assumedBy: new iam.ServicePrincipal('ec2.amazonaws.com'),
    });

    // SSM管理ポリシーを追加
    ec2Role.addManagedPolicy(
      iam.ManagedPolicy.fromAwsManagedPolicyName('AmazonSSMManagedInstanceCore')
    );

    // Aurora PostgreSQL Serverless v2 クラスターの作成
    this.cluster = new rds.DatabaseCluster(this, 'AuroraCluster', {
      engine: rds.DatabaseClusterEngine.auroraPostgres({
        version: engineVersion,
      }),
      serverlessV2MinCapacity: minCapacity,
      serverlessV2MaxCapacity: maxCapacity,
      vpc: this.vpc,
      writer: rds.ClusterInstance.serverlessV2("Writer"),
      vpcSubnets: {
        subnetType: ec2.SubnetType.PRIVATE_WITH_EGRESS,
      },
      securityGroups: [this.databaseSecurityGroup],
      removalPolicy,
    });

    this.cluster.secret?.grantRead(ec2Role);

    const userData = ec2.UserData.forLinux();

    // 第1段階:必要なツールのインストールと初期設定
    userData.addCommands(
      'dnf install postgresql16 jq -y',
      'echo "Setting up environment variables..."',
      `echo ${this.cluster.secret?.secretName}`,
      `aws secretsmanager get-secret-value --secret-id ${this.cluster.secret?.secretName} | jq .SecretString > secrets.json`,
      'PGHOST=`cat secrets.json | jq "fromjson | .host" -r`',
      'PGUSER=`cat secrets.json | jq "fromjson | .username" -r`',
      'PGPASSWORD=`cat secrets.json | jq "fromjson | .password" -r`',
      'echo "export PGHOST=$PGHOST" >> ~/.bash_profile',
      'echo "export PGUSER=$PGUSER" >> ~/.bash_profile',
      'echo "export PGPASSWORD=$PGPASSWORD" >> ~/.bash_profile',
      'source ~/.bash_profile',
    );

    // 第2段階:タイムアウト付きでRDSの準備完了を確認してからサンプルDBを読み込む
    userData.addCommands(
      'echo "Waiting for RDS to be available (timeout: 20 minutes)..."',
      'start_time=$(date +%s)',
      'timeout=1200  # 20 minutes in seconds',
      'while true; do',
      '  if PGPASSWORD=$PGPASSWORD psql -h $PGHOST -U $PGUSER -d postgres -c "SELECT 1" > /dev/null 2>&1; then',
      '    echo "Database connection successful!"',
      '    break',
      '  fi',
      '  current_time=$(date +%s)',
      '  elapsed=$((current_time - start_time))',
      '  if [ $elapsed -ge $timeout ]; then',
      '    echo "Timeout waiting for database to be ready after 20 minutes"',
      '    exit 1',
      '  fi',
      '  echo "Waiting for database to be ready... ($(($timeout - $elapsed)) seconds remaining)"',
      '  sleep 10',
      'done',
      'echo "Proceeding with sample data import..."',
      'curl -O https://www.postgresqltutorial.com/wp-content/uploads/2019/05/dvdrental.zip',
      'unzip ./dvdrental.zip',
      'createdb dvdrental',
      'pg_restore -d dvdrental ./dvdrental.tar',
    );

    // EC2インスタンスの作成
    this.bastionInstance = new ec2.Instance(this, 'BastionInstance', {
      vpc: this.vpc,
      vpcSubnets: {
        subnetType: ec2.SubnetType.PRIVATE_WITH_EGRESS,
      },
      instanceType,
      machineImage: new ec2.AmazonLinuxImage({
        generation: ec2.AmazonLinuxGeneration.AMAZON_LINUX_2023,
      }),
      securityGroup: this.bastionSecurityGroup,
      role: ec2Role,
      userData,
    });

    // 出力の追加
    new cdk.CfnOutput(this, 'EC2InstanceId', {
      value: this.bastionInstance.instanceId,
    });

    new cdk.CfnOutput(this, 'AuroraEndpoint', {
      value: this.cluster.clusterEndpoint.hostname,
    });

    const command = `aws ssm start-session --target ${this.bastionInstance.instanceId} \
    --document-name AWS-StartPortForwardingSessionToRemoteHost \
    --region ${cdk.Stack.of(this).region} \
    --parameters '{ \
      "host": ["${this.cluster.clusterEndpoint.hostname}"], \
      "portNumber": ["5432"], \
      "localPortNumber": ["5432"] \
    }'`;

    new cdk.CfnOutput(this, 'PortForwardingCommand', {
      value: command,
    });

    new cdk.CfnOutput(this, 'GetPasswordCommand', {
      value: `aws secretsmanager get-secret-value --secret-id ${this.cluster.secret?.secretName} | jq ".SecretString | fromjson | .password" -r`,
    });

    new cdk.CfnOutput(this, 'AuroraSecretName', {
      value: this.cluster.secret?.secretName || '',
    });

    // SSM Session Managerを使用したリモートログインコマンド
    new cdk.CfnOutput(this, 'SSMLoginCommand', {
      value: `aws ssm start-session --target ${this.bastionInstance.instanceId} --region ${cdk.Stack.of(this).region}`
    });
  }
}
2. CDK スタックでの使用
メインのスタックファイルで以下のように使用します:
import * as cdk from 'aws-cdk-lib';
import { Construct } from 'constructs';
import { SampleDbEnv } from './constructs/sample-db-env';

export class MyStack extends cdk.Stack {
  constructor(scope: Construct, id: string, props?: cdk.StackProps) {
    super(scope, id, props);

    // デフォルト設定で作成
    const dbEnv = new SampleDbEnv(this, 'SampleDbEnv');

    // または、カスタム設定で作成
    const customDbEnv = new SampleDbEnv(this, 'CustomDbEnv', {
      maxAzs: 3,
      natGateways: 2,
      instanceType: ec2.InstanceType.of(ec2.InstanceClass.T3, ec2.InstanceSize.MEDIUM),
      minCapacity: 1,
      maxCapacity: 4,
      engineVersion: rds.AuroraPostgresEngineVersion.VER_15_4,
    });
  }
}
3. デプロイ
cdk deploy 実行後、以下の出力が表示されます:
Outputs:
  MyStack.SampleDbEnvEC2InstanceId = i-0123456789abcdef0
  MyStack.SampleDbEnvAuroraEndpoint = sample-cluster.cluster-xxxxx.region.rds.amazonaws.com
  MyStack.SampleDbEnvPortForwardingCommand = aws ssm start-session --target i-0123456789abcdef0 --document-name AWS-StartPortForwardingSessionToRemoteHost --region ap-northeast-1 --parameters '{"host": "............" // 省略
  MyStack.SampleDbEnvGetPasswordCommand = aws secretsmanager get-secret-value ...
  MyStack.SampleDbEnvAuroraSecretName = MyStack-SampleDbEnvAuroraClusterSecret...
  MyStack.SampleDbEnvSSMLoginCommand = aws ssm start-session --target i-0123456789abcdef0 ...
4. データベースへの接続
踏み台にログインして使う場合
まず、EC2 インスタンスにログインしましょう。
# 出力された SSMLoginCommand を実行
aws ssm start-session --target i-0123456789abcdef0 --region ap-northeast-1
ログイン先の EC2 で root ユーザに切り替えると、 psql コマンドを叩くだけで接続できます。
(環境変数に接続情報が設定されています)
# root ユーザに切替
sudo su -
# 環境変数が既に設定されているため、そのまま psql コマンドが使えます
psql -d dvdrental
ローカル環境から接続する場合
まず、パスワードを取得します。
# 出力された GetPasswordCommand を実行
aws secretsmanager get-secret-value ...
次に、SSM を使ってポートフォワーディングの設定をします。
# 出力された PortForwardingCommand を実行
aws ssm start-session --target i-0123456789abcdef0 --document-name AWS-StartPortForwardingSessionToRemoteHost --region ap-northeast-1 --parameters '{"host": "............" // 省略
あとは、適当な DB クライアントで localhost:5432 に向かって接続するだけです。
DB 名は dvdrental、ユーザーは postgres、パスワードは先ほど取得したものを使います。
カスタマイズ可能なパラメータ
| パラメータ | 説明 | デフォルト値 |
|---|---|---|
| maxAzs | VPCで使用するAZの数 | 2 |
| natGateways | NAT Gatewayの数 | 1 |
| instanceType | 踏み台サーバーのインスタンスタイプ | t3.small |
| minCapacity | Aurora Serverless v2の最小容量 | 0.5 |
| maxCapacity | Aurora Serverless v2の最大容量 | 1 |
| engineVersion | PostgreSQLのバージョン | VER_16_6 |
| removalPolicy | リソースの削除ポリシー | DESTROY |
注意点
全体的に検証用の構成なので、用法・容量を守ってお使いください。(セキュリティ等)

