目的
Apache(Apache HTTP Server)でWEBサーバーを構築します。
実施した環境
VMWare ESXi上の仮想環境に構築しました。
OS:Ubuntu 22.04 LTS
Apache:2.4.6
WEBサーバーとは
WEBサーバーとはインターネット上でWebページを提供するためのコンピューターシステムです。Webサーバーはクライアントからのリクエストに応じてHTMLファイルなどのコンテンツを返します。
Apacheとは
Apacheとは、世界中で広く使われているオープンソースのWebサーバーソフトウェアです。
手順
1. Apacheのインストール
Ubuntuから以下を入力して実行することでApacheのインストールを行います。
sudo apt-get install apache2
2. Apacheの起動
Apacheの起動
先程、インストールしたApacheを起動します。
以下を入力して実行することでApacheを起動することが出来ます。
sudo systemctl start apache2
Apacheの起動を確認
必要に応じて、次にApacheの起動を確認します。
以下を入力することでApacheの起動を確認することが出来ます。
systemctl status apache2
$ systemctl status apache2
● apache2.service - The Apache HTTP Server
     Loaded: loaded (/lib/systemd/system/apache2>
     Active: active (running) since Thu 2024-09->
       Docs: https://httpd.apache.org/docs/2.4/
   Main PID: 185198 (apache2)
      Tasks: 55 (limit: 2241)
     Memory: 5.2M
        CPU: 6.350s
     CGroup: /system.slice/apache2.service
             ├─185198 /usr/sbin/apache2 -k start
             ├─185199 /usr/sbin/apache2 -k start
             └─185200 /usr/sbin/apache2 -k start

Sep 26 01:59:52  systemd[1]: Starti>
Sep 26 01:59:52  apachectl[185197]:>
Sep 26 01:59:52  systemd[1]: Starte>
lines 1-16/16 (END)
起動中の場合はActive:の項目が緑色で active (running) と表示されます。
上記では「Active: active(runnning)」と表示されているためApacheの起動を確認することができました。
3. WEBブラウザから構築の確認
方法1
Apacheを起動させた状態でWEBブラウザから以下を入力しWebサーバーが構築できているかの確認をします。
http://localhost/
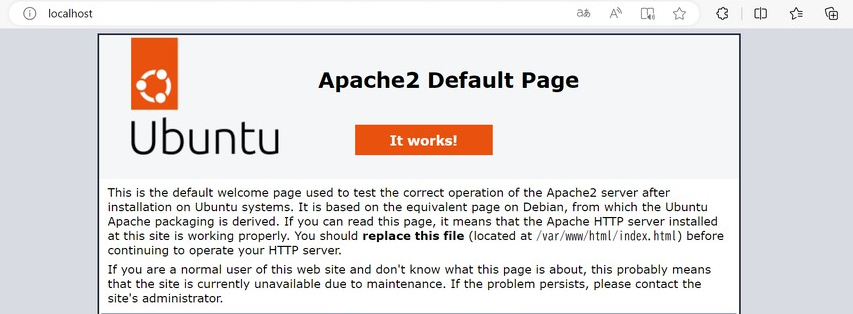
以下のページが反映された場合WEBサーバーの構築は成功しています。

上記ページでは英語で「Ubuntuシステムにインストールした後、Apache2サーバーが正しく動作するかどうかをテストするために使用されるデフォルトのウェルカムページです」と記載があります。
また、方法1はローカル環境でWEBサーバーを構築した際に成功した確認方法です。
方法2
以下を入力してサーバー(localhost)からデータを取得します。
wget localhost
$ wget localhost
--2024-09-26 06:43:54--  http://localhost/
Resolving localhost (localhost)... 127.0.0.1
Connecting to localhost (localhost)|127.0.0.1|:80... connected.
HTTP request sent, awaiting response... 200 OK
Length: 10671 (10K) [text/html]
Saving to: ‘index.html.1’

index.html.1   0%       0  --.-KB/s
index.html.1 100%  10.42K  --.-KB/s    in 0s


2024-09-27 06:43:54 (95.0 MB/s) - ‘index.html.1’ saved [10671/10671]
上記の「HTTP reaquest sent, awaiting response...200 OK」という内容からhttp通信が確認できました。すなわち、方法1と同様にWEBサーバーの構築が確認できたということになります。
今回の仮想環境上でのWEBサーバーの構築の確認作業は方法2で行いました。
おまけ
以下を入力し、方法2で取得したindex.htmlの中身を確認してみました。
less index.html
 <div class="content_section floating_element">
        <div class="content_section_text">
          <p>
                This is the default welcome page used to test the correct
                operation of the Apache2 server after installation on Ubuntu systems.
                It is based on the equivalent page on Debian, from which the Ubuntu Apache
                packaging is derived.
                If you can read this page, it means that the Apache HTTP server installed at
                this site is working properly. You should <b>replace this file</b> (located at
                <tt>/var/www/html/index.html</tt>) before continuing to operate your HTTP server.
          </p>
上記内容からindex.htmlではApache2サーバーが正しく動作するかどうかをテストするために使用されるデフォルトのウェルカムページが記載されていることを確認できました。
方法1でWEBブラウザからWEBサーバーの構築を確認しましたが、方法1で掲載されているページと同じ内容です。
参考資料
Apacheとは? – Webサーバーの基本と使い方を徹底解説
【サーバー構築】ApachでWebサーバーを起動させる
仮想マシンにApacheをインストールしてWebサーバーを構築したお話
HTTPリクエスト、HTTPレスポンスの具体的内容