はじめに
ServerlessFrameworkを用いて、ApiGatewayのWebsocket通信を利用したリアルタイムアウトTodoアプリを実装した時のメモ。
環境
- Svelte
- 3.54.0
- ServerlessFramework
- 3.27.0
完成画面
環境について
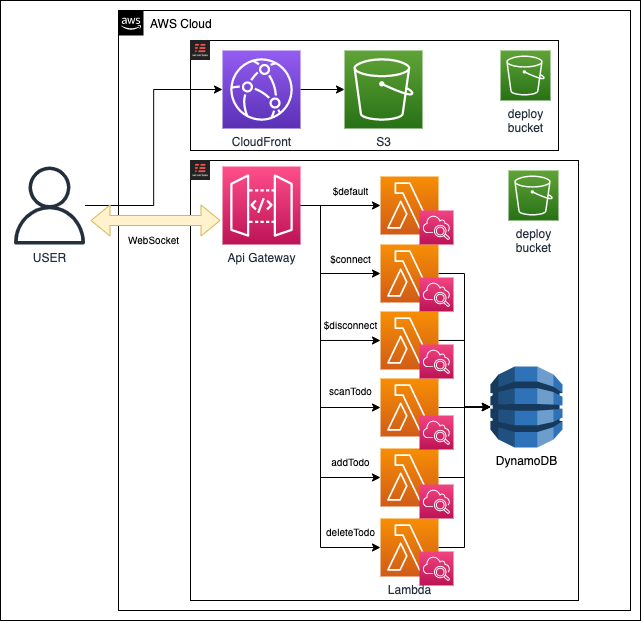
構成図

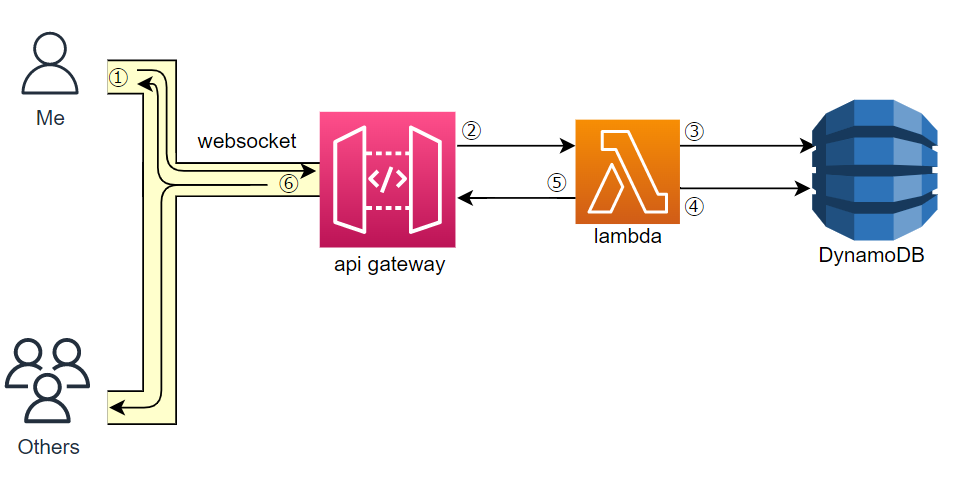
WebSocket説明
1. connect / disconnect時にはDynamoDBに用意したテーブルにユーザーの追加/削除を行う

2. scanData時にはDyamoDBからデータを取得する

3. addData / deleteData時にはDynamoDBに用意したデータテーブルに追加/削除を行う
- lambdaでDataの追加/削除を行う
- 現在接続中のユーザー情報をDynamoDBから取得し、情報を送信する

serverless.yml + α (抜粋)
S3 + CloudFront

serverless.yaml
serverless.yml
service: # 自由に
frameworkVersion: '3'

plugins:
  - serverless-s3-sync

provider:
  name: aws
  stage: dev
  region: # 自由に
  profile: # 自由に

custom:
  stage: ${opt:stage, self:provider.stage}
  s3Sync:
    - bucketName: # s3 syncを行うバケット名
      localDir: # sync ディレクトリ

resources:
  Resources:
    # S3
    AssetsBucket:
      Type: AWS::S3::Bucket
      DeletionPolicy: Delete
      Properties:
        BucketName: # 自由に(custom.s3sync.bucketNameに合わせる)
        PublicAccessBlockConfiguration:
          BlockPublicAcls: true
          BlockPublicPolicy: true
          IgnorePublicAcls: true
          RestrictPublicBuckets: true
        CorsConfiguration:
          CorsRules:
            - AllowedMethods:
                - GET
                - HEAD
              AllowedOrigins:
                - '*'
    # s3バケットポリシー
    # 後述するCloudFrontOriginAccessIdentityを許可する
    AssetsBucketPolicy:
      Type: AWS::S3::BucketPolicy
      Properties:
        Bucket: !Ref AssetsBucket
        PolicyDocument:
          Statement:
            - Action: s3:GetObject
              Effect: Allow
              Resource: !Sub arn:aws:s3:::${AssetsBucket}/*
              Principal:
                AWS: !Sub arn:aws:iam::cloudfront:user/CloudFront Origin Access Identity ${CloudFrontOriginAccessIdentity}
    # CloudFront
    AssetsDistribution:
      Type: AWS::CloudFront::Distribution
      Properties:
        DistributionConfig:
          Origins:
            - Id: S3Origin
              DomainName: !GetAtt AssetsBucket.DomainName
              S3OriginConfig:
                OriginAccessIdentity: !Sub origin-access-identity/cloudfront/${CloudFrontOriginAccessIdentity}
          Enabled: true
          DefaultRootObject: index.html
          Comment: !Sub ${AWS::StackName} distribution
          DefaultCacheBehavior:
            TargetOriginId: S3Origin
            ForwardedValues:
              QueryString: false
            ViewerProtocolPolicy: redirect-to-https
            AllowedMethods:
              - GET
              - HEAD
              - OPTIONS
              - PUT
              - POST
              - PATCH
              - DELETE
    CloudFrontOriginAccessIdentity:
      Type: AWS::CloudFront::CloudFrontOriginAccessIdentity
      Properties:
        CloudFrontOriginAccessIdentityConfig:
          Comment: !Ref AWS::StackName
Api Gateway + lambda + DynamoDB

serverless.yaml
serverless.yml
service: # 自由に
frameworkVersion: '3'

provider:
  name: aws
  stage: dev
  runtime: # 好きなものを
  region: # 自由に
  profile: # 自由に
  websocketsApiRouteSelectionExpression: $request.body.action
  iam:
    role:
      statements:
        - Effect: "Allow"
          Action:
            - "dynamodb:*"
          Resource:
            - arn:aws:dynamodb:ap-northeast-1:*:table/○○ # ○○にはDynamoDBのテーブル名を

custom:
  stage: ${opt:stage, self:provider.stage}

functions:
  # 例としてconnectHandlerとscanDataHandler
  connectHandler:
    handler: handler.connectHandler
    timeout: 30
    events:
      - websocket: $connect
  scanDataHandler:
    handler: handler.scanDataHandler
    timeout: 30
    events:
      - websocket: scanData

resources:
  Resources:
    # DynamoDB
    Dynamodb:
      Type: 'AWS::DynamoDB::Table'
      Properties:
        TableName: # 自由に
        AttributeDefinitions:
          - AttributeName: id   # パーティションキー
            AttributeType: S
          - AttributeName: type # ソートキー
            AttributeType: S
        KeySchema:
          - AttributeName: id   # パーティションキー
            KeyType: HASH
          - AttributeName: type # ソートキー
            KeyType: RANGE
        ProvisionedThroughput:
          ReadCapacityUnits: 1
          WriteCapacityUnits: 1
handler.rb
handler.rb
require 'json'
require 'aws-sdk'

def dynamodb_client
  Aws::DynamoDB::Client.new(region: 'ap-northeast-1')
end

def connectHandler(event:, context:)
  begin
    table_item = {
      table_name: ○○, # 作成したテーブル名
      item: {
        id: event['requestContext']['connectionId'], # パーティションキー
        type: 'user'                                 # ハッシュキー
      }
    }

    dynamodb_client.put_item(table_item)

    { "statusCode": 200 }
  rescue StandardError => e
    puts e

    { "statusCode": 500 }
  end
end

def scanDataHandler(event:, context:)
  scanData = dynamodb_client.scan(
    table_name: ○○ # 作成したテーブル名
  )
  todos = scanData.items.select{ |data| data["type"] === 'todo' }

  api_gw = Aws::ApiGatewayManagementApi::Client.new(
    endpoint: 'https://' + event['requestContext']['domainName'] + '/' + event['requestContext']['stage']
  )

  api_gw(event).post_to_connection(
    connection_id: event['requestContext']['connectionId'],
    data: { todos: todos }.to_json
  )
end
フロント側(Svelte)
+page.svelte
<script lang="ts">
  import { onMount } from 'svelte';

  const connection = new WebSocket(import.meta.env.VITE_WEBSOCKET_URL)

  const scanTodo = () => {
    const message = {
      action: 'scanTodo'
    }

    connection.send(JSON.stringify(message))
  }

  interface Todo {
    id: string;
    type: string;
    content: any;
  }

  let todos: Todo[];

  // メッセージを受け取ったときの処理
  connection.onmessage = event => {
    const json_todo: Todo[] = JSON.parse(event.data)
    todos = json_todo
  }

  onMount(() => {
    scanTodo()
  })
</script>
最後に
GraphQLとAppSyncを使って同じような構成も作ってみたいです〜
