環境準備
Typescriptとcanvas APIでクリスマスツリーを描きましょう。
Typescriptがなかったらnpmでインストールしましょう:
npm install -g npm
npm install -g typescript
三つのファイルを作成しましょう
index.html
tree.ts
tsconfig.json
ファイル内容は以下の通りです。
index.html
<!DOCTYPE html>
<html>
  <head>
    <meta charset="UTF-8" />
  </head>
  <body>
    <canvas id="canvas" width="200" height="200"></canvas>

    <script src="./tree.js"></script>
  </body>
</html>
tsconfig.json
{
    "compilerOptions": {
        "target": "es5",
        "sourceMap": true,
        "lib": [
            "es5",
            "dom"
        ],
        "noUnusedLocals": true,
        "module": "commonjs"
    }
}
tree.js
const canvas = document.getElementById("canvas")  as HTMLCanvasElement | null;;
const ctx = canvas?.getContext("2d");
javascriptと比較して、型を定義する必要があることに注意してください。
同じディレクトリにあればtscコマンドでコンパイルできるかどうか試せます。
松の木を作成
さて、準備が完了したところで、さっそく木を描いていきましょう。
まず木とはどんなものでしょう?
基本的には緑の三角形が重なっているものです。
そして、枝もあります
interface Branch {
    height: number;
    centerPosition: number;
    offset: number;
    color: string;
}

interface Trunk {
    height: number;
    width: number;
    color: string;
}
Treeクラスを作成する
class Tree {
    branch: Branch;
    trunk: Trunk;

    constructor() {
        this.branch = {
            height: 50 * Math.cos(Math.PI / 6),
            centerPosition: 100,
            offset: 0,
            color: "green"
        }
        this.trunk = {
            color: "brown",
            width: 20,
            height: 20
        }
    }
}
三角形を作るには、ちょっとした計算が必要です。
二等辺三角形を作る必要があります。この計算は少し複雑ですが、2次元空間に3つの点が必要です。
ハードコード値として100を使用するので、木の幅は200pxになります。
draw_branch(ctx: CanvasRenderingContext2D) {
        ctx.beginPath();
        ctx.moveTo(this.branch.centerPosition - 100 + this.branch.offset, this.branch.centerPosition + 50 - this.branch.offset);
        ctx.lineTo(this.branch.centerPosition + 100 - this.branch.offset, this.branch.centerPosition + 50 - this.branch.offset);
        ctx.lineTo(this.branch.centerPosition, this.branch.centerPosition + 50 - this.branch.height - this.branch.offset);
        ctx.closePath();
        ctx.fillStyle = this.branch.color;
        ctx.fill();
    }
メソッドを呼び出して、その結果を見ることができます。
const tree = new Tree();

tree.draw_branch(ctx);

次に木は複数の枝を持つので、20ピクセルずつ5つのブランチを作成します。
draw_tree(ctx: CanvasRenderingContext2D) {
        for ( let n = 0; n < 5; n++ ) {
            this.branch.offset = n * 20;
            this.draw_branch(ctx);
        }
    }
木っぽくなってきましたね。

おっと、幹を書くのを忘れました。
draw_trunk(ctx: CanvasRenderingContext2D) {
        ctx.beginPath();
        ctx.rect(90, 150, this.trunk.width, this.trunk.height);
        ctx.closePath();
        ctx.fillStyle = this.trunk.color;
        ctx.fill();
    }

クリスマス・イルミネーションを作る
今はただの松の木ですが、クリスマスなのでクリスマスツリーにしていきましょう。
まずは、明かりを付けてみます。
光は基本的に小さな5pxの円です。
class Light {
    color: string;
    posX: number;
    posY: number;

    draw(ctx: CanvasRenderingContext2D) {
        ctx.beginPath();
        ctx.arc(this.posX, this.posY, 5, 0, 2 * Math.PI);
        ctx.closePath();
        ctx.fillStyle = this.color;
        ctx.fill();
    }

}
この円は、キャンバスの上にランダムに作ろうと思っています。背景色が木であることを確認してから、ランダムな色で光を表示する予定です。
forループで光量を制御することができます。現在、キャンバス全体に対して400個のランダムに生成されたライトを選択しています。
色名「green」は、htmlコードの「#008000」(rgb(0, 128, 0))に対応します。
そして、getImageDataメソッドを使って、現在のピクセルの色をチェックします。
const colors = ["red", "yellow", "cyan"];
function blink(){
    for(let i = 0; i < 400; i++){
        const randX = Math.floor(Math.random() * canvas.width);
        const randY = Math.floor(Math.random() * canvas.height);
        const c = ctx.getImageData(randX, randY, 1, 1).data;

        if (c[0] === 0 && c[1] === 128 && c[2] === 0) {
            const light = new Light();
            light.color = colors[Math.floor(Math.random()*colors.length)];
            light.posX = randX;
            light.posY = randY;
            light.draw(ctx);
        }
    }
}
木にランダムに光を当てる
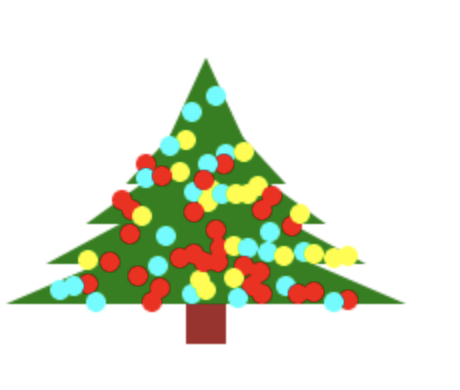
クリスマスツリーっぽくなりましたね。
最後にアニメーションをつけてみよう!
一番簡単な方法は、キャンバスをクリアして、もう一度すべてを描くことです。
キラキラさせるためにタイムアウトを100に設定する。
function mainLoop(): void {
    ctx.clearRect(0, 0, canvas.width, canvas.height);
    tree.draw_tree(ctx);
    window.setTimeout(mainLoop, 100);
    blink();
}

mainLoop();
以下がすべてのコードになります。
interface Branch {
    height: number;
    centerPosition: number;
    offset: number;
    color: string;
}

interface Trunk {
    height: number;
    width: number;
    color: string;
}

class Tree {
    branch: Branch;
    trunk: Trunk;

    constructor() {
        this.branch = {
            height: 50 * Math.cos(Math.PI / 6),
            centerPosition: 100,
            offset: 0,
            color: "green"
        }
        this.trunk = {
            color: "brown",
            width: 20,
            height: 20
        }
    }

    draw_branch(ctx: CanvasRenderingContext2D) {
        ctx.beginPath();
        ctx.moveTo(this.branch.centerPosition - 100 + this.branch.offset, this.branch.centerPosition + 50 - this.branch.offset);
        ctx.lineTo(this.branch.centerPosition + 100 - this.branch.offset, this.branch.centerPosition + 50 - this.branch.offset);
        ctx.lineTo(this.branch.centerPosition, this.branch.centerPosition + 50 - this.branch.height - this.branch.offset);
        ctx.closePath();
        ctx.fillStyle = this.branch.color;
        ctx.fill();
    }

    draw_trunk(ctx: CanvasRenderingContext2D) {
        ctx.beginPath();
        ctx.rect(90, 150, this.trunk.width, this.trunk.height);
        ctx.closePath();
        ctx.fillStyle = this.trunk.color;
        ctx.fill();
    }

    draw_tree(ctx: CanvasRenderingContext2D) {
        for ( let n = 0; n < 5; n++ ) {
            this.branch.offset = n * 20;
            this.draw_branch(ctx);
        }
        this.draw_trunk(ctx);
    }

}

class Light {
    color: string;
    posX: number;
    posY: number;

    draw(ctx: CanvasRenderingContext2D) {
        ctx.beginPath();
        ctx.arc(this.posX, this.posY, 5, 0, 2 * Math.PI);
        ctx.closePath();
        ctx.fillStyle = this.color;
        ctx.fill();
    }

}

const canvas = document.getElementById("canvas")  as HTMLCanvasElement | null;
const ctx = canvas?.getContext("2d");
const colors = ["red", "yellow", "cyan"];
const tree = new Tree();

tree.draw_tree(ctx);

function blink(){
    for(let i = 0; i < 400; i++){
        const randX = Math.floor(Math.random() * canvas.width);
        const randY = Math.floor(Math.random() * canvas.height);
        const c = ctx.getImageData(randX, randY, 1, 1).data;

        if (c[0] === 0 && c[1] === 128 && c[2] === 0) {
            const light = new Light();
            light.color = colors[Math.floor(Math.random()*colors.length)];
            light.posX = randX;
            light.posY = randY;
            light.draw(ctx);
        }
    }
}


function mainLoop(): void {
    ctx.clearRect(0, 0, canvas.width, canvas.height);
    tree.draw_tree(ctx);
    window.setTimeout(mainLoop, 100);
    blink();
}

mainLoop();
まとめ
クリスマスツリーを作る方法はいくつかありますが、今回紹介した方法は最も簡単で早い方法の一つだと思います。
興味があったら是非試してみてください。
それでは、メリークリスマス !