Unity で AWS を使いたい !
Unity で S3 に保存している画像をログインできた人だけに見れるようにしたい!
というような場合の、
AWS SDK のインストールから、Cognito 認証、認証情報を使った S3 の署名付き URL 作成の仕方を書き留めます。
※ AWS で Cognito、S3 を作るやり方については書いていません ![]()
バージョン情報
- Unity: 2022.3.2f.1
- AWS SDK .NET Standard 2.0: 3.7.300.16
1. AWS SDK を Unity に入れる
Special considerations for Unity support には DLL を手動でダウンロードし、ディレクトリに配置する手順が書かれていますが、Nuget For Unity でもできます!
今回は Nuget を使った手順を紹介します。
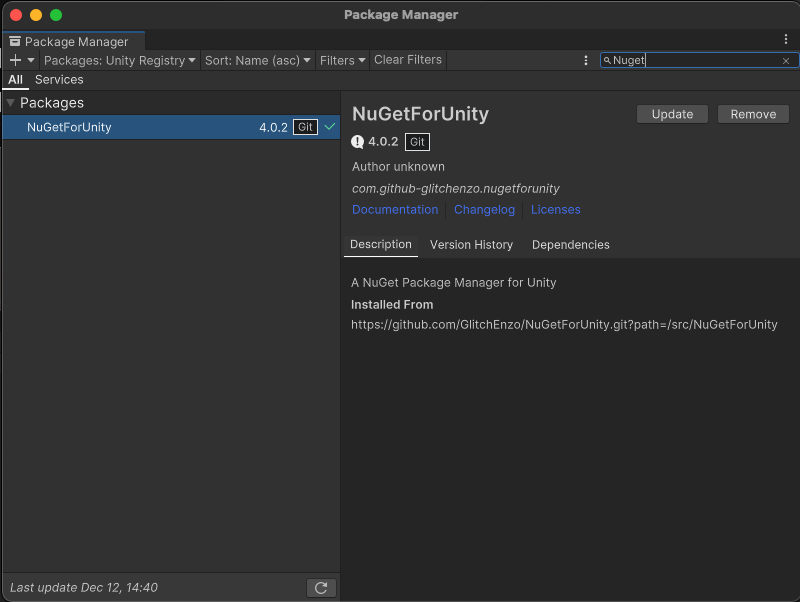
1.1. NugetForUnity のインストール
Window > Package Manager を開いて、Packages で Unity Registry を選択、検索ボックスから NugetForUnity を検索して Install します。
1.2. AWS SDK のインストール
NuGet > Manage Nuget Packages を開いて Online を選択し、検索ボックスを使って、パッケージを Install します。
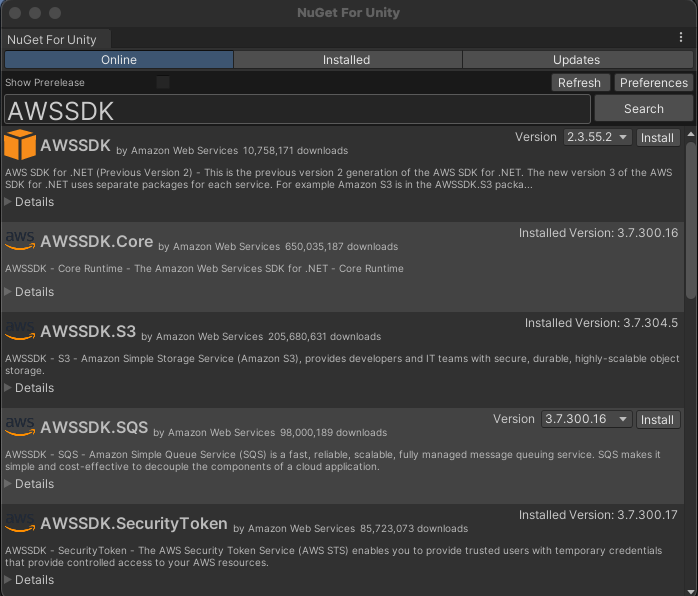
今回は Cognito と S3 を使うので、以下を Install します。
- AWSSDK.Core
- AWSSDK.CognitoIdentity
- AWSSDK.CognitoIdentityProvider
- AWSSDK.SecurityToken
- AWSSDK.S3
- Amazon.Extensions.CognitoAuthentication
手で入れる場合は、依存する Microsoft.Bcl.AsyncInterfaces.dll とかもダウンロードしてくる必要がありますが、Nuget であれば、依存するパッケージも同時に入れてくれます。
1.3. link.xml を作成
ビルドに IL2CPP を使う場合は、Assets フォルダに、以下を記載した link.xml ファイルを作成します。
これをしないと、メソッドが取り除かれてしまい MissingMethodException が出ることがあります。
<linker>
  <assembly fullname="AWSSDK.Core" preserve="all"/>
  <assembly fullname="AWSSDK.CognitoIdentity" preserve="all"/>
  <assembly fullname="AWSSDK.CognitoIdentityProvider" preserve="all"/>
  <assembly fullname="AWSSDK.SecurityToken" preserve="all"/>
  <assembly fullname="AWSSDK.S3" preserve="all"/>
  <assembly fullname="Amazon.Extensions.CognitoAuthentication" preserve="all"/>
</linker>
2. ログイン機能をつくる
2.1. Cognito 認証のメソッドを実装
Cognito を使うために、以下の情報が必要ですので、AWS で Cognito AWS のコンソールで調べておいてください。
- CognitoPoolId
- CognitoClientId
- CognitoIdentityPoolId
CognitoIdentityProviderClient を使って認証を実施します。
using System.Threading.Tasks;
using UnityEngine;
using Amazon;
using Amazon.CognitoIdentity;
using Amazon.CognitoIdentityProvider;
using Amazon.Extensions.CognitoAuthentication;
using Amazon.Runtime;
using Amazon.S3;

public class AwsUtils : MonoBehaviour
{
    const string CognitoPoolId = "ap-northeast-1_xxxxxxxxx";
    const string CognitoClientId = "xxxxxxxxxxxxxxxxxxxxxxxxxx";
    const string CognitoIdentityPoolId = "ap-northeast-1:xxxxxxxx-xxxx-xxxx-xxxx-xxxxxxxxxxxx";

    private static CognitoAWSCredentials CognitoCredentials;
    private static CognitoUser cognitoUser = null;

    // ユーザ名とパスワードを入力して、認証を実施
    public static async Task<AuthFlowResponse> CognitoAuth(string username, string password)
    {
        AmazonCognitoIdentityProviderClient provider = new(new AnonymousAWSCredentials());
        CognitoUserPool userPool = new(CognitoPoolId, CognitoClientId, provider);
        cognitoUser = new(username, CognitoClientId, userPool, provider);
        InitiateSrpAuthRequest authRequest = new()
        {
            Password = password
        };

        AuthFlowResponse authResponse = await cognitoUser.StartWithSrpAuthAsync(authRequest).ConfigureAwait(false);

        // 認証情報を取得
        CognitoCredentials = cognitoUser.GetCognitoAWSCredentials(CognitoIdentityPoolId, RegionEndpoint.APNortheast1);

        return authResponse;
    }
}
※ リージョンは ap-northeast-1 を想定しています。
この後、取得した認証情報 CognitoCredentials を使って色々な AWS リソースを利用します。
2.2. ログイン画面をつくる
UI > Input Field - TextMeshPro でユーザ名とパスワードの入力フォーム UI > Button - TextMeshPro でログインボタンを作ります。
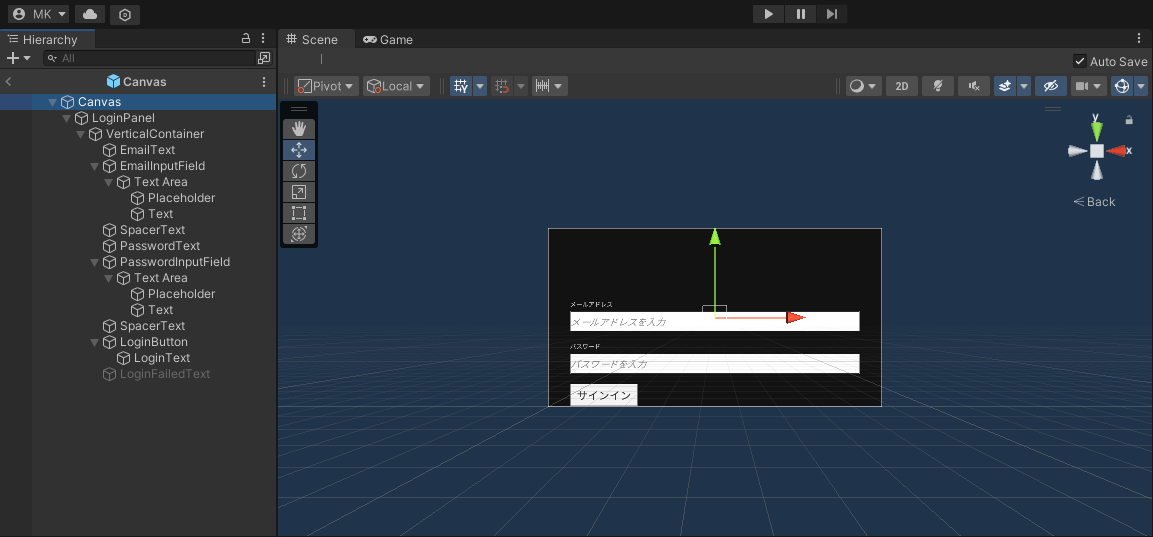
※ メールアドレスをユーザ名として使っています
2.3. ログインスクリプトを作成
username と password を InputField から取得し、ログインを試みます。
以下のようあスクリプトを作成して、LoginPanel に追加します。
using UnityEngine;
using TMPro;
using Amazon.CognitoIdentityProvider.Model;
using Amazon.Extensions.CognitoAuthentication;

public class LoginManager : MonoBehaviour
{
    [SerializeField] private TMP_InputField emailField;
    [SerializeField] private TMP_InputField passwordField;

    // ログイン成功後に実施する
    public Action OnLogin { get; set; };

    public async void Login()
    {
        AuthFlowResponse authResponse;

        // 過去のアクセストークンを消しておく
        PlayerPrefs.DeleteKey("AwsAccessToken");

        try
        {
            authResponse = await AwsUtils.CognitoAuth(emailField.text, passwordField.text);
        }
        catch (UserNotFoundException e)
        {
            // ユーザが見つからない
            Debug.Log(e.Message);
            return;
        }
        catch (NotAuthorizedException e)
        {
            // 認証失敗
            Debug.Log(e.Message);
            return;
        }

        // アクセストークンを保存しておく
        PlayerPrefs.SetString("AwsAccessToken", authResponse.AuthenticationResult.AccessToken);

        // ログイン後のアクション
        OnLogin?.Invoke();
    }
}
※ 今回、アクセストークンは使っていませんが、使う場合もあるので保存しています。
emailField と passwordField に対応する InputField を設定し、
ログイン関数をログイン Button の On Click イベントに登録するとログイン機能の完成です!
3. 認証情報を使って AWS リソース (S3) を利用する
3.1. S3 の署名つき URL 作成メソッドを実装する
2.1. で作った CognitoCredentials を元に S3Client を使って S3 オブジェクトの署名付き URL を生成するメソッドを以下に示します。
(コードは 2.1 の続きです)
public class AwsUtils : MonoBehaviour
{
    ...

    // バケット名とオブジェクトキーを入力して、署名つき URL を生成
    public static string GeneratePresignedUrl(string bucketName, string objectKey, double duration = 900)
    {
        // 認証済みチェック
        if (CognitoCredentials == null) throw new Exception("Not logged in");

        var s3Client = new AmazonS3Client(CognitoCredentials);
        var request = new GetPreSignedUrlRequest()
        {
            BucketName = bucketName,
            Key = objectKey,
            Expires = DateTime.UtcNow.AddSeconds(duration),
        };

        return s3Client.GetPreSignedURL(request);
    }
※ S3 へのアクセス権が認証ユーザに付与されている必要があります。
3.2. URL を使って画像を貼るスクリプトを作成
例えば、S3 に保存したオブジェクトが画像の場合、取得した署名付き URL と UnityWebRequestTexture を使って、画像をテクスチャにして表示することができます。
public class ImageFetcher : MonoBehaviour
{
    [SerializeField] private LoginPanel loginPanel;

    const string bucketName = "xxxxx";
    const string objectKey = "xxxxx"

    Renderer imageRenderer;

    void Awake()
    {
        imageRenderer = gameObject.GetComponent<Renderer>();
    }

    void Start()
    {
        // ログイン後に画像を取得
        loginPanel.OnLogin += FetchAwsImage;
    }

    void FetchAwsImage()
    {
        // 署名付き URL を生成
        string url =  AwsUtils.GeneratePresignedUrl(bucketName, objectKey);
        // URL から画像を取ってきてテクスチャーに貼る
        StartCoroutine(FetchTexture(url));
    }

    // URL を指定して画像を Texture に貼る
    IEnumerator FetchTexture(string url)
    {
        using UnityWebRequest request = UnityWebRequestTexture.GetTexture(url);

        yield return request.SendWebRequest();

        if (request.result != UnityWebRequest.Result.Success)
        {
            // 取得失敗
            Debug.LogError(request.error);
            yield break;
        }

        // 取得した Texture
        Texture2D texture = ((DownloadHandlerTexture)request.downloadHandler).texture;

        // Texture を貼り付け
        imageRenderer.material.mainTexture = texture;
    }
}
このスクリプトを Quad オブジェクトに追加して、loginPanel に 2.2. , 2.3. で作成したログイン画面を指定してあげると、ログイン後に S3 から画像を取ってきて、表示できます。
以上で、S3 に置いたファイルを Cognito 認証して取得する、ということができました!
ちなみに
videoPlayer の URL に対して S3 の署名付き URL は現状使えないようです ![]()