最終的なゴール
最近の車に付いているAIを使った運転支援システム(レーンキープアシストとか,歩行者検知とか...)を見て「これいいな~~」と思いませんか?
そこで,「ないなら作ればいい!!!」と思い至りjetson nanoで運転支援システムを作成していきます.
jetson nanoにpytorch+cuda10.2の環境構築をするのはしんどすぎる
結果から言うと,jetson nano上に最初からインストールされているcudaやcudnnなどが相当厄介でした.なので,dockerで環境構築をワンパンする作戦に変更します.
セットアップ
ここの記事を参考にさせていただきました.
https://note.com/ushinohi/n/nde6b99739f72
pytorchのインストール
cudaのversionの確認
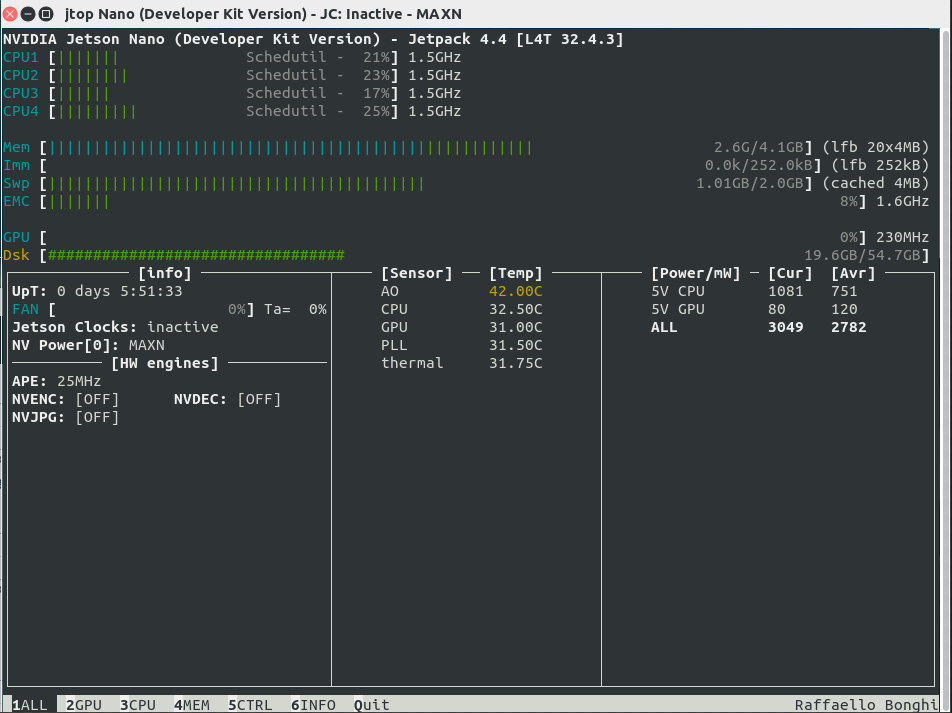
まずはcudaのversionの確認.jtopでjetsonのcudaの情報が見れます.
cudaは10.2であることが分かります.
公式サイトからpytorchのインストール
なので,普通に仮想環境作成して,pytorchのサイトから該当するコマンドでインストールするとこけます.
masaki@masaki-desktop:~/Documents/pytorch_sample$ python3 -m venv venv
masaki@masaki-desktop:~/Documents/pytorch_sample$ source ./venv/bin/activate
(venv) masaki@masaki-desktop:~/Documents/pytorch_sample$ pip install torch torchvision
Collecting torch
  Downloading https://files.pythonhosted.org/packages/f8/02/880b468bd382dc79896eaecbeb8ce95e9c4b99a24902874a2cef0b562cea/torch-0.1.2.post2.tar.gz (128kB)
    100% |████████████████████████████████| 133kB 1.2MB/s
    Complete output from command python setup.py egg_info:
    running egg_info
    creating pip-egg-info/torch.egg-info
    writing pip-egg-info/torch.egg-info/PKG-INFO
    writing dependency_links to pip-egg-info/torch.egg-info/dependency_links.txt
    writing requirements to pip-egg-info/torch.egg-info/requires.txt
    writing top-level names to pip-egg-info/torch.egg-info/top_level.txt
    writing manifest file 'pip-egg-info/torch.egg-info/SOURCES.txt'
    error: package directory 'torch/cuda' does not exist

    ----------------------------------------
Command "python setup.py egg_info" failed with error code 1 in /tmp/pip-build-g6_g0h3r/torch/
そこで,アップグレードしたら治ったって人も居たのでアップグレードしました.
しかし,現状は変わらず.
(venv) masaki@masaki-desktop:~/Documents/pytorch_sample$ pip install --upgrade pip setuptools
Collecting pip
  Downloading https://files.pythonhosted.org/packages/5a/4a/39400ff9b36e719bdf8f31c99fe1fa7842a42fa77432e584f707a5080063/pip-20.2.2-py2.py3-none-any.whl (1.5MB)
    100% |████████████████████████████████| 1.5MB 339kB/s
Collecting setuptools
  Downloading https://files.pythonhosted.org/packages/b0/8b/379494d7dbd3854aa7b85b216cb0af54edcb7fce7d086ba3e35522a713cf/setuptools-50.0.0-py3-none-any.whl (783kB)
    100% |████████████████████████████████| 788kB 607kB/s
Installing collected packages: pip, setuptools
  Found existing installation: pip 9.0.1
    Uninstalling pip-9.0.1:
      Successfully uninstalled pip-9.0.1
  Found existing installation: setuptools 39.0.1
    Uninstalling setuptools-39.0.1:
      Successfully uninstalled setuptools-39.0.1
Successfully installed pip-20.2.2 setuptools-50.0.0
(venv) masaki@masaki-desktop:~/Documents/pytorch_sample$ pip3 install torch torchvision
Collecting torch
  Using cached torch-0.1.2.post2.tar.gz (128 kB)
    ERROR: Command errored out with exit status 1:
     command: /home/masaki/Documents/pytorch_sample/venv/bin/python3 -c 'import sys, setuptools, tokenize; sys.argv[0] = '"'"'/tmp/pip-install-lcef77bx/torch/setup.py'"'"'; __file__='"'"'/tmp/pip-install-lcef77bx/torch/setup.py'"'"';f=getattr(tokenize, '"'"'open'"'"', open)(__file__);code=f.read().replace('"'"'\r\n'"'"', '"'"'\n'"'"');f.close();exec(compile(code, __file__, '"'"'exec'"'"'))' egg_info --egg-base /tmp/pip-pip-egg-info-n4r038gz
         cwd: /tmp/pip-install-lcef77bx/torch/
    Complete output (8 lines):
    running egg_info
    creating /tmp/pip-pip-egg-info-n4r038gz/torch.egg-info
    writing /tmp/pip-pip-egg-info-n4r038gz/torch.egg-info/PKG-INFO
    writing dependency_links to /tmp/pip-pip-egg-info-n4r038gz/torch.egg-info/dependency_links.txt
    writing requirements to /tmp/pip-pip-egg-info-n4r038gz/torch.egg-info/requires.txt
    writing top-level names to /tmp/pip-pip-egg-info-n4r038gz/torch.egg-info/top_level.txt
    writing manifest file '/tmp/pip-pip-egg-info-n4r038gz/torch.egg-info/SOURCES.txt'
    error: package directory 'torch/cuda' does not exist
    ----------------------------------------
ここで,jetsonのページにpytorchなどのインストール方法が載っていることに気が付きました!!
が!!!
torchvisionでこけてます.そこで,エラーを見ると
.......
「libcudart.so.10.0」だとっっっっっ
これはcuda10.0版のやつですね.
つまり,jetsonのページに掴まされたのはcuda10.0版ということでした.なので,cuda10.2版をインストールしてこれば終了!!!
(venv) masaki@masaki-desktop:~/Documents/pytorch_sample$ pip3 install numpy torch-1.3.0-cp36-cp36m-linux_aarch64.whl
Collecting numpy
  Downloading numpy-1.19.1-cp36-cp36m-manylinux2014_aarch64.whl (12.2 MB)
     |████████████████████████████████| 12.2 MB 1.1 MB/s
Processing ./torch-1.3.0-cp36-cp36m-linux_aarch64.whl
Installing collected packages: numpy, torch
Successfully installed numpy-1.19.1 torch-1.3.0
(venv) masaki@masaki-desktop:~/Documents/pytorch_sample$ sudo apt-get install libjpeg-dev zlib1g-dev
パッケージリストを読み込んでいます... 完了
依存関係ツリーを作成しています
状態情報を読み取っています... 完了
zlib1g-dev はすでに最新バージョン (1:1.2.11.dfsg-0ubuntu2) です。
zlib1g-dev は手動でインストールしたと設定されました。
以下のパッケージが自動でインストールされましたが、もう必要とされていません:
  apt-clone archdetect-deb bogl-bterm busybox-static cryptsetup-bin dpkg-repack gir1.2-timezonemap-1.0 gir1.2-xkl-1.0
  grub-common kde-window-manager kinit kio kpackagetool5 kwayland-data kwin-common kwin-data kwin-x11
  libdebian-installer4 libkdecorations2-5v5 libkdecorations2private5v5 libkf5activities5 libkf5attica5
  libkf5completion-data libkf5completion5 libkf5declarative-data libkf5declarative5 libkf5doctools5
  libkf5globalaccel-data libkf5globalaccel5 libkf5globalaccelprivate5 libkf5idletime5 libkf5jobwidgets-data
  libkf5jobwidgets5 libkf5kcmutils-data libkf5kcmutils5 libkf5kiocore5 libkf5kiontlm5 libkf5kiowidgets5
  libkf5newstuff-data libkf5newstuff5 libkf5newstuffcore5 libkf5package-data libkf5package5 libkf5plasma5
  libkf5quickaddons5 libkf5solid5 libkf5solid5-data libkf5sonnet5-data libkf5sonnetcore5 libkf5sonnetui5
  libkf5textwidgets-data libkf5textwidgets5 libkf5waylandclient5 libkf5waylandserver5 libkf5xmlgui-bin
  libkf5xmlgui-data libkf5xmlgui5 libkscreenlocker5 libkwin4-effect-builtins1 libkwineffects11 libkwinglutils11
  libkwinxrenderutils11 libqgsttools-p1 libqt5designer5 libqt5help5 libqt5multimedia5 libqt5multimedia5-plugins
  libqt5multimediaquick-p5 libqt5multimediawidgets5 libqt5opengl5 libqt5positioning5 libqt5printsupport5 libqt5qml5
  libqt5quick5 libqt5quickwidgets5 libqt5sensors5 libqt5sql5 libqt5test5 libqt5webchannel5 libqt5webkit5
  libxcb-composite0 libxcb-cursor0 libxcb-damage0 os-prober python3-dbus.mainloop.pyqt5 python3-icu python3-pam
  python3-pyqt5 python3-pyqt5.qtsvg python3-pyqt5.qtwebkit python3-sip qml-module-org-kde-kquickcontrolsaddons
  qml-module-qtmultimedia qml-module-qtquick2 rdate tasksel tasksel-data
これを削除するには 'sudo apt autoremove' を利用してください。
以下の追加パッケージがインストールされます:
  libjpeg-turbo8-dev libjpeg8-dev
以下のパッケージが新たにインストールされます:
  libjpeg-dev libjpeg-turbo8-dev libjpeg8-dev
アップグレード: 0 個、新規インストール: 3 個、削除: 0 個、保留: 3 個。
206 kB のアーカイブを取得する必要があります。
この操作後に追加で 601 kB のディスク容量が消費されます。
続行しますか? [Y/n] Y
取得:1 http://ports.ubuntu.com/ubuntu-ports bionic-updates/main arm64 libjpeg-turbo8-dev arm64 1.5.2-0ubuntu5.18.04.4 [203 kB]
取得:2 http://ports.ubuntu.com/ubuntu-ports bionic/main arm64 libjpeg8-dev arm64 8c-2ubuntu8 [1,550 B]
取得:3 http://ports.ubuntu.com/ubuntu-ports bionic/main arm64 libjpeg-dev arm64 8c-2ubuntu8 [1,546 B]
206 kB を 3秒 で取得しました (80.2 kB/s)
debconf: delaying package configuration, since apt-utils is not installed
以前に未選択のパッケージ libjpeg-turbo8-dev:arm64 を選択しています。
(データベースを読み込んでいます ... 現在 142183 個のファイルとディレクトリがインストールされています。)
.../libjpeg-turbo8-dev_1.5.2-0ubuntu5.18.04.4_arm64.deb を展開する準備をしています ...
libjpeg-turbo8-dev:arm64 (1.5.2-0ubuntu5.18.04.4) を展開しています...
以前に未選択のパッケージ libjpeg8-dev:arm64 を選択しています。
.../libjpeg8-dev_8c-2ubuntu8_arm64.deb を展開する準備をしています ...
libjpeg8-dev:arm64 (8c-2ubuntu8) を展開しています...
以前に未選択のパッケージ libjpeg-dev:arm64 を選択しています。
.../libjpeg-dev_8c-2ubuntu8_arm64.deb を展開する準備をしています ...
libjpeg-dev:arm64 (8c-2ubuntu8) を展開しています...
libjpeg-turbo8-dev:arm64 (1.5.2-0ubuntu5.18.04.4) を設定しています ...
libjpeg8-dev:arm64 (8c-2ubuntu8) を設定しています ...
libjpeg-dev:arm64 (8c-2ubuntu8) を設定しています ...
(venv) masaki@masaki-desktop:~/Documents/pytorch_sample$ git clone --branch v0.4.2 https://github.com/pytorch/vision torchvision
Cloning into 'torchvision'...
remote: Enumerating objects: 45, done.
remote: Counting objects: 100% (45/45), done.
remote: Compressing objects: 100% (41/41), done.
remote: Total 9701 (delta 14), reused 13 (delta 4), pack-reused 9656
Receiving objects: 100% (9701/9701), 11.48 MiB | 3.83 MiB/s, done.
Resolving deltas: 100% (6726/6726), done.
(venv) masaki@masaki-desktop:~/Documents/pytorch_sample$ cd torchvision
(venv) masaki@masaki-desktop:~/Documents/pytorch_sample/torchvision$ pip3 list
Package       Version
------------- -------
numpy         1.19.1
pip           20.2.2
pkg-resources 0.0.0
setuptools    50.0.0
torch         1.3.0
(venv) masaki@masaki-desktop:~/Documents/pytorch_sample/torchvision$ python3 setup.py install
Traceback (most recent call last):
  File "setup.py", line 14, in <module>
    import torch
  File "/home/masaki/Documents/pytorch_sample/venv/lib/python3.6/site-packages/torch/__init__.py", line 81, in <module>
    from torch._C import *
ImportError: libcudart.so.10.0: cannot open shared object file: No such file or directory
jetsonページからpytorchのインストール
jetsonページからcuda10.2に対応したpytorchをインストールしてきた結果.....ダメだった
(venv2) masaki@masaki-desktop:~/Documents/pytorch_sample/torchvision$ python setup.py install
Traceback (most recent call last):
  File "setup.py", line 14, in <module>
    import torch
  File "/home/masaki/Documents/pytorch_sample/venv2/lib/python3.6/site-packages/torch/__init__.py", line 81, in <module>
    from torch._C import *
ImportError: libcudart.so.10.0: cannot open shared object file: No such file or directory
まとめ
dockerを使用して環境構築してみます.