なんか面白そうなやつがあったので試してみました。
備忘録的な感じです。
Navigationを実装してみる
とりあえず適当な新規プロジェクトを作成してFragmentを追加しました。
スタート画面レイアウト
<?xml version="1.0" encoding="utf-8"?>
<androidx.constraintlayout.widget.ConstraintLayout xmlns:android="http://schemas.android.com/apk/res/android"
    xmlns:app="http://schemas.android.com/apk/res-auto"
    android:layout_width="match_parent"
    android:layout_height="match_parent">

    <!--タイトル-->
    <TextView
        android:id="@+id/app_name"
        android:layout_width="wrap_content"
        android:layout_height="wrap_content"
        android:text="@string/app_name"
        android:textSize="@dimen/app_name_text"
        app:layout_constraintBottom_toBottomOf="parent"
        app:layout_constraintEnd_toEndOf="parent"
        app:layout_constraintStart_toStartOf="parent"
        app:layout_constraintTop_toTopOf="parent"
        app:layout_constraintVertical_bias="0.35" />

    <!--検索ボタン-->
    <Button
        android:id="@+id/start_search"
        android:layout_width="120dp"
        android:layout_height="wrap_content"
        android:layout_marginTop="32dp"
        android:text="@string/bt_start_search"
        app:layout_constraintEnd_toEndOf="parent"
        app:layout_constraintHorizontal_bias="0.5"
        app:layout_constraintStart_toStartOf="parent"
        app:layout_constraintTop_toBottomOf="@+id/app_name" />

    <!--お気に入りボタン-->
    <Button
        android:id="@+id/start_favorite"
        android:layout_width="120dp"
        android:layout_height="wrap_content"
        android:layout_marginTop="24dp"
        android:text="@string/bt_start_favorite"
        app:layout_constraintEnd_toEndOf="parent"
        app:layout_constraintHorizontal_bias="0.5"
        app:layout_constraintStart_toStartOf="parent"
        app:layout_constraintTop_toBottomOf="@+id/start_search" />

    <!--設定ボタン-->
    <Button
        android:id="@+id/start_setting"
        android:layout_width="120dp"
        android:layout_height="wrap_content"
        android:layout_marginTop="24dp"
        android:text="@string/bt_start_setting"
        app:layout_constraintEnd_toEndOf="parent"
        app:layout_constraintHorizontal_bias="0.5"
        app:layout_constraintStart_toStartOf="parent"
        app:layout_constraintTop_toBottomOf="@+id/start_favorite" />

</androidx.constraintlayout.widget.ConstraintLayout>
スタート画面から、ボタン押下で[検索画面/お気に入り画面/設定画面]に
それぞれ遷移できるようなアプリにします。
それではドキュメントに沿ってNavigationを実装していきます。
Step1 - 環境のセットアップ
Navigationに必要なものをアプリのbuild.gradleに追加します。syncを忘れずに。
ここはとりあえず入れるだけなので次に行きます。
dependencies{
    //navigation implementation
    def nav_version = "2.4.1"
    implementation("androidx.navigation:navigation-fragment-ktx:$nav_version")
    implementation("androidx.navigation:navigation-ui-ktx:$nav_version")
    implementation("androidx.navigation:navigation-dynamic-features-fragment:$nav_version")
    implementation("androidx.navigation:navigation-compose:$nav_version")
    androidTestImplementation("androidx.navigation:navigation-testing:$nav_version")
}
Step2 - ナビゲーショングラフの作成
-
手順1
プロジェクト内にあるresディレクトリを右クリックし、
new → Android Resource Fileを選択 -
手順2
Resource TypeにNavigationを選択、適当なFile Nameを入れてOKボタンを押す
これでナビゲーショングラフが作成されます。
初めて作った際は、勝手にresディレクトリ内にnavigationディレクトリを作ってくれます。
また、作成されるとNavigation Editorが開きます。ここでナビゲーションを編集します。
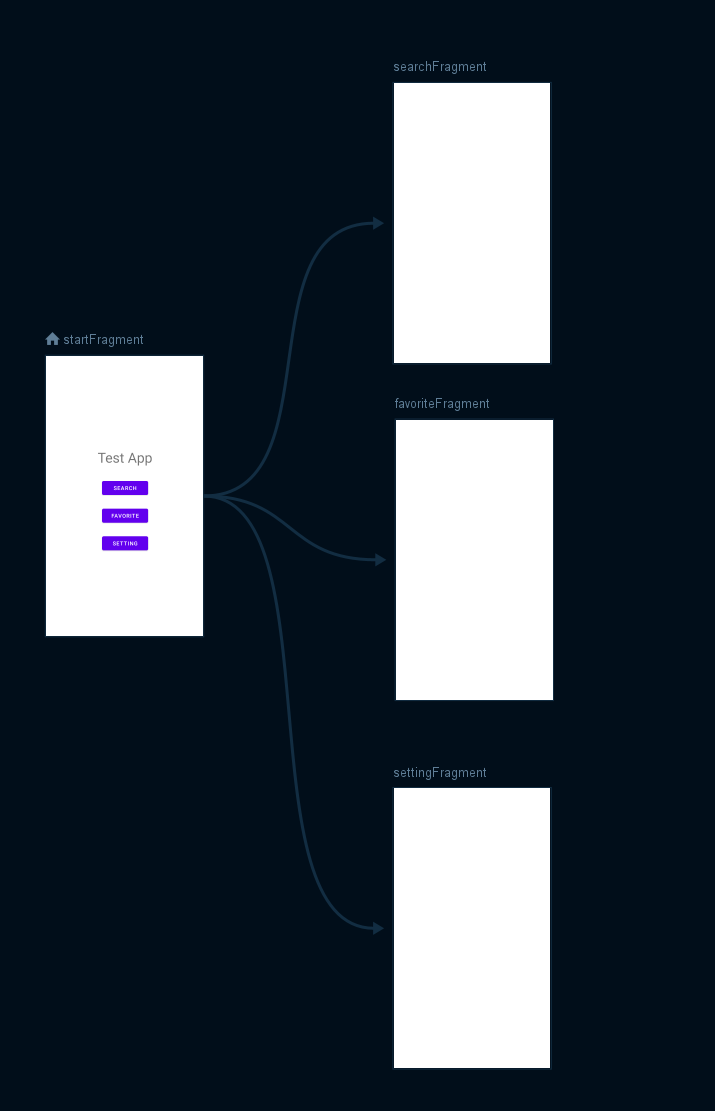
step3 - Navigation Editorでディスティネーション追加
Navigation Editor画面から操作します。
-
手順1
Editorの画面をクリックして先ほど作成したfragment_start.xmlを追加 -
手順2
画面左上のNew Destinationボタンを押下してfragmentを追加または作成
今回はSearch,Favorite,Settingの三つを追加します -
手順3
fragment_startからドラッグし、三つのFragmentにそれぞれドロップしてパスを繋ぐ
とりあえずこんな感じで行きます↓
<?xml version="1.0" encoding="utf-8"?>
<navigation xmlns:android="http://schemas.android.com/apk/res/android"
    xmlns:app="http://schemas.android.com/apk/res-auto"
    xmlns:tools="http://schemas.android.com/tools"
    android:id="@+id/navi_start"
    app:startDestination="@id/startFragment">

    <fragment
        android:id="@+id/startFragment"
        android:name="com.example.lyricmemo.Fragment.StartFragment"
        android:label="StartFragment"
        tools:layout="@layout/fragment_start"
        >
        <action
            android:id="@+id/action_startFragment_to_searchFragment"
            app:destination="@id/searchFragment" />
        <action
            android:id="@+id/action_startFragment_to_favoriteFragment"
            app:destination="@id/favoriteFragment" />
        <action
            android:id="@+id/action_startFragment_to_settingFragment"
            app:destination="@id/settingFragment" />
    </fragment>
    <fragment
        android:id="@+id/searchFragment"
        android:name="com.example.lyricmemo.Fragment.SearchFragment"
        android:label="SearchFragment"
        tools:layout="@layout/fragment_search"
        />
    <fragment
        android:id="@+id/favoriteFragment"
        android:name="com.example.lyricmemo.Fragment.FavoriteFragment"
        android:label="FavoriteFragment"
        tools:layout="@layout/fragment_favorite"
        />
    <fragment
        android:id="@+id/settingFragment"
        android:name="com.example.lyricmemo.Fragment.SettingFragment"
        android:label="SettingFragment"
        tools:layout="@layout/fragment_setting"
        />
</navigation>
・要素内にはidと最初に表示させたいフラグメントを入れます。
・要素内には、遷移させたいフラグメントを設定しておきます。
・要素内にはそのフラグメントの遷移先と、その画面への遷移を示すidを設定しておきます。
注.フラグメントがPreview Unavailableと表示される場合
以下のように該当するFragmentにtoolsの記述を入れてください。
    <fragment
        android:id="@+id/startFragment"
        android:name="com.example.testapp.Fragment.StartFragment"
        android:label="StartFragment"
        tools:layout="@layout/fragment_start"/><!--追加-->
-
ナビゲーション
アプリ内のディスティネーション間の移動 -
ディスティネーション
ユーザーがアプリ内で移動できる場所。アクションを通じて接続される -
ナビゲーショングラフ
全てのデスティネーションとアクションを格納するリソースファイル
また、全てのナビゲーションパスを示す
step3 - Navi Hostを追加する
ナビゲーションホストを埋め込んだフラグメントをxml形式で埋め込みます。
アプリ起動時に表示するメインアクティビティのレイアウトに、
以下のようにNavigationHostFragmentを埋め込んだフラグメントを書き入れました。
<?xml version="1.0" encoding="utf-8"?>
<androidx.constraintlayout.widget.ConstraintLayout xmlns:android="http://schemas.android.com/apk/res/android"
    xmlns:app="http://schemas.android.com/apk/res-auto"
    xmlns:tools="http://schemas.android.com/tools"
    android:layout_width="match_parent"
    android:layout_height="match_parent"
    tools:context=".MainActivity">

    <androidx.fragment.app.FragmentContainerView
        android:id="@+id/nav_host_fragment"
        android:name="androidx.navigation.fragment.NavHostFragment"
        android:layout_width="0dp"
        android:layout_height="0dp"
        app:layout_constraintLeft_toLeftOf="parent"
        app:layout_constraintRight_toRightOf="parent"
        app:layout_constraintTop_toTopOf="parent"
        app:layout_constraintBottom_toBottomOf="parent"
        app:navGraph="@navigation/navi_graph" />

</androidx.constraintlayout.widget.ConstraintLayout>
・ナビゲーションホスト
Navigation Componentの中核を担う部分の一つ。
ディスティネーションを入れておくコンテナであり、
ユーザーが移動するとコンテナ内のディスティネーションも入れ替わる
step4 - ディスティネーションへの移動を実装する
ディスティネーションへの移動を実装するためには、
ナビゲーションコントローラを介して行う必要があります。
    //Fragment.findNavController()
    //View.findNavController()
    //Activity.findNavController(viewId: Int)
これらのメソッドを使用して、コントローラを取得したら、
今度はFragmentで、ActionのIdを指定してディスティネーションへの移動を実装します。
class StartFragment : Fragment() {
    override fun onCreateView(
        inflater: LayoutInflater,
        container: ViewGroup?,
        savedInstanceState: Bundle?
    ): View? {
        super.onCreateView(inflater, container, savedInstanceState)
        val view = inflater.inflate(R.layout.fragment_start, container, false)

        val btSearch   = view.findViewById<Button>(R.id.start_search)
        val btFavorite = view.findViewById<Button>(R.id.start_favorite)
        val btSetting  = view.findViewById<Button>(R.id.start_setting)
        setDestination(btSearch,   R.id.action_startFragment_to_searchFragment)
        setDestination(btFavorite, R.id.action_startFragment_to_favoriteFragment)
        setDestination(btSetting,  R.id.action_startFragment_to_searchFragment)

        return view;
    }

    private fun setDestination(button: Button, destId: Int){
        button.setOnClickListener{
            findNavController().navigate(destId);
        }
    }
}
すこし野暮ったかったので関数化しましたが、
このようにアクションを起こさせたいViewに対して、NavController.navigate(id)で
指定のidを入れてやることで、ディスティネーションへの遷移を実現できます。
・ナビゲーションコントローラ
NavHostを操作する際に使用するコントローラ
NavHost自体は直接操作しない
Step5 - 戻るボタンの処理を実装する
画面内のViewの操作は以上ですが、今度は戻るボタンでの処理を実装する必要があります。
デフォルトだと、そのままアプリが終了しますが今回は一つ前のフラグメントに
戻るように実装していきます。
戻るボタンの処理をOnBackPressDispatcheで変更します。
Navigationで一つ前のFragmentに戻る場合は、
findNavController().popBackStack()を使用します。
class SearchFragment : Fragment() {

    override fun onCreate(savedInstanceState: Bundle?) {
        super.onCreate(savedInstanceState)
        //戻るボタンを押された際の処理
        requireActivity().onBackPressedDispatcher.addCallback(this){
            findNavController().popBackStack()
        }
    }

    override fun onCreateView(
        inflater: LayoutInflater,
        container: ViewGroup?,
        savedInstanceState: Bundle?
    ): View? {
        super.onCreateView(inflater, container, savedInstanceState)
        return inflater.inflate(R.layout.fragment_search, container, false)
    }
}
ex - Safe Args を導入する
デスティネーション間の移動の際に使用する、Safe Args Gradle プラグインを導入します。
タイプセーフなナビゲーションを実現できます。
まず環境の設定から。
dependencies内に以下のように追加します。
buildscript {
    dependencies {
        //追加
        def nav_version = "2.4.1"
        classpath "androidx.navigation:navigation-safe-args-gradle-plugin:$nav_version"
    }
}

plugins {
    id 'com.android.application' version '7.1.2' apply false
    id 'com.android.library' version '7.1.2' apply false
    id 'org.jetbrains.kotlin.android' version '1.5.30' apply false
}

task clean(type: Delete) {
    delete rootProject.buildDir
}
以下はkotlinに適したモジュールなので、Javaも使用している場合には
最後の.kotlinを抜いて使用してください。
plugins {
    id 'com.android.application'
    id 'org.jetbrains.kotlin.android'
    //追加
    id 'androidx.navigation.safeargs.kotlin'
}
※これ以外に、gradle.properties ファイルに android.useAndroidX=true が必要となるので設定しておきましょう。
以上でSafe Argsのセットアップが完了しました。
このSafe Argsを使用して生成されるクラスによって、ディスティネーションへの遷移時に
引数を渡したりすることができるようになります。この引数渡しに関してはまた別の機会に行います。
参考