はじめに
冬になると夜寝るときに布団が冷えちゃってることってありますよね。うちの場合も寝室が別室で、もちろん全館暖房とかでもないため、いざ寝ようと思ったらヒエーってなってしまいます。
対策として、アイリスオーヤマのカラリエという布団乾燥機(以下、カラリエ)を導入しています。安価ながら安定して布団をあっためてくれる優れものなんですが1つ欠点があります。電源をONにするためのタイマーがありません。そのため、わざわざ寝る30分くらい前に寝室に移動するという作業が発生し、せっかくのあっため機能が有効活用できていない状況が続いていました。
ということで、これを改善するためのIoTを自作してみました!
構成
今回、巷で話題のLINE Thingsを使うぜ!と意気込んでいたのですが根本的な課題が見つかったため断念しました。寝室とベッドの配置の問題で、Bluetoothの電波が届かないのです・・・ぐぬぬ。
今回は、多少の電力消費には目をつむってESP32-DevKitC(以下、ESP32)のWiFi経由で、MQTT + AWS IoT + Lambda + LINE Botという構成にします。
ESP32側
モーターによる物理ボタンの制御
物理的に電源スイッチを押す必要があり、方法を色々と検討しましたが、最終的に制御が簡単なDCモーターを使う方法を採用することにしました。
(参考)
Arduinoでモーターを制御する!
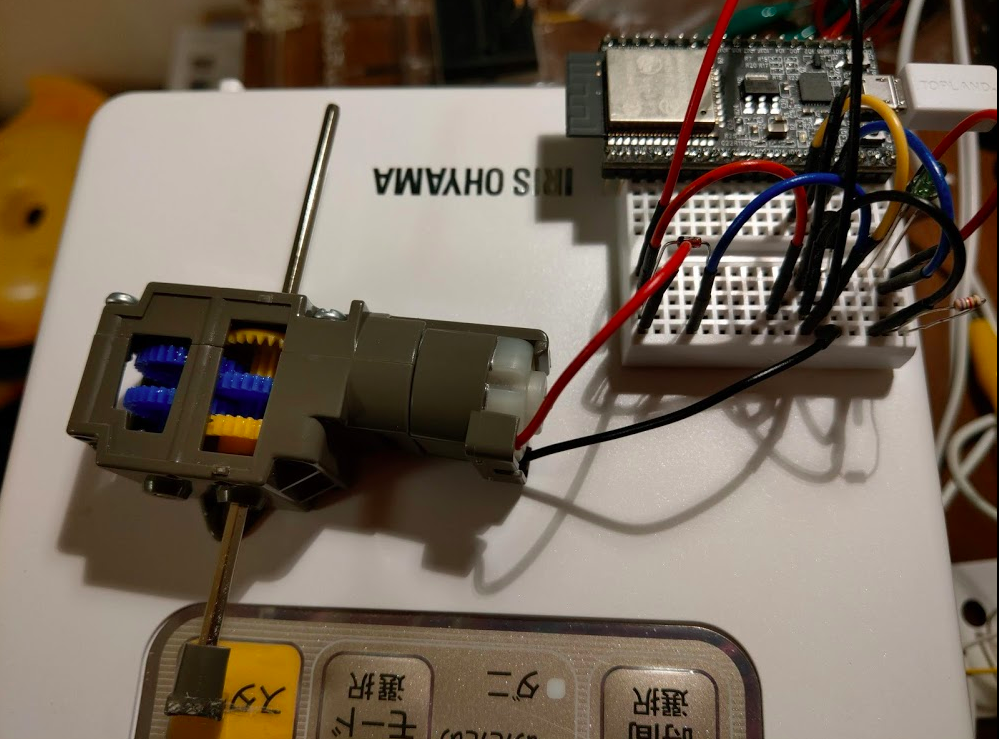
ボタンを押すところのモーター制御には、タミヤのギヤボックスキットを使います。カムの加工などを含めて、とても参考になる記事があったので、ほとんどそのまま作成しています。
(参考)
ひたすらAボタンを押すだけのヤツ、作りました:ウェブ情報実験室
最も大変だったのが、カムの加工と機器への取り付けです。機器への取り付けは両面テープでやってます。
プログラムの概要(Arduino IDE)
今回、MQTTの実装にはpubsubclientを利用しています。実装している内容としては、ESP32起動 → WiFi接続 → MQTT Pub/Sub → LINE BotからのMQTT Publishを受けてモーター動作という流れです。
rotate_motorでは、12番ピンに5Vを0.9秒流します。0.9というのはギアボックスのギア比344.2:1の状態で、カムが1周するように調整した値です。
# include <WiFi.h>
# include <PubSubClient.h>

const char* ssid = "REPLACE_WITH_YOUR_SSID";
const char* password = "REPLACE_WITH_YOUR_PASSWORD";
const char* mqtt_server = "YOUR_MQTT_BROKER_IP_ADDRESS";

const int motor_signal_pin = 12;
const int sensor_signal_pin = 13;

WiFiClient espClient;
PubSubClient client(espClient);

long lastMsg = 0;
char msg[50];
int value = 0;

void rotate_motor() {
  digitalWrite(motor_signal_pin, HIGH);
  delay(900);
  digitalWrite(motor_signal_pin,LOW);
}

void setup_wifi() {
  delay(10);

  // We start by connecting to a WiFi network
  Serial.println();
  Serial.print("Connecting to ");
  Serial.println(ssid);

  WiFi.begin(ssid, password);

  while (WiFi.status() != WL_CONNECTED) {
    delay(500);
    Serial.print(".");
  }

  Serial.println("");
  Serial.println("WiFi connected");
  Serial.println("IP address: ");
  Serial.println(WiFi.localIP());
}

void callback(char* topic, byte* message, unsigned int length) {
  Serial.print("Message arrived on topic: ");
  Serial.print(topic);
  Serial.print(". Message: ");
  String messageTemp;

  for (int i = 0; i < length; i++) {
    Serial.print((char)message[i]);
    messageTemp += (char)message[i];
  }
  Serial.println();

  // If a message is received on the topic esp32/output, you check if the message is "on"
  // Changes the output state according to the message
  if (String(topic) == "esp32/output") {
    Serial.print("Changing output to ");
    if(messageTemp == "on"){
      Serial.println("on");
      rotate_motor();
    }
  }
}

void reconnect() {
  // Loop until we're reconnected
  while (!client.connected()) {
    Serial.print("Attempting MQTT connection...");
    // Attempt to connect
    if (client.connect("ESP8266Client")) {
      Serial.println("connected");
      // Subscribe
      client.subscribe("esp32/output");
    } else {
      Serial.print("failed, rc=");
      Serial.print(client.state());
      Serial.println(" try again in 5 seconds");
      // Wait 5 seconds before retrying
      delay(5000);
    }
  }
}

void setup() {
  Serial.begin(115200);
  setup_wifi();
  client.setServer(mqtt_server, 1883);
  client.setCallback(callback);
  pinMode(motor_signal_pin, OUTPUT);
  pinMode(sensor_signal_pin, INPUT);
}

void loop() {
  if (!client.connected()) {
    reconnect();
  }
  client.loop();
}
機器の写真(固定前)
LINE Bot
LINE BotやAWS IoTについては色々な記事ですでに情報がまとまっているため、省略します。
API Gateway + LambdaにデプロイされたLINEのBotが、MQTTのPub/Subを処理しています。
(コード整理したら後でUpします)
課題 1
ここまでの構築だと、実際に機器が動いているかどうかがよくわからないため改善が必要です。今考えている案では、動作開始すると点灯する本体のLEDが光っているかを判定するか、電流が流れているのを確認するか、などの案があります。
課題 2
ギヤボックスを固定する方法とカムの位置を調整しないと、ボタンの押しがどうも正確にいかないようです。両面テープだとずれたりするので、穴あけで固定かな・・・この点もブラッシュアップが必要です。
課題の対応
これらの課題については、年末に向けて調整していく予定です。
実際の導入効果
今回、IoTLTアドベントカレンダー2019 Neoの記事公開に向けて突貫で作成しましたため、だいぶ未完成な状態です。
次回のIoTLT広島に向けて再構築していきたいと思います!
