↓のGCP版です。AWS以外の部分は下の記事を参照してください。
なぜかGCP版の記事が日本語にない。
※ URLやTokenが見え隠れしていますが、この記事の編集過程で作ったリソースはすべて削除してから投稿しています。
discord の app を作る

bot を作る
アプリを作った画面から、そのままBotも作っておきます

Access tokenをメモ
Botの画面でAccess tokenを取得し、メモしておきます。

MTA1MTQxxxxxxxxxxxxxxxxxx
Application ID もメモ
General Informationに戻ってApplication IDもメモ
1051429xxxxxxxxxxxxxx
スラッシュコマンドの登録
HTTPでPOSTを投げて登録します。
↑にあるPythonスクリプトをコピペ、JSONの中身だけSlashコマンド用に変えて実行します。Pythonの実行環境がない場合は Google Colaboratory でも使うと良いでしょう。
import requests

application_id = "10514xxxxxxxxx"
token = "MTA1MTQyOTM4MTxxxxxxxxxxxxxxxxxxxxxxxxxxxxxx"
url = f"https://discord.com/api/v10/applications/{application_id}/commands"

json = {
    "name": "blep",
    "type": 1,
    "description": "Send a random adorable animal photo",
    "options": [
        {
            "name": "animal",
            "description": "The type of animal",
            "type": 3,
            "required": True,
            "choices": [
                {
                    "name": "Dog",
                    "value": "animal_dog"
                },
                {
                    "name": "Cat",
                    "value": "animal_cat"
                },
                {
                    "name": "Penguin",
                    "value": "animal_penguin"
                }
            ]
        },
        {
            "name": "only_smol",
            "description": "Whether to show only baby animals",
            "type": 5,
            "required": False
        }
    ]
}

# For authorization, you can use either your bot token
headers = {
    "Authorization": f"Bot {token}"
}

r = requests.post(url, headers=headers, json=json)
print(r)
cloud functions を作る
「関数の作成」を押し作ります。
第2世代にします。
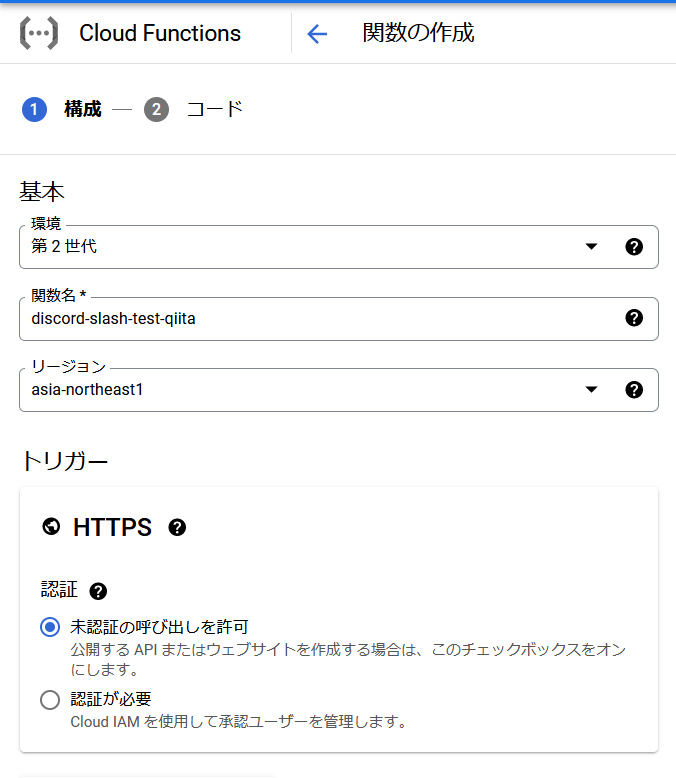
ランタイムはNode.js 16を指定しました。
ほぼ、https://github.com/discord/discord-interactions-js/blob/29b2ef04b9ec2f98fe3328a8fef069016bbdf360/examples/gcloud_function.js にあるコードです。たしか2箇所くらいしか変えていません
const functions = require('@google-cloud/functions-framework');
const { InteractionResponseType, InteractionType, verifyKey } = require('discord-interactions');

const CLIENT_PUBLIC_KEY = "1a4cefaxxxxxxxxxxxxxxxxxxxxxxxxxx";

functions.http('helloHttp', (req, res) => {
  // Verify the request
  const signature = req.get('X-Signature-Ed25519');
  const timestamp = req.get('X-Signature-Timestamp');
  const isValidRequest = verifyKey(req.rawBody, signature, timestamp, CLIENT_PUBLIC_KEY);
  if (!isValidRequest) {
    return res.status(401).end('Bad request signature');
  }

  // Handle the payload
  const interaction = req.body;
  if (interaction && interaction.type === InteractionType.APPLICATION_COMMAND) {
    res.send({
      type: InteractionResponseType.CHANNEL_MESSAGE_WITH_SOURCE,
      data: {
        content: `You used: ${interaction.data.name}`,
      },
    });
  } else {
    res.send({
      type: InteractionResponseType.PONG,
    });
  }
});
package.json にdiscord-interactionsを加えておきます
{
  "dependencies": {
    "@google-cloud/functions-framework": "^3.0.0",
    "discord-interactions": "^3.2.0"
  }
}
デプロイします。
Interaction URLの設定
デプロイできたら、このURLをDiscord ApplicationのGeneral InformationにあるInteractions Endpoint URLにセットして、「Save changes」を押します。ここで動作確認が行われて、疎通すれば設定が保存されます。
サーバーに追加する
Discord Applicationsで、OAuth2 URL Generator→URL Generatorで、Scopesの「bot」にチェックを付けて、生成されたURLを踏んで、サーバーと連携して終わり!
追加したサーバーでコマンドが実行できます

きもち
一番最初に挙げたAWSの記事を参考に、GCP用に変更しながら悪戦苦闘していたのに、実はdiscord-interactionsのリポジトリにあるexampleをコピペしてほんの少し変更するだけで動いたのでつらい。
リソースを消す前に投稿してしまい、2度投稿を消しているので、よく確認したほうがいい。
隠さなくて良いトークンも隠しておいたほうが気持ちがすごく楽という教訓を得ました。