はじめに
こんにちは!今回は、Vite, React, TypeScript, Taiwind CSSを使って筋トレ記録アプリケーションを開発する方法をご紹介します。
この記事について
「既存のトレーニング記録アプリ使ってみたけど...」
種目が多すぎて逆に使いにくい![]()
いつもやる種目が見つからない
自分の種目を追加できない...
そんな経験ありませんか?
「もう自分で作ってしまおう!」
というわけで、隙間時間を使って理想の筋トレ記録アプリを爆速で開発してみました。
この記事では、以下のようなツールスタックを使用して、効率的に開発を進める方法をステップバイステップで解説していきます:
・Vite
・React
・TypeScript
・Tailwind CSS
環境構築から実装まで丁寧に説明していきますので、ぜひ最後までお付き合いください!
アプリについて
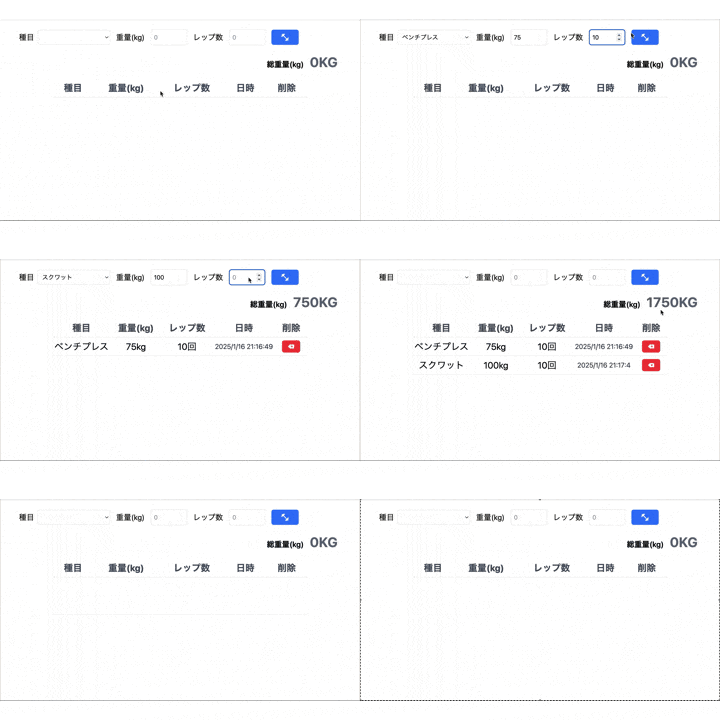
自分専用のため、とにかくシンプルに作りました。
機能としては以下になります。
- 種目のレップ数と重量の記録
- 日時の記録
- 記録の削除機能
- 扱った総重量の表示(これがあるとトレ後の達成感が桁違いです![]() )
)
それでは早速環境構築から始めていきましょう!
1. 環境構築
Viteプロジェクトの作成
npm create vite@latest my-training-app --template react-ts
必要なパッケージのインストール
# 開発環境関連
npm install -D \
  eslint-plugin-react \
  eslint-plugin-vitest \
  eslint-plugin-import \
  prettier \
  eslint-config-prettier \
  npm-run-all

# スタイリング
npm install -D tailwindcss postcss autoprefixer

# アイコン(マークアップで使います)
npm install react-icons

# 型定義
npm install -D @types/node
Tailwind CSSの設定
以下の設定にします。
/** @type {import('tailwindcss').Config} */
export default {
  content: ["./index.html", "./src/**/*.{js,ts,jsx,tsx}"],
  theme: {
    extend: {},
  },
  plugins: [],
};
ESLint + Prettierの設定
開発効率を上げるために、コードの品質チェックツール(ESLint)とコードフォーマッター(Prettier)を導入します。
import js from "@eslint/js";
import globals from "globals";
import reactHooks from "eslint-plugin-react-hooks";
import reactRefresh from "eslint-plugin-react-refresh";
import tseslint from "typescript-eslint";

export default tseslint.config(
  { ignores: ["dist"] },
  {
    extends: [js.configs.recommended, ...tseslint.configs.recommended],
    files: ["**/*.{ts,tsx}"],
    languageOptions: {
      ecmaVersion: 2020,
      globals: globals.browser,
    },
    plugins: {
      "react-hooks": reactHooks,
      "react-refresh": reactRefresh,
    },
    rules: {
      ...reactHooks.configs.recommended.rules,
      "react-refresh/only-export-components": [
        "warn",
        { allowConstantExport: true },
      ],
    },
  },
);
2. 主要な機能の実装
データ構造の定義
記録に必要なデータ構造を定義します。
type WorkoutRecord = {
  exercise: string;   // トレーニング種目名
  weight: number;     // 重量(kg)
  reps: number;      // レップ数
  dateTime: string;  // 記録日時
};
トレーニング種目の管理
トレーニング種目は配列で管理しています。よく使う種目をあらかじめ定義しておくことで、入力の手間を省きます。
好きな種目を追加して下さい!
const exercises = [
    "ベンチプレス", "ダンベルフライ", "スクワット", "デッドリフト", "ラットプルダウン",
    "バーベルカール", "トライセプスプレス", "レッグプレス", "レッグカール", "レッグエクステンション",
    "ヒップスラスト", "クランチ", "レッグレイズ", "プランク", "サイドプランク",
    "ディップス", "チンニング", "プルアップ", "ハンマーカール", "フロントレイズ",
    "サイドレイズ", "リアレイズ", "シュラッグ", "ショルダープレス", "ベントオーバーロウ", "クレーン"
  ];
状態管理の設計
// フォームの入力値
const [exercise, setExercise] = useState("");
const [weight, setWeight] = useState("");
const [reps, setReps] = useState("");

// トレーニング記録の配列
const [workoutRecords, setWorkoutRecords] = useState<WorkoutRecord[]>([]);

// エラーメッセージ
const [error, setError] = useState("");
記録の追加機能の実装
バリデーションを含む記録追加の処理です。
// 記録追加のハンドラー
  const handleAddRecord = () => {
    if (!exercise) {
      setError("種目を選択してください");
      return;
    }

//重量の数値チェック
    const weightInKg = parseInt(weight, 10);
    if (weightInKg <= 0 || isNaN(weightInKg)) {
      setError("重量は0より大きい数値を指定してください");
      return;
    }

//レップ数の数値チェック
    const repsCount = parseInt(reps, 10);
    if (repsCount <= 0 || isNaN(repsCount)) {
      setError("レップ数は0より大きい数値を指定してください");
      return;
    }

//現在の日時を取得
    const dateTime = getDateTime();

//新しい記録を追加
    setWorkoutRecords([...workoutRecords, { exercise, weight: weightInKg, reps: repsCount, dateTime }]);
    setExercise("");
    setWeight("");
    setReps("");
    setError("");
  };

//現在の日時を取得する関数
  const getDateTime = () => {
    const now = new Date();
    return `${now.getFullYear()}/${now.getMonth() + 1}/${now.getDate()} ${now.getHours()}:${now.getMinutes()}:${now.getSeconds()}`;
  };

//記録を削除する関数
  const handleDeleteRecord = (index: number) => {
    const newRecords = workoutRecords.filter((_, i) => i !== index);
    setWorkoutRecords(newRecords);
  };
総重量の計算
reduceを使うことで、すべての記録の重量×レップ数の合計を簡潔に計算できます。
const getTotalWeight = () => {
    return workoutRecords.reduce((total, record) => total + (record.weight * record.reps), 0);
  };
3. UIコンポーネントの実装
フォーム部分
<div className="max-w-4xl mx-auto p-6">
      <div className="space-y-6">
        <div className="flex gap-4 items-center">
          <div className="flex items-center gap-2">
            <label className="text-xl">種目</label>
            <select
              value={exercise}
              onChange={(e) => setExercise(e.target.value)}
              className="border rounded-md p-2 w-48"
            >
              <option value=""></option>
              {exercises.map((ex) => (
                <option key={ex} value={ex}>
                  {ex}
                </option>
              ))}
            </select>
          </div>
          <label className="text-xl">重量(kg)</label>
          <input
            type="number"
            value={weight}
            onChange={(e) => setWeight(e.target.value)}
            className="border rounded-md p-2 w-24"
            placeholder="0"
          />
          <label className="text-xl">レップ数</label>
          <input
            type="number"
            value={reps}
            onChange={(e) => setReps(e.target.value)}
            className="border rounded-md p-2 w-24"
            placeholder="0"
          />
          <button
            onClick={handleAddRecord}
            className="bg-blue-500 text-white px-6 py-2 rounded-md hover:bg-blue-600 text-2xl"
            title="筋トレ記録を追加"
          >
            <IoMdFitness />
          </button>
        </div>
        {error && <div className="flex justify-center text-red-600 text-2xl">{error}</div>}
          {/* ... 総重量の表示 */}
          {/* ... 記録一覧テーブル */}
      </div>
    </div>
記録一覧テーブル
💡 テーブルのレイアウトポイント
- max-w-2xlで最大幅を設定し、見やすさを確保
- text-centerで各セルの内容を中央揃えに
- border-bで行の区切りを表示
- 文字サイズはtext-2xlで大きめに設定し、視認性を向上
<div className="flex justify-center">
  <div className="max-w-2xl w-full">
    <table className="w-full">
      {/* テーブルヘッダー */}
      <thead>
        <tr className="border-b">
          <th className="text-center py-2 px-4 text-2xl font-bold text-gray-600">種目</th>
          <th className="text-center py-2 px-4 text-2xl font-bold text-gray-600">重量(kg)</th>
          <th className="text-center py-2 px-4 text-2xl font-bold text-gray-600">レップ数</th>
          <th className="text-center py-2 px-4 text-2xl font-bold text-gray-600">日時</th>
          <th className="text-center py-2 px-4 text-2xl font-bold text-gray-600">削除</th>
        </tr>
      </thead>
      {/* テーブル本体 */}
      <tbody>
        {workoutRecords.map((record, index) => (
          <tr key={index} className="border-b">
            <td className="text-center py-2 text-2xl">{record.exercise}</td>
            <td className="text-center py-2 text-2xl">{record.weight}kg</td>
            <td className="text-center py-2 text-2xl">{record.reps}回</td>
            <td className="text-center py-2 text-lg text-gray-700">{record.dateTime}</td>
            <td className="text-center py-2">
              <button
                onClick={() => handleDeleteRecord(index)}
                className="bg-red-500 text-white px-4 py-2 rounded-md hover:bg-red-600 focus:outline-none focus:ring-2 focus:ring-red-500"
                title="記録を削除"
              >
                <FaDeleteLeft />
              </button>
            </td>
          </tr>
        ))}
      </tbody>
    </table>
  </div>
</div>
総重量の表示
💡 総重量表示のポイント
-右寄せで配置し、目立つように
-フォントサイズを大きくして強調
-グレーの文字色で視覚的な重みを表現
<div className="text-right">
  <span className="text-xl font-semibold px-2">総重量(kg)</span>
  <span className="text-4xl font-bold text-gray-500 px-2">{getTotalWeight()}KG</span>
</div>
エラーメッセージの表示
💡 エラー表示のポイント
- 条件付きレンダリングでエラーがある時のみ表示
- 赤色で注意を引く
- 中央配置で視認性を確保
{error && (
  <div className="flex justify-center text-red-600 text-2xl">
    {error}
  </div>
)}
4. スタイリングのポイント解説
Tailwindを使うことで、クラス名を組み合わせるだけで必要なスタイリングが実現できます![]()
このアプリでは、Tailwind CSSの主に以下のクラスを活用しています:
レイアウト
-
max-w-4xl: 最大幅の設定 -
mx-auto: 中央寄せ -
p-6: 適度な余白 -
space-y-6: 要素間の縦方向の間隔
フレックスボックス
-
flex: フレックスボックスレイアウト -
items-center: 垂直方向の中央揃え -
justify-center: 水平方向の中央揃え -
gap-4: 要素間の間隔
インタラクション
-
hover:bg-blue-600: ホバー時の色変更 -
focus:outline-none: フォーカス時のアウトライン制御 -
focus:ring-2: フォーカス時のリング表示
4. 機能の拡張アイデア
今回は素早くアプリを開発することに重きを置いていましたが、以下のような機能を追加することで更に実用的なアプリにすることができると思います!
PostgreSQLを使った機能拡張
例えばPostgreSQLを使って以下のようにデータベースを設計します。
-- 種目マスタ
CREATE TABLE exercises (
  id SERIAL PRIMARY KEY,
  name VARCHAR(50) NOT NULL UNIQUE,  -- ベンチプレス, スクワットなど
  created_at TIMESTAMPTZ DEFAULT CURRENT_TIMESTAMP
);

-- トレーニング記録
CREATE TABLE workout_records (
  id SERIAL PRIMARY KEY,
  exercise_id INTEGER REFERENCES exercises(id),
  weight DECIMAL(5,2) NOT NULL,  -- 小数点2桁まで対応
  reps INTEGER NOT NULL,
  recorded_at TIMESTAMPTZ DEFAULT CURRENT_TIMESTAMP,
  CONSTRAINT positive_weight CHECK (weight > 0),
  CONSTRAINT positive_reps CHECK (reps > 0)
);
SQLを使用することによって他にも以下のような機能を追加することができると思います![]()
- 種目ごとの集計機能
- 日付による絞り込み
- グラフでの重量推移表示
- カレンダー表示
- 種目のカテゴリー分け
5. まとめ
シンプルながらも実用的な筋トレ記録アプリを作成することができました。基本的な機能を押さえつつ、拡張性も考慮した設計となっています。ぜひ自分好みにカスタマイズして使ってみてください!
