ETLやディープラーニング以外の機械学習もGPUでぶん回せる!?
ドイツのミュンヘンで現地時間10月10日に開催された「GPU Technology Conference」にて、NVIDIAが「RAPIDS」なるものを発表した。
-
NVIDIA公式ページニュース
RAPIDS Accelerates Data Science End-to-End -
NVIDIA『RAPIDS概要』slideshare
https://www.slideshare.net/NVIDIAJapan/rapids-120510206 -
参考:日本語記事
NVIDIA、大規模データ分析およびマシンラーニング向けオープンソースGPUアクセラレーション プラットフォームのRAPIDSを公開
残念ながら私の英語力では細かいところは理解できていないのだが、どうやら
ETLやモデルの学習、推論もGPUでぶん回す
と言っているっぽい。
GPUってディープラーニングの領域での活躍がメインでETLやディープラーニングでない機械学習ではGPUを使える領域って限られていると思っている(間違っていたら申し訳ない)から、サラッと結構すごいこと言ってるのでは。
上記日本語記事で
NVIDIA DGX-2™ システムでのトレーニング用に XGBoost マシンラーニング アルゴリズムを使用した初期の RAPIDS ベンチマークでは、CPU のみのシステムと比較して 50 倍もスピードアップしました。
とか言っていたり、NVIDIAのニュースページでも以下の図を示して
GPU-powered data science enables much greater interactivity, but affords fewer coffee breaks.
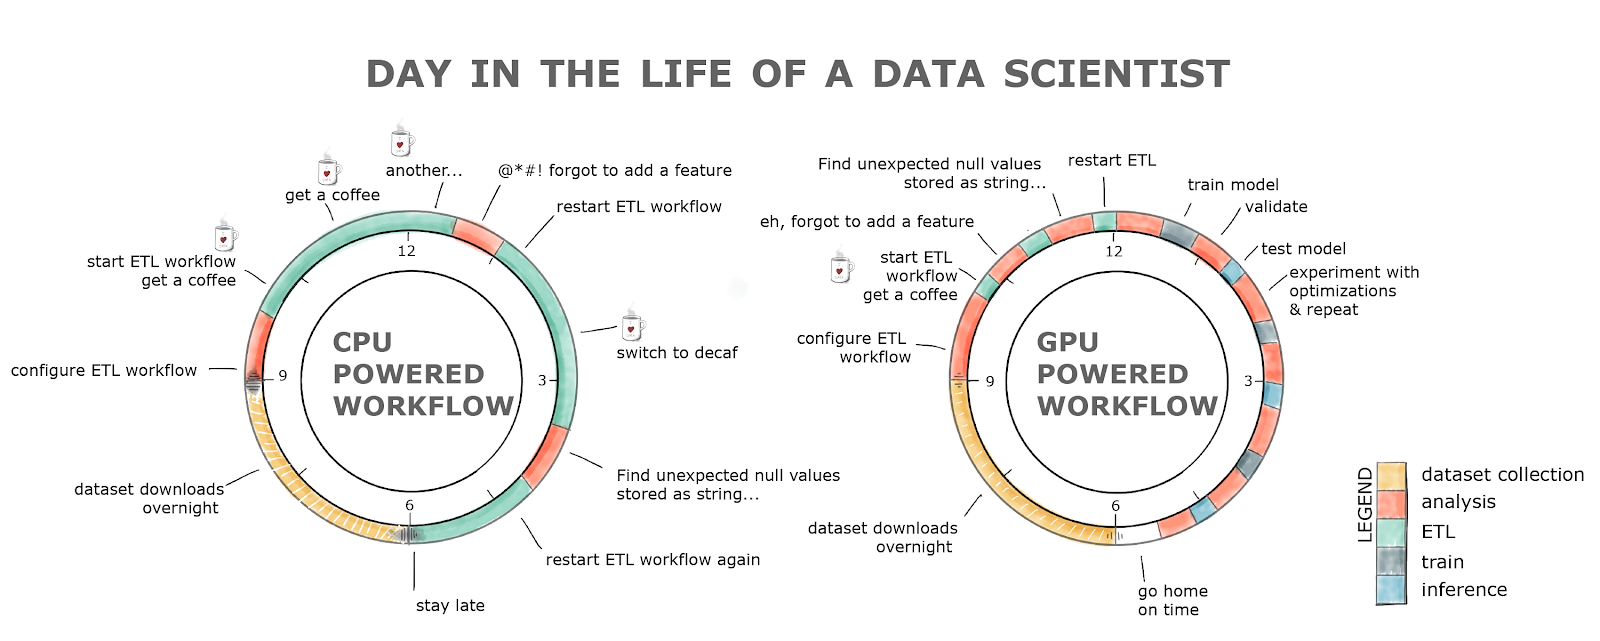
「インタラクティビティはめちゃめちゃ向上するけど、代わりにコーヒーブレークは短くなっちまうな、hahaha!!」(意訳)
なんて言ってるぞ、マジかよ。
こんなこと言われたら試さなずにはいられないので早速試してみた。
と言いたいところなのだが、環境構築だけでハマりまくったので実際に動作させる前までの段階で1つ記事を起こそうと思う。
なお、本記事投稿時点ではRAPIDSのパフォーマンスは未確認なので、
RAPIDSが本当に利用する価値があるものかどうかは投稿者自身もわかっていないことご承知おきを。
備忘録に近い内容になってしまっている感は否めないが、
とりあえず始めてみる際の取っ掛かりの参考程度になれば、と思っている。
環境
- OS
- Ubuntu16.04 64bit
- CPU
- Intel Core i7-7700 CPU @ 3.60GHz × 8
- GPU
- NVIDIA GeForce GTX 1060 6GB
- RAM
- 24GB
RAPIDSの動作条件を確認
まずはRAPIDSを動作させるためにどのような環境を整えれば良さそうかを確認した。
RAPIDS公式ページによると
- GPU support
- NVIDIA Pascal™ architecture or better
- CUDA support
- 9.2 (tags below for each version)
- 10.0 (tags below for each version)
- OS support
- Ubuntu 16.04 LTS (tested and confirmed working)
- Ubuntu 18.04 LTS (tested and confirmed working)
- Docker support
- Docker CE v18+ - apt for Ubuntu 16.04 doesn't include v18+ by default
- nvidia-docker v2+
とのこと。
その他の内容も読んでみると、どうやらRAPIDSのDockerイメージを提供していてそれを使えば手っ取り早くできるぞ、ということらしい。
ぶっちゃけDockerを使ったことすらないので、この時点で前途多難になりそうな予感しかしないが、とりあえず突き進んでみる。
動作環境的には、GPU,OSは今回の使用環境で満たせているが、その他は準備が必要そう。
色々手を動かして見た結果、私の環境の場合は事前準備として以下の手順が必要だった。
- CUDA 9.2 or 10.0 の動作するNVIDIA Driverバージョンに更新
- Docker CEのインストール
- nvidia-docker v2のインストール
CUDA10.0に対応するNVIDIAドライバに更新
以下のサイトでCUDA 10.0の動作要件のNVIDIAドライバのバージョンを確認。
https://docs.nvidia.com/cuda/cuda-toolkit-release-notes/index.html#unsupported-features
どうやらUbuntu環境では410.48以降とのこと。
$ nvidia-smi
でNVIDIAドライバのバージョンを確認したところ384だった、全然ダメじゃん。
てことでドライバの更新をする。
最新のCUDAっぽいし、最新のドライバに更新すれば多分410とかになるしょという軽いノリで以下コマンドでドライバ更新。
$ sudo ubuntu-drivers autoinstall
OS再起動してから更新後のバージョンを確認。
$ nvidia-smi

+-----------------------------------------------------------------------------+
| NVIDIA-SMI 410.66       Driver Version: 410.66       CUDA Version: 10.0     |
|-------------------------------+----------------------+----------------------+
| GPU  Name        Persistence-M| Bus-Id        Disp.A | Volatile Uncorr. ECC |
| Fan  Temp  Perf  Pwr:Usage/Cap|         Memory-Usage | GPU-Util  Compute M. |
|===============================+======================+======================|
|   0  GeForce GTX 106...  Off  | 00000000:01:00.0  On |                  N/A |
| 32%   35C    P8     9W / 120W |    819MiB /  6070MiB |     12%      Default |
+-------------------------------+----------------------+----------------------+
めでたく410.48以降のバージョンになった。
Docker CEのインストール
ほぼほぼ公式の手順通り。
https://docs.docker.com/install/linux/docker-ce/ubuntu/#set-up-the-repository
Dockerリポジトリの設定
$ sudo apt-get update
HTTPS経由でリポジトリを使用するためのパッケージをインストール。
$ sudo apt-get install \
    apt-transport-https \
    ca-certificates \
    curl \
    software-properties-common
公式GPGキーを追加。
$ curl -fsSL https://download.docker.com/linux/ubuntu/gpg | sudo apt-key add -
キーを取得できていることを確認。
$ sudo apt-key fingerprint 0EBFCD88

pub   4096R/0EBFCD88 2017-02-22
      フィンガー・プリント = 9DC8 5822 9FC7 DD38 854A  E2D8 8D81 803C 0EBF CD88
uid                  Docker Release (CE deb) <docker@docker.com>
sub   4096R/F273FCD8 2017-02-22
$ sudo add-apt-repository \
   "deb [arch=amd64] https://download.docker.com/linux/ubuntu \
   $(lsb_release -cs) \
   stable"
Docker CEのインストール
こちらに関してもほぼ上記の公式ドキュメントの『INSTALL DOCKER CE』の内容通り。
$ sudo apt-get update
最新版のDocker CEをインストール。
$ sudo apt-get install docker-ce
Hello Worldで動作確認。
$ sudo docker run hello-world

Unable to find image 'hello-world:latest' locally
latest: Pulling from library/hello-world
d1725b59e92d: Pull complete
Digest: sha256:0add3ace90ecb4adbf7777e9aacf18357296e799f81cabc9fde470971e499788
Status: Downloaded newer image for hello-world:latest

Hello from Docker!
This message shows that your installation appears to be working correctly.

To generate this message, Docker took the following steps:
 1. The Docker client contacted the Docker daemon.
 2. The Docker daemon pulled the "hello-world" image from the Docker Hub.
    (amd64)
 3. The Docker daemon created a new container from that image which runs the
    executable that produces the output you are currently reading.
 4. The Docker daemon streamed that output to the Docker client, which sent it
    to your terminal.

To try something more ambitious, you can run an Ubuntu container with:
 $ docker run -it ubuntu bash

Share images, automate workflows, and more with a free Docker ID:
 https://hub.docker.com/

For more examples and ideas, visit:
 https://docs.docker.com/get-started/
ユーザ権限設定(任意)
dockerコマンドで毎回sudo打つのめんどくせぇ、って人向け?の手順。
セキュリティへの影響もある?ので、こちらは任意。
(私はここの手順を実施したため、本項より後の手順ではsudoなしのコマンド)
https://docs.docker.com/install/linux/linux-postinstall/#manage-docker-as-a-non-root-user
dockerグループの作成。
$ sudo groupadd docker
ユーザをdockerグループに追加。
$ sudo usermod -aG docker $USER
sudoをつけなくても動作することを確認。
$ docker images

REPOSITORY          TAG                 IMAGE ID            CREATED             SIZE
hello-world         latest              4ab4c602aa5e        7 weeks ago         1.84kB
システム起動時にdockerを自動起動するよう設定。
$ sudo systemctl enable docker
nvidia-docker2のインストール
リポジトリのインストール
こちらの手順通り。
Ubuntu 16.04のサポートは×になっているが、一応問題なく進められた。
https://nvidia.github.io/nvidia-docker/
$ curl -s -L https://nvidia.github.io/nvidia-docker/gpgkey | \
  sudo apt-key add -
$ distribution=$(. /etc/os-release;echo $ID$VERSION_ID)
$ curl -s -L https://nvidia.github.io/nvidia-docker/$distribution/nvidia-docker.list | \
  sudo tee /etc/apt/sources.list.d/nvidia-docker.list
$ sudo apt-get update
nvidia-docker2のインストール
だいたいGitHubに記載されている手順通り。
https://github.com/nvidia/nvidia-docker/wiki/Installation-(version-2.0)
$ sudo apt-get install nvidia-docker2
$ sudo pkill -SIGHUP dockerd
nvidia-docker2の動作確認。
$ docker run --runtime=nvidia --rm nvidia/cuda nvidia-smi

Unable to find image 'nvidia/cuda:latest' locally
latest: Pulling from nvidia/cuda
473ede7ed136: Pull complete
c46b5fa4d940: Pull complete
93ae3df89c92: Pull complete
6b1eed27cade: Pull complete
c170ed8be497: Pull complete
0eb9086a62ef: Pull complete
bb300cb4bd26: Pull complete
2155acd35124: Pull complete
Digest: sha256:02baa84b8d06224ed0cc8a08dc728f4cd993d7d46e9eec472ac6619caf5da799
Status: Downloaded newer image for nvidia/cuda:latest
Sun Oct 28 14:25:31 2018
+-----------------------------------------------------------------------------+
| NVIDIA-SMI 410.66       Driver Version: 410.66       CUDA Version: 10.0     |
|-------------------------------+----------------------+----------------------+
| GPU  Name        Persistence-M| Bus-Id        Disp.A | Volatile Uncorr. ECC |
| Fan  Temp  Perf  Pwr:Usage/Cap|         Memory-Usage | GPU-Util  Compute M. |
|===============================+======================+======================|
|   0  GeForce GTX 106...  Off  | 00000000:01:00.0  On |                  N/A |
| 32%   32C    P8     9W / 120W |    896MiB /  6070MiB |     13%      Default |
+-------------------------------+----------------------+----------------------+

+-----------------------------------------------------------------------------+
| Processes:                                                       GPU Memory |
|  GPU       PID   Type   Process name                             Usage      |
|=============================================================================|
+-----------------------------------------------------------------------------+
dockerイメージが追加されていることを確認。
$ docker images

REPOSITORY          TAG                 IMAGE ID            CREATED             SIZE
nvidia/cuda         latest              4c58166d6f67        5 days ago          2.24GB
RAPIDS Dockerコンテナ起動
ここからようやく本題のRAPIDS。
公式ページだけではわからない部分もあったが、NVIDIA技術者のブログと合わせて読むことでとりあえずなんとかなった。
- RAPIDS公式ページ
- https://rapids.ai/documentation.html
- NVIDIA技術者ブログ
- https://devblogs.nvidia.com/gpu-accelerated-analytics-rapids/
RAPIDSのDockerイメージを取ってきてコンテナを起動してみる。
$ docker pull rapidsai/rapidsai:latest

latest: Pulling from rapidsai/rapidsai
3b37166ec614: Pull complete
504facff238f: Pull complete
ebbcacd28e10: Pull complete
c7fb3351ecad: Pull complete
2e3debadcbf7: Pull complete
c216563ccae0: Pull complete
73fdbac2bbc0: Pull complete
c8ed349fd54b: Pull complete
dbe42bf407a7: Pull complete
3e145e8df562: Pull complete
44ff8e32c0b7: Pull complete
aa4dfd23d2ac: Pull complete
632f2ddbd599: Pull complete
977c5d03dbc7: Pull complete
fc454dfcb537: Pull complete
4dc22f05b35a: Pull complete
b7e646d9318a: Pull complete
48fdf442850d: Pull complete
Digest: sha256:59fb3db126c04b18d8522103bb58330ffe0203bb851e329286e5b076e85144a8
Status: Downloaded newer image for rapidsai/rapidsai:latest
イメージが追加されていることを一応確認。
$ docker images

REPOSITORY          TAG                 IMAGE ID            CREATED             SIZE
nvidia/cuda         latest              4c58166d6f67        5 days ago          2.24GB
rapidsai/rapidsai   latest              4b30dcd9849c        2 weeks ago         8.51GB
RAPIDSコンテナを起動。
(動作確認程度の用途では特にホスト側のディレクトリのマウントは必要なさそうだったので、必要最低限のコマンドで)
$ docker run --runtime=nvidia -p 8888:8888 -p 8787:8787 -p 8790-8798:8790-8798 -it rapidsai/rapidsai:latest

root@a1b3c0415a99:/#
anacondaの仮想環境をアクティベート。
root@a1b3c0415a99:/# source activate gdf

(gdf) root@a1b3c0415a99:/#
jupyter-labを起動
(gdf) root@a1b3c0415a99:/# bash /rapids/utils/start_jupyter.sh
起動中のコンテナのIPアドレスを確認。
(gdf) root@a1b3c0415a99:/# hostname --all-ip-addresses
ここでコマンドベースの操作は一旦終了。
ホスト側でブラウザを開いて、URLに
{上記で確認したIPアドレス}:8888
を指定。すると、こんなページが表示される。
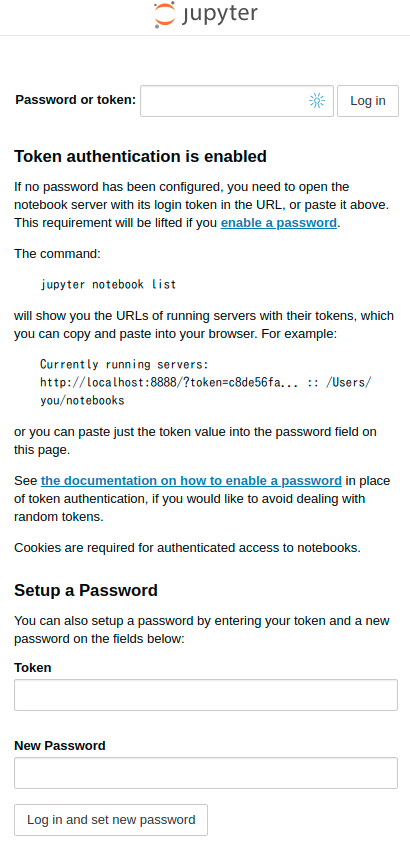
"Password or token"は"rapids"。
無事に認証でき、JupyterLabを開くことができた。
RAPIDSを動作させるまでの準備がおおよそできた。
ここまでを環境構築編とし、次回以降の記事でRAPIDSの実力を検証してみる予定。