はじめに
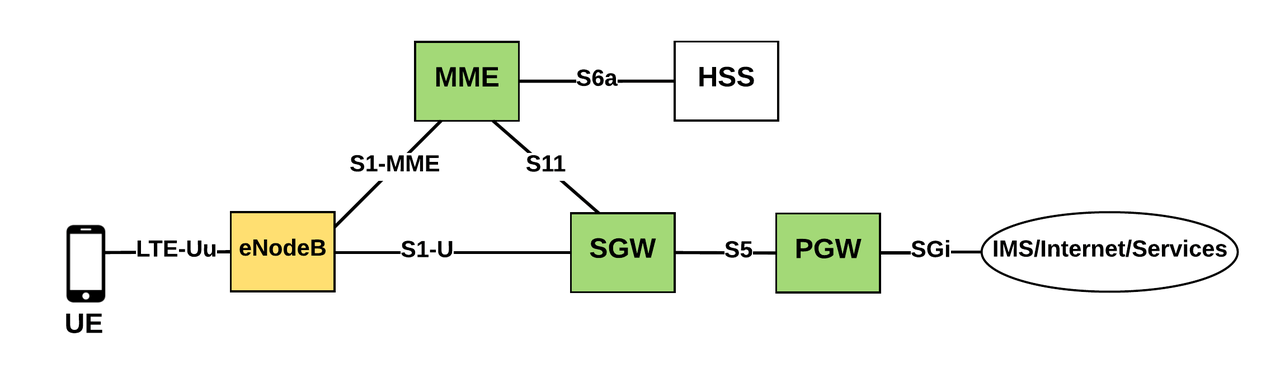
これまでLTE回線を利用する場合は、端末(SIM挿入済み)からモバイルキャリアが設置した「LTE無線基地局(eNodeB)」に接続し、モバイルキャリアが提供する「LTEコア網(Evolved Packet Core:EPC)」を経由して様々なサービスに接続されていました(図参照)。
一方で、現在では「MulteFire(2.4GHz帯・5.0Ghz帯)」や「sXGP(1.9Ghz帯)」など、自営で設置可能な「LTE無線基地局」の商品化が進み、また、「LTEコア網」についても一般的なサーバ上で動作可能な様々なOSS(Open Air Interface、NextEPC、srsLTE)が開発されています。これらのHW/SWを用いて、モバイルキャリアの設備を利用せず全て自営による「LTE無線基地局」・「LTEコア網」を用いたシステム(プライベートLTE)の導入が海外を中心に広がりつつあります。
「プライベートLTE」は社内NWに閉じた環境でLTEを利用したい場合等、様々なユースケースが期待されています。また、将来的には既存のWiFiルータのような手軽さでLTEシステムを導入することが可能になるとも言われています。
今回はRaspberry Pi 3にEPCのOSSであるNextEPCを導入し、「LTEコア網」設備を構築してみました。
【参考】:https://orhanergun.net/2016/07/evolved-packet-core-welcome-lte/
- LTEコア網(EPC):MME/SGW/PGW/HSS
- LTE無線基地局:eNodeB
- 携帯端末:UE
■ プライベートLTEの特徴
- 接続の安定性:移動時も接続が途切れにくい
- セキュリティ:SIM認証による物理的な認証
LTEコア網(Evolved Packet Core:EPC)とは?
LTEのアクセス網を収容するコアネットワークのことをEvolved Packet Core:EPCと呼ぶ。
EPCは以下の5機能からなる。
- Mobility Management Entity:MME
- Serving Gateway:S-GW
- Packet data network Gateway:P-GW
- Home Subscriber Server:HSS
- Policy and Charging Rule Function:PCRF
参考:フルMVNO業者はモバイルキャリア(MNO)のeNodeB、MME、S-GWを利用し、HSSとP-GWを自前で用意することでサービスを提供しています。
LTEコア網の構築環境
- 本体:RaspberryPi 3 Model B (http://www.iodata.jp/product/pc/raspberrypi/ud-rp3/index.htm)
- CPU:Broadcom BCM2837 1.2 GHz 64-bit quad-core ARMv8 Cortex-A53
- メモリ:1.0 GB
- ストレージ:SanDisk microSDHC 32.0 GB (SDSQUAR-032G)
- OS:Ubuntu 16.04 LTS
- Evolved Packet Core:NextEPC
NextEPCとは?
- C言語で記述されたEPC
- OSSとして韓国人技術者により開発されている
- 導入が非常に用意で、かつ軽量な機器でも動作する
Raspberry Pi 3へUbuntu16.04 LTSを導入
- 1: 事前準備
- SD Card Formatterをインストール
- Etcherをインストール
- 2: 上田さんのブログからRaspberry Pi 3用 UbuntuServer 16.04.3 LTSのイメージをダウンロード
- 公式提供イメージをバグフィックスしてくださったものです。
- 3: ダウンロードしたイメージを解凍
- 4: SD Card Formatterを起動し、SD Cardをフォーマットする
- 5: Etcherを起動し、上記ダウンロードイメージをSD Cardに焼く
- 6: SD Cardを挿入し、Raspberry Pi 3を起動
- 7: CLIでログイン(ID/PW=ubuntu)し、ブートローダと解像度の変更
$sudo cat /boot/firmware/config.txt
# For more options and information see
# http://www.raspberrypi.org/documentation/configuration/config-txt.md
# Some settings may impact device functionality. See link above for details

# kernel=uboot.bin

# enable uart (needed for u-boot on RPi3)
enable_uart=1

# set extended DT area
# device_tree_address=0x100
device_tree_end=0x8000
device_tree_address=0x02008000


# enable i2c
dtparam=i2c_arm=on
dtparam=spi=on

# uncomment if you get no picture on HDMI for a default "safe" mode
# hdmi_safe=1

# uncomment this if your display has a black border of unused pixels visible
# and your display can output without overscan
# disable_overscan=1

# uncomment the following to adjust overscan. Use positive numbers if console
# goes off screen, and negative if there is too much border
# overscan_left=16
# overscan_right=16
# overscan_top=16
# overscan_bottom=16

# uncomment to force a console size. By default it will be display's size minus
# overscan.
# framebuffer_width=1280
# framebuffer_height=720

# uncomment if hdmi display is not detected and composite is being output
# hdmi_force_hotplug=1

# uncomment to force a specific HDMI mode (this will force VGA)
hdmi_group=1
hdmi_mode=4

# uncomment to force a HDMI mode rather than DVI. This can make audio work in
# DMT (computer monitor) modes
# hdmi_drive=2

# uncomment to increase signal to HDMI, if you have interference, blanking, or
# no display
# config_hdmi_boost=4

# uncomment for composite PAL
# sdtv_mode=2

# uncomment to overclock the arm. 700 MHz is the default.
# arm_freq=800

# add
kernel=vmlinuz
initramfs initrd.img followkernel
接続先がTVの場合はhdmi_group=1,モニターの場合はhdmi_group=2に設定
- 8: Ubuntu 16.04の更新
$sudo apt-get update
$sudo apt-get upgrade
- 9: PW変更
$sudo passwd ubuntu
- 10: バグフィックス
$sudo touch /var/log/lastlog
- 11: その他
GUI環境は設定しないようにしてください。NextEPCを実行するためのメモリが不足し、Segmentation Faultが発生します。もしGUI環境整備済みの場合はCUI起動設定に変更して下さい。
$sudo systemctl set-default multi-user.target
NextEPCのインストール
- 1: MongoDBのインストール
$sudo apt-get update
$sudo apt-get -y install mongodb
$sudo systemctl start mongodb
- 2: TUN/TAPデバイス設定
$ls -al /dev/net/tun
crw-rw-rw- 1 root root 10, 200 Feb 11  2016 /dev/net/tun

$sudo apt-get install udev
$sudo systemctl start systemd-udevd
$sudo sh -c "cat << EOF > /etc/systemd/network/99-nextepc.netdev
[NetDev]
Name=pgwtun
Kind=tun
EOF"

$sudo systemctl enable systemd-networkd
$sudo systemctl restart systemd-networkd
$sudo apt-get -y install net-tools
$sysctl -n net.ipv6.conf.pgwtun.disable_ipv6
$sudo sh -c "echo 'net.ipv6.conf.pgwtun.disable_ipv6=0' > /etc/sysctl.d/30-nextepc.conf"
$sudo sysctl -p /etc/sysctl.d/30-nextepc.conf
$sudo sh -c "cat << EOF > /etc/systemd/network/99-nextepc.network
[Match]
Name=pgwtun
[Network]
Address=45.45.0.1/16
EOF"

$sudo systemctl restart systemd-networkd
$ifconfig pgwtun
pgwtun    Link encap:UNSPEC  HWaddr 00-00-00-00-00-00-00-00-00-00-00-00-00-00-00-00
          inet addr:45.45.0.1  P-t-P:45.45.0.1  Mask:255.255.0.0
          UP POINTOPOINT RUNNING NOARP MULTICAST  MTU:1500  Metric:1
          RX packets:2 errors:0 dropped:0 overruns:0 frame:0
          TX packets:1 errors:0 dropped:0 overruns:0 carrier:0
          collisions:0 txqueuelen:500
          RX bytes:384 (384.0 B)  TX bytes:28 (28.0 B)
- 3: EPCのインストール
$sudo apt-get -y install autoconf libtool gcc pkg-config git flex bison libsctp-dev libgnutls28-dev libgcrypt20-dev libssl-dev libidn11-dev libmongoc-dev libbson-dev libyaml-dev
$git clone https://github.com/acetcom/nextepc
$cd nextepc
$autoreconf -iv
$./configure --prefix=`pwd`/install
$make -j `nproc`
$make install
- 4: WebUIのインストール
$sudo apt-get -y install curl
$curl -sL https://deb.nodesource.com/setup_8.x | sudo -E bash -
$sudo apt-get -y install nodejs
$cd nextepc/webui
$npm install
$npm run dev &
- 5: WebUIへのログイン
- https://:3000へアクセス
- Username:admin
- Password:1423
- https://:3000へアクセス

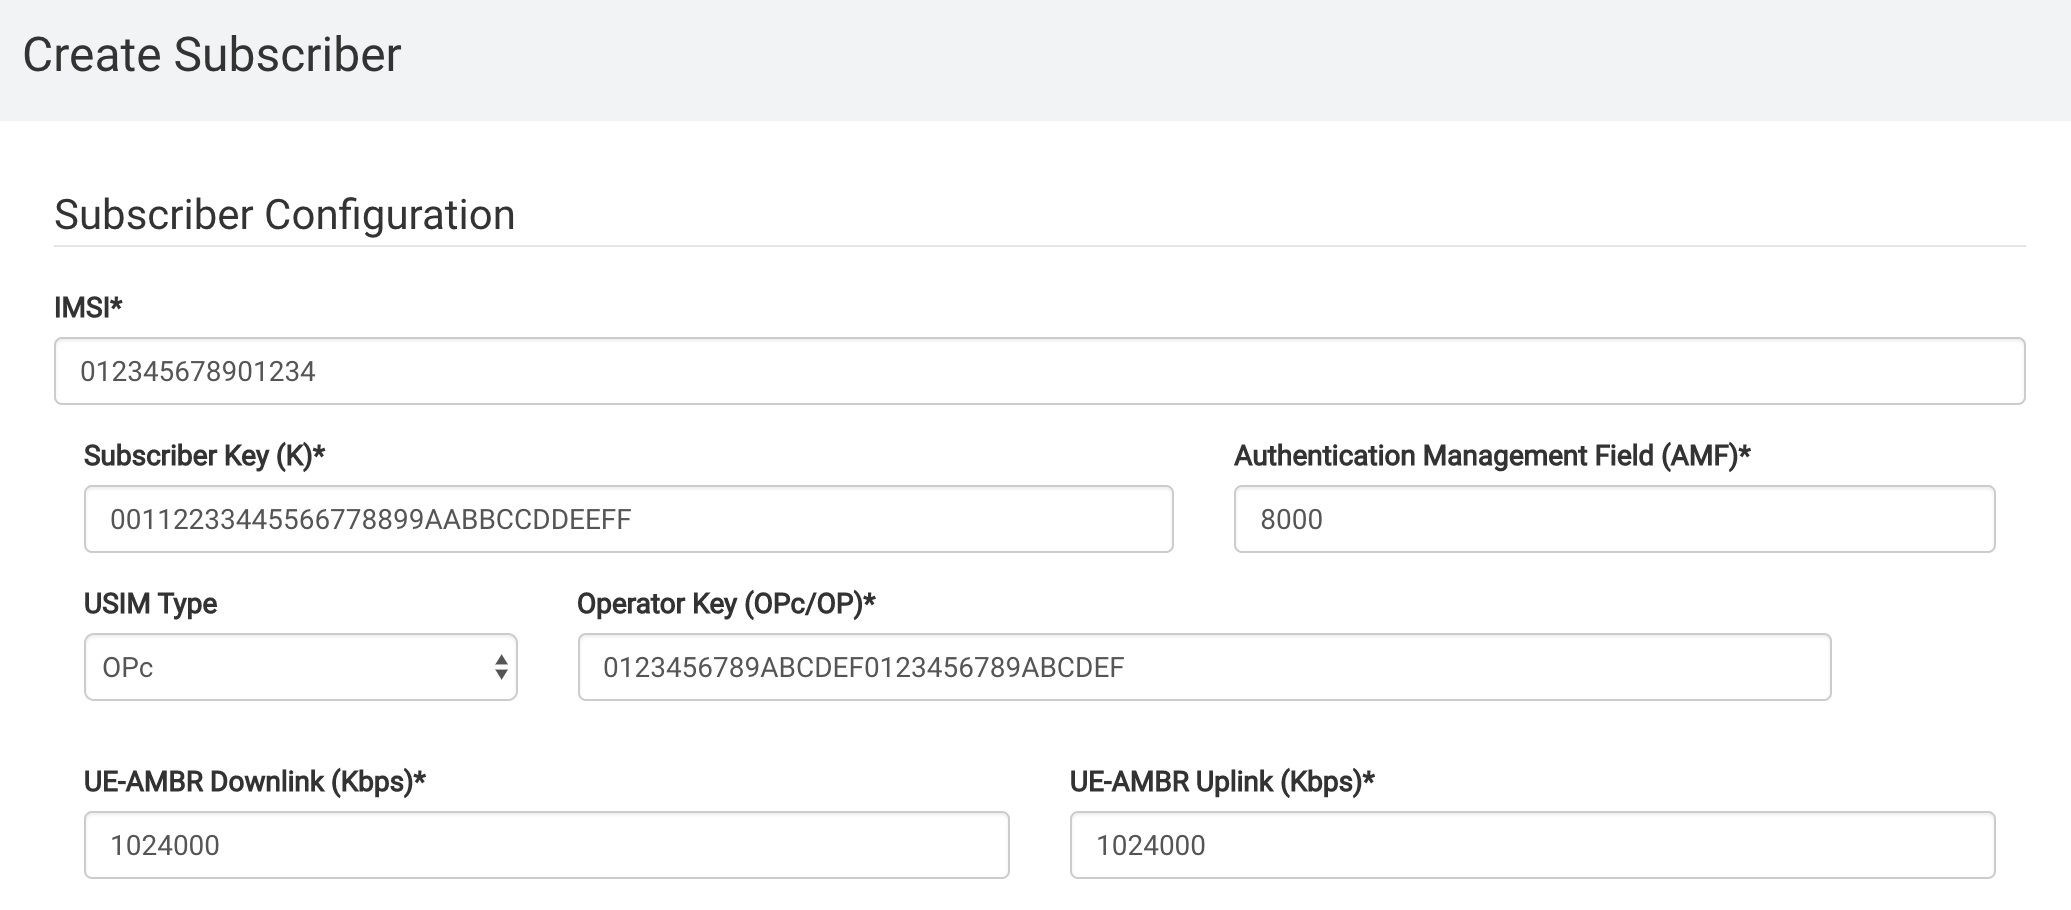
WebUI経由でSIM情報を登録します。
※詳細は次回の記事で記述します。
- 6: EPCの起動
$cd nextepc
$./nextepc-epcd
NextEPC daemon v0.3.10 - Sep  8 2018 06:54:08
  PID[2026] : '/home/ubuntu/nextepc/install/var/run/nextepc-epcd/pid'
  File Logging : '/home/ubuntu/nextepc/install/var/log/nextepc/nextepc.log'
  MongoDB URI : 'mongodb://localhost/nextepc'
  Configuration : '/home/ubuntu/nextepc/install/etc/nextepc/nextepc.conf'
[09/09 05:38:41.402] PCRF try to initialize
[09/09 05:38:43.248] PCRF initialize...done
[09/09 05:38:43.250] PGW try to initialize
[09/09 05:38:43.895] PGW initialize...done
[09/09 05:38:43.896] INFO: CONNECTED TO 'pgw.localdomain' (TCP,soc#7): (fd_logger.c:93)
[09/09 05:38:43.896] gtp_server() [127.0.0.3]:2123
[09/09 05:38:43.896] gtp_server() [127.0.0.3]:2152
[09/09 05:38:43.897] INFO: CONNECTED TO 'pcrf.localdomain' (TCP,soc#10): (fd_logger.c:93)
[09/09 05:38:43.898] SGW try to initialize
[09/09 05:38:43.921] SGW initialize...done
[09/09 05:38:43.921] gtp_server() [127.0.0.2]:2123
[09/09 05:38:43.921] gtp_server() [192.168.100.150]:2152
[09/09 05:38:43.923] HSS try to initialize
[09/09 05:38:44.536] HSS initialize...done
[09/09 05:38:44.536] MME try to initialize
[09/09 05:38:45.876] gtp_server() [192.168.100.150]:2123
[09/09 05:38:45.876] INFO: CONNECTED TO 'mme.localdomain' (TCP,soc#7): (fd_logger.c:93)
[09/09 05:38:45.876] gtp_client() [127.0.0.2]:2123
[09/09 05:38:45.876] MME initialize...done
[09/09 05:38:45.877] INFO: NextEPC daemon start (main.c:157)
[09/09 05:38:45.877] INFO: CONNECTED TO 'hss.localdomain' (TCP,soc#10): (fd_logger.c:93)
[09/09 05:38:45.945] s1ap_server() [192.168.100.150]:36412
終わりに
これら操作で無事Raspberry Pi 3上でNextEPCが起動することができました。これで「LTEコア網」側の設備は構築できたことになります。
次回は「LTE無線基地局」に接続するための「LTEコア網(NextEPC)」側設定方法(各種パラメータ/SIMの登録)を記事にまとめたいと考えています。