久しぶりの投稿です![]()
福岡のPHPerです。この冬に機械学習はじめました。
起こり
ある日、妻から以下のような愚痴を聞かされました![]()
妻:「今日お歳暮を送ったんだけど、お歳暮コーナーのおばちゃんがPC使えなくて住所入力に時間が掛かってイライラした」
私:「あー、なるほど。それはイライラするよね〜。」
と相槌を打ちつつ、住所入力くらい音声認識で簡単に出来るんじゃないかな、ちょっと触ってみようかな、と思い少し調べてみました。
目的
- Webフォームに音声認識を使って住所情報を入力する
有名所なAPIまとめ
音声認識の有名所について調べてみました。結果、今回は Web Speech API とGCPの Cloud Speech API の両方を使ってみることにします。以下、各APIについてです。
Web Speech API
- W3Cコミュニティグループによって策定されている仕様とのこと。ただし、W3C標準ではないみたい。
- Chromeなら動くっぽい
Bing Speech API(Azure)
- Cognitive Servicesの一部。音声・視覚・知識・検索・言語などのコミュニケーション分野に力を入れている模様。
- 音声認識(Bing Speech API)の他にも、Custom Speech Serviceっていう話し方・背景ノイズ・ボキャブラリなどをカスタマイズするサービスがあって、本気でやるときは使いそう。
Speech to Text(IBM Watson)
- 音響的な特徴と言語知識から正確にテキストを書き起こすらしい。
- 長い時間のストリーム音声もOK、カスタマイズ機能により特有の単語や言い回しを追加学習もできる。
- 電話会話音声認識ベンチマークで世界最高の性能とか、みずほ銀行の導入事例とか実績すごい。
Amazon Transcribe(AWS)
- AWS re:Invent 2017で紹介されたサービス。
- 音声や動画をS3に保存し、そのファイルを分析して文章を作るらしいので、AWSの他サービスとの連携が容易そう。
- 本当はこれを使ってみたかったけど、現在は英語・スペイン語しかサポートしてないしPreview版なので今回はやめておいた。
Cloud Speech API(GCP)
- テキストになった結果から不適切なコンテンツをフィルタリングできるみたい。
- REST または gRPC リクエストを送信できるすべての端末に対応している。
- サービスページでさくっと日本語の認識テストができるのがGood

- デモでしっかり住所を認識してくれたので、これも使ってみることに。
Web Speech API
W3Cのサンプルを参考に以下のようにデモページを作成
<!DOCTYPE html>
<html lang='ja'>
  <head>
    <meta charset="UTF-8">
    <title>WebSpeechAPIデモ</title>

    <meta name="viewport" content="width=device-width, initial-scale=1, shrink-to-fit=no">
    <link rel="stylesheet" href="https://maxcdn.bootstrapcdn.com/bootstrap/4.0.0-beta.2/css/bootstrap.min.css">
  </head>

  <body>
    <h1 class="text-center h1">Web Speech API テスト</h1>
    <div id="content">
      <input type="textarea" id="q" name="q" size=60>
      <input type="button" value="Click to Speak" onclick="recognition.start()">
    </div>

    <script src="https://code.jquery.com/jquery-3.2.1.slim.min.js"></script>
    <script src="https://cdnjs.cloudflare.com/ajax/libs/popper.js/1.12.3/umd/popper.min.js"></script>
    <script src="https://maxcdn.bootstrapcdn.com/bootstrap/4.0.0-beta.2/js/bootstrap.min.js"></script>
    <script type="text/javascript" src="./js/recognition.js"></script>
  </body>

</html>
上記のBootstrapとかはただの好みなので、音声認識には関係ないです。
var recognition = new webkitSpeechRecognition();
  recognition.onresult = function(event) {
  if (event.results.length > 0) {
    q.value = event.results[0][0].transcript;
  }
}
デモページで実際に動かしてみると…

ちゃんと動いた!めちゃくちゃ簡単でした![]()
デモページはこちらです。
(マイクへの許可を求められるので、許可する必要があります)
Cloud Speech API
以下の処理フローで行います。
- JavaScriptで音声データをサーバへ送信
- サーバ側(PHP)で音声データをCloud Speech APIに送って結果を取得
なお、以降の開発は以下の環境で行いました。
- OS : CentOS Linux release 7.4.1708
- Apache : Apache/2.4.6 (CentOS)
- PHP : PHP 7.1.7
- PHPフレームワーク : CakePHP 3.5.8
JavaScriptで音声データをサーバへ送信
recorder.jsを使用します。
ほぼ本家のexampleのままですが、↓のような感じです。
<!DOCTYPE html>
<html>

  <head>
    <meta charset="utf-8"/>
    <meta name="viewport" content="width=device-width, initial-scale=1.0">
    <title>Cloud Speech APIデモ</title>

    <script src="https://code.jquery.com/jquery-3.2.1.min.js"></script>
    <script src="/js/recorder.js"></script>
  </head>

  <body>
    <h1 class="text-center h1">Cloud Speech API テスト</h1>
    <div id="content">
      <input type="textarea" id="q" name="q" size=60>
      <button onclick="startRecording(this);">record</button>
      <button onclick="stopRecording(this);" disabled>stop</button>
    </div>

    <script src="/js/cloud_speech.js"></script>
  </body>

</html>
var audio_context;
var recorder;

function startUserMedia(stream) {
  var input = audio_context.createMediaStreamSource(stream);
  recorder = new Recorder(input);
}

function startRecording(button) {
  recorder && recorder.record();
  button.nextElementSibling.disabled = false;
}

function stopRecording(button) {
  recorder && recorder.stop();
  button.disabled = true;
  button.previousElementSibling.disabled = false;

  recorder.exportWAV(function(blob) {
    var form = new FormData();
    form.append('fname', 'test.wav');
    form.append('data', blob);

    $.ajax({
      type: 'POST',
      url: '/upload.json',
      data: form,
      processData: false,
      contentType: false
    }).done(function(data) {
      $('#q').val(data.transcript);
    });
  });

  recorder.clear();
}

window.onload = function init() {
  try {
    // webkit shim
    window.AudioContext = window.AudioContext || window.webkitAudioContext;
    navigator.getUserMedia = navigator.getUserMedia || navigator.webkitGetUserMedia;
    window.URL = window.URL || window.webkitURL;

    audio_context = new AudioContext;
  } catch (e) {
    alert('No web audio support in this browser!');
  }

  navigator.getUserMedia({audio: true}, startUserMedia, function(e) {});
};
サーバ側(PHP)で音声データをCloud Speech APIに送って結果を取得
予め以下の対応が必要です。
- GCP上でCloud Speech APIを有効化
- サービスアカウントキーのJSONを発行後、サーバに配置
- ffmpegコマンドのインストール(音声ファイルの変換に使用する)
次にPHPのクライアント ライブラリのインストールします。
composer require google/cloud
PHPの実装は以下のような感じです。
<?php
namespace App\Controller;

use Google\Cloud\Speech\SpeechClient;

class UploadController extends AppController
{
    private $projectId = '<プロジェクトID>';
    private $keyFilePath = '<アカウントキーのJSONファイルパス>';

    public function index()
    {
        $now = time();
        $originalFile = TMP . $now . $this->request->getData('fname');

        // 音声データをtmp配下に保存
        move_uploaded_file($this->request->getData('data.tmp_name'), $originalFile);

        // 音声データの形式をWAV -> FLACに変換
        $filePath = TMP . $now . 'output.flac';
        $command = sprintf(
            '/usr/bin/ffmpeg -i %s -vn -ar 32000 -ac 1 -acodec flac -f flac %s',
            $originalFile,
            $filePath
        );
        exec($command, $output, $returnVar);

        // Cloud Speech APIにリクエストを送る
		$speech = new SpeechClient([
			'projectId' => $this->projectId,
            'languageCode' => 'ja-JP',
            'keyFilePath' => $this->keyFilePath,
		]);

		$options = [
			'encoding' => 'FLAC',
			'sampleRate' => 32000,
		];

        // 変換後の音声データの中身を取得
        $handle = fopen($filePath, 'r');
        // ハンドルが取れない場合は1秒待って再取得
        if (!$handle) {
            sleep(1);
            $handle = fopen($filePath, 'r');
        }

		$result = $speech->recognize($handle, $options);
		$transcript = (empty($result)) ? '' : $result[0]->alternatives()[0]['transcript'];

		$this->set(compact('transcript'));
    }
}
実行してみると…
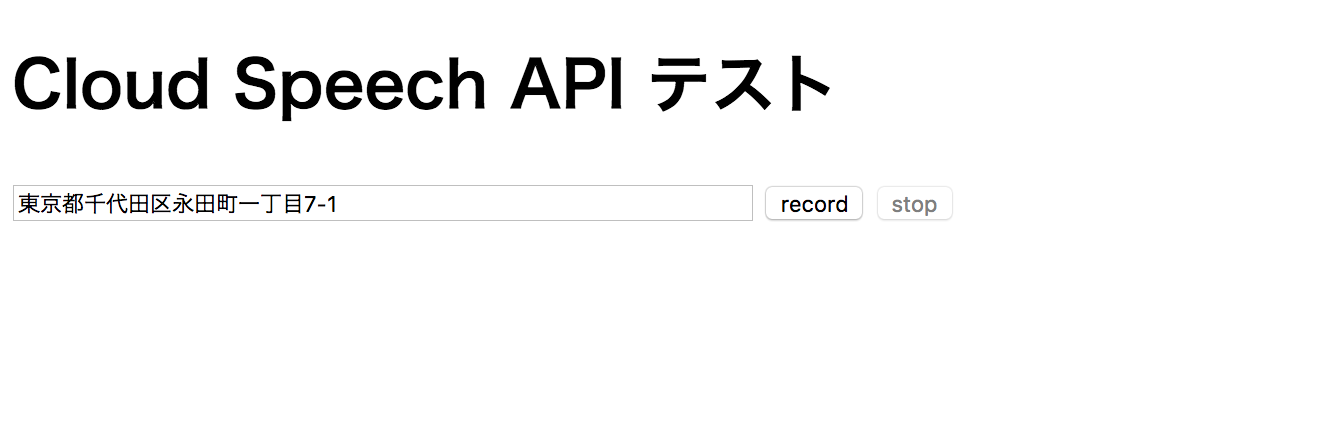
うまくいきました![]()
![]()
なお、お金がかかってしまうのでこちらはデモページは用意していません![]()
参考にしたサイト
大変参考になりました。ありがとうございました![]()
http://www.yoheim.net/blog.php?q=20140701
http://www.cyokodog.net/blog/web-speechi-api/
https://w3c.github.io/speech-api/speechapi.html
https://github.com/mattdiamond/Recorderjs
https://developers.google.com/identity/sign-in/web/devconsole-project
https://qiita.com/snoguchi/items/d12f0407075d7978925c
所感
- Cloud Speech APIのほうは意外と大変だった…
- GCP初めて触ったんですが、AWSと同じような感じだろうと思ったら認証周りが全然異なっていてハマった…
- 音声データ変換周りでうまくコマンドインストールできずにハマった…
- Web Speech APIは使うのは簡単だし、住所レベルならミスも少なそうだった
- リクエスト上限数などはあるのかどうかよくわからなかった
- 対応ブラウザもNotSupportといいつつ、動くものもあるみたいだった。
以上です。