Azureで提供される Windows Server のベースイメージは英語OSのみなので、通常は言語パックをインストールして日本語化し、sysprepしてひな形となるイメージを作成します。今更ですが、このイメージ作成の処理をPackerで自動化してみました。
Packerとは
Packerは仮想マシンのイメージ作成を自動化するためのIaCツールで、HashiCorp社によって提供されています。一時的に仮想マシンを起動し、指定されたセットアップ処理を実行後、イメージの作成と一時環境の削除までを行ってくれます。
初めて触りましたが、クラウドなどのインフラ構成をコード化するTerraformと似たような構文なので、Terraformに馴染みがある場合は学習コストは低い印象です。
環境
ローカルマシンはWindows11ですが、devcontainer上で実行します。
- Ubuntu 22.04.2 LTS
- Packer 1.8.6
{
	"name": "Ubuntu",
	"image": "mcr.microsoft.com/devcontainers/base:jammy",
	"features": {
		"ghcr.io/devcontainers/features/azure-cli:1": {},
		"ghcr.io/devcontainers/features/git:1": {},
		"ghcr.io/devcontainers-contrib/features/packer-asdf:2": {}
	},
	"customizations": {
		"vscode": {
			"extensions": [
				"4ops.packer",
				"cweijan.vscode-office"
			]
		}
	}
}
フォルダ構成
フォルダ構成は以下のような形です。
rejigtry と scripts フォルダは日本語化の処理で使うレジストリとPowerShellスクリプトです。Packer関連のファイルとしては .hcl の3ファイルのみです。
$ tree
.
├── azure-winvm-image.pkr.hcl
├── registry
│   ├── ja-JP-default.reg
│   └── ja-JP-welcome.reg
├── scripts
│   ├── install_language_pack_1.ps1
│   └── install_language_pack_2.ps1
├── variables.auto.pkrvars.hcl
└── variables.pkr.hcl
ソースはGitHubにあげています。
-
azure-winvm-image.pkr.hcl
ビルドの処理を記述するメインのファイルです。
Packerのコードは拡張子がpkr.hclのファイルに記述していきます。ビルド処理の内容は後述。 -
variables.pkr.hcl
変数とビルド処理を一つのファイルにまとめても構いませんが、変数はvariables.pkr.hclに分けました。
ここでは変数の名前と型だけを定義しています。デフォルト値も設定できますが、変数の値は後述のvariables.auto.pkrvars.hclにまとめて書くことにしました。
variable "project" {
  type = string
}

variable "location" {
  type = string
}

variable "resource_group_name" {
  type = string
}

variable "vm_size" {
  type = string
}

variable "gallery_name" {
  type = string
}

variable "image_definition" {
  type = string
}

variable "replication_regions" {
  type = list(string)
}

variable "winrm_password" {
  type = string
}

variable "inbound_ip_addresses" {
  type = list(string)
}
-
variables.auto.pkrvars.hcl
変数の値を定義します。auto.pkrvars.hclで終わる名前を付けるとPackerのコマンド実行時に自動的に読み込んでくれます。Terraformで言うところの*.tfvarsです。書き方も同じでKey=Valueの形式で次のように記述します。
project              = "MyProject"
location             = "japaneast"
resource_group_name  = "packer-rg"
vm_size              = "Standard_DS1_v2"
gallery_name         = "windows_sig"
image_definition     = "2022-datacenter-smalldisk-g2"
replication_regions  = ["japaneast"]
winrm_password       = "P@ssw0rd!"
inbound_ip_addresses = ["xxx.xxx.xxx.xxx"]
ビルド処理
続いて、メインの azure-winvm-image.pkr.hcl の中身について。
Source ブロック
Source ブロックでは、起動するVMに関する設定やイメージの保存先について定義します。
Azureの公式ドキュメント を参考にしつつ、いくつか手を加えたところをかいつまんで記載します。
- ローカル変数でタイムスタンプを定義し、タグとリソースグループ名末尾に付与
- 以下、サービスプリンシパルでの認証は使用せず
use_azure_cli_auth = trueにしてaz loginでサインインする前提(GithubActionsとの統合 を見据えて)- tenant_id
- subscription_id
- client_id
- client_secret
- ベースイメージは win2022 の smalldisk
- スポットVMを使用(
spotを指定) -
allowed_inbound_ip_addressesで接続元IPアドレスを制限(NSGが作成される) - イメージはAzure Compute Galleryに格納(あらかじめ作成しておく)
locals {
  timestamp = formatdate("YYYYMMDDhhmmss", timeadd(timestamp(), "9h"))
  image_version = formatdate("YYYY.MMDD.hhmm", timeadd(timestamp(), "9h"))
}

source "azure-arm" "windowsserver-2022" {
  azure_tags = {
    project = var.project
    created = local.timestamp
  }
  use_azure_cli_auth       = true
  location                 = var.location
  temp_resource_group_name = "tmp-packer${local.timestamp}"
  communicator             = "winrm"
  image_offer              = "WindowsServer"
  image_publisher          = "MicrosoftWindowsServer"
  image_sku                = "2022-datacenter-smalldisk-g2" # az vm image list-skus --location japaneast --publisher MicrosoftWindowsServer --offer WindowsServer --output table
  os_type                  = "Windows"
  vm_size                  = var.vm_size
  spot {
    max_price       = "-1"
    eviction_policy = "Deallocate"
  }

  allowed_inbound_ip_addresses = var.inbound_ip_addresses

  ## Note: Use the following parameters if you are building using an existing virtual network. In that case, disable the `allowed_inbound_ip_addresses` parameter.
  # private_virtual_network_with_public_ip = true
  # virtual_network_name = var.virtual_network_name
  # virtual_network_subnet_name = var.virtual_network_subnet_name
  # virtual_network_resource_group_name = var.virtual_network_resource_group_name

  winrm_insecure = true
  winrm_timeout  = "5m"
  winrm_use_ssl  = true
  winrm_username = "packer"
  winrm_password = var.winrm_password

  ## Note: If you want to save it as a managed image, specify the following parameters.
  # managed_image_name                = "win-2022-smalldisk-image-ja"
  # managed_image_resource_group_name = var.resource_group_name

  ## Note: If saving to Compute Gallery, specify the parameters in the `shared_image_gallery_destination` block.
  ## If you want to save to both, `specify managed_image_*` parameters for both.
  shared_image_gallery_destination {
    resource_group      = var.resource_group_name
    gallery_name        = var.gallery_name
    image_name          = var.image_definition
    image_version       = local.image_version
    replication_regions = var.replication_regions
  }
}
なお、コメントで書いていますが、virtual_network_* のパラメータを使えば既存のVnet上にVMを起動してビルドすることもできます。
また、Azure Compute Gallery を使わない場合は managed_image_* を指定するとマネージドイメージとして保存できます(両方指定も可能)
Build ブロック
Build ブロックには、起動したVM上で行う処理を Source ブロックに続けて記述します。
-
fileプロビジョナーでregistryフォルダのレジストリファイルをVMのCドライブ直下に転送 -
powershellプロビジョナーで、PowerShellコマンドを実行- 第1段階が言語パックのインストール
- 第2段階がもろもろの言語設定
- 言語パックインストール後、言語設定後にWindows再起動
-
windows-restartプロビジョナーを使うとオンラインになるまで待機します(デフォルト5分)
-
- 最後にSysprep実行
build {
  sources = ["source.azure-arm.windowsserver-2022"]

  # Transfer the registry files.
  provisioner "file" {
    source      = "${path.root}/registry/"
    destination = "C:/"
  }

  # Download and install language packs.
  provisioner "powershell" {
    scripts = [
      "${path.root}/scripts/install_language_pack_1.ps1",
    ]
  }

  provisioner "windows-restart" {}

  # Language Settings.
  provisioner "powershell" {
    scripts = [
      "${path.root}/scripts/install_language_pack_2.ps1",
    ]
  }

  provisioner "windows-restart" {}

  # Running Sysprep.
  provisioner "powershell" {
    inline = [
      "while ((Get-Service WindowsAzureGuestAgent).Status -ne 'Running') { Start-Sleep -s 5 }",
      "& $env:SystemRoot\\System32\\Sysprep\\Sysprep.exe /generalize /oobe /mode:vm /quiet /quit",
      "while($true) { $imageState = Get-ItemProperty HKLM:\\SOFTWARE\\Microsoft\\Windows\\CurrentVersion\\Setup\\State | Select ImageState; if($imageState.ImageState -ne 'IMAGE_STATE_GENERALIZE_RESEAL_TO_OOBE') { Write-Output $imageState.ImageState; Start-Sleep -s 10  } else { break } }"
    ]
  }
}
日本語化の処理
前述の通り、言語パックのインストールと言語設定はPowerShellで実行しています。
合間に再起動させるためにファイルを分けていますが、ひとまとめにすると以下のような流れです。
※Windows Server 2022 前提にしていますが、ベースイメージが Windows Server 2019 の場合でもURLとパスを変えれば良いだけです
Write-Host "Download the languagePack for Windows Server 2022"
$downloadPath = "C:\lang.iso"
$downloadUrl = "https://go.microsoft.com/fwlink/p/?linkid=2195333"

# Windows Server 2019
# $downloadUrl = "https://software-download.microsoft.com/download/pr/17763.1.180914-1434.rs5_release_SERVERLANGPACKDVD_OEM_MULTI.iso"

## Note: Download speed is faster with net.webclient than with the Invoke-WebRequest command.
# Invoke-WebRequest -Uri $downloadUrl -OutFile $downloadPath
$wc = New-Object net.webclient
$wc.Downloadfile($downloadUrl, $downloadPath)

Write-Host "Mount ISO."
$mountResult = Mount-DiskImage $downloadPath -PassThru

Write-Host "Get the drive letter of the mounted ISO."
$driveLetter = ($mountResult | Get-Volume).DriveLetter

Write-Host "Stores paths"
$lppath = $driveLetter + ":\LanguagesAndOptionalFeatures\Microsoft-Windows-Server-Language-Pack_x64_ja-jp.cab"

# Windows Server 2019
# $lppath = $driveLetter + ":\x64\langpacks\Microsoft-Windows-Server-Language-Pack_x64_ja-jp.cab"

Write-Host "Install Japanese languagePack using Lpksetup.exe command."
lpksetup.exe /i ja-JP /s /p $lppath

while((Get-Process "lpksetup" -ErrorAction SilentlyContinue) -ne $null) {
    Write-Host "lpksetup process is running."
    Start-Sleep -Seconds 60
}
Write-Host "The process has been completed."

Write-Host "Unmount disk and delete ISO."
DisMount-DiskImage $downloadPath
Remove-Item $downloadPath

Write-Host "Set the language used by the user to Japanese."
Set-WinUserLanguageList -LanguageList ja-JP,en-US -Force

Write-Host "Overwrites the input language with Japanese."
Set-WinDefaultInputMethodOverride -InputTip "0411:00000411"

### Packerのwindows-restartプロビジョナーを使ってここで再起動 ###

Write-Host "Override the UI language with Japanese."
Set-WinUILanguageOverride -Language ja-JP

Write-Host "Set the time/date format to the same as the Windows language."
Set-WinCultureFromLanguageListOptOut -OptOut $False

Write-Host "Location is set to Japan."
Set-WinHomeLocation -GeoId 0x7A

Write-Host "Set the system locale to Japan."
Set-WinSystemLocale -SystemLocale ja-JP

Write-Host "Modify the registry to change the Welcome screen and default user display language."
$DefaultHKEY = "HKU\DEFAULT_USER"
$DefaultRegPath = "C:\Users\Default\NTUSER.DAT"
reg load $DefaultHKEY $DefaultRegPath
reg import "C:\ja-JP-default.reg"
reg unload $DefaultHKEY
reg import "C:\ja-JP-welcome.reg"
Remove-Item "C:\ja-JP-*.reg"

## Note: Switch the language bar to legacy mode if necessary
# Write-Host "Set MS-IME input method."
# Set-WinLanguageBarOption -UseLegacySwitchMode -UseLegacyLanguageBar

## Note: Time zone settings will initialized by Sysprep
# Write-Host "Set the time zone to Tokyo."
# Set-TimeZone -Id "Tokyo Standard Time"
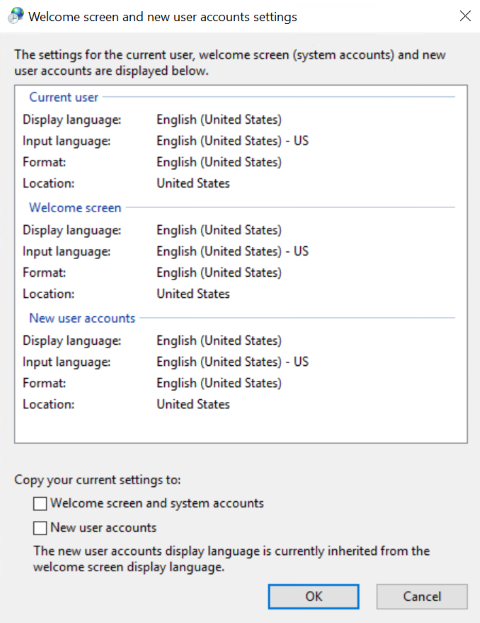
ここでは、GUIで行う処理を一つずつPowerShellで実行しているだけですが、Windows Serverでは以下の画面で行う2つの設定をPowerShellのコマンドで実行することができません。
- Welcomスクリーンの言語設定
- 新しいユーザーの言語設定
なので、レジストリをインポートしてInternational関連のデフォルト値を書き換えて実現しています。
sny0421 さんがGitHubに公開しているものを参考にさせて頂きました(ありがとうございます)
Windows11 であれば Copy-UserInternationalSettingsToSystem で同等のコピー処理ができるようになっているのですが、早く Windows Server にも対応してほしいですね。
Copy-UserInternationalSettingsToSystem -WelcomeScreen $True -NewUser $True
ビルド実行
30分ちょっとくらいで処理は完了しました。
# *.pkr.hclファイルをフォーマット
packer fmt .

# *.pkr.hclファイルの検証
packer validate .

# ビルド実行
packer build .
デバッグ
# 各ステップの間で停止し、キーボード入力を待ってから続行する
packer build -debug .

# エラー発生時に処理を継続するか中断するかを選択する
packer build -on-error=ask .
NSGにRDP許可を追加すればビルド中のVMに接続して確認することもできます。
つまづいたところ
先人達のいくつかのコードを助けに実装しましたが、思ってた以上にハマりました。。
まだ全容は理解していませんが、色々と試行錯誤して良い勉強になりました。
言語パックのダウンロード
言語パックを含むisoはファイルサイズが数GBと巨大ですが、大きいファイルを Invoke-WebRequest でダウンロードすると遅いです。
Start-BitsTransfer を使うと速いのですが、WinRM越しでは実行できないようです。
結果、net.webclient でのダウンロードにしました。
$wc = New-Object net.webclient
$wc.Downloadfile($downloadUrl, $downloadPath)
lpksetupコマンドの挙動
lpksetup は言語パックをコマンドラインでインストールできるツールですが、-f オプションの挙動がよくわからず悩みました。
If the computer must restart, forces a restart even if there are other users logged on to the computer.
これ、インストールが終わったら再起動されるわけではない・・・?
少なくとも、私が試した環境ではいつまで経っても再起動しませんでした。
後で気づいたのですが、ビルド中にOSトリガーで再起動されても困るのでいずれにせよ不要でした。
で、次の処理へ進むためにインストールの処理が終わっているかどうか判定する必要があるので Wait-Proccess で lpksetup が終わるまで待機させるようにしたのですが、なぜか Packer では終了を拾うことができませんでした。代わりに Get-Process のプロセスがなくなるまで While でループさせるようにしました。
タイムゾーンは設定しても意味ない
Sysprep すると初期化されて UTC に戻るので意味ないです。凡ミス。
レジストリファイルのエンコードは UTF-16 LE
UTF-8になっていると一部文字化けします。凡ミス。
スポット VM の指定方法
リファレンスの Azure Resource Manager Builder を見ても Spot のパラメータが載ってない?
Goのドキュメント arm に書いてあった。
まとめ
今回は、Windows Server 2022 を日本語化してイメージ作成する処理を Packer で自動化する手順をご紹介しました。Packer を使うと、Azure VM のイメージ作成を自動化することができます。マルチクラウドのツールなので、AWS の AMI 作成にもよく使われます。
次は GithubActions で Packer を実行できるようにしてみたいと思います。
