はじめに
DIでDagger2を使っていると、いつも「おんやあ?」となるので自分用にメモっておきます。
Dagger2の構成は初心者にはハードルが高いです。
しかもRetrofit2をDIでInjectしようとしたり、引数付きのViewModelを作ろうとするとますます混乱します。
そこでDagger2+Retrofit2(+OkHttp3)+ViewModel(+レイヤードアーキテクチャ)という、よく使う組み合わせのDIの最小構成(たぶん)をこちらに記載しておきます。
※当方DI初心者ですのでおかしいところがあったらガンガン指摘ください。喜びます(マゾ)。
2020/03/17 構成を修正しました。
リポジトリ
https://github.com/nanaten/DaggerRetrofitViewModel
こちらに全体のソースコードを置いておきます。
DIが機能している事を示すために、GitHubのAPI(repos/octocat/Hello-World)にアクセスして結果をトースト表示してます。
※APIへのアクセスにRxJavaも使っていますがそちらは解説しない予定です。
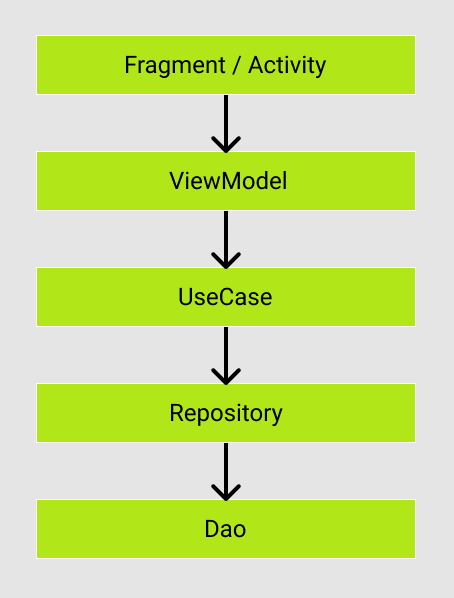
構成
下記のような構成を想定しています。
実装
1. Gradle設定
    final DAGGER_VERSION = '2.25.3'
    final RETROFIT_VERSION = '2.7.0'

    // retrofit
    implementation "com.squareup.retrofit2:adapter-rxjava2:$RETROFIT_VERSION"
    implementation "com.squareup.retrofit2:converter-moshi:$RETROFIT_VERSION"
    implementation "com.squareup.retrofit2:retrofit:$RETROFIT_VERSION"

    // dagger2
    implementation "com.google.dagger:dagger:$DAGGER_VERSION"
    implementation "com.google.dagger:dagger-android:$DAGGER_VERSION"
    implementation "com.google.dagger:dagger-android-support:$DAGGER_VERSION"
    kapt "com.google.dagger:dagger-compiler:$DAGGER_VERSION"
    kapt "com.google.dagger:dagger-android-processor:$DAGGER_VERSION"
    implementation "com.squareup.okhttp3:logging-interceptor:4.2.2"

    // Android Architecture Components
    implementation "androidx.lifecycle:lifecycle-extensions:2.2.0-rc03"
    implementation "androidx.lifecycle:lifecycle-livedata:2.2.0-rc03"
GradleにDagger2, Retrofit2, AACを設定します。
Daggerは2.24、Retrofitは2.5.0が現状の最新です。
2019/12/26 バージョンが間違っていたので修正しました。
Daggerは2.25.3、Retrofitは2.7.0が最新となります。
2020/01/07追記
JakeWharton氏曰く「Gson is deprecated.」との事だったので、GsonからMoshiに変更しました。
2.まずはApplicationとMainActivityの依存関係を注入
基本となるApplicationクラスを作成します。
class App: Application()
AndroidManifest.xmlに登録するのを忘れずに。
    <application
        android:name=".App"
AppをinjectするためにAppModuleを作成します。
@Module
abstract class AppModule {
    @Binds
    abstract fun provideContext(application: App): Context
}
※2019/12/27 10:40 修正
@Component.Factoryを使用した方法に修正を行いました。
@Component.Factoryを使用したDIについてはこちらの記事を参考にさせて頂きました。
AppComponentを作成します。
@Singleton
@Component(
    modules = [
        AndroidInjectionModule::class,
        AppModule::class]
)
interface AppComponent : AndroidInjector<App> {
    @Component.Factory
    interface Factory {
        fun create(@BindsInstance app: App): AppComponent
    }
}
AndroidInjectionModuleを@Componentに追加します。
AndroidSupportInjectionModuleの代わりに使えるModuleです。
DispatchingAndroidInjectorの依存関係を解消してくれるそうです。
ここで、Appクラスに DaggerApplication を継承させるように修正します。
必ず使わなければいけないものではありませんが、DaggerによるDIを少し楽にしてくれます。
DaggerApplication は applicationInjector() をオーバーライドする必要があります。
Appインスタンスをinject出来るように、以下のように実装します。
class App : DaggerApplication() {
    override fun applicationInjector(): AndroidInjector<out DaggerApplication> {
        return DaggerAppComponent.factory()
            .create(this)
    }
}
DaggerAppComponent が赤字になっていると思いますが、一旦ビルドすると、DaggerAppComponentが自動的に生成され、インポート出来るようになります。
ここまででAppクラスのDIが完了しました。
次に、Activityをinject出来るようにしていきます。
@Module
abstract class MainActivityBuilder {
    @ActivityScope
    @ContributesAndroidInjector
    abstract fun bindMainActivity(): MainActivity
}
MainActivityのbindingに@ActivityScopeアノテーションをつけています。
同じScopeを指定したInjectは、ライフサイクルが共通(?)になります。
次に、MainActivityにDaggerAppCompatActivityを継承させます。
DaggerAppCompatActivityがAndroidInjection.inject(this)を代わりにやってくれているため、コードがすっきりします。
class MainActivity : DaggerAppCompatActivity()
AppComponentに、作成した MainActivityBuilder をmodulesとして追加します。
@Singleton
@Component(
    modules = [
        AndroidInjectionModule::class,
        AppModule::class,
        MainActivityBuilder::class] // 追加
)
interface AppComponent : AndroidInjector<App> {
    @Component.Factory
    interface Factory {
        fun create(@BindsInstance app: App): AppComponent
    }
}
ここまででビルドしてもらうと、普通にActivityが立ち上がるようになっているかと思います。
3. Fragmentの依存性を注入する
業務で実装するアプリはFragmentを使用する事が多いと思うので、Fragmentの依存性も注入します。
ここではMainFragmentという名前にします。
MainFragment用のModuleを追加します。
@Module
internal abstract class MainFragmentModule {
    @ContributesAndroidInjector
    abstract fun provideMainFragment(): MainFragment
}
これをMainActivityのModuleとして指定します。
@Module
abstract class MainActivityBuilder {
    @ActivityScope
    @ContributesAndroidInjector(modules = [MainFragmentModule::class]) // 追加
    abstract fun bindMainActivity(): MainActivity
}
MainFragmentにはDaggerFragmentを継承します。
こうする事でHasAndroidInjectorが実装されたFragmentとなるため、AndroidSupportInjection.inject(this)を記述しないで済みます。
class MainFragment : DaggerFragment() {
ここまででApp, Activity, Fragmentのinjectが完了しました。
長くなるので今回はここまで。
次回はRetrofitとViewModelのDIになります。