前提条件
- Windows11
- 商用利用でも無料(例えばDocker Desktopは有料化されたので避けています)
- 筆者と同等の環境を揃えられるように書いていますが読者に最適な環境とは限りません
目標開発環境の要件
gitbashとコマンドプロンプトの両方で以下の確認用スクリプトが動く(echoは意図の解説)
git -v && ssh -V
echo "gitやsshが使える、基礎の基礎"

gcc --version && gfortran --version && make --version
echo "MinGW(Minimalist GNU for Windows)が使える, makeがそのまま使える."

pyenv version && python --version && pip --version && pipenv --version
echo "pyenv-winにより任意のPythonインタプリタバージョンを切り替えて使える. pyenv-winによりPython 3系がインストールされている. pipenvとpyenv-winの連携により任意のPythonバージョンのPipfileを展開できる"

node -v && npm -v && npx -v
echo "NodeJSが使える"

cargo -V
echo "rustが使える。組み込みでもない限りC/C++で新規プロジェクトを立てる理由がない."

docker ps && docker compose ls && kubectl version
echo "Docker Engineが起動している。Docker Compose V2が使える。Kubernetesが使える"
前書き
本稿はWindows 11を工場出荷状態にクリーンインストールしてから開発環境を復旧するマニュアルです.これがあると嬉しい点としては以下があげられます.
- 未経験者が戦力になるまでの時間を短縮できる
- 長年の負債によりCドライブの空き容量が逼迫しても全消去する勇気が持てる
これらの利益を得るために開発環境の復旧は1時間以内に終わらせられるように訓練しておくと良いです.
[図1 終焉のCドライブ]

WSL2は説明不要…カスタムディストリビューションを使いましょう
WSL2はUbuntuに開発環境を加えた自分専用のディストリビューションを作ることができるので今更言うことがありません.初期化初日から事前に準備したカスタムディストリビューションで快適に作業しましょう.組み込み開発者などは特におすすめです.
この辺の記事が参考になります.
手順1. GitとGitBashのインストールと設定
- 上記URLを開き、Windowsアイコンから
64-bit Git for Windows Setupのリンクをクリックし、Git-2.47.1-64-bit(2025/1/12最新)をダウンロード - インストール(いろいろと設定項目がありますが規定値でNextボタンを押していけばいいです)
- (オプション)このタイミングで有識者は
~/.ssh/id_rsaを引き継ぐべきです。リモートレポジトリや外部サーバーへアクセスできるようになります
手順2. gcc, makeなどを含むMinGWのインストール.
- URLを開き7zアーカイブのダウンロードリンクのうち、ファイル名に
x86_64posixsehucrtを含む最新版をダウンロードすればいい - この図では図中下側で青色に選択されている
x86_64-14.2.0-release-posix-seh-ucrt-rt_v12-rev0.7z(2025/1/12最新)をダウンロード

- 圧縮ファイルを展開する.中の
mingw64というディレクトリをホームディレクトリ直下に移動.ホームディレクトリはエクスプローラーのアドレス欄に%USERPROFILE%と打てば開きます。そのなかにドラッグ&ドロップしましょう

x86_64-posix-sehは(Architecture)-(Threads)-(Exception)を意味します.
ArchitectureはCPUアーキテクチャ.x86_64(64bit)とi686(32bit)のいずれかですがWindows11は64bitしかないのでx86_64を選択する
Threadsはスレッドモデル.posix(標準)とwin32(Windowsネイティブ)が選択肢ですが、GNUでRustをビルドしたり, mutexを扱うコードを書く場合にwin32では問題になるのでposixを選択する
Exceptionは例外処理.sef,sijiが選択肢(dwarf-2は32bitのみ)、基本的にはsehが良い
環境変数を設定しPATHを通す
- スタートメニューの🔍に
envと入力しEnterを押すと環境設定画面が開く

- オレンジ矢印に沿ってユーザー環境変数の
Pathに%USERPROFILE%\mingw64\binを追加しOKをクリック

Makeを使えるように設定
- スタートメニューの🔍に
gitbashと入力しEnterを押すとGitBashが開く - 黒い画面に
cd $(dirname $(which mingw32-make)) && ln -s mingw32-make make.exeと入力
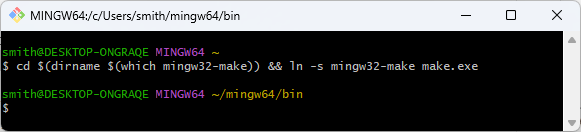
下記引用の事情でmingw-w64をインストールしただけの状態ではmingw32-makeと打たないとmakeが起動しません.そこでmingw32-makeからmake.exeへのシンボリックリンクを貼ります.なお.exe拡張子が付いたシンボリックリンクでないとコマンドプロンプト等からmakeを起動できません(GitBashは拡張子が無くとも実行可能ファイルと認識してくれます).
最後に make コマンドについてちょっと書いておきます *4。 MinGW で提供されている make コマンドには "mingw32-make.exe" という名前が付いており、コマンドプロンプトから使用する場合は "mingw32-make" とコマンドを打たなければいけません。 なぜこのような名前が付いているのかは以下に書いてあります。
(中略)
つまり、MSYS にも make が含まれており、名前の衝突を防ぐために MinGW の make の名前を変更した、ということのようです。 MSYS をインストールして make を使うのであればこのままでいいと思いますが、MSYS をインストールしないのであれば mingw32-make.exe をコピーして make.exe にリネームしてもいいかと思います。
手順3. 最強のPython環境(pyenv + pipenv).
Pythonには様々なインストール手段があります.Hello Worldレベルでいいなら手段はどうでもいいですが,仕事としてPythonを書くならばインタプリタ切替、パッケージ切替、パッケージインストールの三点が揃ったインストール手段を使いましょう.その点で最強なのがpyenvとpipenvの組み合わせです.あらゆるPipfileに対してインタプリタやパッケージのバージョンを気にせず同期できます.
参考記事
Pyenvは公式にはWindowsに対応していないのでPyenv-winというWindows版をインストールします.公式ドキュメントを読むと以下のようなインストール手段があります.
- PowerShell - easiest way
- Git Commands - default way + adding manual settings
- Pyenv-win zip - manual installation
- Python pip - for existing users
本稿では2番目のGit Commandを用いる方法でインストールします.1は外部スクリプトを実行するのが色々リスクなので避けました.
具体的手順
GitBashを開いて以下のコマンドを入力し~/.pyenvにレポジトリをコピーします
# GitBash
git clone https://github.com/pyenv-win/pyenv-win.git ~/.pyenv
次に以下のユーザー環境変数を設定すればPyenvのインストールは完了です.OKボタンを教えて環境変数変更を確定することを忘れないでください
| Variable | Value |
|---|---|
| PYENV | %USERPROFILE%\.pyenv\pyenv-win\ |
| PYENV_HOME | %USERPROFILE%\.pyenv\pyenv-win\ |
| PYENV_ROOT | %USERPROFILE%\.pyenv\pyenv-win\ |
| Path先頭に追加1 | %USERPROFILE%\.pyenv\pyenv-win\bin |
| Path先頭に追加2 | %USERPROFILE%\.pyenv\pyenv-win\shims |
手順通りならユーザー環境変数および環境変数Pathは下図のようになっているはずです。
図中最下のAppData\Local\Microsoft\WindowsAppsはpyenvより上にあるとpythonの起動で競合を起こすので一番下に下げてください(右の下へボタンを使います)
ユーザー環境変数

環境変数Path

この操作は上記記事の以下を参考にしています
If for some reason you cannot execute PowerShell command(likely on an organization managed device), type "environment variables for you account" in Windows search bar and open Environment Variables dialog.
You will need create those 3 new variables in User Variables section(top half). Let's assume username ismy_pc.
|Variable|Value|
|---|---|
|PYENV|C:\Users\my_pc\.pyenv\pyenv-win
|PYENV_HOME|C:\Users\my_pc\.pyenv\pyenv-win
|PYENV_ROOT|C:\Users\my_pc\.pyenv\pyenv-win
And add two more lines to user variablePath.C:\Users\my_pc\.pyenv\pyenv-win\bin C:\Users\my_pc\.pyenv\pyenv-win\shims
pyenvがインストールできたらGitBashを開きなおします
pyenv install 3 pyenv global 3 pip install pipenvのコマンドを叩き最新版のPythonおよびpipenvをインストールします。
smith@DESKTOP-ONGRAQE MINGW64 ~
$ pyenv install 3 # インタプリタVer3.**の最新をインストール
:: [Info] ::  Mirror: https://www.python.org/ftp/python
:: [Info] ::  Mirror: https://downloads.python.org/pypy/versions.json
:: [Info] ::  Mirror: https://api.github.com/repos/oracle/graalpython/releases
:: [Downloading] ::  3.13.1 ...
:: [Downloading] ::  From https://www.python.org/ftp/python/3.13.1/python-3.13.1-amd64.exe
:: [Downloading] ::  To   C:\Users\smith\.pyenv\pyenv-win\install_cache\python-3.13.1-amd64.exe
:: [Installing] ::  3.13.1 ...
:: [Info] :: completed! 3.13.1

smith@DESKTOP-ONGRAQE MINGW64 ~
$ pyenv global 3 # インタプリタVer3.**の最新をグローバルに設定

smith@DESKTOP-ONGRAQE MINGW64 ~
$ python -V # Pythonインストールを確認
Python 3.12.3

smith@DESKTOP-ONGRAQE MINGW64 ~
$ python -V # Pythonインストールを確認
Python 3.12.3

smith@DESKTOP-ONGRAQE MINGW64 ~
$ pip install pipenv
(中略)
Successfully installed certifi-2024.6.2 distlib-0.3.8 filelock-3.15.1 pipenv-2024.0.1 platformdirs-4.2.2 setuptools-70.0.0 virtualenv-20.26.2
手順4. Node.jsのインストール
ビルド済みバイナリにパスを通すのが早いです.
- URLを開いてStandalone Binaryから最新LTS(2025/1/12時点で
node-v22.13.0-win-x64)をダウンロード - 圧縮ファイルを展開する.中の
node-v22.13.0-win-x64というディレクトリをホームディレクトリ直下に移動.ホームディレクトリはエクスプローラーのアドレス欄に%USERPROFILE%と打てば開きます。そのなかにドラッグ&ドロップしましょう - ユーザー環境変数Pathに
%USERPROFILE%\node-v22.13.0-win-x64を追記してPATHを通します
gitbashを開いて以下のようにコマンドが実行出来たら完了です.
smith@DESKTOP-ONGRAQE MINGW64 ~
$ node -v && npm -v && npx -v
v22.13.0
10.9.2
10.9.2
手順5. Rustのインストール
- URLからRUSTUP-INIT.exe(64bit)をクリックし、ダウンロード
- RUSTUP-INIT.exeをダブルクリック
- 以下の手順でGNU版をインストール
3択を提示されますが素直に1(Quick install via the Visual Studio Community installer)で良いです
1とENTERを押しましょう。

Visual Studio Installerのウィザードが始まります。続行ボタンから既定設定のまま続けていきます。


Visual Studio のインストールが終わると以下のように黒い画面に変化があります。もうVisual Studio系のウィンドウ(図中Sign in to Visual Studioなど)は不要なので閉じていいです。
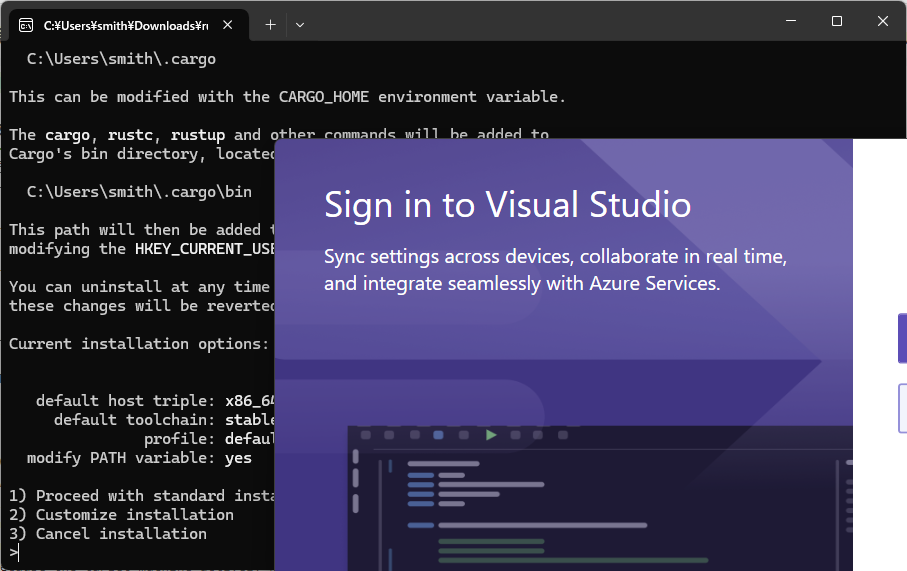
1) Proceed with standard installationで進めるため1とENTERを押しましょう。x86_64-pc-windows-msvcと表示されていることを確認してください。
Current installation options:


   default host triple: x86_64-pc-windows-msvc
     default toolchain: stable (default)
               profile: default
  modify PATH variable: yes

1) Proceed with standard installation (default - just press enter)
2) Customize installation
3) Cancel installation
>1
入力後以下のような文章が続いて出力されます
info: profile set to 'default'
info: default host triple is x86_64-pc-windows-msvc
info: syncing channel updates for 'stable-x86_64-pc-windows-msvc'
info: latest update on 2025-01-09, rust version 1.84.0 (9fc6b4312 2025-01-07)
info: downloading component 'cargo'
  6.9 MiB /   6.9 MiB (100 %)   3.8 MiB/s in  1s ETA:  0s
info: downloading component 'clippy'
info: downloading component 'rust-docs'
 16.5 MiB /  16.5 MiB (100 %)   3.8 MiB/s in  4s ETA:  0s
info: downloading component 'rust-std'
 22.2 MiB /  22.2 MiB (100 %)   3.8 MiB/s in  5s ETA:  0s
info: downloading component 'rustc'
 63.9 MiB /  63.9 MiB (100 %)   3.7 MiB/s in 17s ETA:  0s
info: downloading component 'rustfmt'
info: installing component 'cargo'
info: installing component 'clippy'
info: installing component 'rust-docs'
 16.5 MiB /  16.5 MiB (100 %)   1.9 MiB/s in 13s ETA:  0s
info: installing component 'rust-std'
 22.2 MiB /  22.2 MiB (100 %)  11.1 MiB/s in  2s ETA:  0s
info: installing component 'rustc'
 63.9 MiB /  63.9 MiB (100 %)  13.5 MiB/s in  4s ETA:  0s
info: installing component 'rustfmt'
info: default toolchain set to 'stable-x86_64-pc-windows-msvc'

  stable-x86_64-pc-windows-msvc installed - rustc 1.84.0 (9fc6b4312 2025-01-07)


Rust is installed now. Great!

To get started you may need to restart your current shell.
This would reload its PATH environment variable to include
Cargo's bin directory (%USERPROFILE%\.cargo\bin).

Press the Enter key to continue.
これでRustのインストールは完了です.エンターキーを押して黒い画面を閉じてください。
手順6 Dockerのインストール
Docker Desktop for Windowsは商用利用において有料化されました.フリーランスでもなく、会社がライセンス料を払うわけでもないなら使えません.またインストールには管理者権限を必要とするため情シスの目に留まります.
従業員数250名を超える企業、または年間売上高1000万ドルを超える企業でDocker Desktopを商用利用するには、有料サブスクリプション(Pro、Team、または Business) が必要です。
そこでRancher Desktopをインストールします.DockerやDocker Composeのコマンドがそのまま使えるオープンソースプロジェクトです
具体的手順
- 上記URLのDownload for Windows (x64)から
Rancher.Desktop.Setup.**.exeをダウンロードしインストールします- インストール前に管理者権限でPowerShellを開き
wsl --installというコマンドを叩いておきましょう
- インストール前に管理者権限でPowerShellを開き
- インストール完了後、再起動してください
- インストール過程で様々なシステム設定が変更されるので再起動したほうがいいです
- 再起動後、スタートメニューからRancher Desktopを起動。以下のような画面が出てくるはずでそのままAcceptをクリック

- 以下のようにdockerの基本的なコマンドが使えるようになります
$ docker ps && docker compose ls && kubectl version
CONTAINER ID   IMAGE     COMMAND   CREATED   STATUS    PORTS     NAMES
NAME                STATUS              CONFIG FILES
Client Version: v1.29.2
Kustomize Version: v5.0.4-0.20230601165947-6ce0bf390ce3
Unable to connect to the server: dial tcp [::1]:8080: connectex: No connection could be made because the target machine actively refused it.
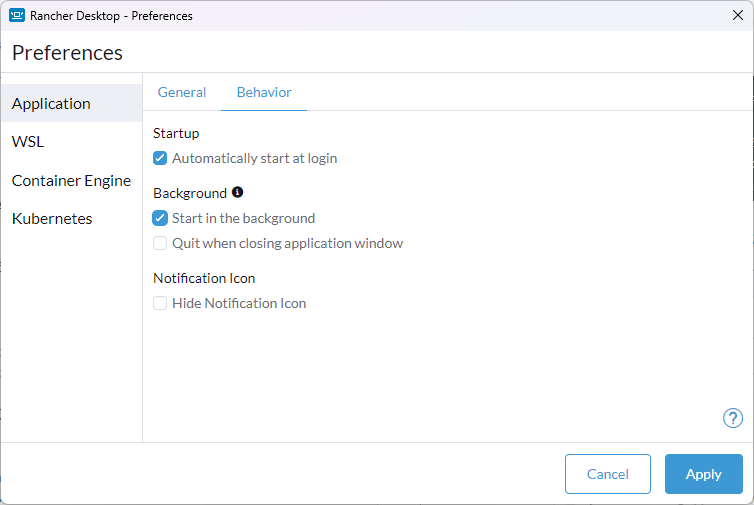
- Preference>>Application>>Behaviorに進み、Automatically start at login と Start in the backgroundにチェックを入れてApplyをクリックしておきます。Dockerは常に起動している方が生産性高いです。
手順7 細かい設定
- Windows TerminalにGitBash(
C:\Program Files\Git\bin\bash.exe)の登録 - ~/.sshの設定など
環境変数の確認
以上で手順は終わりです。
手順通り進めばこのように設定されているはず
| 環境変数 | 値 |
|---|---|
| Pathに含まれている | C:\Users\ユーザー名\.cargo\bin; %USERPROFILE%\.pyenv\pyenv-win\bin; %USERPROFILE%\.pyenv\pyenv-win\shims; %USERPROFILE%\mingw64\bin; %USERPROFILE%\node-v20.14.0-win-x64; |
| PYENV | C:\Users\ユーザー名\.pyenv\pyenv-win\ |
| PYENV_HOME | C:\Users\ユーザー名\.pyenv\pyenv-win\ |
| PYENV_ROOT | C:\Users\ユーザー名\.pyenv\pyenv-win\ |
最後に
貴方の御用のためにお使いください
おまけ:Dockerfileで同じ環境を実現する(CI/CDなどに)
FROM ubuntu:24.04
#Makefile
#setup:
#	cat Dockerfile | sed -n -E 's/^RUN\s+(.*)/\1/p; s/^(#.*)/\1/p'
#build:
#	docker build . -t lzpel/home
#env: build
#	sed -i '/^\s*[Ee][Nn][Vv] /d' Dockerfile
#	docker run --rm -it lzpel/home bash -l -c printenv | sed -E -e 's/^([^=]*)=(.*)/\1="\2"/' -e '1s/^/ENV\n/' | paste -sd' ' >> Dockerfile
#test: build
#	docker run --rm -it lzpel/home sh -c "cargo version && python --version && pip --version && pipenv --version && npm -v"
SHELL ["/bin/bash", "-o", "pipefail", "-l", "-c"]
WORKDIR /root
# bash -l -c で~/profileや~/.bashrcなどの変更を取り込んでコマンドを実行しているのがコツ
RUN apt update -y && apt upgrade -y && \
# https://github.com/pyenv/pyenv/wiki#suggested-build-environment
apt install -y build-essential libssl-dev zlib1g-dev libbz2-dev libreadline-dev libsqlite3-dev curl git libncursesw5-dev xz-utils tk-dev libxml2-dev libxmlsec1-dev libffi-dev liblzma-dev &&\
apt clean && rm -rf /var/lib/apt/lists/*
RUN curl --proto '=https' --tlsv1.2 -sSf https://sh.rustup.rs | sh -s -- -y &&\
source $HOME/.cargo/env && cargo install wasm-pack && rm -rf ~/.cargo/registry ~/.cargo/git /tmp/*
RUN git clone https://github.com/pyenv/pyenv.git ~/.pyenv &&\
echo 'export PYENV_ROOT="$HOME/.pyenv"' >> ~/.profile &&\
echo 'export PATH="$PYENV_ROOT/bin:$PATH"' >> ~/.profile &&\
echo 'eval "$(pyenv init -)"' >> ~/.profile
RUN pyenv install 3 && pyenv global 3 && pip install --no-cache-dir pipenv
RUN curl -o- https://raw.githubusercontent.com/nvm-sh/nvm/v0.40.2/install.sh | PROFILE="$HOME/.profile" bash
RUN nvm install --lts
ENV PYENV_SHELL="bash" NVM_INC="/root/.nvm/versions/node/v22.14.0/include/node" HOSTNAME="4dd53b6ddcbe" HOMEBREW_PREFIX="/home/linuxbrew/.linuxbrew" PWD="/root" HOME="/root" INFOPATH="/home/linuxbrew/.linuxbrew/share/info:/home/linuxbrew/.linuxbrew/share/info:/home/linuxbrew/.linuxbrew/share/info:/home/linuxbrew/.linuxbrew/share/info:/home/linuxbrew/.linuxbrew/share/info:/home/linuxbrew/.linuxbrew/share/info:/home/linuxbrew/.linuxbrew/share/info:/home/linuxbrew/.linuxbrew/share/info:/home/linuxbrew/.linuxbrew/share/info:" NVM_DIR="/root/.nvm" TERM="xterm" HOMEBREW_CELLAR="/home/linuxbrew/.linuxbrew/Cellar" SHLVL="0" NVM_CD_FLAGS="" HOMEBREW_REPOSITORY="/home/linuxbrew/.linuxbrew/Homebrew" PYENV_ROOT="/root/.pyenv" PATH="/root/.pyenv/shims:/root/.pyenv/bin:/root/.pyenv/bin:/root/.pyenv/bin:/root/.pyenv/bin:/root/.pyenv/bin:/root/.pyenv/bin:/root/.pyenv/bin:/home/linuxbrew/.linuxbrew/bin:/home/linuxbrew/.linuxbrew/sbin:/home/linuxbrew/.linuxbrew/bin:/home/linuxbrew/.linuxbrew/sbin:/home/linuxbrew/.linuxbrew/bin:/home/linuxbrew/.linuxbrew/sbin:/home/linuxbrew/.linuxbrew/bin:/home/linuxbrew/.linuxbrew/sbin:/home/linuxbrew/.linuxbrew/bin:/home/linuxbrew/.linuxbrew/sbin:/home/linuxbrew/.linuxbrew/bin:/home/linuxbrew/.linuxbrew/sbin:/home/linuxbrew/.linuxbrew/bin:/home/linuxbrew/.linuxbrew/sbin:/home/linuxbrew/.linuxbrew/bin:/home/linuxbrew/.linuxbrew/sbin:/root/.cargo/bin:/root/.nvm/versions/node/v22.14.0/bin:/home/linuxbrew/.linuxbrew/bin:/home/linuxbrew/.linuxbrew/sbin:/usr/local/sbin:/usr/local/bin:/usr/sbin:/usr/bin:/sbin:/bin" NVM_BIN="/root/.nvm/versions/node/v22.14.0/bin" _="/usr/bin/printenv"