概要
Ubuntu22.04にMySQL8.0.30をインストールします。
Ubuntu22.04でsudo apt installコマンド実行によってインストールされるMySQLのバージョンを調べると8.0.30でした。(2022/08/08現在)
$ sudo apt update
$ sudo apt search mysql

手順1 MySQLをインストール
$ sudo apt update
$ sudo apt install mysql-server mysql-client
$ sudo systemctl start mysql.service
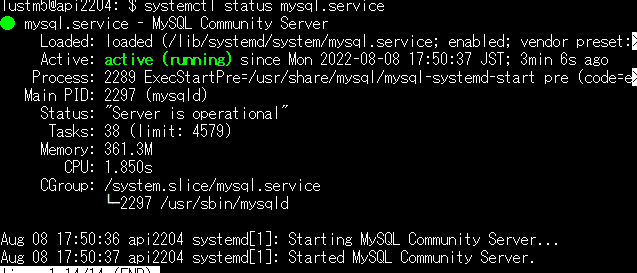
$ systemctl status mysql.service
activeになっていればOKです。(この画面はCtrl+Cで抜けられます。)
手順2 MySQLのrootユーザのパスワード設定
手順3のセキュリティスクリプトをそのまま実行するとエラーが出てしまうため、先にMySQLにログインしてMySQLのrootユーザの認証方法とパスワードを変更・設定します。手順4で元の認証方法に戻します。
$ sudo mysql -u root
[sudo] password for lustm5: (Ubuntuのsudoパスワードを入力)
mysql> ALTER USER 'root'@'localhost' IDENTIFIED WITH mysql_native_password BY 'HukuzatuP@ssw0rd';
mysql> exit
手順3 セキュリティスクリプトの実行
セキュリティスクリプトを実行してセキュリティオプションを変更します。
$ sudo mysql_secure_installation
自分はエラーが出たため手順3→手順2→手順3とやっていて、以下のメッセージは2回目の手順3のものです。最初から手順2→手順3と進めた場合のメッセージとは少し違うかもしれないですがご参考なさってください。パスワード強度はどうするかと聞かれるかもしれません。パスワードを変えるかどうかはn、それ以外はすべてyで進めました。
lustm5@api2204:~$ sudo mysql_secure_installation

Securing the MySQL server deployment.

Enter password for user root: (HukuzatuP@ssw0rdを入力)
The 'validate_password' component is installed on the server.
The subsequent steps will run with the existing configuration
of the component.
Using existing password for root.

Estimated strength of the password: 100
Change the password for root ? ((Press y|Y for Yes, any other key for No) : n

 ... skipping.
By default, a MySQL installation has an anonymous user,
allowing anyone to log into MySQL without having to have
a user account created for them. This is intended only for
testing, and to make the installation go a bit smoother.
You should remove them before moving into a production
environment.

Remove anonymous users? (Press y|Y for Yes, any other key for No) : y
Success.


Normally, root should only be allowed to connect from
'localhost'. This ensures that someone cannot guess at
the root password from the network.

Disallow root login remotely? (Press y|Y for Yes, any other key for No) : y
Success.

By default, MySQL comes with a database named 'test' that
anyone can access. This is also intended only for testing,
and should be removed before moving into a production
environment.


Remove test database and access to it? (Press y|Y for Yes, any other key for No) : y
 - Dropping test database...
Success.

 - Removing privileges on test database...
Success.

Reloading the privilege tables will ensure that all changes
made so far will take effect immediately.

Reload privilege tables now? (Press y|Y for Yes, any other key for No) : y
Success.

All done!
手順4 MySQLのrootユーザのパスワード設定を戻す
手順2で変えたMySQLのrootユーザの認証方法をデフォルトのauth_socketに戻します。パスワード認証のままでよければ飛ばしても問題ありません。
$ mysql -u root -pHukuzatuP@ssw0rd
mysql> ALTER USER 'root'@'localhost' IDENTIFIED WITH auth_socket;
mysql> exit
$ sudo mysql -u root
[sudo] password for lustm5: (Ubuntuのsudoパスワードを入力)
sudo mysql -u rootでちゃんとログイン出来たら作業完了です。
デフォルトのauth_socketは、MySQLのユーザ名とUbuntuのユーザ名が一致している場合に接続を許可するという認証方式です。そのため、rootという名前のユーザが作れないUbuntuでは、mysqlの前にsudoを付けてログインします。付けない場合はエラーが出てログインできません。
