Rails5.2でStripeを使うで紹介していたAPIで警告が出るようになってしまったので、新しいバージョンを利用するための簡単なサンプルです。公式ドキュメント「Accept a payment」の流れとほぼ同じです(Rubyのところだけ切り取った感じ)。以下のようなクレジットカード決済ページをサイトに組み込みます。

前提として、docker-composeでRails5.2開発環境で紹介している手順でrailsのアプリが立ち上がった状態から開始しています。
まずはgemを追加します。
gem 'stripe'
アクションを2つ持ったコントローラを作成します。
docker-compose exec web rails g controller Pages payment1 payment2
単品の購入に必要な実装
支払いボタンを置きたいページの前処理でsessionを生成します。ここで商品の価格などを指定できます。
def payment1
  # Set your secret key. Remember to switch to your live secret key in production!
  # See your keys here: https://dashboard.stripe.com/account/apikeys
  Stripe.api_key = Rails.application.credentials.stripe_secret_key

  @session = Stripe::Checkout::Session.create(
    payment_method_types: ['card'],
    line_items: [{
      price_data: {
        currency: 'jpy',
        product_data: {
          name: 'サンプル商品',
        },
        unit_amount: 1980,
      },
      quantity: 1,
    }],
    mode: 'payment',
    success_url: request.base_url + '/pages/payment2?session_id={CHECKOUT_SESSION_ID}',
    cancel_url: request.base_url + '/pages/payment1',
  )
end
StripeのAPIにアクセスするための秘密鍵は直接コードに書かず、railsのcredentialsに保管します。以下のコマンドは、docker環境で立ち上げている場合です(エディタの選択などはお好みで…)。
docker-compose exec web apt install nano
docker-compose exec -e EDITOR=nano web rails credentials:edit
秘密鍵を記載して保存します。Stripeにログインした状態でドキュメントを読むとテスト用の鍵が既に埋め込まれた状態になっているので、それをそのまま使います。プロダクション環境用のキーはダッシュボードから別途取得する必要があります。
stripe_secret_key: sk_test_xxxxxx
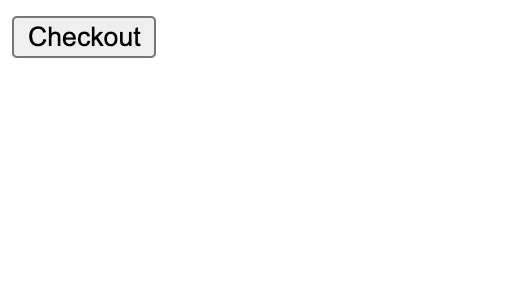
支払いボタンの配置は以下のような形。buttonタグ自体はいたってシンプルなので、それぞれのサイトに合わせてデザインを調整するのに便利そうです。
<script src="https://js.stripe.com/v3/"></script>
<button id="checkout-button">Checkout</button>

<script>
  var stripe = Stripe('pk_test_DfoKFBIrAGKhxBbDgP0G954e');
  var checkoutButton = document.getElementById('checkout-button');

  checkoutButton.addEventListener('click', function() {
    stripe.redirectToCheckout({
      // Make the id field from the Checkout Session creation API response
      // available to this file, so you can provide it as argument here
      // instead of the {{CHECKOUT_SESSION_ID}} placeholder.
      sessionId: '<%= @session.id %>'
    }).then(function (result) {
      // If `redirectToCheckout` fails due to a browser or network
      // error, display the localized error message to your customer
      // using `result.error.message`.
    });
  });
</script>
/pages/payment1
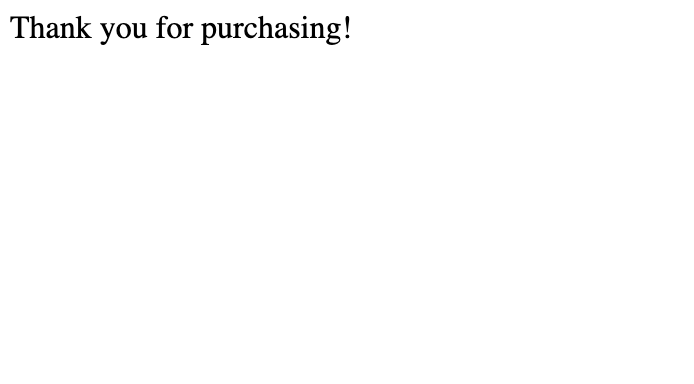
決済完了のページには、メッセージだけ置いています。
<p>Thank you for purchasing!</p>
/pages/payment2
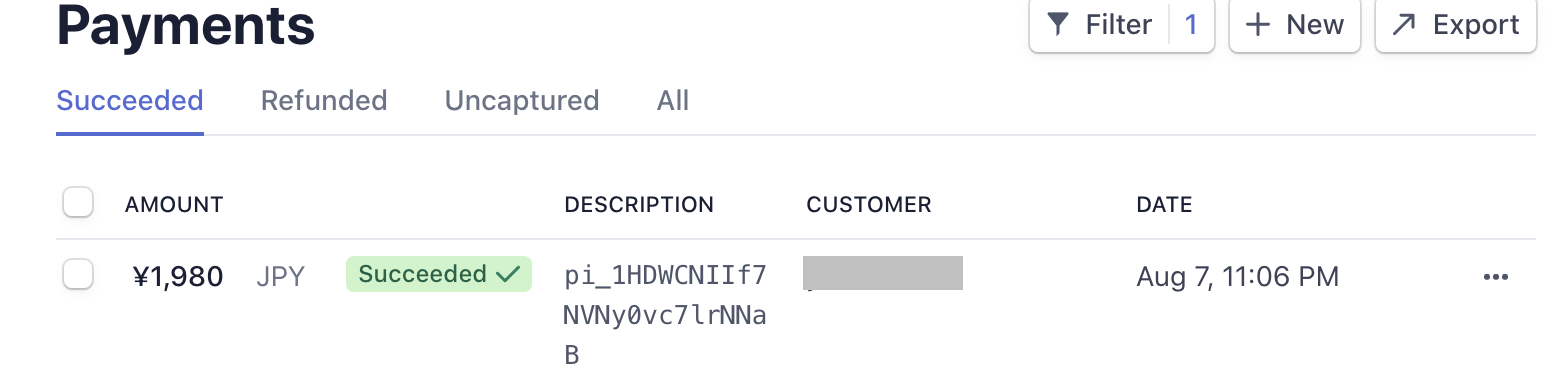
実際にテスト用のカード情報を入力すると、ダッシュボードに取引の結果が表示されていることを確認できます(返金処理などはここから可能です)。
(おまけ)購読の申込
同じく、Sessionオブジェクトからサブスクリプションも作成することが可能です。申し込んだ後の状態管理が大切ですので、実際にはこのようにサブスクリプションを作りっぱなしの実装にはならないかと思いますが、ごく簡単なフローとしてはこれだけで実装可能です。webhookの実装方法などは公式ドキュメントを参照してください。
def subscription1
  Stripe.api_key = Rails.application.credentials.stripe_secret_key

  @session = Stripe::Checkout::Session.create(
    payment_method_types: ['card'],
    line_items: [{
      price_data: {
        currency: 'jpy',
        product_data: {
          name: '月額メンバー',
        },
        unit_amount: 360,
        recurring: {interval: "month"}
      },
      quantity: 1,
    }],
    mode: 'subscription',
    success_url: request.base_url + '/pages/payment2?session_id={CHECKOUT_SESSION_ID}',
    cancel_url: request.base_url + '/pages/subscription1',
  )
end