AWSでWEB3層構造の構築にチャレンジしてみました。
前回の記事の続きです。
- AWSでWEB3層構造の構築①(WEB3層構造の基礎)
- AWSでWEB3層構造の構築②(VPC、サブネット、NW設定、インスタンス起動、SSH接続)
- AWSでWEB3層構造の構築③(WEBサーバ、APサーバの構築と連携)
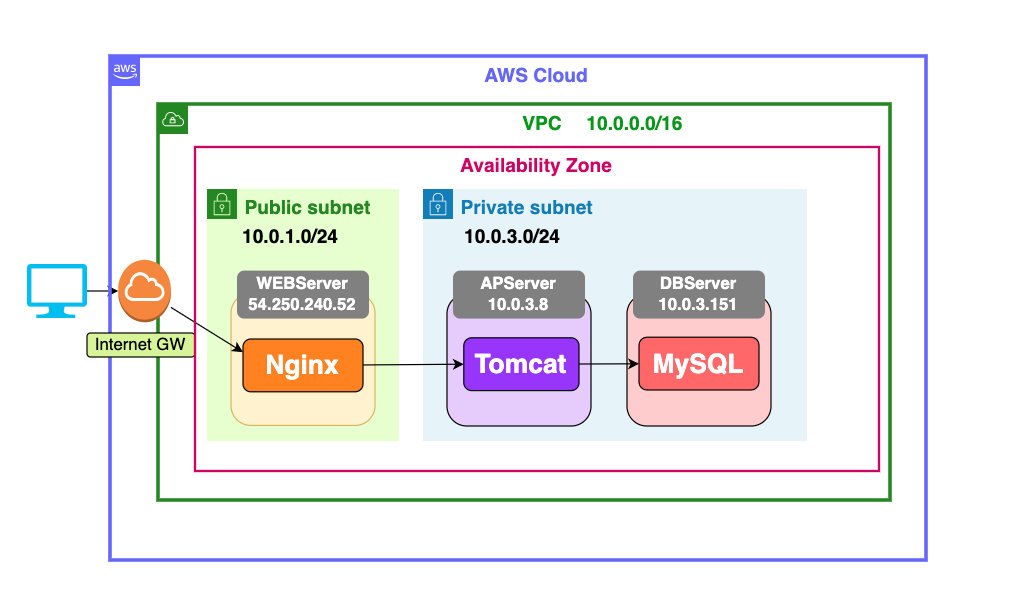
作りたい環境は以下の図の通りです。
1. DBサーバ構築
MySQLをインストールして、DBサーバを構築していきます。
AmazonLinuxには標準でMariaDBというデータベースが入っていますが、MySQLをインストールする際に競合するため、mariadbを先に削除しておきます。
$ sudo yum list installed | grep mariadb
mariadb-libs.x86_64                   1:5.5.68-1.amzn2                 installed
MariaDBが入っていることを確認した

$ sudo yum -y remove mariadb-libs.x86_64
Complete!
次にMySQLのリポジトリをインストールします。
リポジトリのURLは以下を参照。
$ sudo wget http://dev.mysql.com/get/mysql80-community-release-el7-7.noarch.rpm

$ sudo yum localinstall -y mysql80-community-release-el7-7.noarch.rpm

complete!が出ればOK

$ sudo yum install -y mysql-community-server
MySQLのサーバー機能をインストール

$ sudo mysqld --version
/usr/sbin/mysqld  Ver 8.0.32 for Linux on x86_64 (MySQL Community Server - GPL)

インストール完了
MySQLデータベースで利用する文字コードに UTF-8 を指定し、文字化け対策をするために設定ファイル(/etc/my.cnf)を変更します。
$ sudo vi /etc/my.cnf

[mysqld]節に以下を追記
character_set_server=utf8
skip-character-set-client-handshake

$ sudo systemctl restart mysqld
再起動して設定を反映

$ sudo systemctl enable mysqld
MySQL自動起動設定をON

$ sudo systemctl list-unit-files | grep mysqld
mysqld.service                                enabled
自動起動のONを確認
MySQLへログインする際のパスワードを変更します。
$ sudo cat /var/log/mysqld.log | grep password
2023-01-25T05:12:16.775407Z 6 [Note] [MY-010454] [Server] A temporary password is generated for root@localhost: k4g(L<fguWMp

初期パスワードは k4g(L<fguWMp

$ sudo mysql_secure_installation

Securing the MySQL server deployment.

Enter password for user root:初期パスワード

The existing password for the user account root has expired. Please set a new password.

New password: 任意の新しいパスワード

Re-enter new password: 任意の新しいパスワード

The 'validate_password' plugin is installed on the server.
The subsequent steps will run with the existing configuration
of the plugin.
Using existing password for root.

Estimated strength of the password: 100
Change the password for root ? ((Press y|Y for Yes, any other key for No) : yを入力

New password: 任意の新しいパスワード

Re-enter new password: 任意の新しいパスワード

Estimated strength of the password: 100
Do you wish to continue with the password provided?(Press y|Y for Yes, any other key for No) : yを入力

By default, a MySQL installation has an anonymous user,
allowing anyone to log into MySQL without having to have
a user account created for them. This is intended only for
testing, and to make the installation go a bit smoother.
You should remove them before moving into a production
environment.

Remove anonymous users? (Press y|Y for Yes, any other key for No) : yを入力
Success.


Normally, root should only be allowed to connect from
'localhost'. This ensures that someone cannot guess at
the root password from the network.

Disallow root login remotely? (Press y|Y for Yes, any other key for No) : yを入力
Success.

By default, MySQL comes with a database named 'test' that
anyone can access. This is also intended only for testing,
and should be removed before moving into a production
environment.


Remove test database and access to it? (Press y|Y for Yes, any other key for No) : yを入力
 - Dropping test database...
Success.

 - Removing privileges on test database...
Success.

Reloading the privilege tables will ensure that all changes
made so far will take effect immediately.

Reload privilege tables now? (Press y|Y for Yes, any other key for No) : yを入力
Success.

All done!
ユーザーrootのパスワードの設定を終えたので、MySQLへログインしてみます。
$ mysql -u root -p
Enter password: 新しいパスワード
mysql> show variables like '%chara%';
+--------------------------+--------------------------------+
| Variable_name            | Value                          |
+--------------------------+--------------------------------+
| character_set_client     | utf8mb3                        |
| character_set_connection | utf8mb3                        |
| character_set_database   | utf8mb3                        |
| character_set_filesystem | binary                         |
| character_set_results    | utf8mb3                        |
| character_set_server     | utf8mb3                        |
| character_set_system     | utf8mb3                        |
| character_sets_dir       | /usr/share/mysql-8.0/charsets/ |
+--------------------------+--------------------------------+
8 rows in set (0.01 sec)
文字コードがutf8になっていることを確認
続いて、MySQLで参照するためのDBを用意するため、以下からworld databaseをインポートしました。
$ sudo wget https://downloads.mysql.com/docs/world-db.tar.gz

$ tar -zxvf world-db.tar.gz
world-db/
world-db/world.sql
MySQLにログインし、SOURCEコマンドにてworld-db.sqlをインポートします。
mysql> source world-db/world.sql

mysql> show databases;
+--------------------+
| Database           |
+--------------------+
| information_schema |
| mysql              |
| performance_schema |
| sys                |
| world              |
+--------------------+
データベースに"world"がインポートされた事を確認

mysql> use world;
Database changed
データベースをworldに変更

mysql> show tables;
+-----------------+
| Tables_in_world |
+-----------------+
| city            |
| country         |
| countrylanguage |
+-----------------+
テーブルが存在することを確認
APサーバからMySQLがインストールされているDBサーバアクセスをするため、以下のデータベース用のユーザーを新規作成し以下の権限追加を行います。
ユーザー名:testuser
パスワード:Pass1234%
mysql> CREATE USER testuser@'%' IDENTIFIED BY 'Pass1234%';
Query OK, 0 rows affected (0.00 sec)

mysql> GRANT ALL ON world.* TO testuser@'%';
Query OK, 0 rows affected (0.00 sec)

mysql> FLUSH PRIVILEGES;
変更した権限を反映

mysql> SHOW GRANTS FOR 'testuser';
+-----------------------------------------------------+
| Grants for testuser@%                               |
+-----------------------------------------------------+
| GRANT USAGE ON *.* TO `testuser`@`%`                |
| GRANT ALL PRIVILEGES ON `world`.* TO `testuser`@`%` |
+-----------------------------------------------------+
2 rows in set (0.00 sec)
testuserにworldデータベースに関する全ての権限が付与されました。
以上でDBサーバの構築は完了です。
2. APサーバとDBサーバの連携
APサーバとDBサーバを連携するために(JSPからMySQLにアクセスするために)、まずはAPサーバにJDBCドライバをインストールします。
| 用語 | 意味 |
|---|---|
| JSP | HTMLの中にJavaのコードを埋め込んで実行させるための仕組み。つまり、Javaの実行結果をHTMLとして出力させて、動的なページを生成することが可能となる。 |
| JDBCドライバ | JavaプログラムからデータベースにアクセスするためのAPI(Application Programming Interface)のこと。 |
以下の手順でインストールします。
$ sudo yum -y install mysql-connector-java
/usr/share/java/配下に置かれたJDBCドライバ(mysql-connector-java.jar)を、lib配下に移動します。
$ sudo mv /usr/share/java/mysql-connector-java.jar /opt/tomcat/lib/

$ sudo chown tomcat:tomcat /opt/tomcat/lib/mysql-connector-java.jar
所有者を変更
続いて、/opt/tomcat/webapps配下にjspディレクトリを作成し、/opt/tomcat/webapps/jsp配下にtest.jspを作成します。
$ sudo mkdir /opt/tomcat/webapps/jsp

$ sudo touch /opt/tomcat/webapps/jsp/test.jsp

$ sudo chown tomcat:tomcat /opt/tomcat/webapps/jsp/test.jsp

$ sudo chmod 750 /opt/tomcat/webapps/jsp/test.jsp

$ sudo vi /opt/tomcat/webapps/jsp/test.jsp

###test.jspの中身###

<%@ page contentType="text/html; charset=utf-8" import="java.sql.*" %>

<html>
<head>
<title>Hello! World</title>
</head>

<body>
<h1>Hello! World</h1>

<tr>
<td>ID</td> <td>Name</td> <td>CountryCode</td> <td>District</td> <td>Population</td>
</tr>

<%
    Class.forName("com.mysql.jdbc.Driver");
    Connection conn=DriverManager.getConnection("jdbc:mysql://10.0.3.151:3306/world?" +
    "user=testuser&password=Pass1234%&useUnicode=true&characterEncoding=utf-8");
    Statement st=conn.createStatement();
    ResultSet res = st.executeQuery("select * from city;");

    while(res.next()){
        out.println("<tr>");
        out.println("<td>" + res.getString("ID") + "</td>");
        out.println("<td>" + res.getString("Name") + "</td>");
        out.println("<td>" + res.getString("CountryCode") + "</td>");
        out.println("<td>" + res.getString("District") + "</td>");
        out.println("<td>" + res.getString("Population") + "</td>");
        out.println("</tr>");
    }
    st.close();
    conn.close();

%>
</table>
</body>
</html>
以上でAPサーバとDBサーバの連携が完了しました。
連携が完了したことを確認するために以下の手順を試してみましょう。
①APサーバのTomcatサービスを再起動。
②DBサーバのmysqldサービスを再起動
③ブラウザにJSPのパス「 http://WEBサーバのパブリックアドレス/jsp/test.jsp 」を入力する。
ここで、world(データベース)が表示されればAPサーバとDBサーバの連携は成功です。
と言いたいところですが、なんと下記のエラーが出てしまいました。
3.ネットワーク設定の修正
サーバ間の連携が上手くいっていないようなので、エラーが発生してしまいました。まずはネットワークが繋がっているか確かめるために、各サーバに接続しpingコマンドで各サーバ間の疎通確認をしてみます。
WEBサーバからAPサーバ:問題なし
WEBサーバからDBサーバ:問題なし
APサーバからWEBサーバ:応答なし
APサーバからDBサーバ:問題なし
DBサーバからWEBサーバ:応答なし
DBサーバからAPサーバ:問題なし
上記の結果から、プライベートネットとパブリックネットワークの間に不具合が起きているようです。
ここで色々調べていたところ、どうやらパブリックサブネットにNATゲートウェイを配置することが解決策だと判明しました。
前々回の記事- AWSでWEB3層構造の構築②(VPC、サブネット、NW設定、インスタンス起動、SSH接続)で、ローカルホストからプライベートネットワーク内のサーバにSSH接続する際に候補の一つとして挙がった選択肢です。
金銭的コストが掛かるので候補から外しましたが、これがベストプラクティスのようです。ちなみに、NATゲートウェイは、使用しない時は速やかに削除するのが良いでしょう。- NATゲートウェイを削除する
前回の記事- AWSでWEB3層構造の構築③(WEBサーバ、APサーバの構築と連携)で、
「WEBサーバにSquidをインストールしたことで、APサーバとDBサーバはインターネットに繋がった」
と判断していましたが、あくまでもプライベートサブネット内のサーバでyumやwgetコマンドを使えるようになっただけのようです。
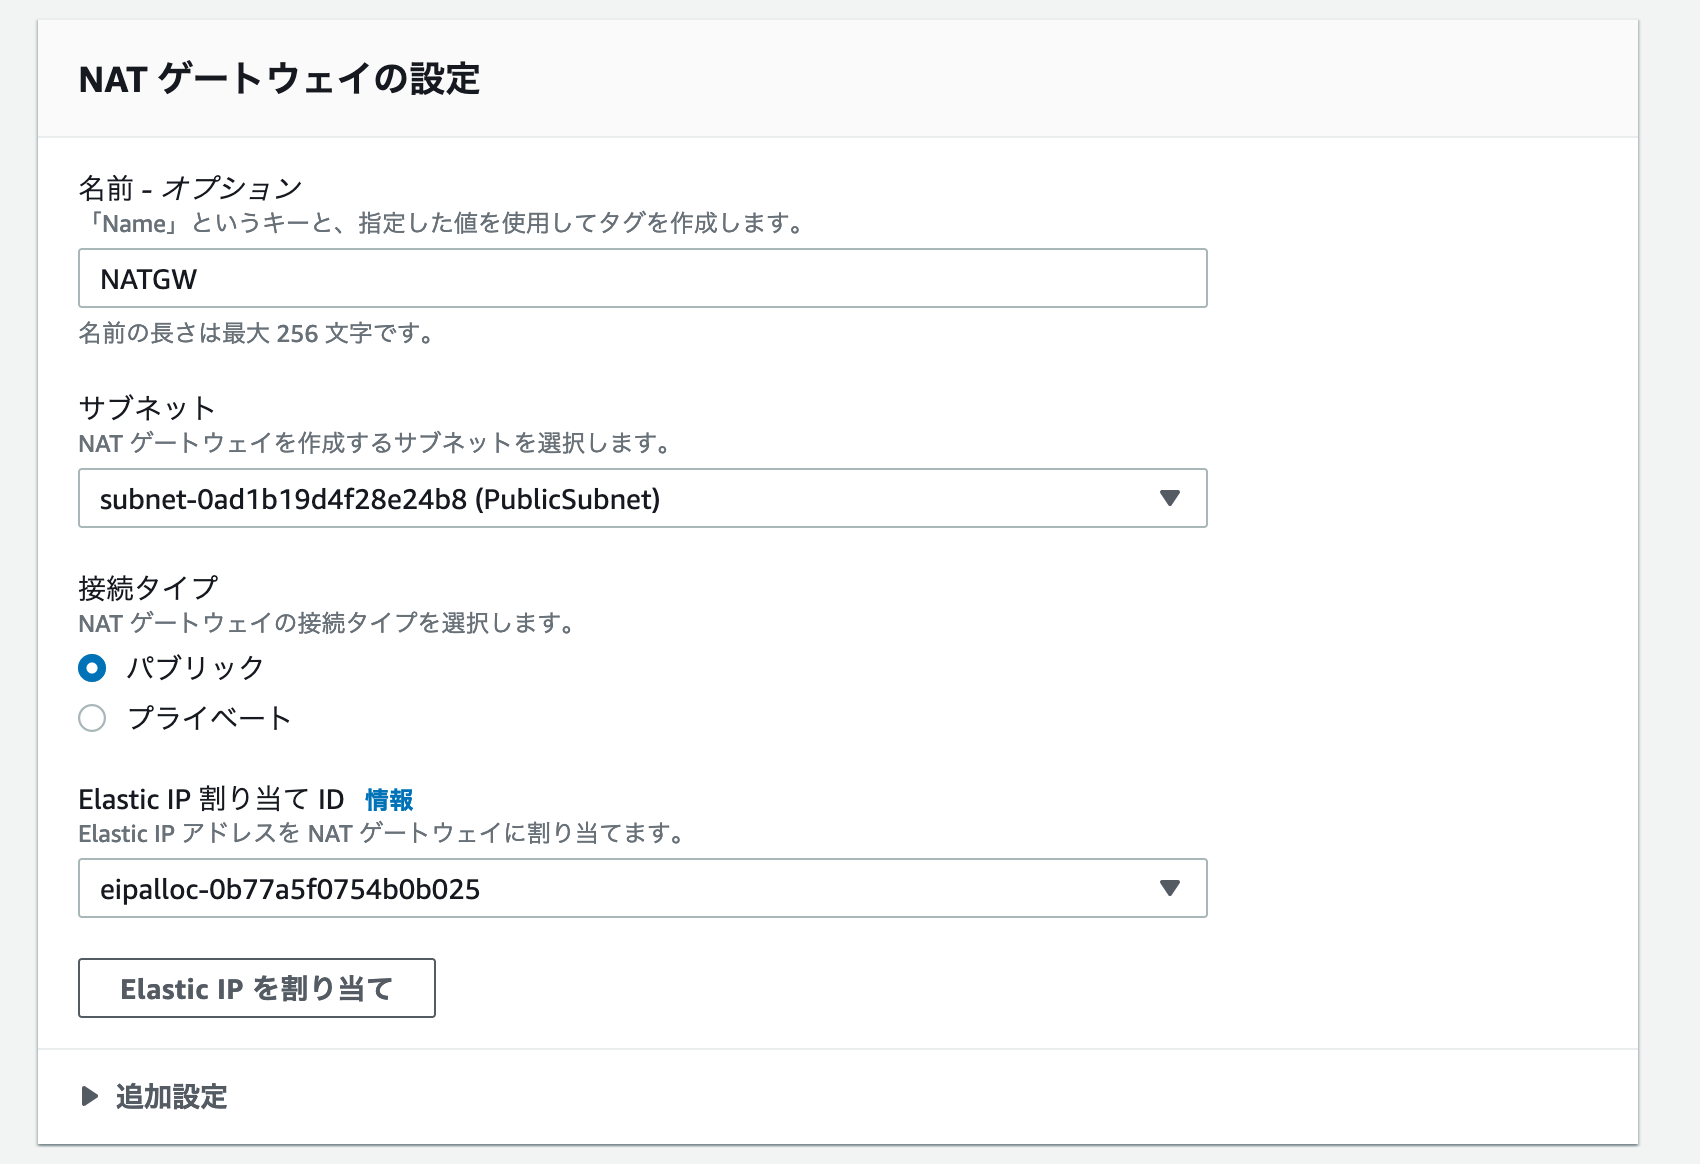
解決方法も判明したので、以下の手順で早速NATゲートウェイを作成していきます。
①AWSコンソールの検索窓で「NATゲートウェイ」を検索、「NATゲートウェイを作成」をクリック
②任意の名前を入力
③サブネットは作成したパブリックサブネットを選択
④接続タイプはパブリックを選択
⑤「Elastic IPを割り当て」をクリック
⑥「NATゲートウェイを作成」をクリック
以上でNATゲートウェイの作成は終わりました。
続いて、以下の手順でルートテーブルを作成していきます。
①AWSコンソールの検索窓で「ルートテーブル」を検索、「ルートテーブルを作成」をクリック
②任意の名前を入力
③使用しているVPCを選択
④「ルートテーブルを作成」をクリック
⑤「ルートを編集」をクリック
⑥「ルートを追加」をクリック
⑦送信先に0.0.0.0/0 、ターゲットにNATゲートウェイを選択し、デフォルトルート(0.0.0.0/0)をNATゲートウェイに向けるよう、テーブルを追加
⑧「変更を保存」をクリック
⑨サブネットの関連付けのタブから「サブネットの関連付けを編集」をクリックします
⑩プライベートサブネットを選択し、関連付けを保存をクリックします。
これで、プライベートサブネットはNATゲートウェイを介してインターネットへの接続ができるようになりした。
先ほどと同様にネットワークが繋がっているか確かめるために、各サーバに接続しpingコマンドで各サーバ間の疎通確認をしてみます。
WEBサーバからAPサーバ:問題なし
WEBサーバからDBサーバ:問題なし
APサーバからWEBサーバ:問題なし
APサーバからDBサーバ:問題なし
DBサーバからWEBサーバ:問題なし
DBサーバからAPサーバ:問題なし
無事、各サーバ間の疎通確認が取れました!
ネットワークの問題は解消されたので、ブラウザにJSPのパス「 http://WEBサーバのパブリックアドレス/jsp/test.jsp 」を入力し、連携が取れているかどうか確認してみましょう。
こんにちは、Internal Server Error。
まだまだ付き合いは長くなりそうです。
APサーバ /opt/tomcat/conf配下のserver.xmlも編集が必要みたいなので、次回記事ではその辺りを調べていきます。
参考


