目的
Laravelのデプロイ
EC2とRDSを利用する
RDSはEC2からの通信のみ許可
WEBサーバ nginx
アプリケーションサーバ php-fpm
特に冗長化構成とかにはしない
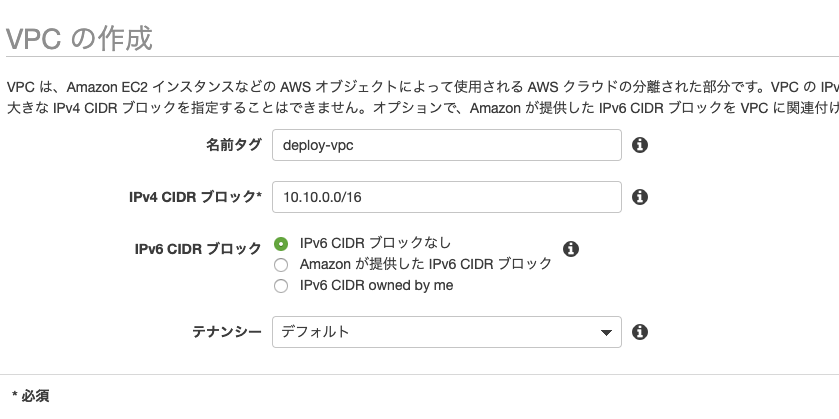
VPCの作成
 |
|---|
名前を「deploy-vpc」
IPv4 CIDR ブロック*を「10.10.0.0/16」に設定
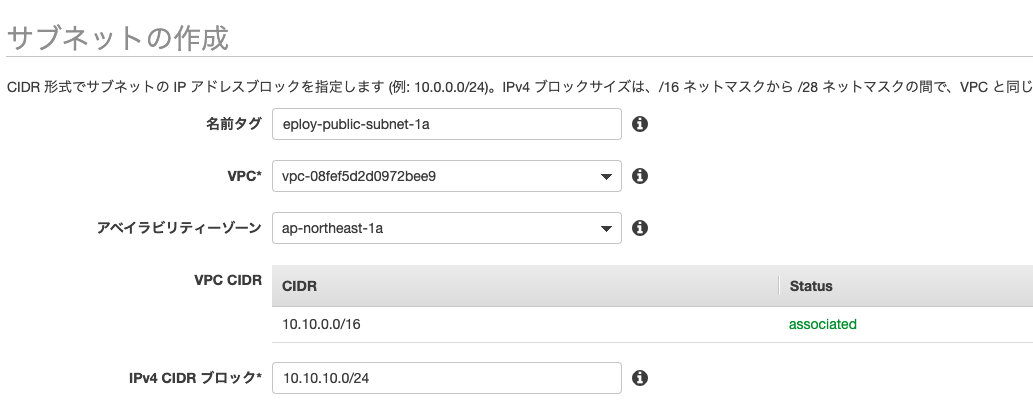
publicサブネットの作成
WEBサービスを公開するためのサブネットを作成したいので、サブネットをpublicで作成します。
こちらのサブネットにWEBサーバ用のEC2を紐付けて外部からアクセスできる状態を作ります。
 |
|---|
名前を「deploy-public-subnet-1a」
VPCに先ほど作成作成した「deploy-vpc」を選択
アベイラビリティーゾーンを「ap-northeast-1a」
IPv4 CIDR ブロックを「10.10.10.0/24」
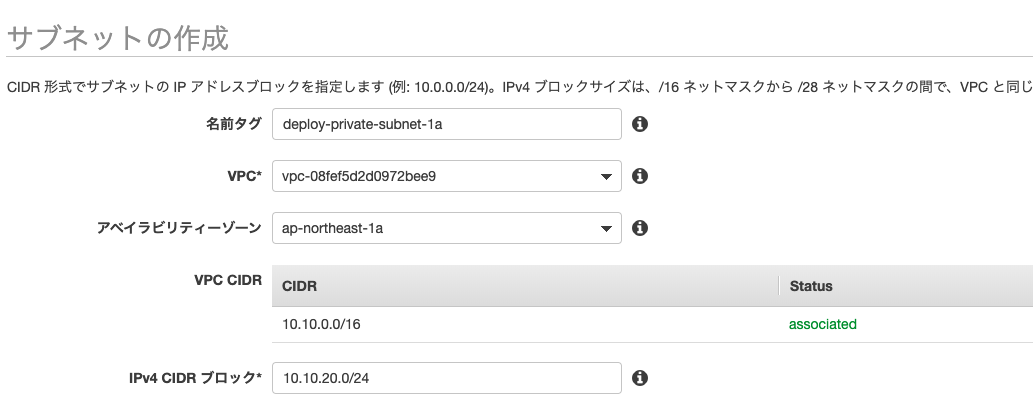
privateサブネットの作成
こちらはWEBサービス用のRDSを紐づけるためのサブネットです。
外部からアクセスされたくないためプライベート用のサブネットを用意します。
 |
|---|
名前を「deploy-private-subnet-1a」
VPCに先ほど作成作成した「deploy-vpc」を選択
アベイラビリティーゾーンを「ap-northeast-1a」
IPv4 CIDR ブロックを「10.10.20.0/24」
DB用のsubnetを作成するときに、複数のアベイラビリティーゾーンを指定する必要があるので同様にもう一つprivateサブネットを作成します。
名前を「deploy-private-subnet-1c」
VPCに先ほど作成作成した「deploy-vpc」を選択
アベイラビリティーゾーンを「ap-northeast-1c」
IPv4 CIDR ブロックを「10.10.21.0/24」
インターネットゲートウェイの作成
名前を「deploy-igw」で作成
作成後、VPC「deploy-vpc」にアタッチします
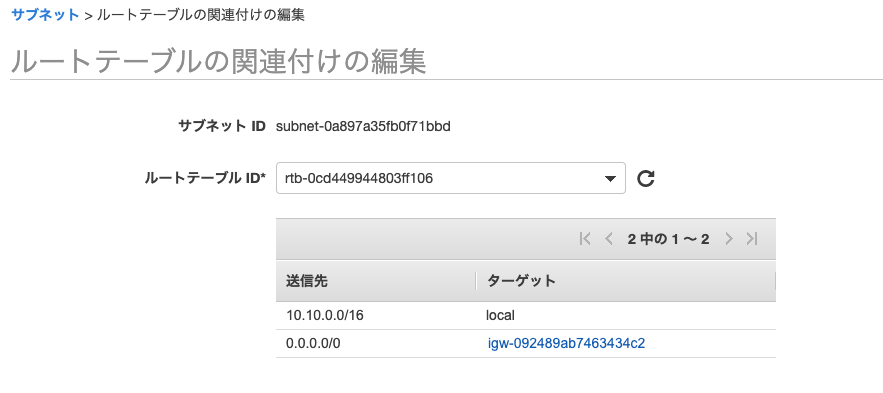
ルートテーブルの作成
VPCダッシュボードのルートテーブルを選択し、
 |
|---|
名前「deploy-public-route」のルートテーブルを作成
 |
|---|
サブネット「deploy-public-subnet-1a」のsubnetの関連付けで「deploy-public-subnet」を関連付けます。
 |
|---|
routeの編集で
送信先を「0.0.0.0/0」 ターゲットにインターネットゲートウェイ「deploy-igw」を選択します。
WEBサーバ用のEC2を作成
1.AMIの選択
クイックスタートで「Amazon Linux 2 AMI (HVM), SSD Volume Type」を選択
2.インスタンスタイプの選択
インスタンスタイプに「t2.micro」を選択
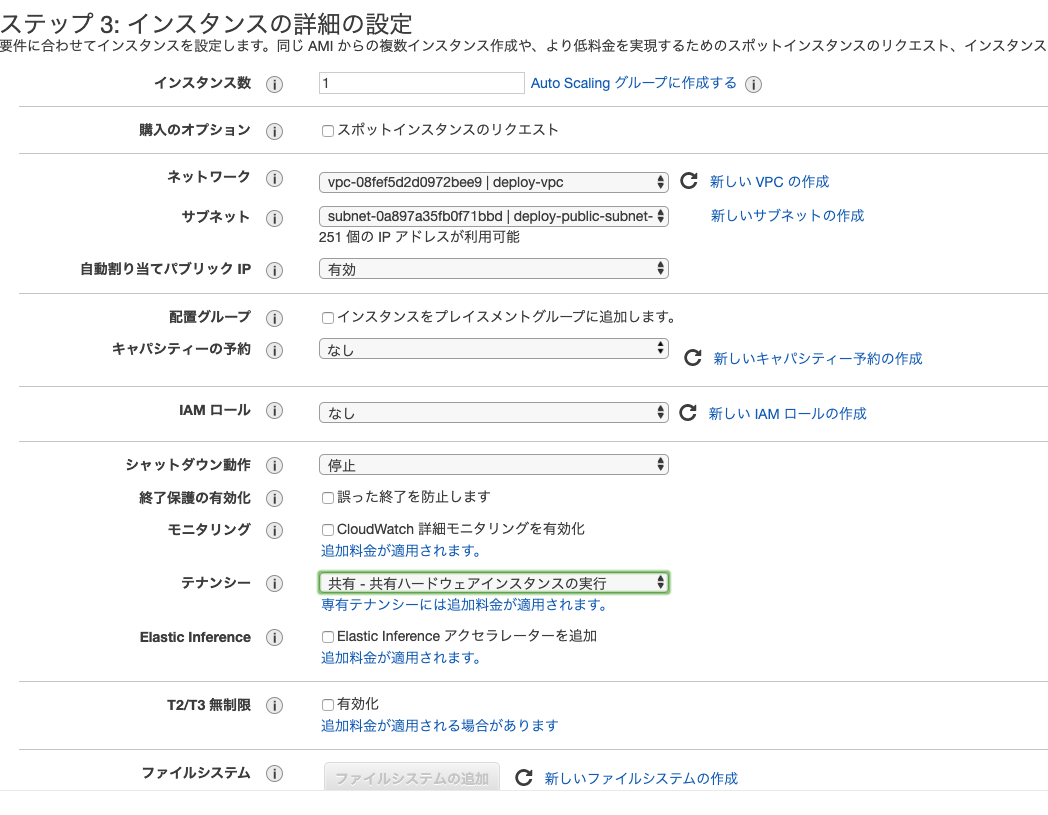
3.インスタンスの詳細の設定
 |
|---|
ネットワークに「deploy-vpc」を選択
サブネットに「deploy-public-subnet-1a」を選択
ネットワークインターフェースのIPに「10.0.10.10」を指定
4.ストレージの追加
特に何もしなくてOK
5.タグの追加
Nameに「deploy-ec2」を設定
6.セキュリティグループの設定
新しいセキュリティーグループを作成する
グループ名を「deploy-ec2」
必要に応じてSSHのIPアドレスを絞ることも可能です。
webとして公開したいので下記の設定を追加してください。

SSH接続もできるようにしたいので以下を追加しましょう(自宅IPなどで絞った方が安全なので推奨です)

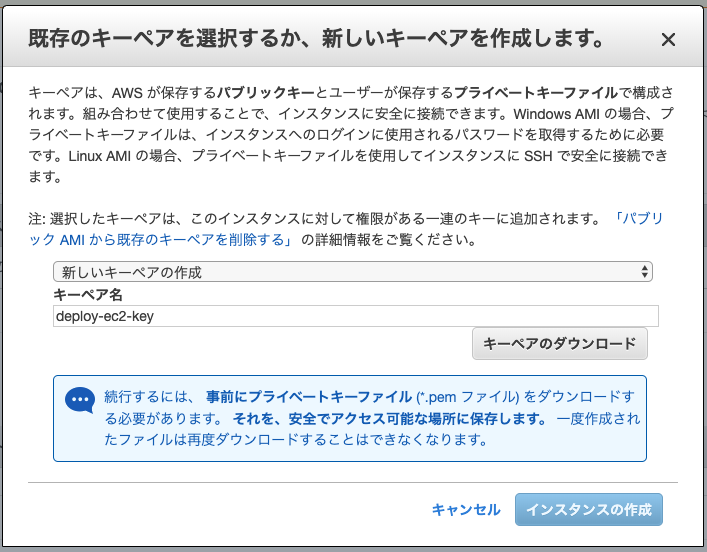
7.EC2に接続するためのキーペアを作成
 |
|---|
ssh接続するために必要なkeyを作成し、ダウンロードしておきましょう。
以上の条件でインスタンスを作成します。
WEBサーバにアクセスできるように設定
1.EC2のIPアドレスを確認
EC2のインスタンスの説明タブを開くと
IPv4 パブリック IP にEC2のIPが記載されているのでそちらをチェック
今回は「18.182.54.143」でやっていきます。
2.sshの設定
$ mv ~/Downloads/deploy-ec2-key.pem ~/.aws/ #keyの移動
$ chmod 600 ~/.aws/deploy-ec2-key.pem # keyの権限を変更
.ssh/configを編集する
Host deploy-ec2
    HostName 18.182.54.143
    User ec2-user
    IdentityFile ~/.aws/deploy-ec2-key.pem
    Port 22
接続確認
$ ssh deploy-ec2
The authenticity of host '18.182.54.143 (18.182.54.143)' can't be established.
ECDSA key fingerprint is SHA256:XUj6MKrad+8tZ4eAOsvNvb3fbaEgtwcgtuia7ZckxFM.
Are you sure you want to continue connecting (yes/no)? yes
Warning: Permanently added '18.182.54.143' (ECDSA) to the list of known hosts.

       __|  __|_  )
       _|  (     /   Amazon Linux 2 AMI
      ___|\___|___|

https://aws.amazon.com/amazon-linux-2/
[ec2-user@ip-10-10-10-10 ~]$
OK
RDSの設定
セキュリティーグループを作成
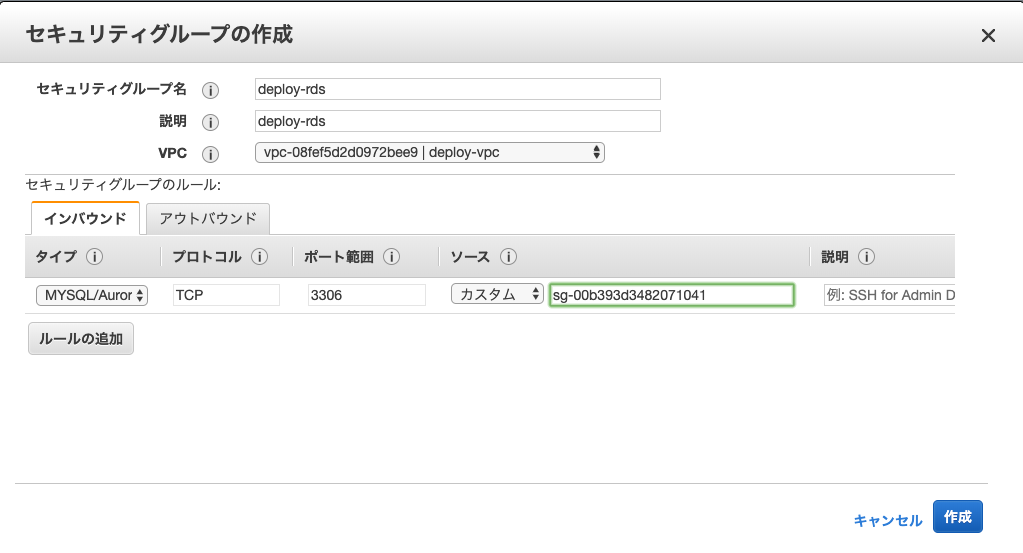
まず最初に、EC2からのみのアクセスを許可するようセキュリティーグループを作成します。
EC2ダッシュボードのセキュリティーグループから作成していきます。
 |
|---|
| セキュリティーグループ「deploy-rds」 |
| インバウンドルールを |
| タイプ「MYSQL/Aurora」 |
| プロトコル「TCP」 |
| ポート「3306」 |
| ソースで「deploy-ec2」のセキュリティーグループを選択 |
| そのまま作成します。 |
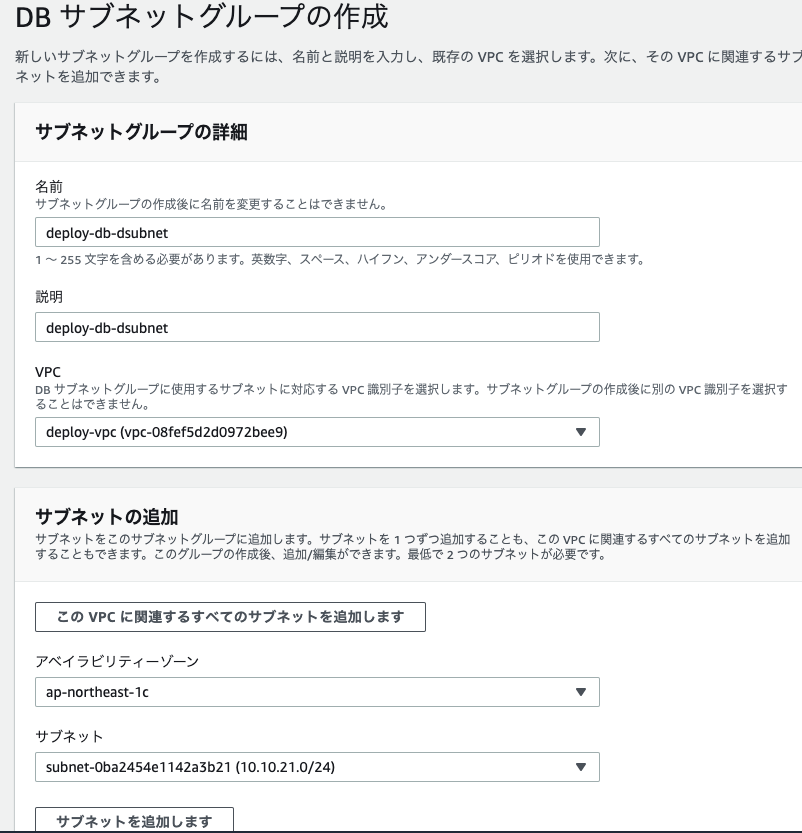
DBサブネットの作成
 |
|---|
 |
|---|
サブネットの追加で先ほど追加したprivateなsubnetを2つ追加し、作成します。
RDSの作成
標準作成でMySQLの最新バージョンを選択し、テンプレートを選択
特に今回は冗長化とかはしないので
ストレージの自動スケーリングは無効に
スタンバイインスタンスも作成しません。
VPCに「deploy-vpc」を選択
サブネットグループに先ほど作成したdb-subnetを選択
VPC セキュリティグループに「deploy-rds」を選択
上記設定でRDSを作成します。
これでいったんAWS側の設定は完了です。
Laravel 環境構築
nginxとphpをインストール
$ sudo amazon-linux-extras install nginx1.12
$ sudo amazon-linux-extras install php7.3
$ sudo service nginx start #nginxの起動
$ sudo service php-fpm start # php-fpmの起動
ここまで問題なくできると自身のEC2インスタンスのIPにアクセスするとnginxのページが表示されると思います!
composerインストール
Composerをインストールしたいのですが、t2.microだとメモリが足りないことがあるので、swapファイルを作成します。
sudo dd if=/dev/zero of=/swapfile1 bs=1M count=1024
sudo chmod 600 /swapfile1
mkswap /swapfile1
swapon /swapfile1
curl -sS https://getcomposer.org/installer | php
mv composer.phar /usr/bin/composer

sudo yum install --enablerepo=remi,remi-php73 php-pecl-zip php-devel php-mbstring php-pdo php-gd php-xml
mkdir /var/www/
cd /var/www/
composer create-project --prefer-dist laravel/laravel site
sudo chmod 777 /var/www/site
sudo chmod 777 /var/www/site/logs
sudo chmod 777 /var/www/site/logs/laravel.log
sudo chmod 777 /var/www/site/bootstrap/cache
sudo chmod 777 /var/www/site/storage/framework/sessions
sudo chmod 777 /var/www/site/storage/framework/views
composer update
sudo php artisan key:generate
途中権限がない箇所でプロジェクトを生成してしまったせいか、やたら権限なくて怒られてしまったので
横着してchmod 777で権限を付けています。
本来ならnginxかphp-fpmを実行するuserに権限を持たせるのが良いかと思います。
nginx.confの設定をLaravel用に書き換える
# For more information on configuration, see:
#   * Official English Documentation: http://nginx.org/en/docs/
#   * Official Russian Documentation: http://nginx.org/ru/docs/

user nginx;
worker_processes auto;
error_log /var/log/nginx/error.log;
pid /run/nginx.pid;

# Load dynamic modules. See /usr/share/nginx/README.dynamic.
include /usr/share/nginx/modules/*.conf;

events {
    worker_connections 1024;
}

http {
    log_format  main  '$remote_addr - $remote_user [$time_local] "$request" '
                      '$status $body_bytes_sent "$http_referer" '
                      '"$http_user_agent" "$http_x_forwarded_for"';

    access_log  /var/log/nginx/access.log  main;

    sendfile            on;
    tcp_nopush          on;
    tcp_nodelay         on;
    keepalive_timeout   65;
    types_hash_max_size 2048;

    include             /etc/nginx/mime.types;
    default_type        application/octet-stream;

    # Load modular configuration files from the /etc/nginx/conf.d directory.
    # See http://nginx.org/en/docs/ngx_core_module.html#include
    # for more information.
    include /etc/nginx/conf.d/*.conf;

    server {
        listen       80 default_server;
        listen       [::]:80 default_server;
        server_name  _;
        root         /var/www/site/public;

        # Load configuration files for the default server block.
        include /etc/nginx/default.d/*.conf;

	location / {
	    #index  index.php index.html index.htm;
	    try_files $uri $uri/ /index.php?$query_string;
 	}
	location ~ \.php$ {
            fastcgi_pass  unix:/run/php-fpm/www.sock;
            fastcgi_index index.php;
            fastcgi_param SCRIPT_FILENAME $document_root$fastcgi_script_name;
            include       fastcgi_params;
        }
    }

# Settings for a TLS enabled server.
#
#    server {
#        listen       443 ssl http2 default_server;
#        listen       [::]:443 ssl http2 default_server;
#        server_name  _;
#        root         /usr/share/nginx/html;
#
#        ssl_certificate "/etc/pki/nginx/server.crt";
#        ssl_certificate_key "/etc/pki/nginx/private/server.key";
#        ssl_session_cache shared:SSL:1m;
#        ssl_session_timeout  10m;
#        ssl_ciphers HIGH:!aNULL:!MD5;
#        ssl_prefer_server_ciphers on;
#
#        # Load configuration files for the default server block.
#        include /etc/nginx/default.d/*.conf;
#
#        location / {
#        }
#
#        error_page 404 /404.html;
#            location = /40x.html {
#        }
#
#        error_page 500 502 503 504 /50x.html;
#            location = /50x.html {
#        }
#    }

}
php-fpmの設定を編集
@@ -21,9 +21,9 @@
 ; Note: The user is mandatory. If the group is not set, the default user's group
 ;       will be used.
 ; RPM: apache user chosen to provide access to the same directories as httpd
+user = nginx
-user = apache
 ; RPM: Keep a group allowed to write in log dir.
+group = nginx
-group = apache

 ; The address on which to accept FastCGI requests.
 ; Valid syntaxes are:
@@ -35,8 +35,6 @@ group = nginx
 ;                            (IPv6 and IPv4-mapped) on a specific port;
 ;   '/path/to/unix/socket' - to listen on a unix socket.
 ; Note: This value is mandatory.
+listen.owner = nginx
+listen.group = nginx
 listen = /run/php-fpm/www.sock
php-fpmとnginxの再起動
sudo service php-fpm restart
sudo service nginx restart
EC2のIPアドレスを確認
動作成功!🎉
RDSに接続できるよう.envの編集
DB_CONNECTION=mysql
DB_HOST={RDSのエンドポイント}
DB_PORT=3306
DB_DATABASE=hoge
DB_USERNAME=root
DB_PASSWORD=rootroot
動作チェック
$ php artisan migrate
Migration table created successfully.
Migrating: 2014_10_12_000000_create_users_table
Migrated:  2014_10_12_000000_create_users_table (0.03 seconds)
Migrating: 2014_10_12_100000_create_password_resets_table
Migrated:  2014_10_12_100000_create_password_resets_table (0.03 seconds)
Migrating: 2019_08_19_000000_create_failed_jobs_table
Migrated:  2019_08_19_000000_create_failed_jobs_table (0.01 seconds)
こちらも動作成功!🎉
記載漏れやおかしい所ありましたら指摘お願いします!
