2
5

Delete article

Deleted articles cannot be recovered.

Draft of this article would be also deleted.

Are you sure you want to delete this article?

More than 1 year has passed since last update.

アダプティブカードで選択肢を動的に変更する

Last updated at Posted at 2023-01-18

概要

  1. SharePointのリストからデータを取ってくる
  2. 取得したデータをアダプティブカードに選択肢として埋め込めむ

PowerAutomate × アダプティブカードを絡めて、
上記を実装しようとした際にハマったので、備忘録として残します。

SharePointリストのデータ

image.png
組織情報なので、部署名が変わったすることがある。
その際にアダプティブカードを直接変更したりうするのは手間。
→このSharePointから最新の情報を毎回取得する。
※有効のフラグを作成してますが、今回の記事では取得するデータの制御については扱いません。

ハマった箇所

image.png
上記のように「\」が所々に挿入されてしまって、うまくアダプティブカードに埋め込めない。

コーディング

1. SharePointリストからデータを取得

SharePointリストから「複数項目の取得」でデータを取得

2. 変数定義

  • 「変数を初期化する」で変数を定義
  • 種類は「アレイ」を選択

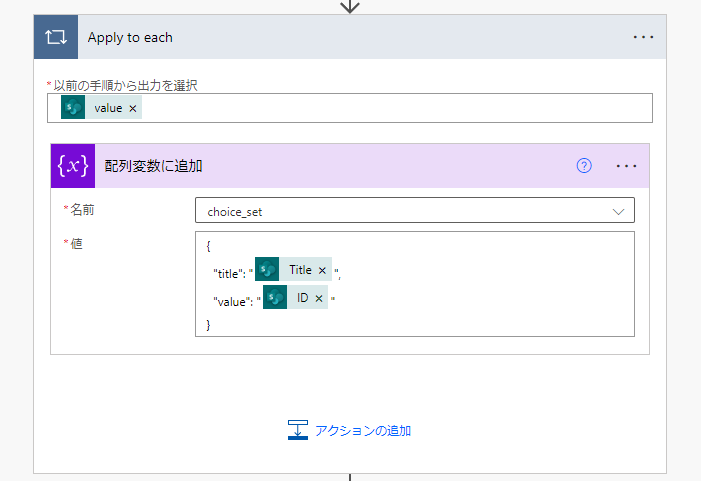
3. 配列変数に追加(選択肢を作成)

ループを回して、上記で定義した配列変数に追加していく

  • title:表示名に該当するものを選択
  • value:後で更新やIDを引っ張れるようにIDにしておくと後で楽
  • 注意:「concat関数」で結合しようとすると、上手くいかないので(下記のように)直接変数内で定義する
{
  "title": "@{items('Apply_to_each')?['Title']}",
  "value": "@{items('Apply_to_each')?['ID']}"
}

image.png

アダプティブカードへ挿入

今回、動的選択肢にさせたい「Input.ChoiceSet」の「choices」の値として挿入
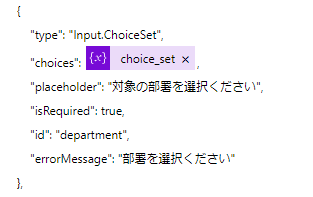
image.png

最後に投稿して確認

問題なければ、かきのように選択可能になる。
image.png

2
5
0

Register as a new user and use Qiita more conveniently

  1. You get articles that match your needs
  2. You can efficiently read back useful information
  3. You can use dark theme
What you can do with signing up
2
5

Delete article

Deleted articles cannot be recovered.

Draft of this article would be also deleted.

Are you sure you want to delete this article?