3行で
・C#
・データの中身を見たい
・超入門者(とりあえずコピペで動かしたい)
含まれる内容
WriteLine→ToString→PropertyGrid→LINQPad連携→VisualStudioのような統合環境
の順にステップアップしていきます。
はじめに(読飛ばし可)
C#(.NET)でプログラムやデータ処理を行う際に、各種データをダンプする事は良くあると思います。
この記事では、PropertyGridを中心に少しの手間でデータ出力をよりリッチにする方法を書いていきますので、手を動かすコストと天秤をかけながら使えるものを使用していただければと思います。
最初の方は超入門者(Hello Worldレベル)を対象としていますのでかなり基本的な記載があります。
対象とするデータ構造
入れ子になったクラス構造。ダンプするフィールドはすべてpublicなプロパティで表現される。
今回は例として以下のデータ構造をベースとして追加したりカスタマイズします。
public class SampleData
{
  public int Id { get; set; } = 0;
  public string Comment { get; set; } = "Text";
}
説明で使用するアプリ
- Visual Studio 2017 Community Edition
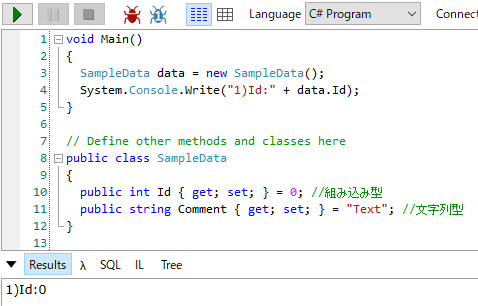
- LINQPad - 下記のようにLanguageをC# Programに変更します。次に、SampleData等使用するクラスを書きます。
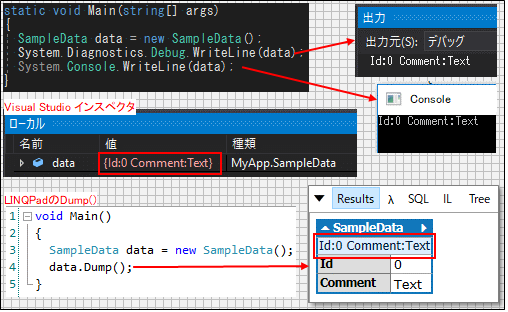
標準出力、デバック出力はResultに出ます。
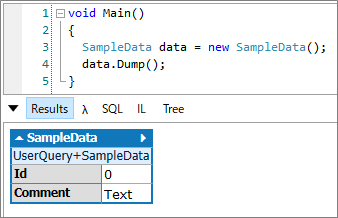
また、LINQPad組み込みのDump()を使用すると下記のように可視化されます。
WriteLine系
一番基本的なやつ。System.Console.WriteやWriteLine(改行付き)を使用する。Hello Worldでも使用するのでお馴染み。下記の例では問題ないですが、data.Id + "text"のようにString以外を先に置くとエラーになります。これは次節のToStringを理解する必要があります。
SampleData data = new SampleData();
System.Console.Write("1)Id:" + data.Id);
System.Console.WriteLine(", Comment:" + data.Comment);
System.Console.WriteLine("2)Id:{0}, Comment:{1}", data.Id, data.Comment);//Cのprintfに近い形式
System.Console.WriteLine($"3)Id:{data.Id}, Comment:{data.Comment}");//C#7.0(VS2015以降)で可
1)Id:0, Comment:Text
2)Id:0, Comment:Text
3)Id:0, Comment:Text
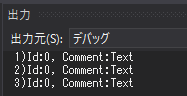
Visual Studioの出力パネルに出す場合はSystem.Diagnostics.Debug.Write* を使用する。
SampleData data = new SampleData();
System.Diagnostics.Debug.Write("1)Id:" + data.Id);
System.Diagnostics.Debug.WriteLine(", Comment:" + data.Comment);
System.Diagnostics.Debug.WriteLine("2)Id:{0}, Comment:{1}", data.Id, data.Comment);//Cのprintfに近い形式
System.Diagnostics.Debug.WriteLine($"3)Id:{data.Id}, Comment:{data.Comment}");//C#7.0(VS2015以降)で可
実行結果 (Visual studio 2017)
ToString()の使用
C#はデフォルトですべてのオブジェクト(変数)でToString()が使用できます。どんな変数でも.ToString()とつければstringの文字列になって返ってきます。このToString()は特別で、文字列の変換が要求された場合に暗黙的に呼ばれます。下記はVisual Studioのインスペクタの例です。
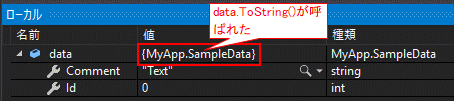
この例だと、dataツリーを展開しないと中身が見えないので不便です。以下のように
SampleDataのToStringを編集(オーバーライド)する事によって表示を改善します。
public class SampleData
{
  public int Id { get; set; } = 0; //組み込み型
  public string Comment { get; set; } = "Text"; //文字列型
  public override string ToString() //追加
  {
    return $"Id:{Id} Comment:{Comment}";
  }
}
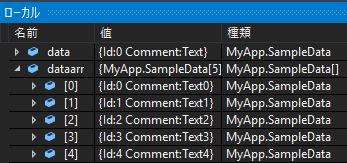
実行結果は下記です。余白節約のために1枚の画像にまとめています。
特に配列の場合、下記の様に見通しが良くなります。
PropertyGrid (基本編)
- PropertyGridをフォームに貼り付ける。
- コード側でPropertyGrid.SelectedObject にダンプしたいオブジェクトをセットする。
SampleData data = new SampleDatta();
propertyGrid1.SelectedObject = data;
表示のチューニングは下記属性を使用します。他にもありますが大体下記を覚えておけば問題ありません。
| 内容 | コード 例 |
|---|---|
| 読み取り専用 | ReadOnly(true) |
| カテゴリ(デフォルトはその他) | Category("カテゴリ名") |
| 説明(下のペインのやつ) | Description("説明文") |
| 表示名の変更 | DisplayName("表示名") |
| 非表示化 | Browsable(false) |
  public class SampleData
  {
    [ReadOnly(true)]
    [Category("値")]
    [Description("プライマリキーです。")]
    [DisplayName("ID(プライマリキー)")]//日本語名にもできる
    public int Id { get; set; } = 0; //組み込み型

    [ReadOnly(true)]
    [Category("値")]
    [Description("コメント文です")]
    public string Comment { get; set; } = "Text"; //組み込み型
    public override string ToString()
    {
      return $"Id:{Id} Comment:{Comment}";
    }
  }
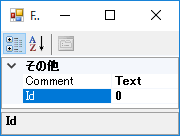
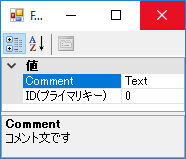
実行結果
自作クラスの展開が出来ないときは?
下記のように、自作クラスSampleDataの子要素Childを入れてみます。
public class SampleData
{
  [ReadOnly(true)]
  public int Id { get; set; } = 0; //組み込み型
  [ReadOnly(true)]
  public string Comment { get; set; } = "Text"; //組み込み型
  [ReadOnly(true)]
  public SampleData Child { get; set; } //追加
  public override string ToString()
  {
    return $"Id:{Id} Comment:{Comment}";
  }
}
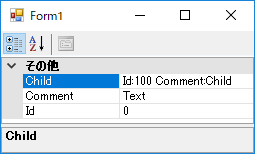
以下のように、ChildはToStringに基づいてダンプできていますが、ツリーの展開ができません。
この時、クラス定義の前に [TypeConverter( typeof(ExpandableObjectConverter) )] を追加します。
[TypeConverter(typeof(ExpandableObjectConverter))]
public class SampleData
{
  [ReadOnly(true)]
  public int Id { get; set; } = 0; //組み込み型
...省略
}
覚えられないので、スニペットか、VisualStudioのクラステンプレートを改造して上記を入れておくとよいでしょう。
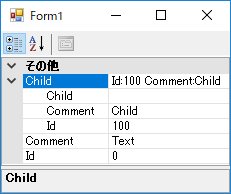
実行結果は下記で、Childがツリーで展開可能になります。
特殊ケース
ExpandableObjectConverterを使用していてもDynamic型のプロパティの場合はツリー展開されません。
dynamic型プロパティの前にExpandableObjectConverterを別途付けておく必要があります。
これは調べてもなかなか出てこないケースです。
[TypeConverter(typeof(ExpandableObjectConverter))]
public class SampleData
{
...省略
  [ReadOnly(true)]
  [TypeConverter(typeof(ExpandableObjectConverter))]//dynamicの場合プロパティ定義側にも必要
  public dynamic Dynamic { get; set; }
...省略
}
private void Form1_Load(object sender, EventArgs e)
{
  var data = new SampleData();
  data.Dynamic = new SampleData() { Id = 1, Comment="Dynamic"};
  propertyGrid1.SelectedObject = data;
}
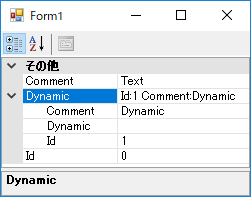
実行結果
Listが展開できないときは?
プロパティ名に別名を付けて切り替えたい
やりたいことは以下
仕様書等が日本語のフィールド名でプログラムは英語名で...という時があるかどうか分かりませんが、簡単に実現できます。
プロパティの表示名はDisplayNameAttributeを使用するのですが、これを継承して2つ目の言語を追加します。
/// <summary>
/// プロパティの表示名を設定します。バイリンガル対応で2言語目に日本語を想定しています。
/// </summary>
public class DisplayMultiNameAttribute : DisplayNameAttribute
{
    /// <summary>
    /// 2言語目(日本語)を優先します。
    /// </summary>
    public static bool UseSecondName { get; set; } = false;
    private string displayNameDef;
    private string displayNameJa;
    /// <summary>
    /// プロパティの表示名を設定します。
    /// </summary>
    public DisplayMultiNameAttribute(){}
    /// <summary>
    /// プロパティの表示名を設定します。
    /// </summary>
    /// <param name="displayName">表示名</param>
    public DisplayMultiNameAttribute(string displayName)
    {
        this.displayNameDef = displayName;
    }
    /// <summary>
    /// プロパティの表示名を設定します。
    /// </summary>
    /// <param name="displayNameEng">1言語目(デフォルト)</param>
    /// <param name="displayNameJa">2言語目(日本語)</param>
    public DisplayMultiNameAttribute(string displayNameEng, string displayNameJa)
    {
        this.displayNameDef = displayNameEng;
        this.displayNameJa = displayNameJa;
    }
    /// <summary>
    /// 表示名称を取得します。
    /// </summary>
    public override string DisplayName{
      get{
        if (UseSecondName){
          if (string.IsNullOrEmpty(displayNameJa))
            return displayNameDef;
          else
            return displayNameJa;
        }
        else
          return displayNameDef;
      }
    }
}
あとはクラス側にDisplayMultiNameAttributeを設定し、コントロール側からDisplayMultiNameAttribute.UseSecondName を切り替えればOKです。
public class SampleData
{
  //[DisplayName("ID(Primary key)")] //標準
  [DisplayMultiName("ID(Primary key)", "ID(プライマリキー)")]//今回の拡張
  public uint Id { get; set; } = 0; //組み込み型
}
PropertyGrid内部のツールバーにボタンを追加する場合はちょっと大変ですが以下です。
public partial class CustomPropertyGrid : PropertyGrid
{
  //一部省略
  public bool IsJapanese { get { return _isJapanese; } set { setIsJapanese(value); } }
  private bool _isJapanese = true;
  private void AddPropertyGridToolbarButton()
  {
      const string FieldName = "toolStrip";
      FieldInfo info;
      ToolStrip bar;
      try
      {
          info = typeof(PropertyGrid).GetField(FieldName, BindingFlags.NonPublic | BindingFlags.Instance);
          bar = (ToolStrip)info.GetValue(this);
      }
      catch{
          bar = null;
      }
      if (bar == null){
          return;
      }
      langButton = new ToolStripButton("日本語") { Checked = true };
      langButton.Click += langButton_Click;
      bar.Items.Add(langButton);
  }
  private void langButton_Click(object sender, EventArgs e)
  {
      langButton.Checked = !langButton.Checked;
      IsJapanese = langButton.Checked;
  }
  private void setIsJapanese(bool value)
  {
      DisplayMultiNameAttribute.UseSecondName = value;
      _isJapanese = value;
      this.Refresh();
  }
}
PropertyGrid 応用編
一部アイテムは既に別記事で書いているので記事へのリンクにします。
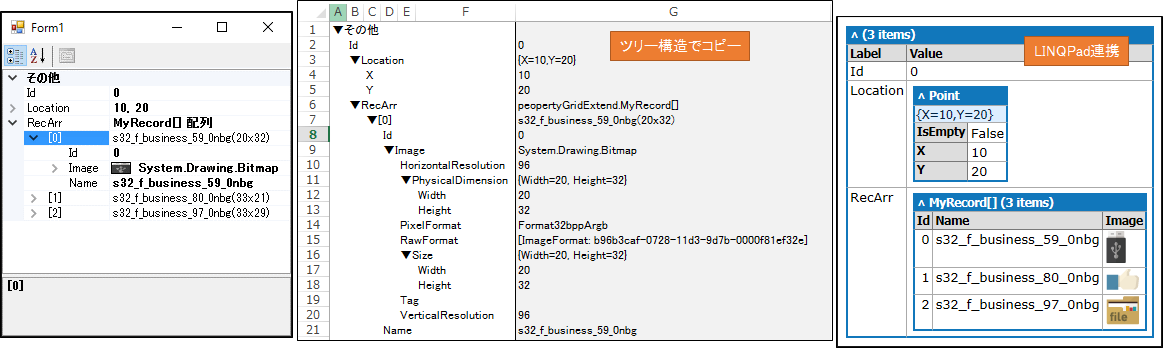
LINQPad連携
- コピーペースト対応
- Html出力対応(LINQPad使用)
別記事へのリンク
PropertyGridにコピペ機能を追加する(1/2)
PropertyGridにコピペ機能を追加する(2/2)]
3. 表示を0x0000の形にする
まず、以下のクラスを追加してください。CanConvertFromで対応可能かどうか判断して、ConvertToは実際に文字列に変換するときに呼ばれます。このクラスを基本形として改造すると大体のケースで対応できるかと思います。
public class UInt0xHexConverter : TypeConverter
{
  public override bool CanConvertFrom(ITypeDescriptorContext context, Type sourceType)
  {
    if (sourceType == typeof(ushort)||
      sourceType == typeof(uint)||
      sourceType == typeof(ulong)||
      sourceType == typeof(UInt64))
      return true;
    return base.CanConvertFrom(context, sourceType);
  }

  public override object ConvertTo(ITypeDescriptorContext context, CultureInfo culture, object value, Type destinationType)
  {
    if (destinationType == typeof(string))
    {
      if (value is ushort)
      {
        return $"0x{value:X4}";
      }
      else if (value is uint)
      {
        return $"0x{value:X8}";
      }
      else if (value is ulong)
      {
        return $"0x{value:X8}";
      }
      else if (value is byte)
      {
        return $"0x{value:X2}";
      }
      else if (value is UInt64)
      {
        return $"0x{value:X}";
      }
    }
    return base.ConvertTo(context, culture, value, destinationType);
  }
}
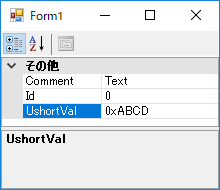
使用方法は以下のような感じで、0x0000形式に変えたいプロパティの前に"[TypeConverter(typeof(UInt0xHexConverter))]"を挿入してください。
public class SampleData
{
  [ReadOnly(true)]
  public uint Id { get; set; } = 0; //組み込み型
  [ReadOnly(true)]
  [TypeConverter(typeof(UInt0xHexConverter))] // 新しく追加したTypeConverter
  public ushort UshortVal { get; set; } = 0xabcd; //組み込み型
...省略
}
実行結果は下記で、ushortの値が0xの形で表示できています。
以下は更新中 ...
- PropertyGrid 応用編
- 表示を日本語切り替え可能にする (resxを使用しない方法) → DisplayNameAttributeを継承したクラスを作成
- PrioertyGridにボタンを追加する。(日本語表示切替とかあると便利)
- PropertyGrid で子要素を新しいウィンドウで開く(ネストが深いとこの機能は必須)
- Lazy<T>を使用した遅延読み込み対応 →プロパティにLazy<T>を使用し、ツリー展開時に読み込みを実施する。パフォーマンス改善効果のほか、入れ子構造が無限ループになった時にもエラーにならない。
- DockPanelSuite + PropertyGrid (+LINQPad)
- VS風の環境を簡単に作成する。子要素を新しいPropertyGridのドッキング可能なウィンドウやタブで開く。
- RazorEngineを使用したテンプレート出力
テンプレート出力方法は一つでも知っておくと便利。- htmlやテキスト形式のレポートを作成する。
- Excelに自由に出力する(仮)
やっぱりExcelで出力できると実践に活かせます。- MS Officeを使用しない方法 参考記事(http://qiita.com/midori44/items/acab9106e6dad9653e73)