最近、recompose を使用して React を書いており、ある程度知見が溜まって来た為、整理の意味を込めて纏めてみました。不備、不明点等がありましたら、コメント頂ければ幸いです。
TL;DR
- HoCs 、recompose とは
- recomposeの代表的な API の紹介・使い方
- setDisplayName:Component に任意の名前付与
- withStateHandlers:State 、handler の管理
- compose:複数の recompose API を束ねる
- lifecycle: React のライフサイクル管理
- pure:不要なレンダリング削減(パフォーマンス向上)
- onlyUpdateForkeys:不要なレンダリング削減(パフォーマンス向上)
- branch:Boolean を使用した Component の出し分け
- renderNothing: 常に null を返す HoCs
- nest: Component をネスト
- 以下に各APIごとのサンプルコードがあります。
- https://github.com/locol23/learn-recompose-react-hoc
- また、recompose API を組み合わせてすぐに React 開発が出来る boilerplate も準備しました。
対象読者
- React の基本的な書き方は理解済み
- HoCs、recompose が気になっているが、まだ触っていない方
Higher-order Components (以下、HoCs) とは
- 高階関数(Higher-order function)が語元と言われています
- 高階関数の場合、関数を引数にして、関数を返却します1が、HoCs の場合は Component を引数にして、Component を返却します。
- setDisplayName API の説明を見て頂ければ、なんとなくイメージがつかめると思います。
HoCs化するモチベーション
- Mixin(多重継承)を実現出来る
- Component を SFC(Stateless Functional Components) で記載出来ることで可読性が向上
- State や React のライフサイクル を HoCs で扱うことで、ロジックとビューの分離が可能
recompose とは
- HoCs を簡単に扱う為のライブラリです。
- 特に compose API を使用することで複数の recompose API をまとめることが出来る為、非常に便利です。
各種APIのサンプルコード
- 実際に動作する各種APIのサンプルコードを準備しましたので、あわせて見て頂ければと思います。
-
https://github.com/locol23/learn-recompose-react-hoc
- 各種 API の名前のディレクトリに移動し、
yarn install、yarn build後、http://localhost:1234 にて確認することが出来ます。
- 各種 API の名前のディレクトリに移動し、
それでは早速 API を見ていきます。
recompose APIs
setDisplayName
- 引数として与えられた任意の名前をComponentに付与する API です。
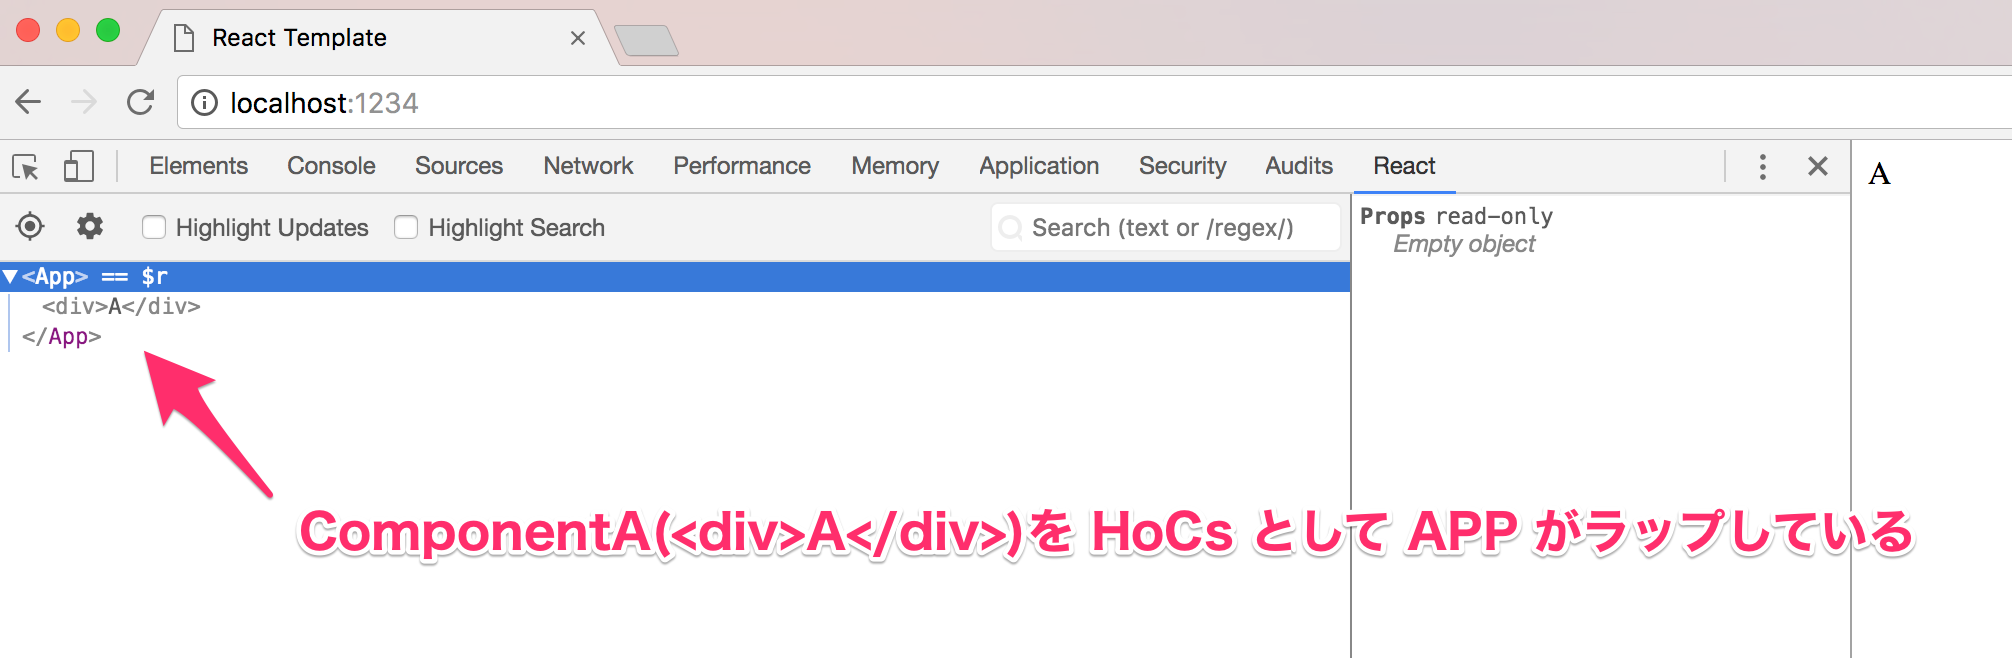
以下のコードより setDisplayName は ComponentA を引数として、ComponentA に App という名前を付与して返却しています。そのことから、HoCs の説明であった様に setDisplayName が HoCs となっていることがわかります。
import React from 'react'
import { setDisplayName } from 'recompose'

const ComponentA = () => <div>A</div>

export default setDisplayName('App')(ComponentA)
実際に React Developer Tools で確認してみます。以下の図の様にAppという名前で setDisplayName が HoCs として、ComponentA をラップしています。この様に、HoCs は Component をラップしているイメージとなります。
withStateHandlers
- State と その State を扱うための handlers を設定出来る(this.setState的位置づけ) API です。
- withState と withHandlers では1つの State しか扱えなかった為、複数の State を扱えるように拡張されています。
- 現状、複数の State を扱う場合、withStateHandlers を使用する形が良いと感じています。
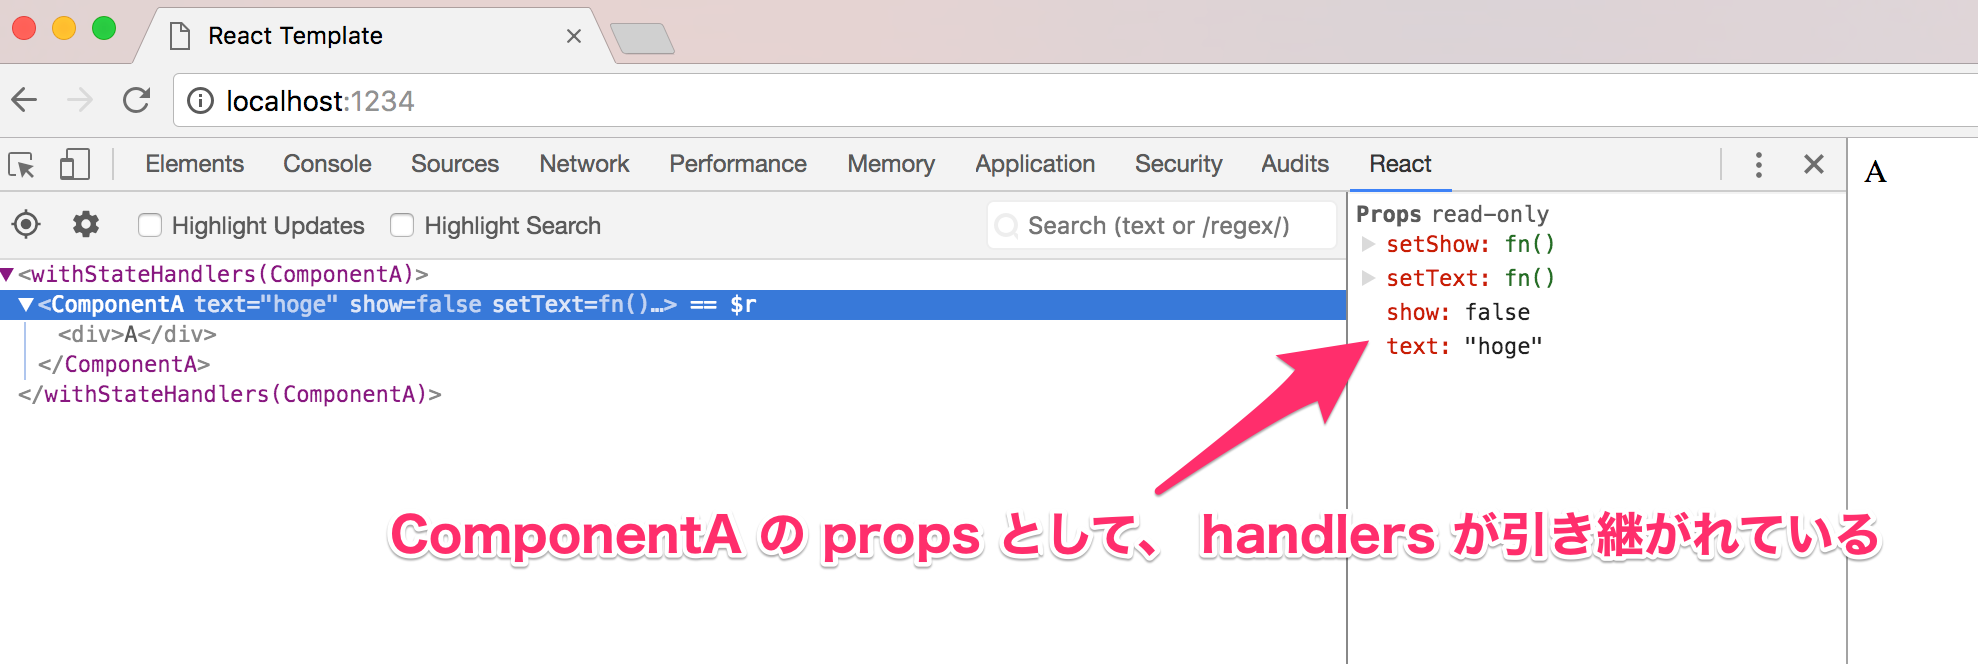
setDisplayName 同様に withStateHandlers が HoCs となり、ComponentA をラップしています。 第1引数では、State を定義しており、第2引数は handler を定義しています。handler の setText では、setText 実行時に引数 t を取るようにしており、setShow では、State の show の値をそのまま使用し、実行するごとに true と false が反転するようにしています。
import React from 'react'
import { withStateHandlers } from 'recompose'

const ComponentA = () => <div>A</div>

export default withStateHandlers(
  {
    text: 'hoge',
    show: false,
  },
  {
    setText: () => t => ({ text: t }),
    setShow: ({ show }) => () => ({ show: !show }),
  }
)(ComponentA)
以下の React Developer Tools 右側にて State を確認出来ます。

また、handlers については、props を通じて ComponentA に渡されていることが確認出来ます。
State を柔軟に設定したい場合は、以下のような handler を準備すると便利です。
export default withStateHandlers(
  {
    text: 'hoge',
    show: false,
  },
  {
    updateState: state => update => ({ ...state, ...update }),
  }
)(ComponentA)
compose
- 上記の setDisplayName や withStateHandlers 等を使用し、同じ Component をラップする場合、今まで同様に記述することも出来ますが、 compose を使用することでよりスマートに書くことが出来ます。
- 他の API とセットで頻繁に使用する API となります。
compose を使用せずに記述した場合、以下の様に深くネストし、可読性が下がってしまいます。
HoCs(HoCs(HoCs(HoCs(ComponentA))))
compose を使用して書いた場合
※左から右に順番に実行されます。
compose(HoCs, HoCs, HoCs, HoCs)(Component)
以下が実際のコードになります。
const ComponentA = () => <div>A</div>

// Enhance = compose(HoCs, HoCs)
const Enhance = compose(
  setDisplayName('App'),
  withStateHandlers(
    {
      text: 'hoge',
      show: false,
    },
    {
      setText: () => t => ({ text: t }),
      setShow: ({ show }) => () => ({ show: !show }),
    }
  )
)

export default Enhance(ComponentA) // compose(HoCs, HoCs)(Component)を export している
lifecycle
- React のライフサイクル系のメソッドにアクセスする為の API です。
以下は componentDidMount で State をセットする例です。
const Component = () => <div>Component</div>

const Enhance = compose(
  setDisplayName('App'),
  withStateHandlers(
    {
      text: 'hoge',
      show: false,
    },
    {
      setText: () => t => ({ text: t }),
      setShow: ({ show }) => () => ({ show: !show }),
    }
  ),
  lifecycle({
    componentDidMount() {
      this.props.setText('fuga')
      this.props.setShow()
    },
  })
)

export default Enhance(Component)
React Developer Tools の結果から、componentDidMount の handler で State の text と show の値が更新されたことが確認出来ます。

pure
- shallowEqual を使用することで、props の変更を検知し、必要な場合だけレンダリングします。
- 不要なレンダリングを避けることでパフォーマンス向上を狙えます。
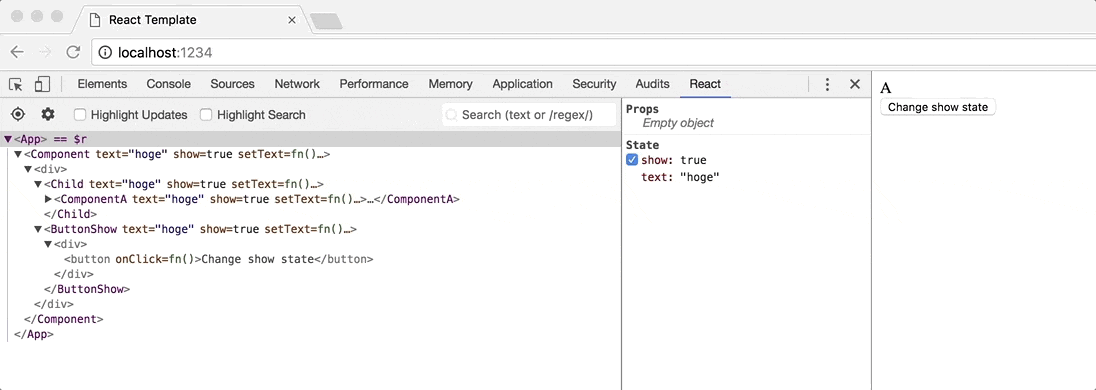
App Component から Child Component を呼び出しています。 Child Comoponent が pure でラップされている為、props の text が 変更された場合だけ再度レンダリングされます。
const ButtonText = props => {
  const handler = () =>
    props.text === 'hoge' ? props.setText('fuga') : props.setText('hoge')
  return (
    <div>
      <button onClick={handler}>Change text state</button>
    </div>
  )
}

const ButtonShow = props => (
  <div>
    <button onClick={props.setShow}>Change show state</button>
  </div>
)

const Component = props => (
  <div>
    <Child text={props.text} />
    <ButtonText {...props} />
    <div>{String(props.show)}</div>
    <ButtonShow {...props} />
  </div>
)

const Enhance = compose(
  setDisplayName('App'),
  withStateHandlers(
    {
      text: 'hoge',
      show: false,
    },
    {
      setText: () => t => ({ text: t }),
      setShow: ({ show }) => () => ({ show: !show }),
    }
  )
)

export default Enhance(Component)
const Component = ({ text }) => (
  <div>
    {text}
    {console.log('render Child Component')}
  </div>
)

const Enhance = compose(setDisplayName('Child'), pure)

export default Enhance(Component)
以下の様に text が更新された時にだけ Child Component がレンダリングされ、render Child Componentが出力されています。

onlyUpdateForKeys
- pure 同様、shallowEqual を使用することで props が変更された場合のみレンダリングされます。
- pure 同様、不要なレンダリングを避けることでパフォーマンス向上を狙えます。
- pureとの違いとしては、配列形式にて監視する props のプロパティを指定することが出来ます。
- 子供の Component に props を指定せずに流し込んでおき、再レンダリングが必要なプロパティだけ監視するというような使い方が出来ます。
レンダリング結果は pure の場合と同様となります。
const ButtonText = props => {
  const handler = () =>
    props.text === 'hoge' ? props.setText('fuga') : props.setText('hoge')
  return (
    <div>
      <button onClick={handler}>Change text state</button>
    </div>
  )
}

const ButtonShow = props => (
  <div>
    <button onClick={props.setShow}>Change show state</button>
  </div>
)

const Component = props => (
  <div>
    <Child {...props} />
    <ButtonText {...props} />
    <div>{String(props.show)}</div>
    <ButtonShow {...props} />
  </div>
)

const Enhance = compose(
  setDisplayName('App'),
  withStateHandlers(
    {
      text: 'hoge',
      show: false,
    },
    {
      setText: () => t => ({ text: t }),
      setShow: ({ show }) => () => ({ show: !show }),
    }
  )
)

export default Enhance(Component)
const Component = props => (
  <div>
    {props.text}
    {console.log('Child Component')}
  </div>
)

const Enhance = compose(setDisplayName('Child'), onlyUpdateForKeys(['text']))

export default Enhance(Component)
branch
- 第1引数の結果( boolean )によって、第2引数(Right Component)と第3引数(Left Component)を出し分ける APIです。
App.js の State の show は最初 true の為、最初は Child.js の ComponentA がレンダリングされます。その後、setShow を実行することで show が false になる為、ComponentB がレンダリングされます。
const ButtonShow = props => (
  <div>
    <button onClick={props.setShow}>Change show state</button>
  </div>
)

const Component = props => (
  <div>
    <Child {...props} />
    <ButtonShow {...props} />
  </div>
)

const Enhance = compose(
  setDisplayName('App'),
  withStateHandlers(
    {
      text: 'hoge',
      show: true,
    },
    {
      setText: () => t => ({ text: t }),
      setShow: ({ show }) => () => ({ show: !show }),
    }
  )
)

export default Enhance(Component)
const ComponentA = () => <div>A</div>

const ComponentB = () => <div>B</div>

const checkShowState = ({ show }) => show

const withCheckShowState = branch(
  checkShowState,
  component => component,
  renderComponent(ComponentB)
)

const Enhance = compose(setDisplayName('Child'), withCheckShowState)

export default Enhance(ComponentA)
実際に動作させると以下の様になります。 true と false によって、ComponentA と ComponentBが出し分けされていることがわかります。

また、branch と renderNothing API を組み合わせることで、Component の表示・非表示をすることも出来ます。
renderNothing
- 常に null を返す HoCs の API です。
- branch と合わせて使用することが多いと思います。
branch のサンプルとほぼ同じ内容となります。違う点は App.js の State の show が false になった時に、 renderNothing が null を返す為、 ComponentA が非表示になります。
const ButtonShow = props => (
  <div>
    <button onClick={props.setShow}>Change show state</button>
  </div>
)

const Component = props => (
  <div>
    <Child {...props} />
    <ButtonShow {...props} />
  </div>
)

const Enhance = compose(
  setDisplayName('App'),
  withStateHandlers(
    {
      text: 'hoge',
      show: true,
    },
    {
      setText: () => t => ({ text: t }),
      setShow: ({ show }) => () => ({ show: !show }),
    }
  )
)

export default Enhance(Component)
const ComponentA = () => <div>A</div>

const checkShowState = ({ show }) => show

const withCheckShowState = branch(
  checkShowState,
  component => component,
  renderNothing
)

const Enhance = compose(setDisplayName('Child'), withCheckShowState)

export default Enhance(ComponentA)
実際に動作させると以下の様になります。 true と false によって、ComponentA が表示と非表示を繰り返していることがわかります。
nest
- 引数として渡した Component をネストする API です。
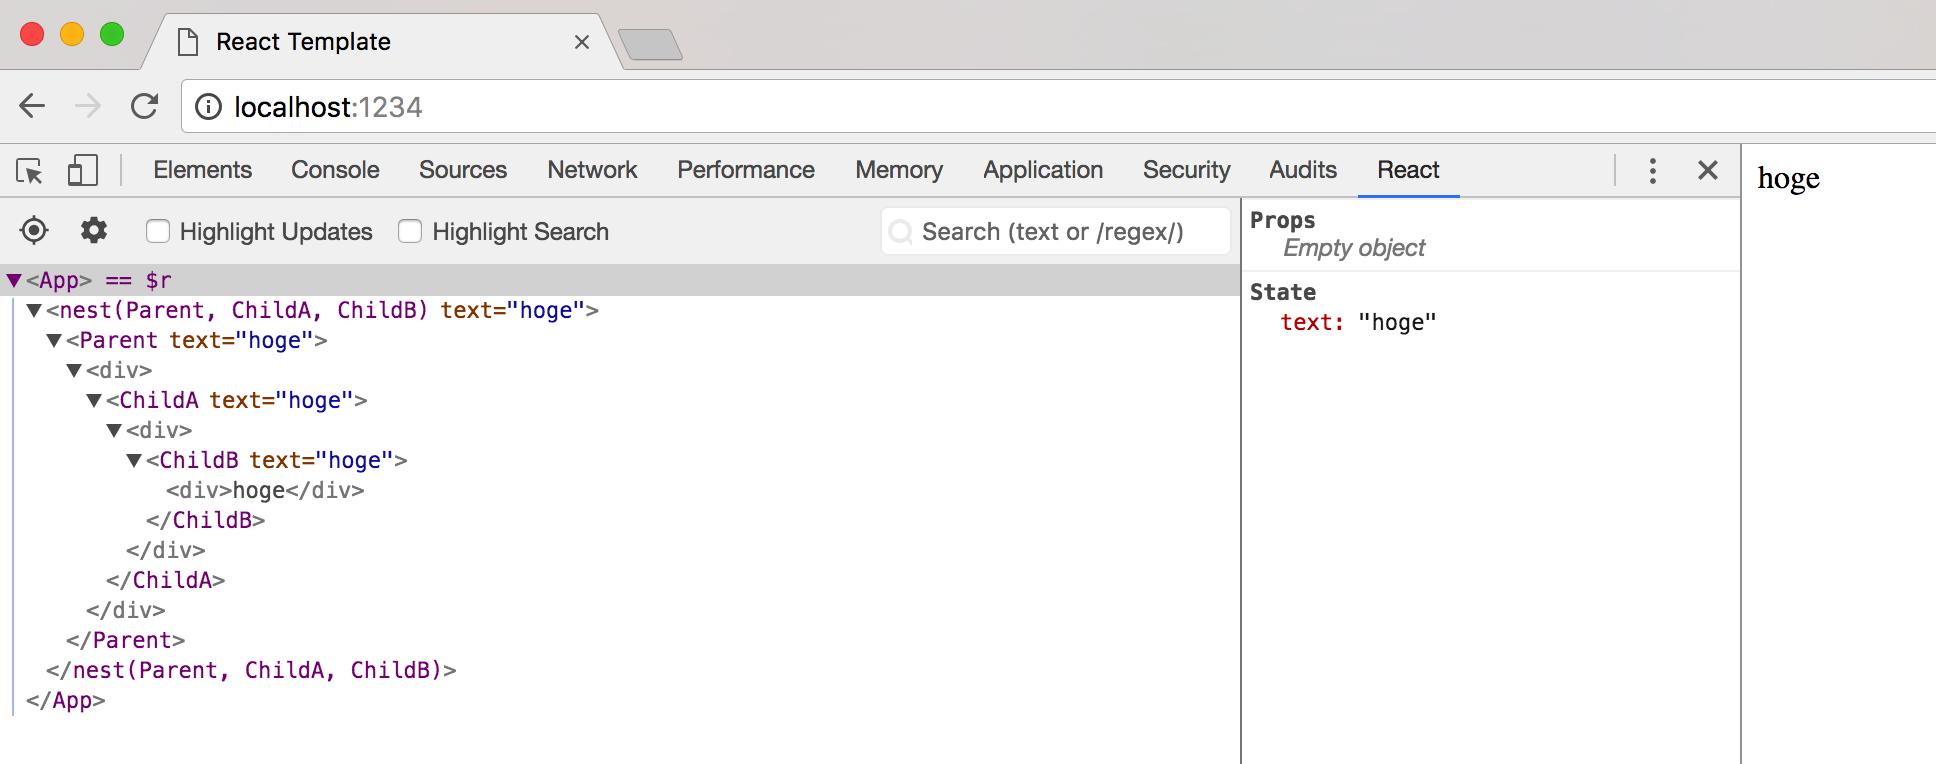
以下の例では、Parent Component > ChildA Component > ChildB Component の順番にネストさせています。
import React from 'react'
import { compose, setDisplayName, withStateHandlers, nest } from 'recompose'

const Parent = props => <div>{props.children}</div>

const ChildA = props => <div>{props.children}</div>

const ChildB = props => <div>{props.text}</div>

const Component = nest(Parent, ChildA, ChildB)

const Enhance = compose(
  setDisplayName('App'),
  withStateHandlers({ text: 'hoge' })
)

export default Enhance(Component)
実際に React Developer Tools で確認すると、以下の様になります。props として State の text が ChildB Component まで引き継がれていることが確認出来ます。
Google Developer Console の Elements でも<div>でネストしていることが確認出来ます。
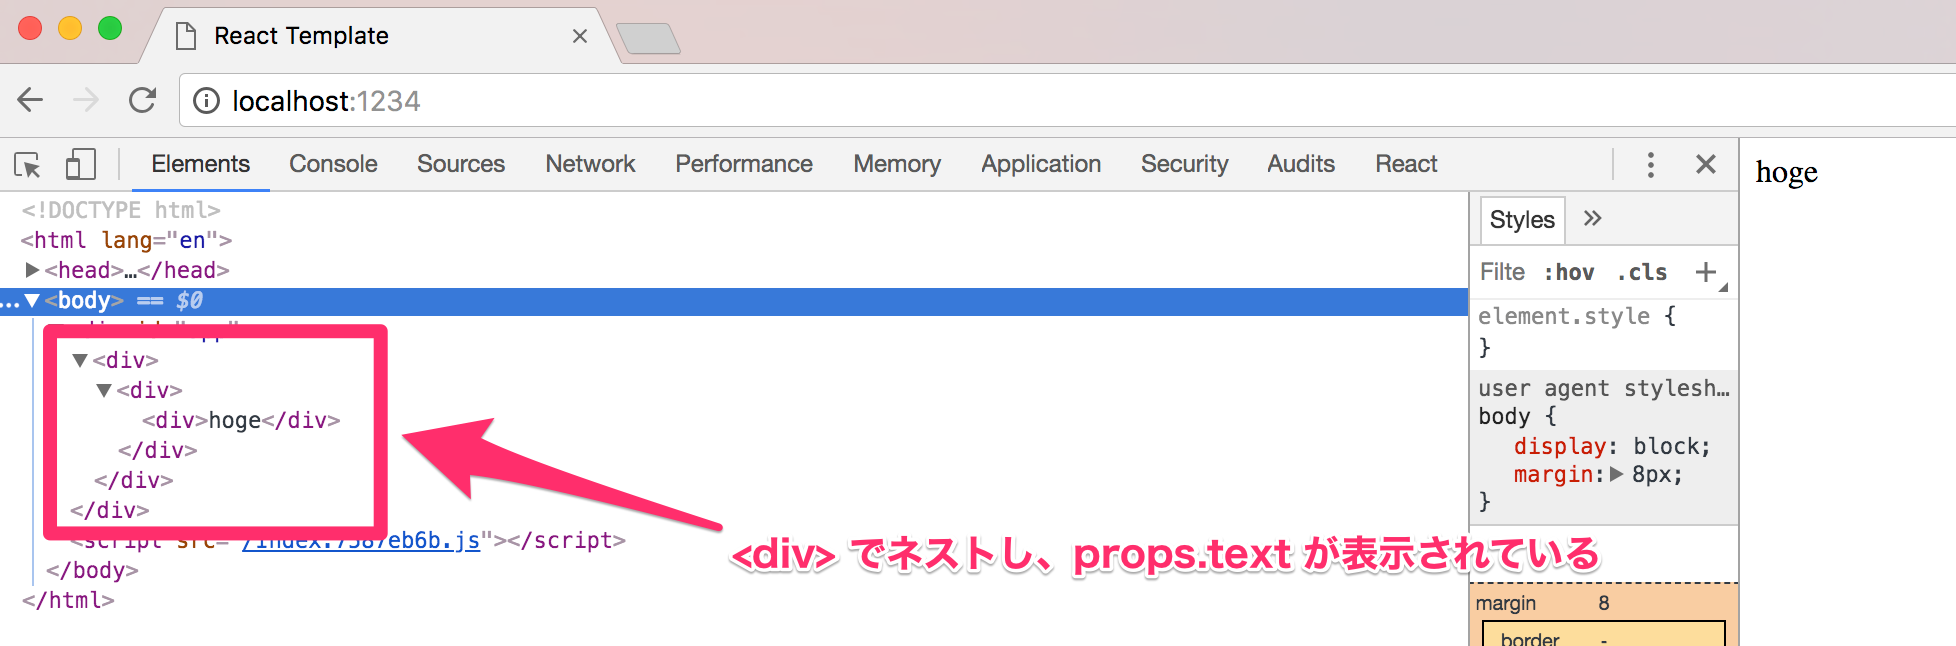
また、Component としてネストさせたいが、HTMLとしては<div>で階層を深くしたくない場合があると思います。その場合は、<React.Fragment>を使用することで実現出来ます。
import React from 'react'
import { compose, setDisplayName, withStateHandlers, nest } from 'recompose'

const Parent = props => <React.Fragment>{props.children}</React.Fragment>

const ChildA = props => <React.Fragment>{props.children}</React.Fragment>

const ChildB = props => <div>{props.text}</div>

const Component = nest(Parent, ChildA, ChildB)

const Enhance = compose(
  setDisplayName('App'),
  withStateHandlers({ text: 'hoge' })
)

export default Enhance(Component)
React Developer Tools にて Parent Component > ChildA Component > ChildB Component の順番にネストしていることが確認出来ます。

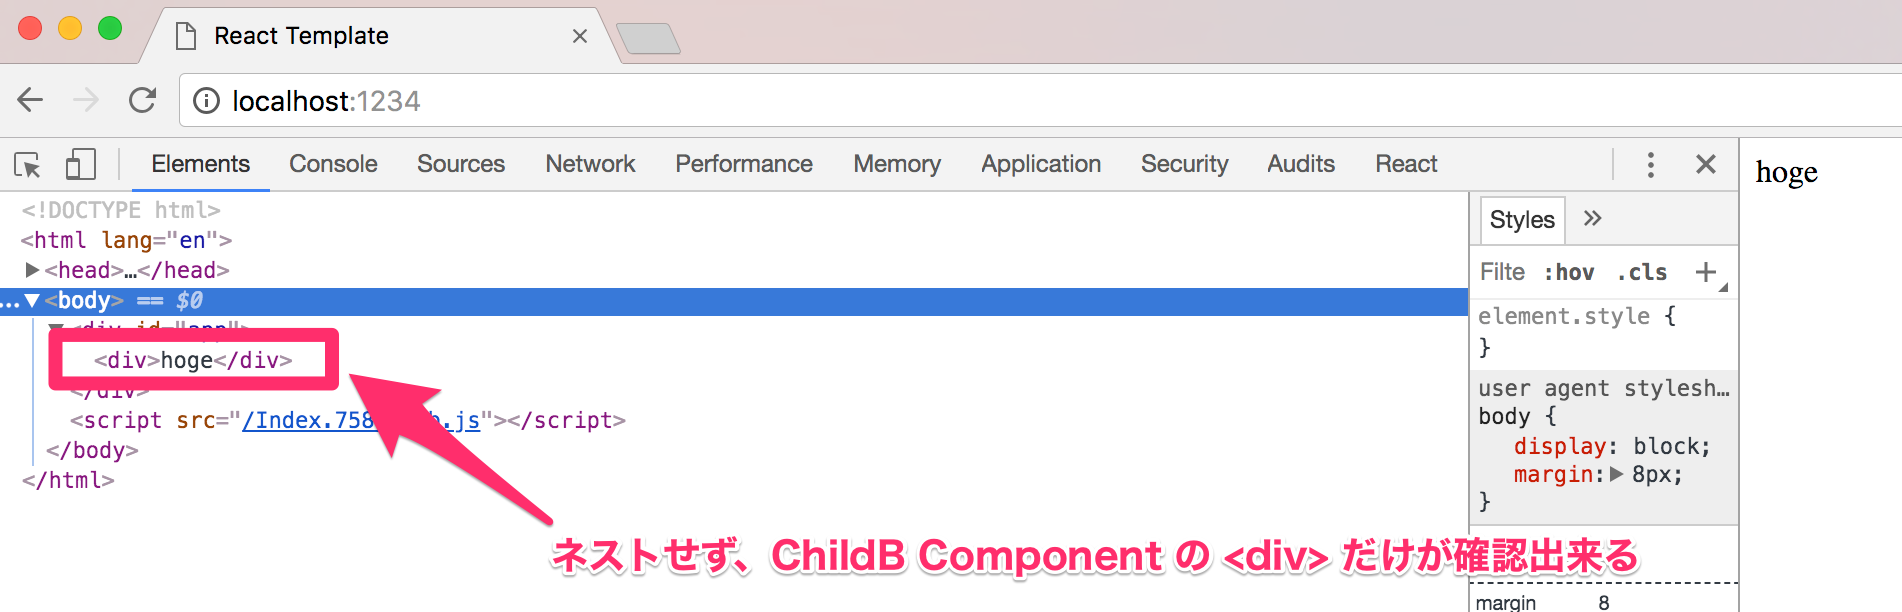
一方で、<React.Fragment>により、Parent Component と ChildA Component は Component としては存在していますが、HTMLとしては存在していないことが確認出来ます。
<React.Fragment>は以下の様に Component をまとめる際にも便利です。
const Component = () => (
  <React.Fragment>
    <ComponentA />
    <ComponentB />
    <ComponentC />
  </React.Fragment>
)
まとめ
- recompose を使用することで HoCs を簡単に扱うことが出来ます。
- Component をSFCで書くことが出来る為、コードがシンプルになり、可読性が向上します。
- HoCsの部分で State や lifecycle を書くことが出来る為、実際の Component 部分ではビューの表示に専念することが出来ます。
参考
- 【公式】Higher-order Components
- 【公式】recompose APIs
- 【技術書典4】Libraries of React
- Reactの Higher-order Components (HoCs) という概念に関するメモ
- メンテナブルな React Component を目指すための小技集
- Reactのコンポーネントをステートレスに!!!recomposeとは? ~0からreact習得記 day 09~
- React component ライフサイクル図
- React.jsのmixinについて
-
そうでない場合もあります。 ↩