記事を書くことにしたきっかけ
CloudWatch LogsのURLを自分のプログラム内で生成したかったのですが、そのURLの構造に関する公式情報が見つからず、さらに構成に一癖があり、意外と苦戦しました。
URLの構成を解説し、TypeScriptによって生成できるようにしてみます。

この記事を読むとわかること
- CloudWatch LogsのURLの構造
- TypeScriptでURLを生成する方法
調べてわかったこと
- CloudWatch LogsのURLを生成する方法は公式で用意されていない模様
- 構造を解析してURLを生成することは可能 (ただしAWSの仕様変更で動かなくなる可能性あり)
URLの構成
以下のURLを生成する手順を具体的に考えてみます。
https://ap-northeast-1.console.aws.amazon.com/cloudwatch/home?region=ap-northeast-1#logsV2:log-groups/log-group/$252Faws$252Ftest/log-events/test-event$3FfilterPattern$3D$2522dummy-filter$2522
URLの構成
URLは3つに分けることができます。
base path query は呼び分けるために私が命名しました。
※ 画像はクリックで拡大表示されます。

base部分の構成
解説する文字列
https://ap-northeast-1.console.aws.amazon.com/cloudwatch/home?region=ap-northeast-1
解説
ここは見ての通りかと思います。変化するのはap-northeast-1のみです。
path部分の構成
解説する文字列
#logsV2:log-groups/log-group/$252Faws$252Ftest/log-events/test-event
解説
先ほどの図の紫色の線がポイントです。変化する部分を日本語に置き換えてみます。
#logsV2:log-groups/log-group/ロググループ名/log-events/ログストリーム名
ここでの問題はロググループ名です。
URLエンコードされたような雰囲気ですが、少し違う結果です。
参考: URLエンコードとは (「分かりそう」で「分からない」でも「分かった」気になれるIT用語辞典)
さらに観察していくと、$25が2回登場することに気が付きます。
ちなみに%のURLエンコード結果は%25です。
つまりURLエンコードが2回実行され、さらに%が$に置換される処理となっていることがわかりました。
| 元の文字列 | /aws/test |
|---|---|
| 1. URLエンコードする | %2Faws%2Ftest |
| 2. もう一度URLエンコードする | %252Faws%252Ftest |
3. %を$に置換する (完成形) |
$252Faws$252Ftest |
この例の場合ではロググループ名だけが変換されましたが、ログストリーム名に特殊文字が含まれていた場合は同様に変換されます。
query部分の構成
解説する文字列
$3FfilterPattern$3D$2522dummy-filter$2522
解説
解析した結果、元の文字列は?filterPattern="dummy-filter"でした。
ちなみに""はAWS側による自動付与でなく、フィルタ文字に意図的に含めたものです。
これは必要な場合と不要な場合があります。
- 特殊文字(
-のような文字)が含まれている場合-
""で囲わなければならない (例:"dummy-filter")
-
- 特殊文字が含まれていない場合
-
""で囲う必要はない (例:dummy)
-
先ほどとは違い、1回目のURLエンコードの範囲に注意する必要があります。
「1回目はユーザが入力した文字列に対して」「2回目は全体に対して」となっているようです。
| 元の文字列 | ?filterPattern="dummy-filter" |
|---|---|
1. フィルタ文字"dummy-filter"のみをURLエンコードする |
?filterPattern=%22dummy-filter%22 |
| 2. 全体に対してURLエンコードする | %3FfilterPattern%3D%2522dummy-filter%2522 |
3. %を$に置換する (完成形) |
$3FfilterPattern$3D$2522dummy-filter$2522 |
作成したソースコード
TypeScriptで実装した結果を載せます。
2回目のURLエンコードで使用する共通処理
1回目のURLエンコードはJSで用意されている encodeURIComponent() を使用します。
2回目のURLエンコードの時は%を$に変換する処理が同時に必要なため、以下のメソッドを用意しておきます。
const encodeForLog = (str: string): string => {
  return encodeURIComponent(str).replace(/%/g, "$");
};
base部分の生成
解説はいらないと思います。
const buildBaseUrl = (region: string): string => {
  return `https://${region}.console.aws.amazon.com/cloudwatch/home?region=${region}`;
};
path部分の生成
解説した手順を実装します。
「固定文字のlog-groups log-group log-eventsのエンコードは不要では?」と突っ込みを受けるかもしれませんが、AWS内部の実装を想像するとエンコードしている気がしていて(ただの予想です)、全てをエンコードする処理にしました。
const buildPath = (groupName: string, streamName: string): string => {
  const encodedGroupName = encodeURIComponent(groupName);
  const encodedStreamName = encodeURIComponent(streamName);

  const path = ["log-groups", "log-group", encodedGroupName, "log-events", encodedStreamName]
    .map((str) => encodeForLog(str))
    .join("/");

  return `#logsV2:${path}`;
};
query部分の生成
先ほどの解説には登場しませんでしたが、期間の指定も可能なのでstart endも組み込んでみました。
const buildLogQuery = (filterPattern: string, start: Date, end: Date): string => {
  const options = [];

  if (filterPattern) {
    const quotedFilterPattern = encodeURIComponent(`"${filterPattern}"`);
    options.push(`filterPattern=${quotedFilterPattern}`);
  }
  if (start) {
    options.push(`start=${start.getTime()}`);
  }
  if (end) {
    options.push(`end=${end.getTime()}`);
  }

  if (options.length === 0) return "";

  const query = `?${options.join("&")}`;

  return encodeForLog(query);
};
結合する処理
最後に3つに分けて生成した文字列を1つにまとめます。
export interface BuildCloudWatchLogStreamUrlProps {
  region: string;
  groupName: string;
  streamName: string;
  filterPattern?: string;
  start?: Date;
  end?: Date;
}

export const buildCloudWatchLogStreamUrl = (props: BuildCloudWatchLogStreamUrlProps): string => {
  const baseUrl = buildBaseUrl(props.region);
  const path = buildPath(props.groupName, props.streamName);
  const query = buildLogQuery(props.filterPattern, props.start, props.end);

  return `${baseUrl}${path}${query}`;
};
完成
以上で最低限region groupName streamNameがわかればURLを生成することが可能になりました。
また、必要に応じてfilterPattern start endの指定も可能になりました。
プログラム全文
export interface BuildCloudWatchLogStreamUrlProps {
  region: string;
  groupName: string;
  streamName: string;
  filterPattern?: string;
  start?: Date;
  end?: Date;
}

export const buildCloudWatchLogStreamUrl = (props: BuildCloudWatchLogStreamUrlProps): string => {
  const baseUrl = buildBaseUrl(props.region);
  const path = buildPath(props.groupName, props.streamName);
  const query = buildLogQuery(props.filterPattern, props.start, props.end);

  return `${baseUrl}${path}${query}`;
};

const buildBaseUrl = (region: string): string => {
  return `https://${region}.console.aws.amazon.com/cloudwatch/home?region=${region}`;
};

const buildPath = (groupName: string, streamName: string): string => {
  const encodedGroupName = encodeURIComponent(groupName);
  const encodedStreamName = encodeURIComponent(streamName);

  const path = ["log-groups", "log-group", encodedGroupName, "log-events", encodedStreamName]
    .map((str) => encodeForLog(str))
    .join("/");

  return `#logsV2:${path}`;
};

const buildLogQuery = (filterPattern: string, start: Date, end: Date): string => {
  const options = [];

  if (filterPattern) {
    const quotedFilterPattern = encodeURIComponent(`"${filterPattern}"`);
    options.push(`filterPattern=${quotedFilterPattern}`);
  }
  if (start) {
    options.push(`start=${start.getTime()}`);
  }
  if (end) {
    options.push(`end=${end.getTime()}`);
  }

  if (options.length === 0) return "";

  const query = `?${options.join("&")}`;

  return encodeForLog(query);
};

const encodeForLog = (str: string): string => {
  return encodeURIComponent(str).replace(/%/g, "$");
};
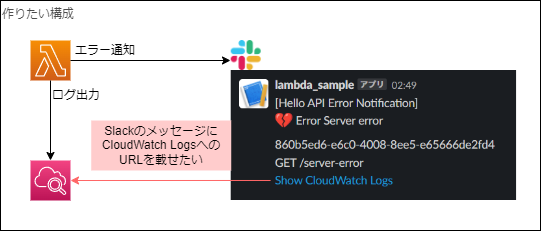
(余談1) なぜCloudWatch LogsのURLが必要になったのか
きっかけは「SlackにLambdaエラーをCloudWatch LogsのURLを含めて通知したい」という理由からでした。
すぐにエラーログを参照したい時に役立つと思います。
Lambdaから先ほどのメソッドを呼び出す例
Lambdaには以下のような処理を書いてURLを取得するようにしました。
const url = buildCloudWatchLogStreamUrl({
  region: process.env.AWS_REGION,
  groupName: context.logGroupName,
  streamName: context.logStreamName,
  filterPattern: context.awsRequestId,
});
引数の参考情報 (AWS公式ドキュメント)
- 環境変数について
- contextについて
(余談2): AWS Chatbotという選択肢
Chatbotが使える場合、似たようなSlack通知が可能らしいです。
CloudWatchのメトリクスからLambdaのエラーを検知してAWS ChatbotでSlack通知するという方法らしいのですが、Chatbotの自由度が低く(用途が限定的)、私のケースでは導入できませんでした。
ですがChatbotで事足りるケースではとても簡単に導入できるようなので、Chatbotも覚えておきたいところです。