.NET nanoFrameworkのサンプルプログラム4つ目です。
今回は Azure IoT Hub に接続してみます。
nanoFramework用のDeviceClient(Azure IoT Hub SDK)パッケージがあるので接続は簡単です。
ハードウェア
・M5 ATOM Matrix
・ESP32 DevkitC
ソフトウェア
・VisualStudio2019
・ファームウェア ESP32_PICO 1.7.4-preview.54
・ファームウェア ESP32_REV0 1.7.4-preview.54
・Azure IoT Hub
追加するNuGetパッケージ
・nanoFramework.System.Device.WiFi 1.4.0-preview.36
・nanoFramework.Azure.Devices.Client 1.0.0-preview.222
プログラム
using System;
using System.Diagnostics;
using System.Threading;

//追加
using System.Device.WiFi;
using nanoFramework.Networking;
using nanoFramework.Azure.Devices.Client;


namespace NF_ESP32_IotHub
{
    public class Program
    {
        const string ssid = "YOUR SSID";
        const string password = "PASSWORD";
        const string deviceId = "DEVICEID";
        const string saskey = "SASKEY";
        const string iothubAddress = "YOUR IOTHUB ADDRESS";

        public static void Main()
        {
            if (!ConnectWifi())
            {
                Debug.WriteLine("Connection fail...");
                return;
            }
            else
            {
                Debug.WriteLine("Connected...");
            }

            //クライアント
            DeviceClient client = new DeviceClient(iothubAddress, deviceId, saskey);

            var isOpen=client.Open();
            Debug.WriteLine($"Connection is open: {isOpen}");

            for (int i = 0; i < 10; i++)
            {
                client.SendMessage("Hello IoTHub!");
                Debug.WriteLine("Send Message...");
                Thread.Sleep(10000);
            }
            Thread.Sleep(Timeout.Infinite);
        }

        private static bool ConnectWifi()
        {
            Debug.WriteLine("Connecting WiFi");

            var success = WiFiNetworkHelper.ConnectDhcp(ssid, password, reconnectionKind: WiFiReconnectionKind.Automatic, requiresDateTime: true, token: new CancellationTokenSource(60000).Token);

            if (!success)
            {
                Debug.WriteLine($"Can't connect to the network, error: {WiFiNetworkHelper.Status}");
                if (WiFiNetworkHelper.HelperException != null)
                {
                    Debug.WriteLine($"ex: {WiFiNetworkHelper.HelperException}");
                }
            }

            Debug.WriteLine($"Date and time is now {DateTime.UtcNow}");

            return success;
        }
    }
}
・DEVICEIDはIoT Hubに登録したDevice名になります。
・SASKEYは登録したデバイスの主キーになります。
・IOTHUB ADDRESSはIoTHubのホスト名になります。
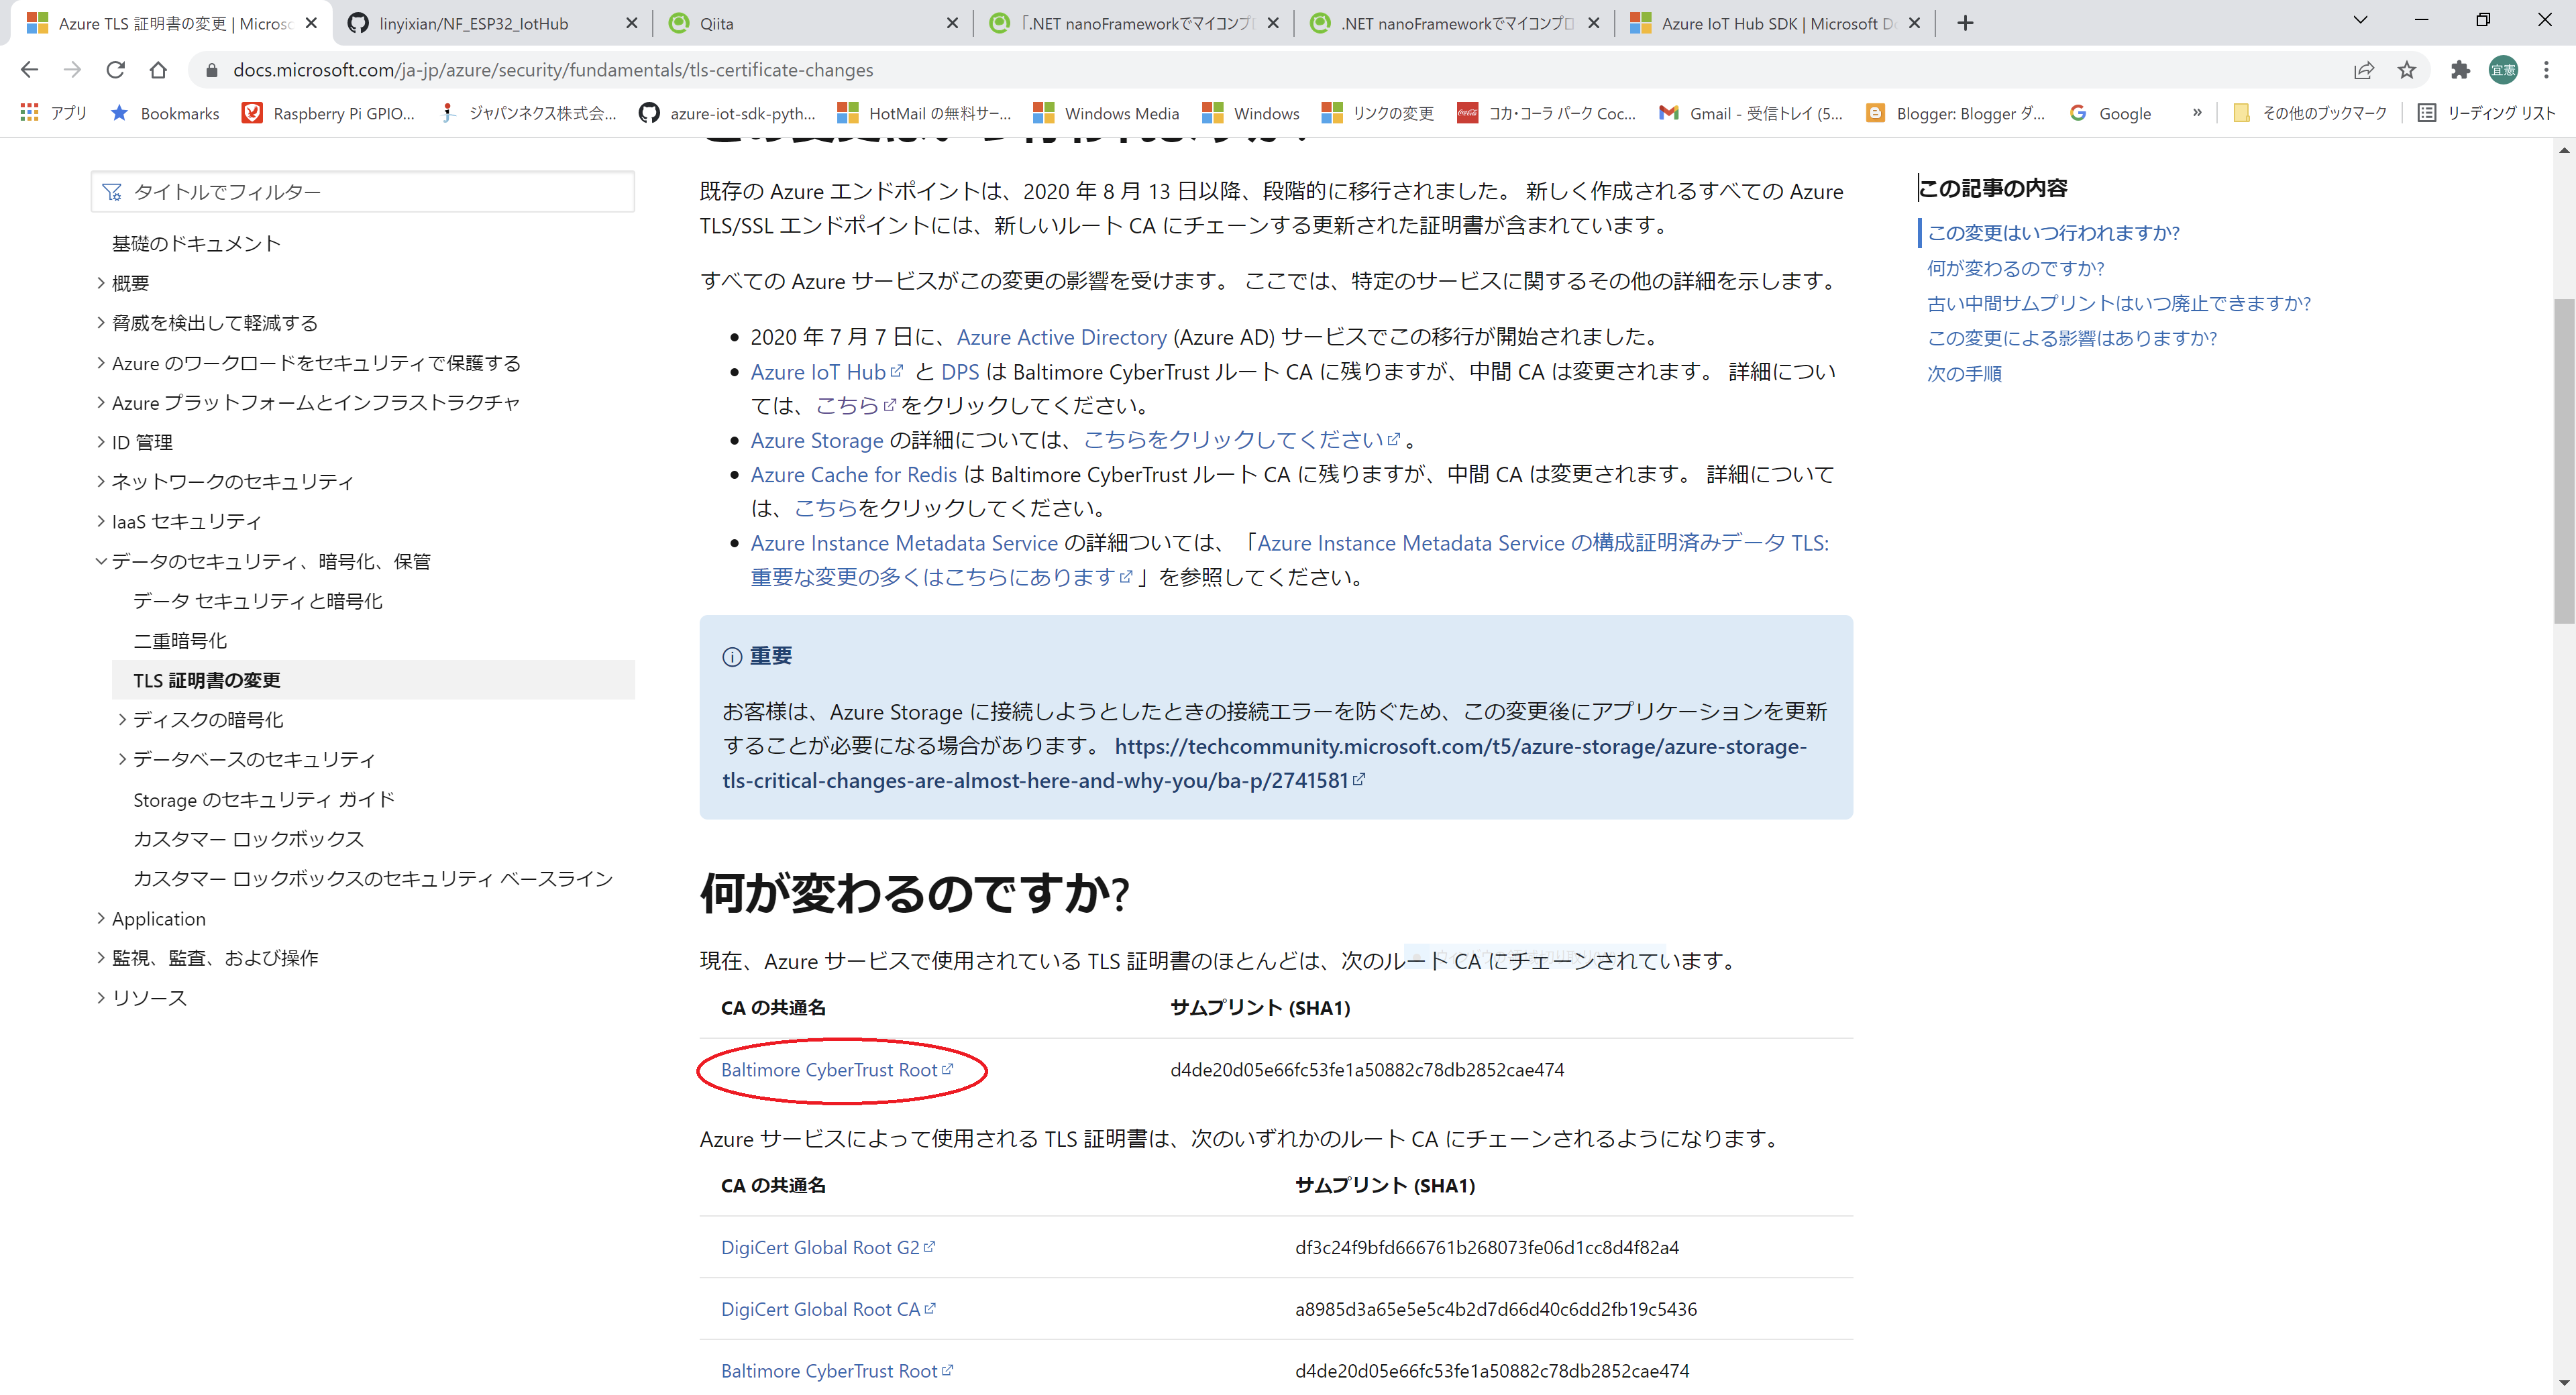
・IoTHubに接続するためにはルートCA証明書が必要になります。
証明書の登録方法は
1.ソースコードに埋め込む
2.リソースとしてプロジェクトに加える
3.デバイスにアップロードする
今回は3のデバイスにアップロードするを行います。
・まず次のページから「Baltimore CyberTrust Root」をダウンロードしておきます。
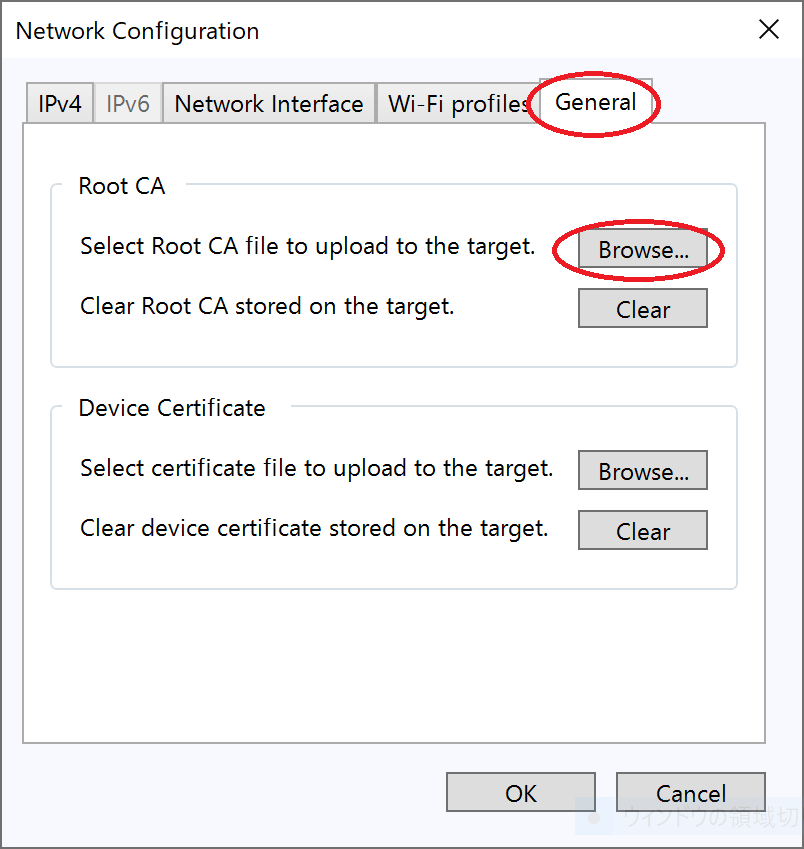
・次にVisualStudioをDeviceExplolerウインドウに切り替えて、上部のEdit Network Configurationボタンをクリックします。

・Generalタブに切り替えて、Browseボタンをクリックします。
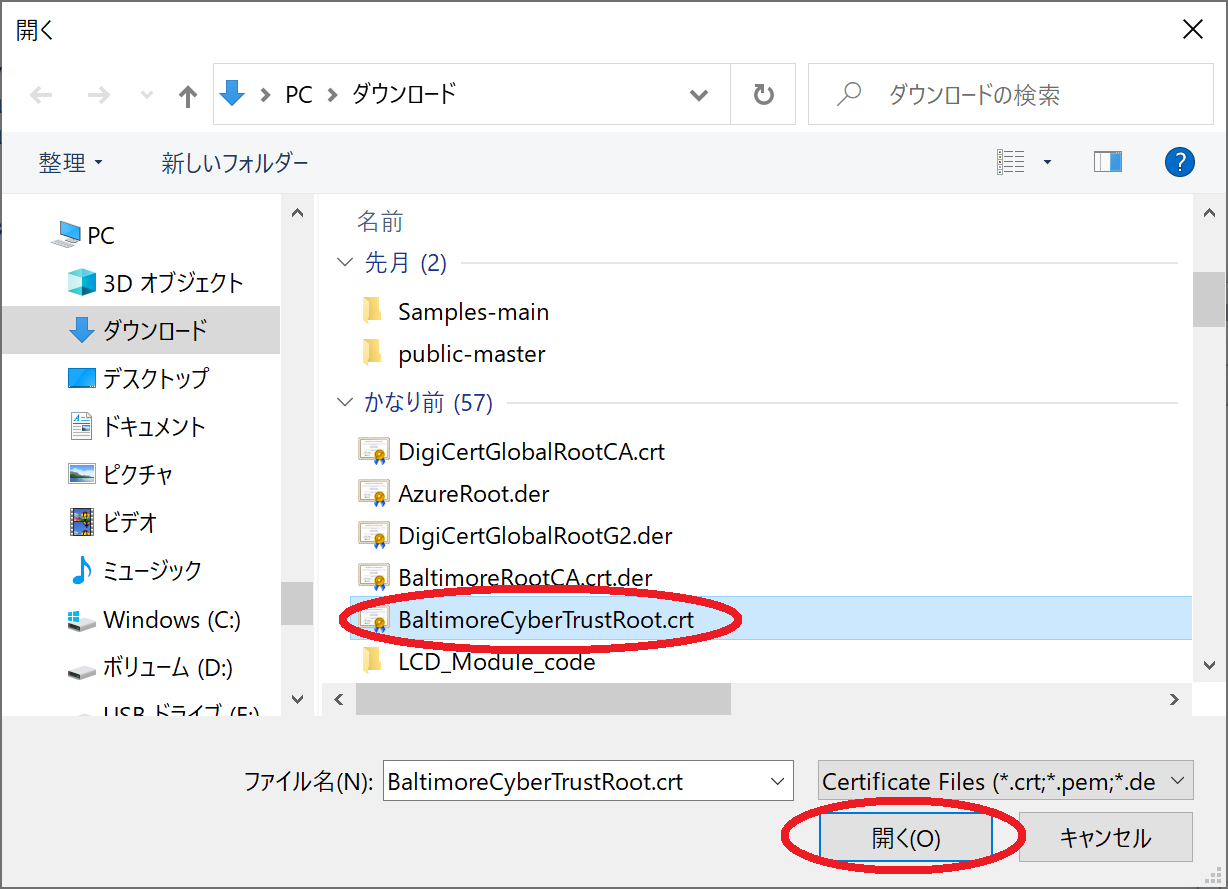
・ファイルダイアログで先ほどダウンロードした証明書ファイルを選択して開くボタンをクリックすると、デバイスに証明書がアップロードされます。
・プログラムを実行するとIoTHubへメッセージが10秒ごとに10件送信されます。
以上 IoT Hub 接続サンプルになります。
ソースコード一式はこちらからダウンロードできます。