4. ③メニューから「File→Open」でフォルダーピッカーを表示し、画像を保存しているフォルダを選べるようにする
・ここはフォルダーピッカーの使い方になります。
・フォルダーピッカーを使用するのでOpen_ClickもIAsyncActionへ変更します。
#pragma once

#include "MainWindow.g.h"

namespace winrt::PicViewer::implementation
{
    struct MainWindow : MainWindowT<MainWindow>
    {
        MainWindow()
        {
            //タイトル名の変更
            this->Title(L"PicViewer");
        }

        //HWND取得関数
        HWND getHwnd();

        //Openがクリックされたよ!-ここは非同期へ変更
        winrt::Windows::Foundation::IAsyncAction Open_Click(winrt::Windows::Foundation::IInspectable const& sender, winrt::Microsoft::UI::Xaml::RoutedEventArgs const& e);

        //Exitがクリックされたよ!-ここは非同期へ変更
        winrt::Windows::Foundation::IAsyncAction Exit_Click(winrt::Windows::Foundation::IInspectable const& sender, winrt::Microsoft::UI::Xaml::RoutedEventArgs const& e);
    };
}

namespace winrt::PicViewer::factory_implementation
{
    struct MainWindow : MainWindowT<MainWindow, implementation::MainWindow>
    {
    };
}
・次は実装です。こちらは実装するOpen_Clickまで載せます。
・フォルダピッカーで最初に開くフォルダはピクチャフォルダを提案します。
・フォルダーピッカーで「キャンセル」を選ぶとnullptrを返します。そのときはco_returnします。
#include "pch.h"
#include "MainWindow.xaml.h"
#if __has_include("MainWindow.g.cpp")
#include "MainWindow.g.cpp"
#endif

using namespace winrt;
using namespace Microsoft::UI::Xaml;

//::IWindowNativeと::IInitializeWithWindowを使うのにmicrosoft.ui.xaml.window.h、Shobjidl.hが必要
//MessageDialogを使うのにWindows.UI.Popups.hが必要
#include <microsoft.ui.xaml.window.h>
#include <winrt/Windows.UI.Popups.h>
#include <Shobjidl.h>

//FolderPickerを使用するのにwinrt/Windows.Storage.Pickers.hが必要
#include <winrt/Windows.Storage.Pickers.h>

namespace winrt::PicViewer::implementation
{
}

HWND winrt::PicViewer::implementation::MainWindow::getHwnd()
{
	auto windowNative{ this->m_inner.as<::IWindowNative>() };
	HWND hWnd{ 0 };
	windowNative->get_WindowHandle(&hWnd);

	return hWnd;
}

winrt::Windows::Foundation::IAsyncAction winrt::PicViewer::implementation::MainWindow::Open_Click(winrt::Windows::Foundation::IInspectable const& sender, winrt::Microsoft::UI::Xaml::RoutedEventArgs const& e)
{
	//各種ピッカーもwinrt::Windows~
	auto folderpicker = Windows::Storage::Pickers::FolderPicker();
	folderpicker.as<::IInitializeWithWindow>()->Initialize(getHwnd());

	//初期に開くフォルダはピクチャフォルダ
	folderpicker.SuggestedStartLocation(Windows::Storage::Pickers::PickerLocationId::PicturesLibrary);

	//ピッカーを表示
	auto&& serchfolder = co_await folderpicker.PickSingleFolderAsync();

	//キャンセルだったらco_return
	if (serchfolder == nullptr)
		co_return;
}

//以下Exit_Click()なので後略
5. ④フォルダーピッカーで選んだフォルダにある画像のサムネイルを表示する。
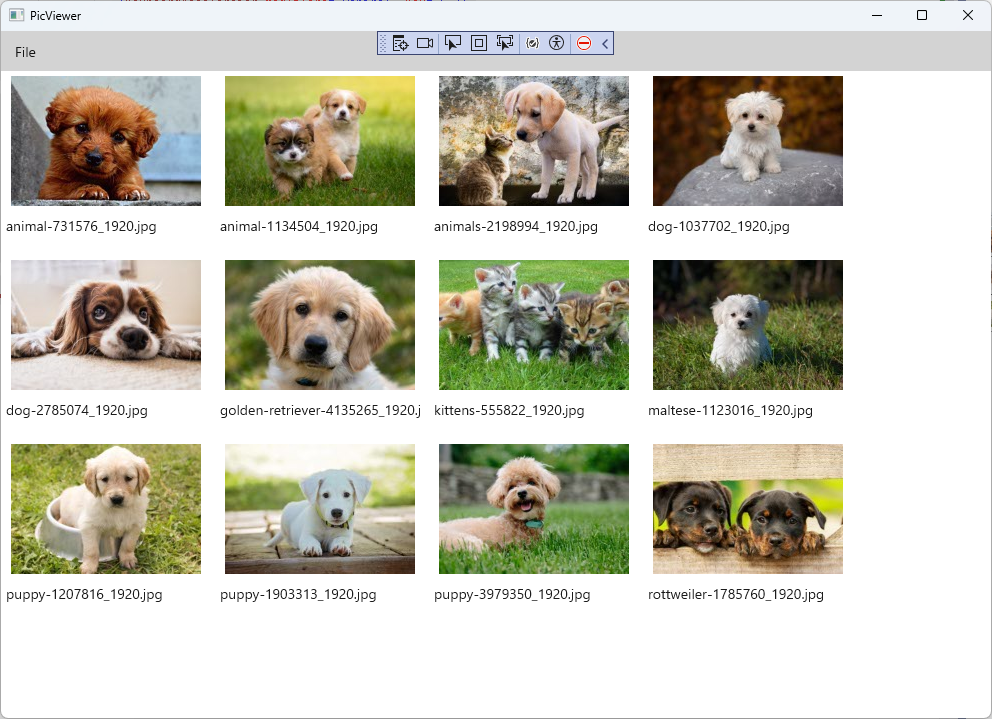
・基本的にはC++/WinRTでUWPその13 ピクチャフォルダをサムネイル表示しようとほぼ同じことを行って、メニューバーの下にグリッドビューを配置しそこへフォルダにある画像のサムネイルを表示させます。
・前回と同じように、
5-1.StorageFile+サムネイル+ファイル名を保存するViewModelを作成
5-2.ViewModelを取得する部分をOpen_Clickへ追加。IObservableVectorへ保存
5-3.MenuBarの下へGridViewを配置、②のVectorをBindし表示
の順に進みます
5-1.StorageFile+サムネイル+ファイル名を保存するViewModelを作成
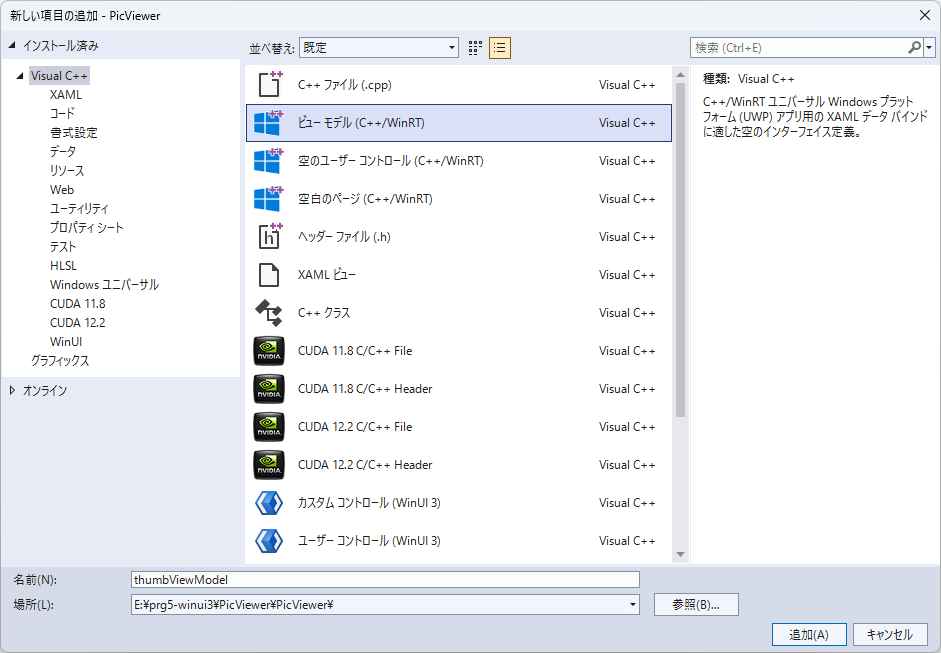
・まずは「thumbViewModel」という名前でViewModelを追加し、諸々追記します。追加するのはビューモデル(C++/WinRT)です。WinUI 3のビューモデルはないので。

・それでは追記していきます。
・まずはthumbViewModel.idlから。基本的にはその13とほぼ同じですが、BitmapImageがWindows.UI~では無く、Microsoft.UI~となります。間違えると後でコンパイルエラーとなります。
namespace PicViewer
{
    [bindable]
    [default_interface]
    runtimeclass thumbViewModel
    {
        thumbViewModel();
        thumbViewModel(Windows.Storage.StorageFile imagefile, Microsoft.UI.Xaml.Media.Imaging.BitmapImage thunbimage, String imagename);

        Windows.Storage.StorageFile GetImageFile{ get; };
        Microsoft.UI.Xaml.Media.Imaging.BitmapImage GetThumbImage{ get; };
        String GetImageName{ get; };
    }
}
・thumbViewModelの実装はthumbViewModel.hでやってしまいます。
・Windows~とMicrosoft~さえ間違えなければ、その13そのままです。
・thumbViewModel.cppは載せませんが、propertyとかご丁寧に書いてくれているのでそれを削除しておいてください。
#pragma once

#include "thumbViewModel.g.h"

namespace winrt::PicViewer::implementation
{
    struct thumbViewModel : thumbViewModelT<thumbViewModel>
    {
        thumbViewModel() = default;

        thumbViewModel(
            //StorageFileはWindows~
            Windows::Storage::StorageFile const& imagefile,
            //BitmapImageはMicrosoft~
            Microsoft::UI::Xaml::Media::Imaging::BitmapImage const& thumbimage,
            hstring const& imagename
        ) :
            _imageFile(imagefile),
            _thumbImage(thumbimage),
            _imageName(imagename)
        {}

        Windows::Storage::StorageFile GetImageFile() const
        {
            return _imageFile;
        }

        Microsoft::UI::Xaml::Media::Imaging::BitmapImage GetThumbImage() const
        {
            return _thumbImage;
        }

        hstring GetImageName() const
        {
            return _imageName;
        }

    private:
        Windows::Storage::StorageFile _imageFile{ nullptr };
        Microsoft::UI::Xaml::Media::Imaging::BitmapImage _thumbImage;
        hstring _imageName;

    };
}

namespace winrt::PicViewer::factory_implementation
{
    struct thumbViewModel : thumbViewModelT<thumbViewModel, implementation::thumbViewModel>
    {
    };
}
5-2.ViewModelを取得する部分をOpen_Clickへ追加。IObservableVectorへ保存
・まずはMainWindow.idlへthumbViewModelVecを追加。
・次にサムネイル取得関数と、Open_Click関数へthmubViewModel取得部分を追加。
の順で進めます。
・MainWindow.idlではまず、thumbViewModelをimportし、viewModelVecを追加します。
import "thumbViewModel.idl";

namespace PicViewer
{
    [default_interface]
    runtimeclass MainWindow : Microsoft.UI.Xaml.Window
    {
        MainWindow();
        Windows.Foundation.Collections.IObservableVector<IInspectable> viewModelVec{ get; };
    }
}
・MainWindow.xaml.hでは、thumbViewModelを保存するメンバの作成および初期化を行い、idlで宣言したゲッターの実装を追加します。
#pragma once

#include "MainWindow.g.h"

namespace winrt::PicViewer::implementation
{
    struct MainWindow : MainWindowT<MainWindow>
    {
        MainWindow()
        {
            //タイトル名の変更
            this->Title(L"PicViewer");

            //_thumbViewModelVecの初期化
            _thumbViewModelVec = winrt::single_threaded_observable_vector<IInspectable>();
        }

        //HWND取得関数
        HWND getHwnd();

        //idlで宣言したゲッター
        Windows::Foundation::Collections::IObservableVector<Windows::Foundation::IInspectable> viewModelVec() const
        {
            return _thumbViewModelVec;
        }

        //Openがクリックされたよ!-ここは非同期へ変更
        winrt::Windows::Foundation::IAsyncAction Open_Click(winrt::Windows::Foundation::IInspectable const& sender, winrt::Microsoft::UI::Xaml::RoutedEventArgs const& e);

        //Exitがクリックされたよ!-ここは非同期へ変更
        winrt::Windows::Foundation::IAsyncAction Exit_Click(winrt::Windows::Foundation::IInspectable const& sender, winrt::Microsoft::UI::Xaml::RoutedEventArgs const& e);

    private:
        //thumbViewModelを保存するメンバ
        Windows::Foundation::Collections::IObservableVector<Windows::Foundation::IInspectable> _thumbViewModelVec{ nullptr };
    };
}

namespace winrt::PicViewer::factory_implementation
{
    struct MainWindow : MainWindowT<MainWindow, implementation::MainWindow>
    {
    };
}
・MainWindow.xaml.hでは、必要なヘッダをインクルードして、OpenClick関数の後半にthumbViewModelを取得する部分を追加します。
#include "pch.h"
#include "MainWindow.xaml.h"
#if __has_include("MainWindow.g.cpp")
#include "MainWindow.g.cpp"
#endif

using namespace winrt;
using namespace Microsoft::UI::Xaml;

//::IWindowNativeと::IInitializeWithWindowを使うのにmicrosoft.ui.xaml.window.h、Shobjidl.hが必要
//MessageDialogを使うのにWindows.UI.Popups.hが必要
#include <microsoft.ui.xaml.window.h>
#include <winrt/Windows.UI.Popups.h>
#include <Shobjidl.h>

//FolderPickerを使用するのにwinrt/Windows.Storage.Pickers.hが必要
#include <winrt/Windows.Storage.Pickers.h>

//Windows::Storage::Search~を使用するのに必要
#include <winrt/Windows.Storage.Search.h>

//thumbViewModel.hも忘れずに
#include"thumbViewModel.h"

namespace winrt::PicViewer::implementation
{
}

HWND winrt::PicViewer::implementation::MainWindow::getHwnd()
{
	auto windowNative{ this->m_inner.as<::IWindowNative>() };
	HWND hWnd{ 0 };
	windowNative->get_WindowHandle(&hWnd);

	return hWnd;
}

winrt::Windows::Foundation::IAsyncAction winrt::PicViewer::implementation::MainWindow::Open_Click(winrt::Windows::Foundation::IInspectable const& sender, winrt::Microsoft::UI::Xaml::RoutedEventArgs const& e)
{
	//各種ピッカーもwinrt::Windows~
	auto folderpicker = Windows::Storage::Pickers::FolderPicker();
	folderpicker.as<::IInitializeWithWindow>()->Initialize(getHwnd());

	//初期に開くフォルダはピクチャフォルダ
	folderpicker.SuggestedStartLocation(Windows::Storage::Pickers::PickerLocationId::PicturesLibrary);

	//ピッカーを表示
	auto&& serchfolder = co_await folderpicker.PickSingleFolderAsync();

	//キャンセルだったらco_return
	if (serchfolder == nullptr)
		co_return;

	//ここから選択されたフォルダの画像ファイルを変換・保存
	_thumbViewModelVec.Clear();

	//jpgとpngとbmpとgif画像を探す。さがすフォルダはそのフォルダのみ
	Windows::Storage::Search::QueryOptions serchoptions{};
	serchoptions.FileTypeFilter().Append(L".jpg");
	serchoptions.FileTypeFilter().Append(L".png");
	serchoptions.FileTypeFilter().Append(L".bmp");
	serchoptions.FileTypeFilter().Append(L".gif");
	serchoptions.FolderDepth(Windows::Storage::Search::FolderDepth::Shallow);

	//フォルダ内をサーチして、画像ファイルのStorageFileをallimageへ保存
	auto serchresult = serchfolder.as<Windows::Storage::Search::IStorageFolderQueryOperations>().CreateFileQueryWithOptions(serchoptions);
	auto&& allimage = co_await serchresult.GetFilesAsync();

	//allimageをすべて走査して3つすべて取得できれば、_thumbViewModelVecへ保存
	for (auto&& imagefile : allimage)
	{
		auto&& thumbnail{ co_await imagefile.GetThumbnailAsync(Windows::Storage::FileProperties::ThumbnailMode::PicturesView, 190, Windows::Storage::FileProperties::ThumbnailOptions::ResizeThumbnail) };

		Microsoft::UI::Xaml::Media::Imaging::BitmapImage thumbImage{};
		if (thumbnail)
			thumbImage.SetSource(thumbnail);
		else
			continue;

		auto&& thumbViewModel = make<PicViewer::implementation::thumbViewModel>(imagefile, thumbImage, imagefile.Name());
		_thumbViewModelVec.Append(thumbViewModel);
	}
}
5-3.MenuBarの下へGridViewを配置、②のVectorをBindし表示
・MainWindow.xamlを変更してGridViewを追加し、選んだフォルダにある画像のサムネイルを表示出来るように変更しましょう。変更するのはMainWindow.xamlのみです。
<?xml version="1.0" encoding="utf-8"?>
<Window
    x:Class="PicViewer.MainWindow"
    xmlns="http://schemas.microsoft.com/winfx/2006/xaml/presentation"
    xmlns:x="http://schemas.microsoft.com/winfx/2006/xaml"
    xmlns:local="using:PicViewer"
    xmlns:d="http://schemas.microsoft.com/expression/blend/2008"
    xmlns:mc="http://schemas.openxmlformats.org/markup-compatibility/2006"
    mc:Ignorable="d">

    <Grid RequestedTheme="Default" >

        <Grid.RowDefinitions>
            <RowDefinition Height="auto" />
            <RowDefinition Height="1*"/>
        </Grid.RowDefinitions>
        <MenuBar Background="LightGray" BorderBrush="Black" BorderThickness="1" CornerRadius="5">
            <MenuBarItem Title="File">

                <MenuFlyoutItem Text="Open" Click="Open_Click">
                    <MenuFlyoutItem.KeyboardAccelerators>
                        <KeyboardAccelerator Modifiers="Control" Key="O"/>
                    </MenuFlyoutItem.KeyboardAccelerators>
                </MenuFlyoutItem>

                <MenuFlyoutItem Text="Exit" Click="Exit_Click">
                    <MenuFlyoutItem.KeyboardAccelerators>
                        <KeyboardAccelerator Modifiers="Control" Key="E"/>
                    </MenuFlyoutItem.KeyboardAccelerators>
                </MenuFlyoutItem>

            </MenuBarItem>
        </MenuBar>

        <GridView ItemsSource="{x:Bind viewModelVec}" Name="thumbGrid"  Grid.Row="1" IsItemClickEnabled="True" >
            <GridView.ItemTemplate>
                <DataTemplate x:Name="ImageTextDataTemplate" x:DataType="local:thumbViewModel">
                    <StackPanel Height="170" Width="200" Margin="5">
                        <Image Source="{x:Bind GetThumbImage}" Height="130" Width="190" />
                        <StackPanel Margin="0,10">
                            <TextBlock Text="{x:Bind GetImageName}"/>
                        </StackPanel>
                    </StackPanel>
                </DataTemplate>
            </GridView.ItemTemplate>
        </GridView>

    </Grid>
</Window>

