1.データバインディングとは
・まずはMSのページをよく読んでください。よく読んでも私にはよくわからなかったですorz
データ バインディングの概要
データ バインディングの詳細
・個人的に一番参考になったのはC#ですがこのページでした。
marikoootaの日記 データ・バインディングを理解する
・データバインディングとは、私の中では「コントロールにデータを結びつける仕組み」です。
・「データが変化したらコントロールに通知する」こともできます。そこまで実装したら、QTでいうシグナル/スロット、もしくはデザインパターンで言うオブザーバーパターンのようなものにまですることができます。
・今回はコントロール(TextBlock)にバインドできるデータ(ViewModel)を作成し、xamlでバインドするところまでやります。
・View Modelは「.idl」「.h」「.cpp」の3ファイルからなり、.idlではC#風のコンストラクタとプロパティーの宣言をし、.hと.cppでC++の実装をするというような感じとなります。
・MSのwebページでいうとXAML コントロール: C++/WinRT プロパティへのバインドの一部です。次回はデータが変化したらコントロールに通知する箇所をやります。
2.プロジェクトの作成
・前回と同じようにBlank App(C++/WinRT)を選び、今回は「bind_1」という名前でプロジェクトを作成します。
・MainPage.xamlからmyButton、MainPage.hとMainPage.cppからイベントハンドラを削除し、まっさらにしてください。
3.ViewModelの作成
3-1.StringViewModelの作成(バインドできるViewModelの作成)
・まずはStringViewModelという名前のViewModelを作成し、それをTextBlockへバインドして表示されるか確認します。
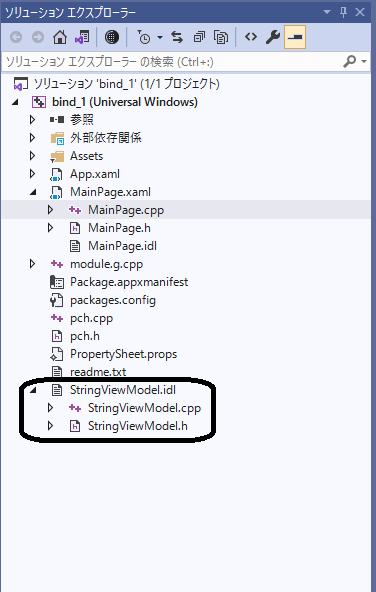
・それでは実装に入ります。プロジェクト→モジュールの追加から

・View Modelを選び、名前を「StringViewModel」にして追加します。

・すると、「StringViewModel.idl」「StringViewModel.h」「StringViewModel.cpp」が追加されます。

3-2.StringViewModel.idlの編集
・[Windows.UI.Xaml.Data.Bindable]に変更します。
・StringViewModel.idlを以下に変更します。MyPropertyとかいらないので削除し、DataStringを追加します。
・このDataStringが(C#でいうプロパティー?)ゲッター/セッターだよという宣言です。
・StringViewModel()はコンストラクタでそのまま残しておきます。
    [bindable]
    [default_interface]
    runtimeclass StringViewModel
    {
        StringViewModel();
        Int32 MyProperty;
    }
namespace bind_1
{
    [Windows.UI.Xaml.Data.Bindable]
    runtimeclass StringViewModel
    {
        StringViewModel();
        String DataString;
    }
}
## 3-3.StringViewModel.hの編集 ・StringViewModel.hを以下に変更します。いらないMyMyPropertyを削除し、idlで追加したDataStringとデータメンバを追加します。C#なら自動実装プロパティーとかあって楽なのですが、C++ではゲッターとセッターをゴリゴリ書きます。.g.hは気にしないで下さい。
# pragma once

# include "StringViewModel.g.h"

namespace winrt::bind_1::implementation
{
    struct StringViewModel : StringViewModelT<StringViewModel>
    {
        StringViewModel() = default;

        int32_t MyProperty();
        void MyProperty(int32_t value);
    };
}

namespace winrt::bind_1::factory_implementation
{
    struct StringViewModel : StringViewModelT<StringViewModel, implementation::StringViewModel>
    {
    };
}
# pragma once

# include "StringViewModel.g.h"

namespace winrt::bind_1::implementation
{
    struct StringViewModel : StringViewModelT<StringViewModel>
    {
        //ここはdefaultを削除
        StringViewModel();
        //ここ追加
        StringViewModel(const winrt::hstring value);

        //ここ追加 セッターですね
        void DataString(winrt::hstring const& value);
        //こちらはゲッター
        winrt::hstring DataString();

    private:
        //ここ追加
        winrt::hstring m_DataString;
    };
}

namespace winrt::bind_1::factory_implementation
{
    struct StringViewModel : StringViewModelT<StringViewModel, implementation::StringViewModel>
    {
    };
}
・StringViewModel.cppも以下に変更します。こちらも.g.cppは気にしないで下さい。勝手に作っているファイルです。でもちょくちょくここが原因でエラーになるんですよねorz
# include "pch.h"
# include "StringViewModel.h"
# if __has_include("StringViewModel.g.cpp")
# include "StringViewModel.g.cpp"
# endif

namespace winrt::bind_1::implementation
{
    int32_t StringViewModel::MyProperty()
    {
        throw hresult_not_implemented();
    }

    void StringViewModel::MyProperty(int32_t /*value*/)
    {
        throw hresult_not_implemented();
    }
}
# include "pch.h"
# include "StringViewModel.h"
# if __has_include("StringViewModel.g.cpp")
# include "StringViewModel.g.cpp"
# endif

namespace winrt::bind_1::implementation
{
    //これ以降追加
    StringViewModel::StringViewModel() : m_DataString(L"First String")
    {
    }
    StringViewModel::StringViewModel(const winrt::hstring value)
    {
        m_DataString = value;
    }

    void StringViewModel::DataString(winrt::hstring const& value)
    {
        m_DataString = value;
    }
    winrt::hstring StringViewModel::DataString()
    {
        return m_DataString;
    }
}
・MainPage.idlを編集して、StringViewModel.idlをインポートします。importは#無しで合ってます。#importだとエラーが出ます。importの最後にセミコロンも必要です。#importディレクティブと紛らわしいので注意して下さい。何度間違えてエラーを起こしたことか・・・ ・StringViewModelのオブジェクトのSViewModelもここで宣言します。
namespace bind_1
{
    [default_interface]
    runtimeclass MainPage : Windows.UI.Xaml.Controls.Page
    {
        MainPage();
        Int32 MyProperty;
    }
}
import "StringViewModel.idl";

namespace bind_1
{
    [default_interface]
    runtimeclass MainPage : Windows.UI.Xaml.Controls.Page
    {
        MainPage();
        Int32 MyProperty;

        StringViewModel SViewModel{ get; };
    }
}
・MainPage.hを編集して、StringViewModel.hをインクルードして、SviewModel()とm_SViewModelを追加します。
# pragma once

# include "MainPage.g.h"

namespace winrt::bind_1::implementation
{
    struct MainPage : MainPageT<MainPage>
    {
        MainPage();

        int32_t MyProperty();
        void MyProperty(int32_t value);
}

namespace winrt::bind_1::factory_implementation
{
    struct MainPage : MainPageT<MainPage, implementation::MainPage>
    {
    };
}
# pragma once

# include "MainPage.g.h"
# include "StringViewModel.h"

namespace winrt::bind_1::implementation
{
    struct MainPage : MainPageT<MainPage>
    {
        MainPage();

        int32_t MyProperty();
        void MyProperty(int32_t value);

        //ここ追加
        bind_1::StringViewModel SViewModel();

    private :
        //ここ追加
        bind_1::StringViewModel m_SViewModel{ nullptr };
    };
}

namespace winrt::bind_1::factory_implementation
{
    struct MainPage : MainPageT<MainPage, implementation::MainPage>
    {
    };
}
・MainPage.cppを編集して、SViewModel()を実装します。SViewModelはm_SViewModelを返すだけです。また、コンストラクタでm_SViewModelを作成します。
# include "pch.h"
# include "MainPage.h"
# include "MainPage.g.cpp"

using namespace winrt;
using namespace Windows::UI::Xaml;

namespace winrt::bind_1::implementation
{
    MainPage::MainPage()
    {
        InitializeComponent();
    }

    int32_t MainPage::MyProperty()
    {
        throw hresult_not_implemented();
    }

    void MainPage::MyProperty(int32_t /* value */)
    {
        throw hresult_not_implemented();
    }
}
# include "pch.h"
# include "MainPage.h"
# include "MainPage.g.cpp"

using namespace winrt;
using namespace Windows::UI::Xaml;

namespace winrt::bind_1::implementation
{
    MainPage::MainPage()
    {
        //ここ追加
        m_SViewModel = winrt::make<bind_1::implementation::StringViewModel>();
        InitializeComponent();
    }

    int32_t MainPage::MyProperty()
    {
        throw hresult_not_implemented();
    }

    void MainPage::MyProperty(int32_t /* value */)
    {
        throw hresult_not_implemented();
    }
}

//ここ追加
bind_1::StringViewModel winrt::bind_1::implementation::MainPage::SViewModel()
{
    return m_SViewModel;
}
・MainPage.xamlを変更して、ボタン一つとtextBlock一つを作りハンドラーを追加し、textBlockにSviewModelをバインドします。
<Page
    x:Class="bind_1.MainPage"
    xmlns="http://schemas.microsoft.com/winfx/2006/xaml/presentation"
    xmlns:x="http://schemas.microsoft.com/winfx/2006/xaml"
    xmlns:local="using:bind_1"
    xmlns:d="http://schemas.microsoft.com/expression/blend/2008"
    xmlns:mc="http://schemas.openxmlformats.org/markup-compatibility/2006"
    mc:Ignorable="d">

</Page>
<Page
    x:Class="bind_1.MainPage"
    xmlns="http://schemas.microsoft.com/winfx/2006/xaml/presentation"
    xmlns:x="http://schemas.microsoft.com/winfx/2006/xaml"
    xmlns:local="using:bind_1"
    xmlns:d="http://schemas.microsoft.com/expression/blend/2008"
    xmlns:mc="http://schemas.openxmlformats.org/markup-compatibility/2006"
    mc:Ignorable="d">

    <StackPanel Orientation="Vertical" HorizontalAlignment="Center" VerticalAlignment="Center">
        <Button x:Name="button1" Height="30" Width="300" Content="click" Click="button1_Click"></Button>
        <TextBlock x:Name="text1" Text="{x:Bind Path=SViewModel.DataString, Mode=OneWay}" Height="300" Width="300" Margin="10,10,10,10"></TextBlock>

    </StackPanel>
</Page>
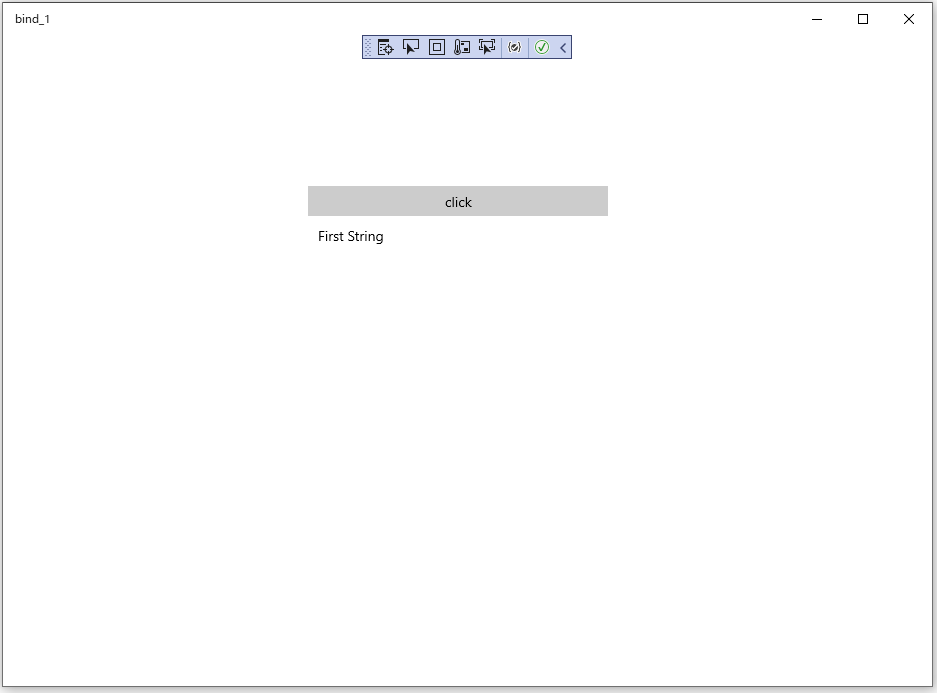
・ここまで終わったらビルド→実行してみて下さい。ボタンとtextblockへ「First String」が表示されているはずです。MainPage.cppでm_SViewModelを作成するときにデフォルトコンストラクタを呼んでいるので「First String」が表示されます

・MainPage.cppでm_SViewModel = winrt::make<bind_1::implementation::StringViewModel>(L"Rewritten on the main page");と変更すると「Rewritten on the main page」が表示されます。
・xamlでバインドしているのは以下の部分です。
<TextBlock x:Name="text1" Text="{x:Bind Path=SViewModel.DataString, Mode=OneWay}" Height="300" Width="300" Margin="10,10,10,10"></TextBlock>
text1という名前のTextBlockのTextにSViewModel.DataStringをバインドするよという宣言ですね。
・これでコントロールにバインドできるViewModelができました。次はStringVireModelの変更通知部分を作成します。