**Firebase Authentication(認証)**は、バックエンドサービス、使いやすいSDK、既製のUIライブラリを提供し、アプリにユーザーを認証できます。パスワード、電話番号、Google、Facebook、Twitterなどの一般的な連携型IDプロバイダーを使った認証に対応しています。
本記事では、Flutterアプリをセットアップし、Firebase認証を使ってGoogleサインインを実装する方法をご紹介いたします。
注意: 本記事では、最新のFlutter 2.0安定版でnullセーフティを有効にしてサンプルアプリを作成します。
本記事では、以下の項目について解説いたします:
- null安全で新しいFlutterプロジェクトを作成
- 新規Firebaseプロジェクトを作成
- Android、iOS&ウェブ用Firebaseをセットアップ
- Firebase認証を設定
- ユーザー自動ログイン
- Firebaseを**Codemagic**(Flutter用CI/CD)で構成
- よくある問題のトラブルシューティング
プロジェクト概要
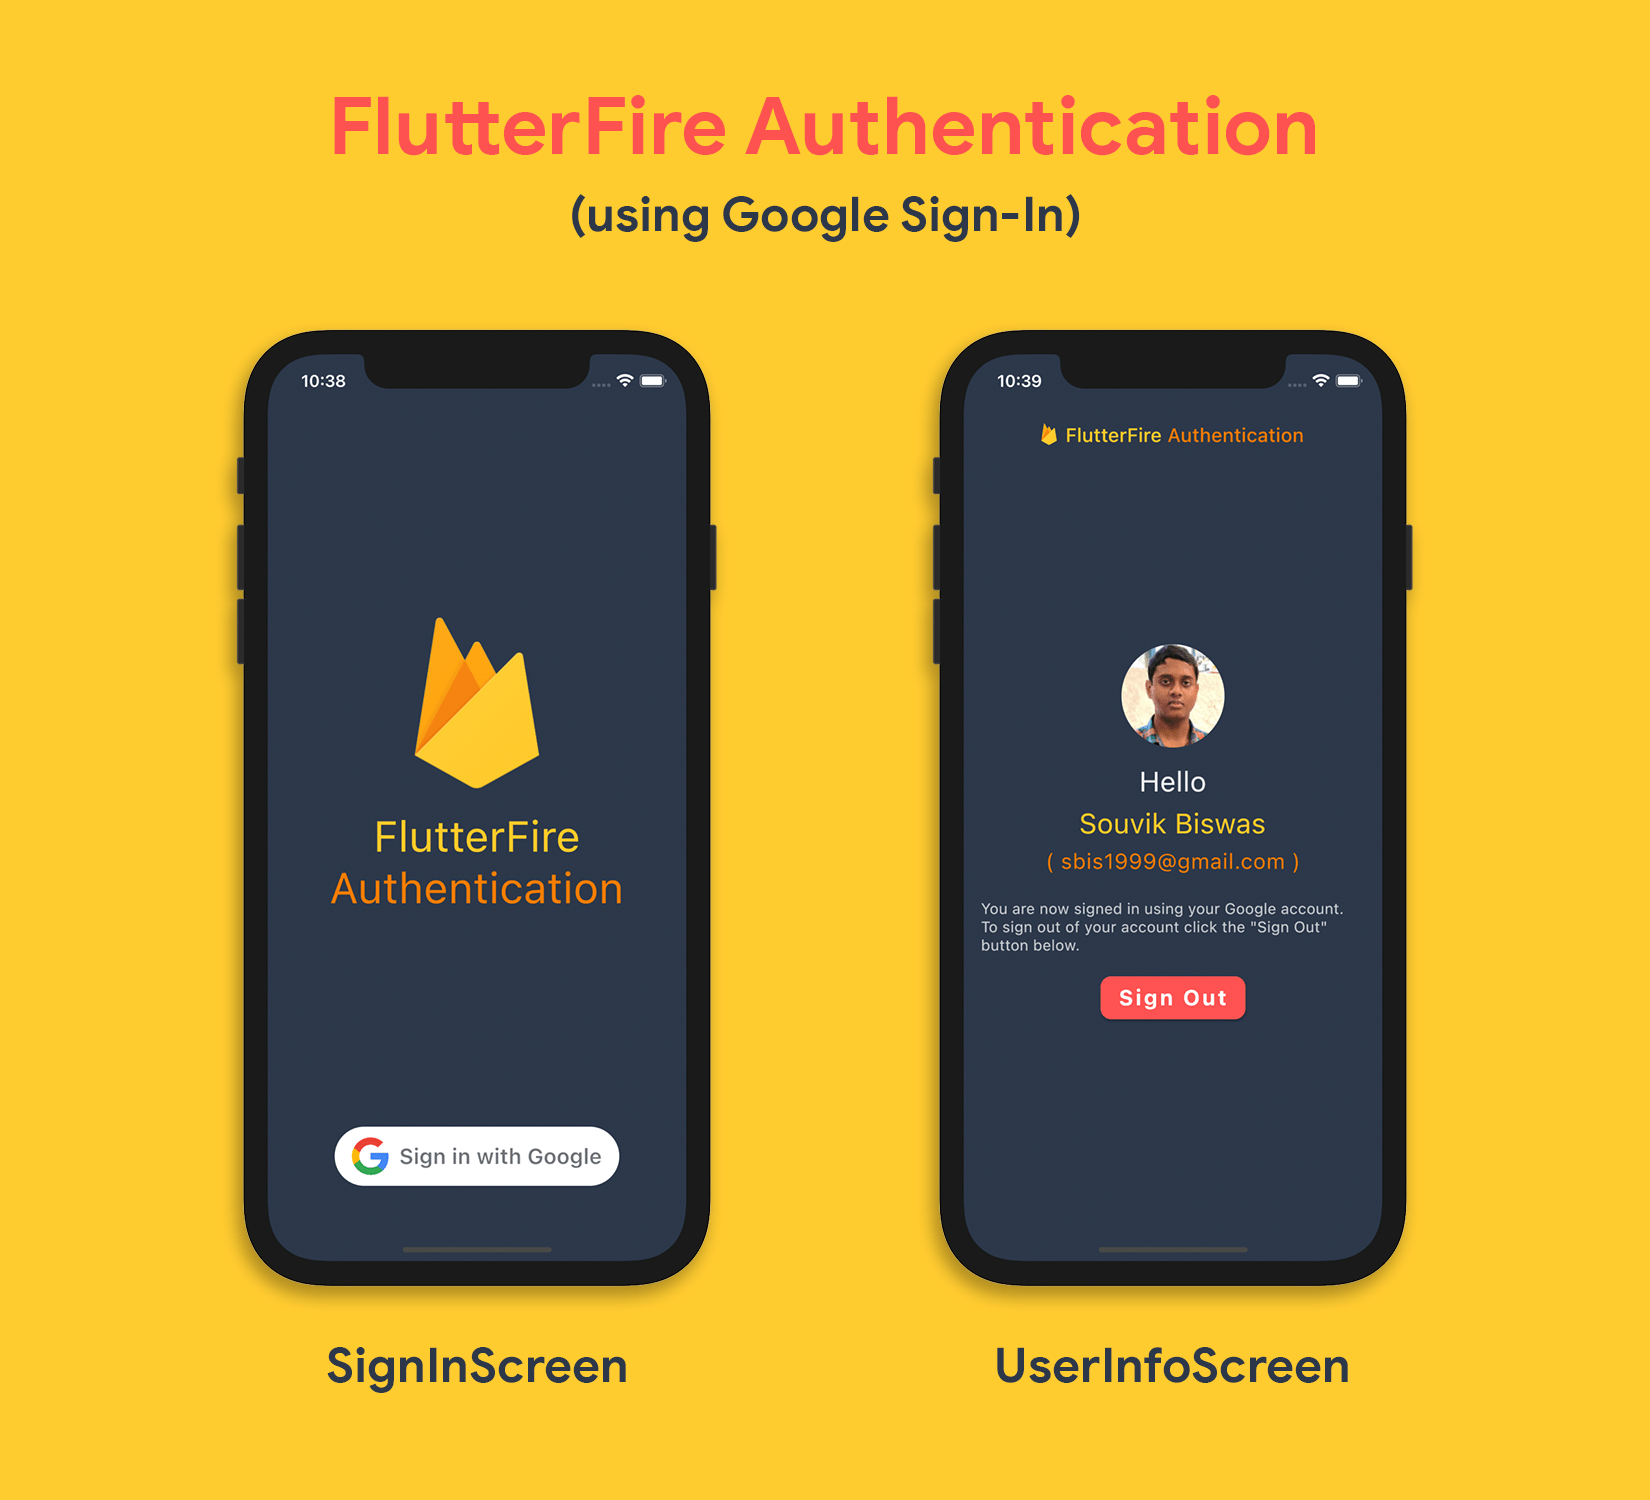
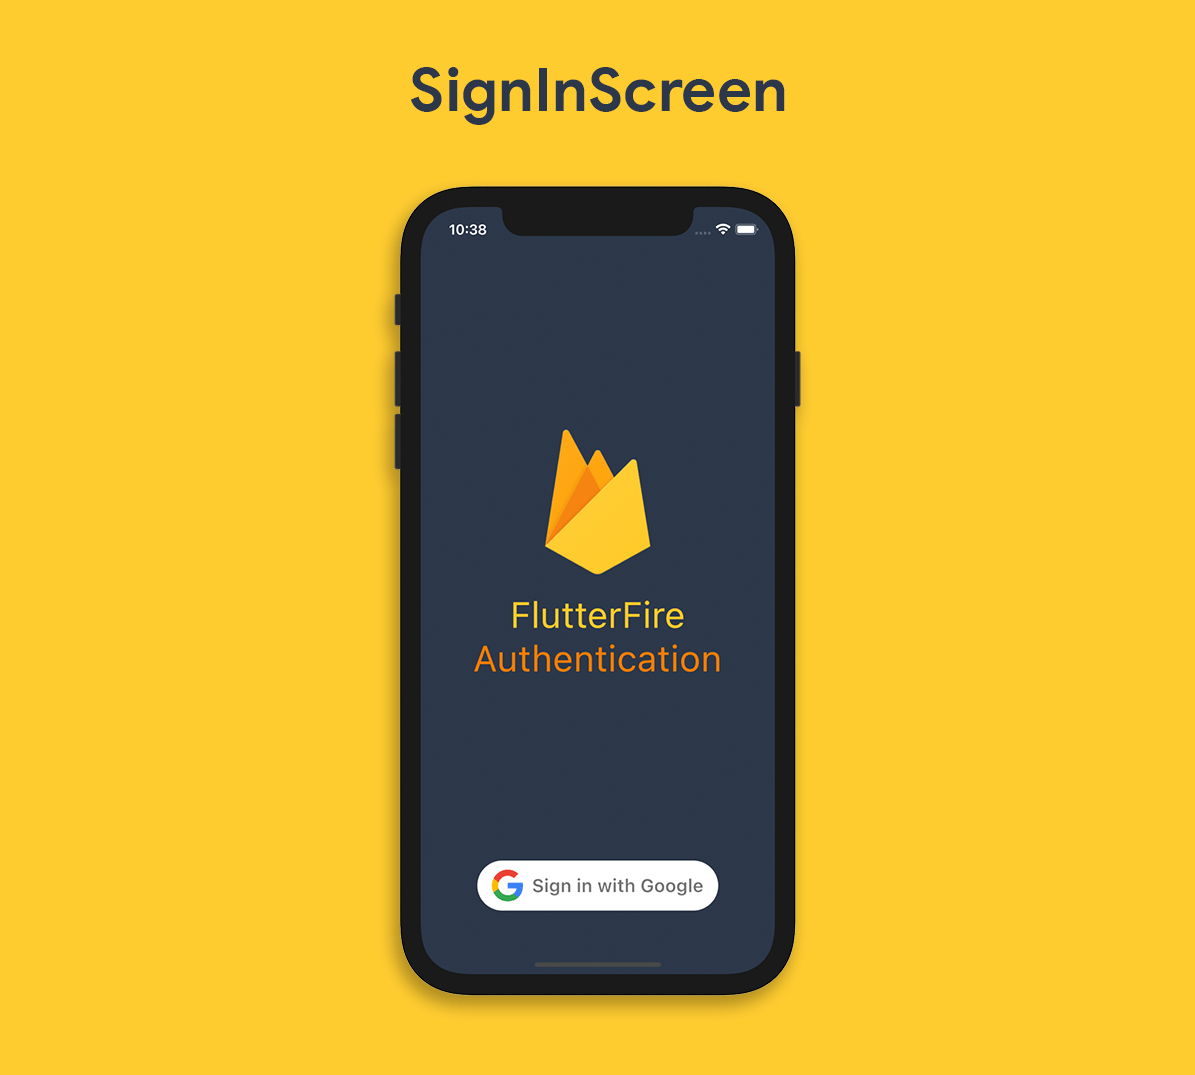
アプリのレイアウトは、2画面だけの構成でシンプルです。最初の画面はサインイン画面(Googleアカウントでログインする画面)、次の画面はユーザー情報画面(Googleアカウントから取得したユーザー情報の一部を表示する画面)で、サインアウトのボタンがあります。
プロジェクトのディレクトリ構成は、以下のようになります:

はじめに
まず、最新版のFlutter 2で新規にFlutterプロジェクトを作成し、null安全に移行するところから開始します。次に、必要なパッケージとアセットをプロジェクトに追加します。
新規Flutterプロジェクトを作成
ターミナルを開くか、コードエディタでターミナルを使用します。プロジェクトを作成するフォルダに移動し、以下のコマンドを使用します:
flutter create flutterfire_samples
次に、お気に入りのコードエディタでプロジェクトを開きます。VS Codeで開くには、以下を使用できます:
code flutterfire_samples
Flutter 2.0は安定版チャンネルでnull安全に対応していますが、アプリ内で使用するためには、プロジェクトをnull安全に移行するコマンドを実行する必要があります。
マイグレーションコマンドを実行する前に、現在のプロジェクトの依存関係がすべてnull安全に対応しているかどうかを、以下を使用して確認します:
dart pub outdated --mode=null-safety
その後、以下のコマンドを実行し、移行します:
dart migrate
[こちら]の移行ガイドをご参照ください(https://dart.dev/null-safety/migration-guide)。
プラグイン
このプロジェクトに必要なプラグインは次のとおりです:
- firebase_core: Firebaseの初期化用
- firebase_auth: Firebase認証の実装用
- google_sign_in: Googleサインインを利用
他のFirebase関連のプラグインを使用する場合は
firebase_coreプラグインを含める必要があります。これは、FirebaseApp()` の初期化に使用されるからです。
パッケージは pubspec.yaml ファイルに追加することで、Flutterプロジェクトにインポートできます:
firebase_core: ^1.0.1
firebase_auth: ^1.0.1
google_sign_in: ^5.0.0

これを保存して flutter packages get を実行します。
アセット
このサンプルアプリのUIを構築する際に、2つの画像が必要になります。
画像は[こちら]から入手できます(https://github.com/sbis04/flutterfire-samples/tree/google-sign-in/assets)。
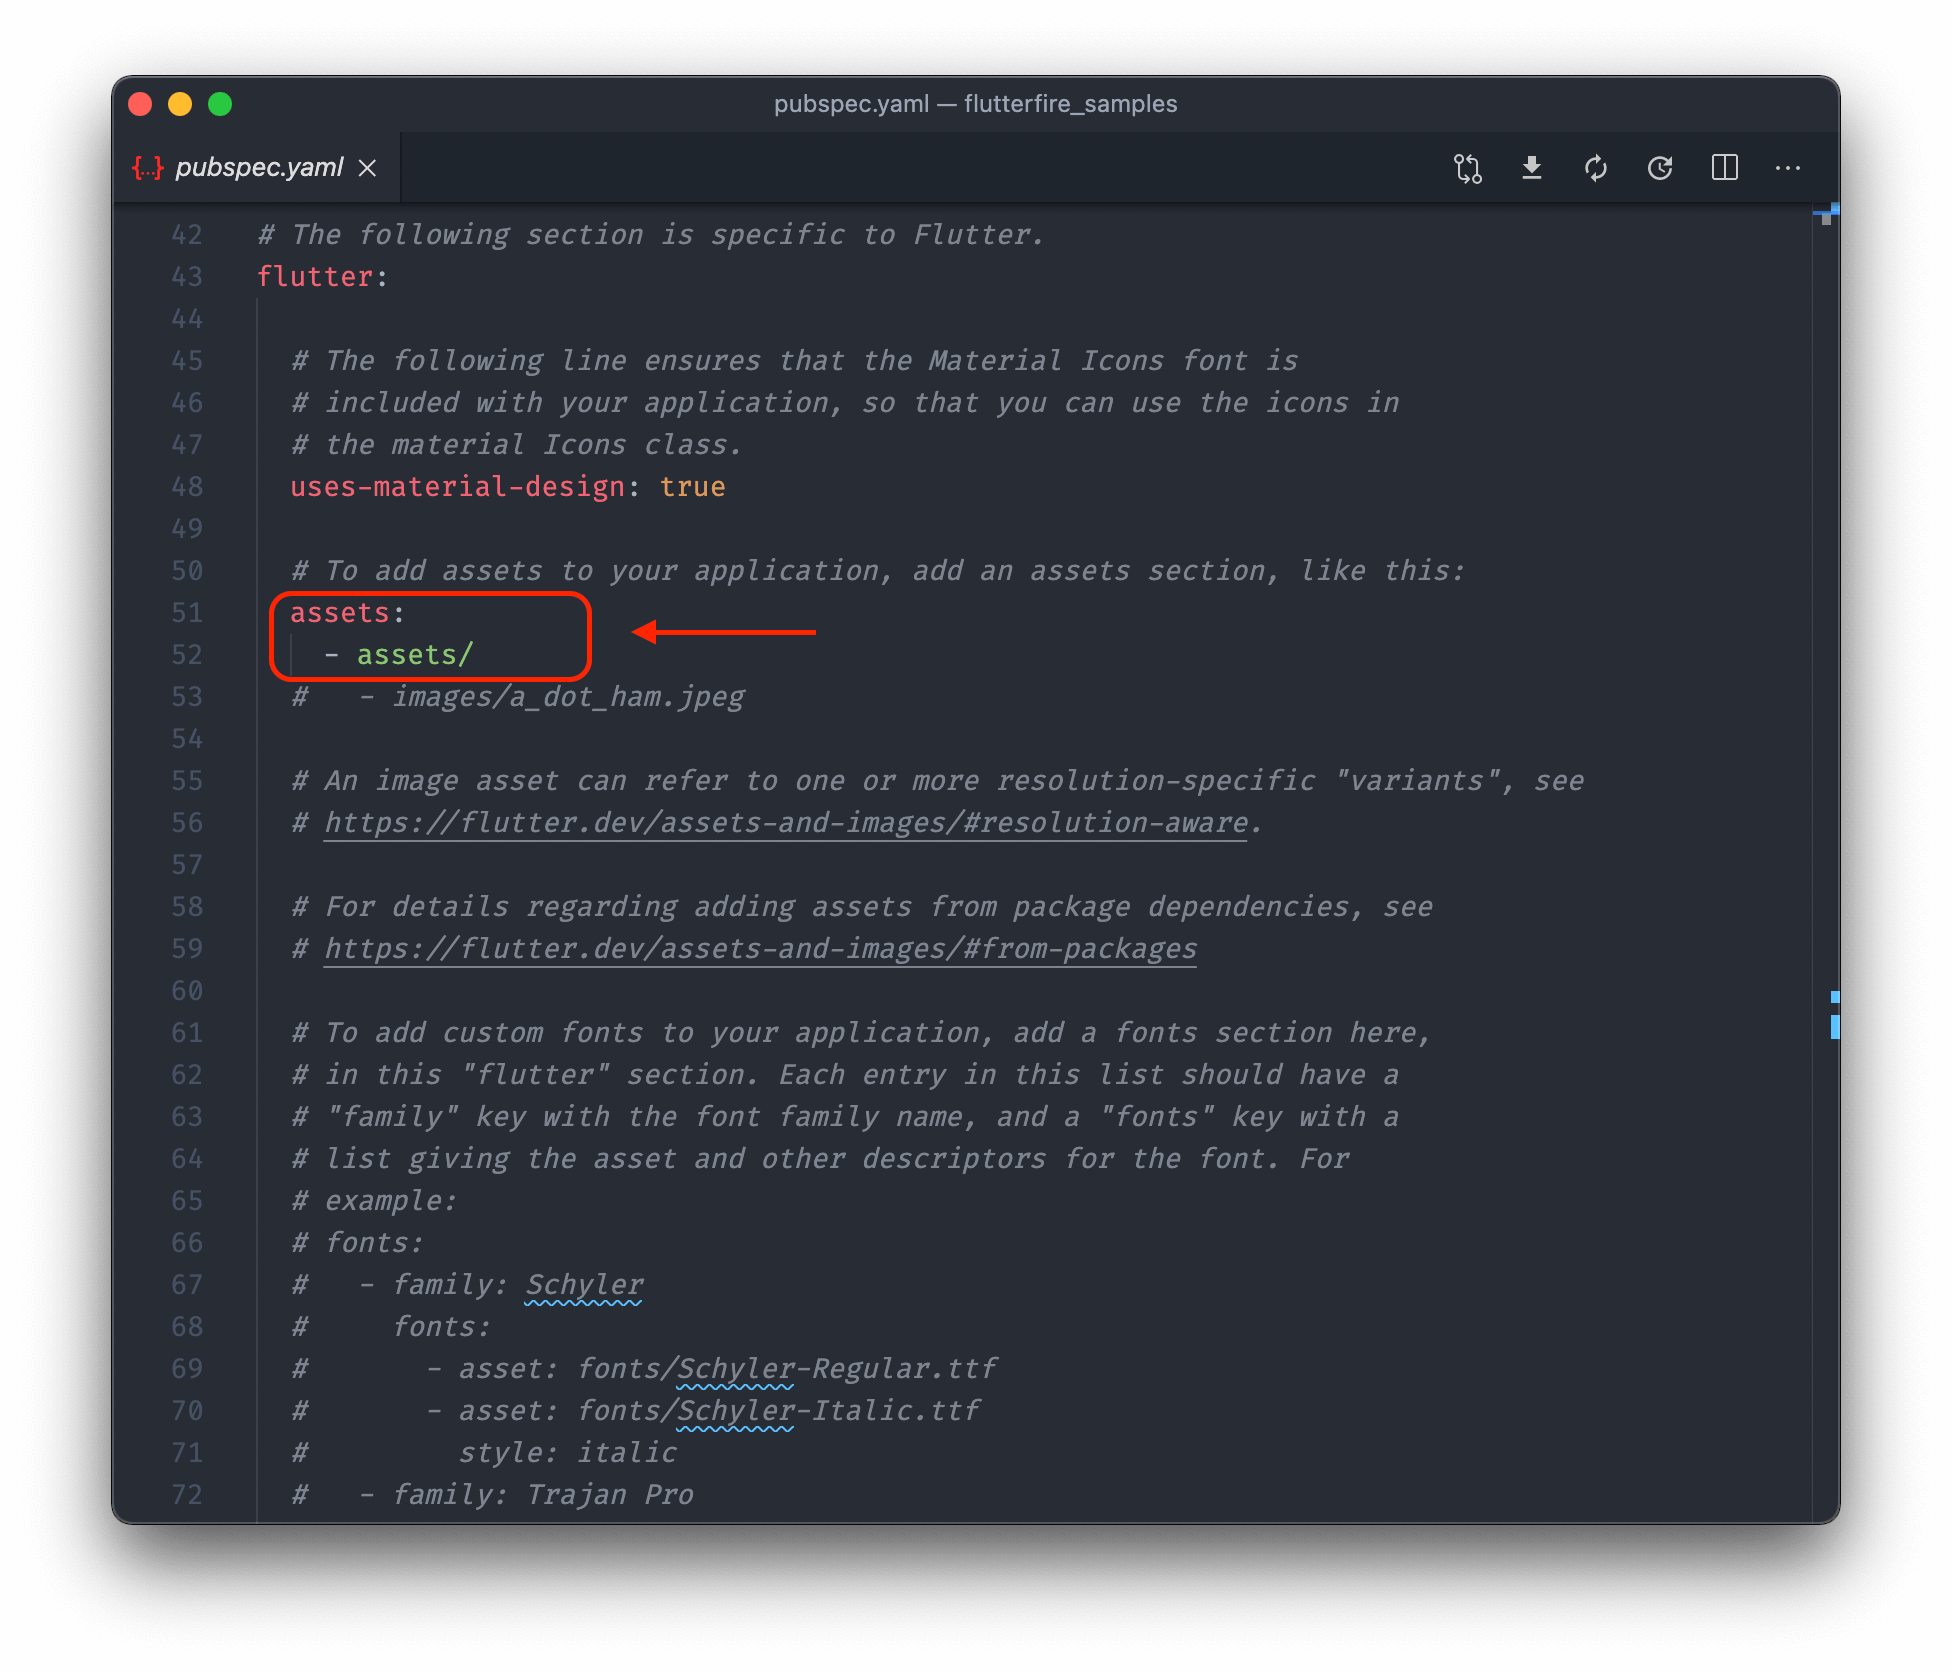
プロジェクトディレクトリに assets という新規フォルダを作成し、ダウンロードした2つの画像 (google_logo.png と firebase_logo.png) を挿入します。
ここで、pubspec.yaml ファイルに assets フォルダをインポートします。
Firebaseプロジェクトのセットアップ
アプリケーションでFirebaseを使い始めるには、まずFirebaseのプロジェクトを新規に作成する必要があります。以下の手順に従ってください:
-Firebaseコンソールにアクセスし、新規Firebaseプロジェクトを作成します。
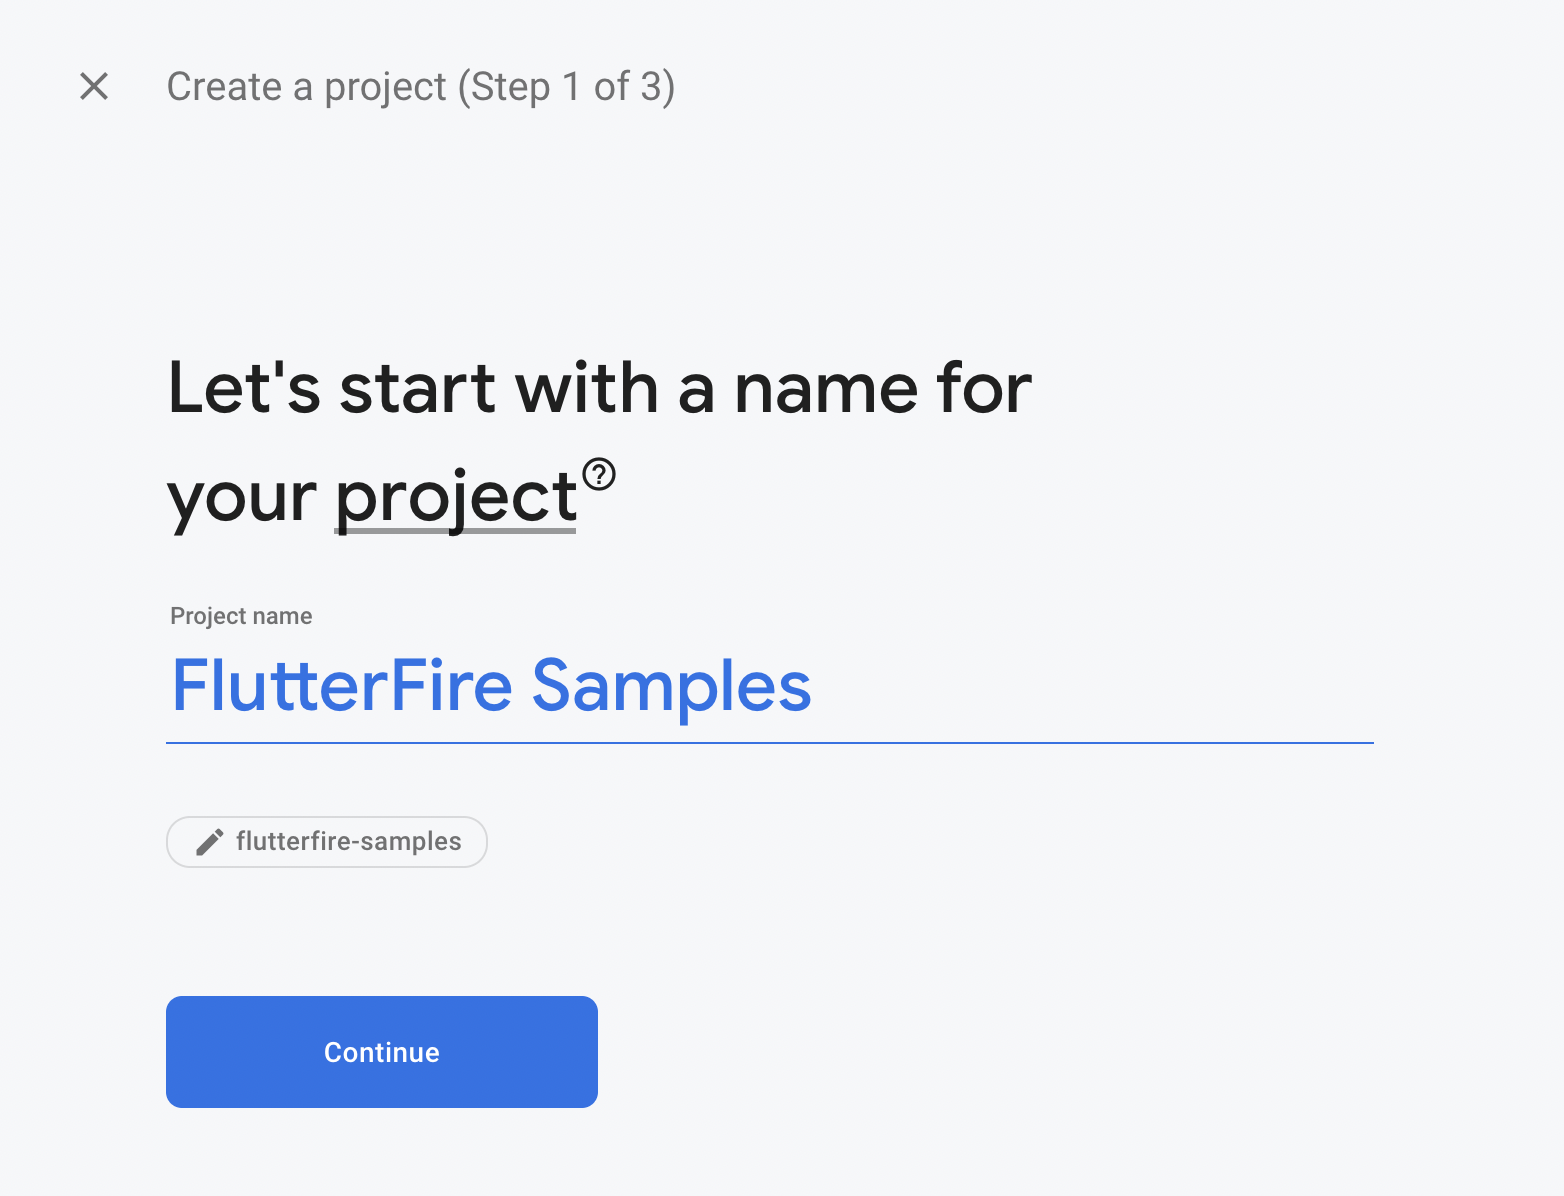
-プロジェクトの追加をクリックします。

-プロジェクト名を入力し、**続行(Continue)**をクリックします。
-次に、プロジェクトのGoogleアナリティクスを有効にするかどうか尋ねられます。今回はサンプルプロジェクトなので、解析は必要ないと思います。プロジェクトの作成をクリックします。

とにかくGoogleアナリティクスを有効にしたい場合は、次の画面でGoogleアナリティクスのアカウントを選択するように指示されます。

プロジェクトが作成されるのを待つと、プロジェクトのFirebaseダッシュボードに移動します。

プラットフォーム構成
次に、プラットフォーム固有のFirebase構成を完了させる必要があります。Flutter(クロスプラットフォームのフレームワーク)を使っているとはいえ、Firebaseプロジェクトは各プラットフォームに別々に統合する必要があります。Flutter 2.0は安定版チャンネルでAndroid、iOS、ウェブに対応しているので、3つのプラットフォームすべてに対応した構成を行います。
Androidの設定
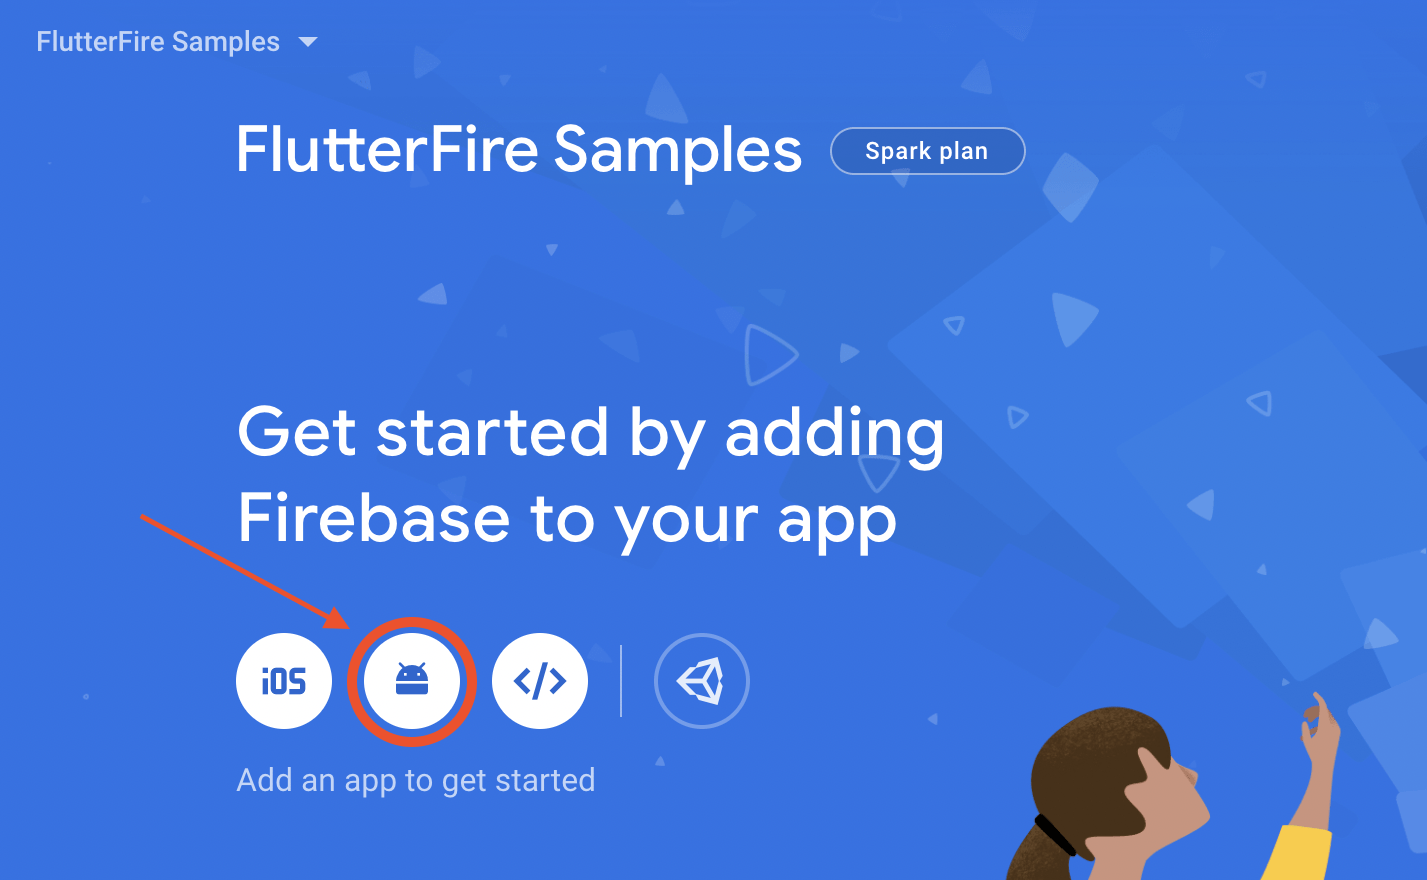
まず、Androidプラットフォーム用に構成しましょう。
-FirebaseダッシュボードからAndroidアイコンを選択します。
-Androidのパッケージ名、アプリのニックネーム、SHA-1を入力します。アプリの登録をクリックします。

-google-services.json ファイルをダウンロードし、android -> app ディレクトリに配置します。次へをクリックします。

-指示に従って、必要なコードスニペットをプロジェクトに追加します。次へをクリックします。

これで、Android用Firebaseの構成は完了です。最後のステップでは、**コンソールに進む(Continue to console)**をクリックしてダッシュボードに戻ります。

iOSの設定
-ダッシュボードでiOSアイコンを選択します。
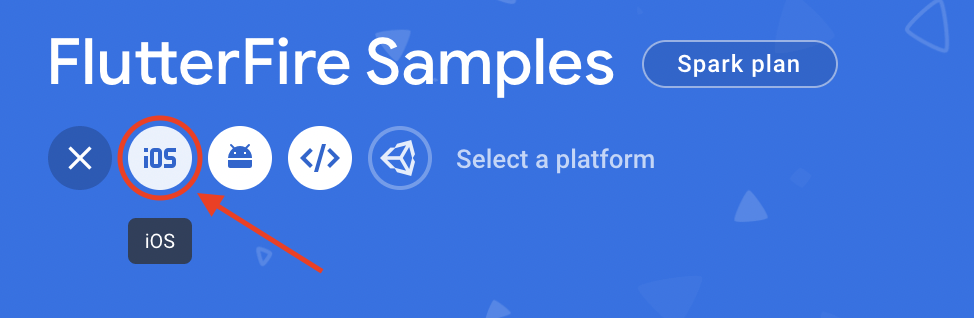
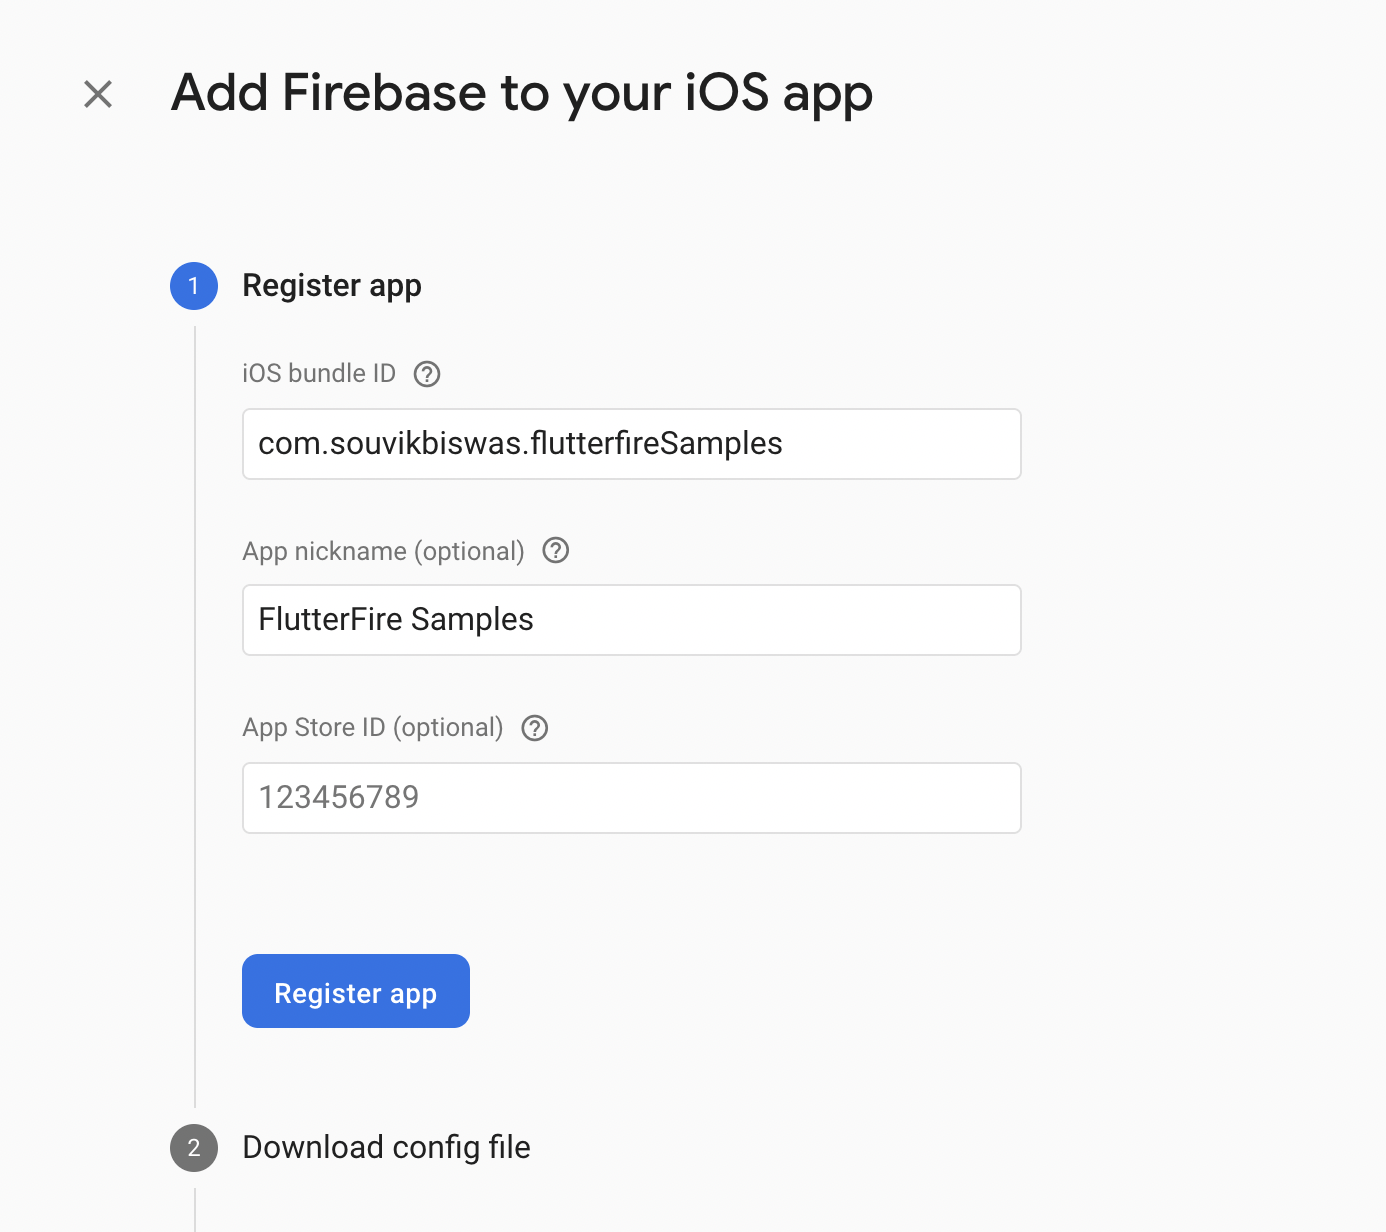
-iOSバンドルIDとアプリのニックネームを入力します。アプリの登録をクリックします。
-GoogleService-Info.plistファイルをダウンロードします。次へをクリックします。
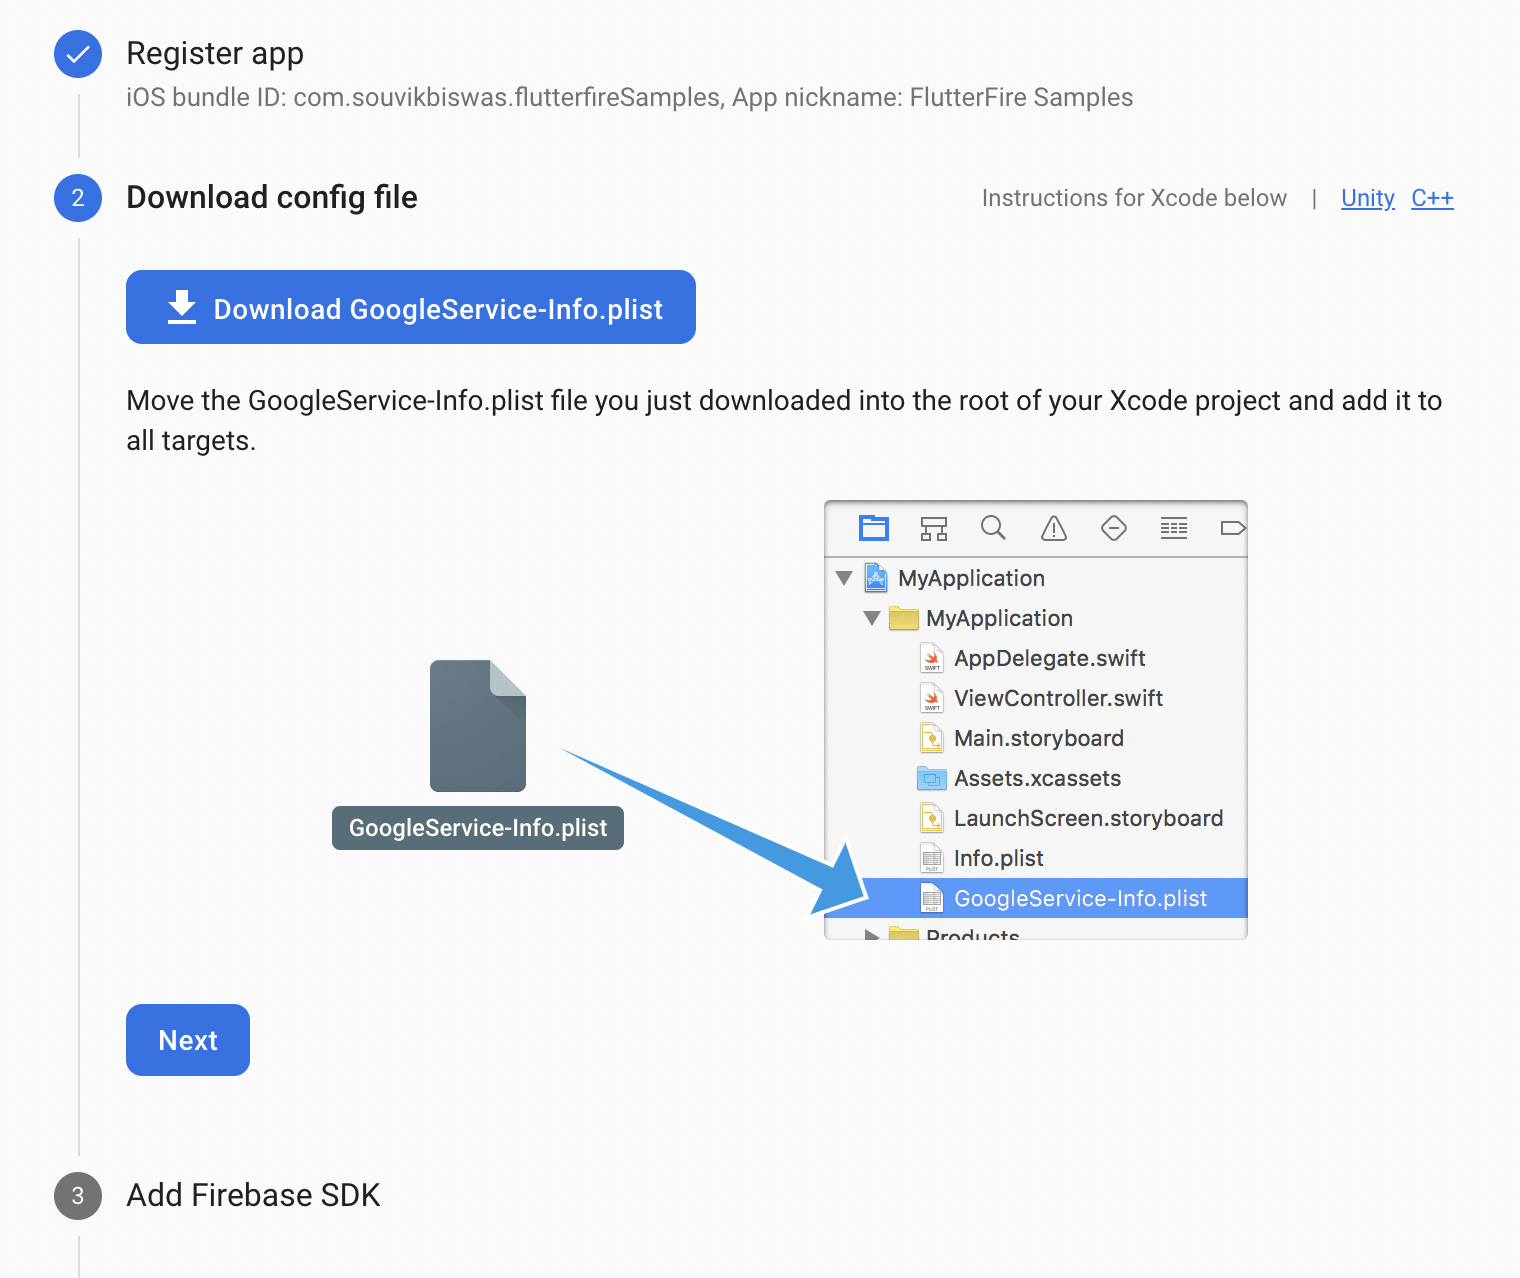
-プロジェクトに戻り、Xcodeを使ってiosフォルダを開き、ダウンロードしたファイルをRunnerサブフォルダにドラッグ&ドロップします。ダイアログボックスが表示されたら、「ターゲットに追加」ボックスでRunnerが選択されていることを確認します。次に、**終了(Finish)**をクリックします。
-ステップ3と4は省略可能です。これらは、近日追加予定のFlutter Firebaseプラグインで自動的に設定される予定です。**コンソールに進む(Continue to console)**をクリックすると、ダッシュボードに戻ります。

ウェブの設定
-ダッシュボード上のウェブアイコンを選択します。

-アプリのニックネームを入力し、アプリの登録をクリックします。

-ここで、Firebase SDKをウェブアプリに統合するためのコードスニペットを追加します。

次に、**コンソールに進む(Continue to console)**をクリックして、ダッシュボードに戻ります。
以上で、3つのプラットフォームすべてに対するFirebaseの構成は完了です。
認証の設定
Firebase認証でGoogleサインインを利用するには、Firebaseダッシュボードの左メニューから**認証(Authentication)**ページに行き、**サインイン方法(Sign-in method)**タブを選択し、有効化する必要があります。
ここで、Google(プロバイダーの下)を有効にし、プロジェクト名とサポートメールを入力し、保存をクリックします。

また、Firebaseプロジェクト設定 -> 一般でサポートメールも追加してください。

Android端末でGoogleサインインを利用する場合、追加設定は必要なくなりました。しかし、iOS端末で使用するには、もう1つだけ必要なことがあります。
プロジェクトディレクトリ -> ios -> Runner -> Info.plist**ファイルを開き、そこに以下を追加してください:
<!-- Put me in the [my_project]/ios/Runner/Info.plist file -->
<!-- Google Sign-In section -->
<key>CFBundleURLTypes</key>
<array>
	<dict>
		<key>CFBundleTypeRole</key>
		<string>Editor</string>
		<key>CFBundleURLSchemes</key>
		<array>
			<!-- TODO Replace this value: -->
			<!-- Copied from GoogleService-Info.plist key REVERSED_CLIENT_ID -->
			<string>com.googleusercontent.apps.861823949799-vc35cprkp249096uujjn0vvnmcvjppkn</string>
		</array>
	</dict>
</array>
<!-- End of the Google Sign-In section -->
上記のコメントに従って、値を
GoogleService-Info.plistファイルにあるREVERSED_CLIENT_IDに置き換えることを忘れないでください。
Firebaseの初期化
Firebase認証によるGoogleサインインを使うための構成をしたので、認証ロジックのメソッドを定義していきます。
フォルダlib -> utils内にauthentication.dartというファイルを新規に作成します。他のFirebaseサービスを利用するには、まず、FirebaseAppを初期化する必要があります:
class Authentication {
  static Future<FirebaseApp> initializeFirebase() async {
    FirebaseApp firebaseApp = await Firebase.initializeApp();

    // TODO: Add auto login logic

    return firebaseApp;
  }
}
上記のコードでは、initializeFirebase() メソッド内でFirebaseを初期化しています。後で、ここに自動ログインのロジックを追加する予定です。
Googleサインインの実装
では、Googleサインイン用のメソッドを追加してみましょう:
class Authentication {
  static Future<User?> signInWithGoogle({required BuildContext context}) async {
    FirebaseAuth auth = FirebaseAuth.instance;
    User? user;

    final GoogleSignIn googleSignIn = GoogleSignIn();

    final GoogleSignInAccount? googleSignInAccount =
        await googleSignIn.signIn();

    if (googleSignInAccount != null) {
      final GoogleSignInAuthentication googleSignInAuthentication =
          await googleSignInAccount.authentication;

      final AuthCredential credential = GoogleAuthProvider.credential(
        accessToken: googleSignInAuthentication.accessToken,
        idToken: googleSignInAuthentication.idToken,
      );

      try {
        final UserCredential userCredential =
            await auth.signInWithCredential(credential);

        user = userCredential.user;
      } on FirebaseAuthException catch (e) {
        if (e.code == 'account-exists-with-different-credential') {
          // handle the error here
        }
        else if (e.code == 'invalid-credential') {
          // handle the error here
        }
      } catch (e) {
        // handle the error here
      }
    }

    return user;
  }
}
ここでは、SnackBarを表示することで、よりエレガントにエラーを処理できます (そのためにこのメソッドに BuildContext を渡していることにお気づきかもしれません)。try-catch ブロックは次のように変更できます:
try {
  final UserCredential userCredential =
      await auth.signInWithCredential(credential);

  user = userCredential.user;
} on FirebaseAuthException catch (e) {
  if (e.code == 'account-exists-with-different-credential') {
    ScaffoldMessenger.of(context).showSnackBar(
      Authentication.customSnackBar(
        content:
            'The account already exists with a different credential.',
      ),
    );
  } else if (e.code == 'invalid-credential') {
    ScaffoldMessenger.of(context).showSnackBar(
      Authentication.customSnackBar(
        content:
            'Error occurred while accessing credentials. Try again.',
      ),
    );
  }
} catch (e) {
  ScaffoldMessenger.of(context).showSnackBar(
    Authentication.customSnackBar(
      content: 'Error occurred using Google Sign-In. Try again.',
    ),
  );
}
customSnackBar()メソッドは以下のようなものです:
static SnackBar customSnackBar({required String content}) {
  return SnackBar(
    backgroundColor: Colors.black,
    content: Text(
      content,
      style: TextStyle(color: Colors.redAccent, letterSpacing: 0.5),
    ),
  );
}
今回定義したsignInWithGoogle() メソッドは、AndroidとiOSプラットフォームでGoogleサインインによるユーザー認証を行うのに役立ちます。しかし、ウェブでGoogleサインインを使うには、以下のように変更する必要があります:
import 'package:flutter/foundation.dart' show kIsWeb;

class Authentication {
  static Future<User?> signInWithGoogle({required BuildContext context}) async {
    FirebaseAuth auth = FirebaseAuth.instance;
    User? user;

    if (kIsWeb) {
      GoogleAuthProvider authProvider = GoogleAuthProvider();

      try {
        final UserCredential userCredential =
            await auth.signInWithPopup(authProvider);

        user = userCredential.user;
      } catch (e) {
        print(e);
      }
    } else {
      final GoogleSignIn googleSignIn = GoogleSignIn();

      final GoogleSignInAccount? googleSignInAccount =
          await googleSignIn.signIn();

      if (googleSignInAccount != null) {
        final GoogleSignInAuthentication googleSignInAuthentication =
            await googleSignInAccount.authentication;

        final AuthCredential credential = GoogleAuthProvider.credential(
          accessToken: googleSignInAuthentication.accessToken,
          idToken: googleSignInAuthentication.idToken,
        );

        try {
          final UserCredential userCredential =
              await auth.signInWithCredential(credential);

          user = userCredential.user;
        } on FirebaseAuthException catch (e) {
          if (e.code == 'account-exists-with-different-credential') {
            // ...
          } else if (e.code == 'invalid-credential') {
            // ...
          }
        } catch (e) {
          // ...
        }
      }
    }

    return user;
  }
}
ウェブプラットフォームでは、FirebaseAuthインスタンスのsignInWithPopup()メソッドを使用する必要があります。
サインアウトメソッド
サインアウトメソッドの実装は非常にシンプルですが、ウェブプラットフォームではgoogleSignIn.signOut() メソッドを呼び出す必要はありません(これはエラーになると思います)。FirebaseAuth.instance.signOut() を呼び出すだけで、その役目を果たします。
import 'package:flutter/foundation.dart' show kIsWeb;

class Authentication {
  static Future<void> signOut({required BuildContext context}) async {
    final GoogleSignIn googleSignIn = GoogleSignIn();

    try {
      if (!kIsWeb) {
        await googleSignIn.signOut();
      }
      await FirebaseAuth.instance.signOut();
    } catch (e) {
      ScaffoldMessenger.of(context).showSnackBar(
        Authentication.customSnackBar(
          content: 'Error signing out. Try again.',
        ),
      );
    }
  }
}
UIの構築
main.dartファイルからすべてを削除し、以下に示す定型的なコードを貼り付けるだけです。
import 'package:flutter/material.dart';

import 'screens/sign_in_screen.dart';

void main() {
  runApp(MyApp());
}

class MyApp extends StatelessWidget {
  @override
  Widget build(BuildContext context) {
    return MaterialApp(
      title: 'FlutterFire Samples',
      debugShowCheckedModeBanner: false,
      theme: ThemeData(
        primarySwatch: Colors.indigo,
        brightness: Brightness.dark,
      ),
      home: SignInScreen(),
    );
  }
}
それでは SignInScreen のUIを構築してみましょう。
SignInScreenのレイアウト
ディレクトリlib -> screens内に sign_in_screen.dart という新規dartファイルを作成します。
SignInScreenのレイアウトは以下のようになります:
SignInScreenは ステートフルウィジェットであるべきです。なぜなら、後でUIを変更する予定なので、ウィジェットを再描画する必要があるからです。
class SignInScreen extends StatefulWidget {
  @override
  _SignInScreenState createState() => _SignInScreenState();
}

class _SignInScreenState extends State<SignInScreen> {
  @override
  Widget build(BuildContext context) {
    return Container();
  }
}
SignInScreenUIのコードは次のようになります:
class _SignInScreenState extends State<SignInScreen> {
  @override
  Widget build(BuildContext context) {
    return Scaffold(
      backgroundColor: CustomColors.firebaseNavy,
      body: SafeArea(
        child: Padding(
          padding: const EdgeInsets.only(
            left: 16.0,
            right: 16.0,
            bottom: 20.0,
          ),
          child: Column(
            mainAxisSize: MainAxisSize.max,
            children: [
              Row(),
              Expanded(
                child: Column(
                  mainAxisSize: MainAxisSize.min,
                  mainAxisAlignment: MainAxisAlignment.center,
                  children: [
                    Flexible(
                      flex: 1,
                      child: Image.asset(
                        'assets/firebase_logo.png',
                        height: 160,
                      ),
                    ),
                    SizedBox(height: 20),
                    Text(
                      'FlutterFire',
                      style: TextStyle(
                        color: CustomColors.firebaseYellow,
                        fontSize: 40,
                      ),
                    ),
                    Text(
                      'Authentication',
                      style: TextStyle(
                        color: CustomColors.firebaseOrange,
                        fontSize: 40,
                      ),
                    ),
                  ],
                ),
              ),
              FutureBuilder(
                future: Authentication.initializeFirebase(context: context),
                builder: (context, snapshot) {
                  if (snapshot.hasError) {
                    return Text('Error initializing Firebase');
                  } else if (snapshot.connectionState == ConnectionState.done) {
                    return GoogleSignInButton();
                  }
                  return CircularProgressIndicator(
                    valueColor: AlwaysStoppedAnimation<Color>(
                      CustomColors.firebaseOrange,
                    ),
                  );
                },
              ),
            ],
          ),
        ),
      ),
    );
  }
}
上記のコードでは、GoogleSignInButtonウィジェットを表示する前に、Firebaseが初期化されるのを待つために FutureBuilderがあることに気づかれるでしょう。
ここで、Google*でサインイン(Sign in with Google)ボタンをデザインする必要があります。ディレクトリlib -> widgets内にgoogle_sign_in_button.dart という新規ファイルを作成します。
これは StatefulWidgetで、onPressed()メソッド内にGoogleサインイン認証へのメソッド呼び出しが含まれています。
class GoogleSignInButton extends StatefulWidget {
  @override
  _GoogleSignInButtonState createState() => _GoogleSignInButtonState();
}

class _GoogleSignInButtonState extends State<GoogleSignInButton> {
  bool _isSigningIn = false;

  @override
  Widget build(BuildContext context) {
    return Padding(
      padding: const EdgeInsets.only(bottom: 16.0),
      child: _isSigningIn
          ? CircularProgressIndicator(
              valueColor: AlwaysStoppedAnimation<Color>(Colors.white),
            )
          : OutlinedButton(
              style: ButtonStyle(
                backgroundColor: MaterialStateProperty.all(Colors.white),
                shape: MaterialStateProperty.all(
                  RoundedRectangleBorder(
                    borderRadius: BorderRadius.circular(40),
                  ),
                ),
              ),
              onPressed: () async {
                setState(() {
                  _isSigningIn = true;
                });

                // TODO: Add a method call to the Google Sign-In authentication

                setState(() {
                  _isSigningIn = false;
                });
              },
              child: Padding(
                padding: const EdgeInsets.fromLTRB(0, 10, 0, 10),
                child: Row(
                  mainAxisSize: MainAxisSize.min,
                  mainAxisAlignment: MainAxisAlignment.center,
                  children: <Widget>[
                    Image(
                      image: AssetImage("assets/google_logo.png"),
                      height: 35.0,
                    ),
                    Padding(
                      padding: const EdgeInsets.only(left: 10),
                      child: Text(
                        'Sign in with Google',
                        style: TextStyle(
                          fontSize: 20,
                          color: Colors.black54,
                          fontWeight: FontWeight.w600,
                        ),
                      ),
                    )
                  ],
                ),
              ),
            ),
    );
  }
}
上記のコードでは、onPressed()メソッドを埋めていません。では、認証メソッドの呼び出しを追加しましょう:
onPressed: () async {
  setState(() {
    _isSigningIn = true;
  });

  User? user =
      await Authentication.signInWithGoogle(context: context);

  setState(() {
    _isSigningIn = false;
  });

  if (user != null) {
    Navigator.of(context).pushReplacement(
      MaterialPageRoute(
        builder: (context) => UserInfoScreen(
          user: user,
        ),
      ),
    );
  }
}
認証が正常にユーザーを返した場合、UserInfoScreenに移動して、取得したユーザーを渡します。
UserInfoScreenのレイアウト
ディレクトリlib -> screens内に user_info_screen.dart という新規dartファイルを作成します。
UserInfoScreenのレイアウトは次のようになります:
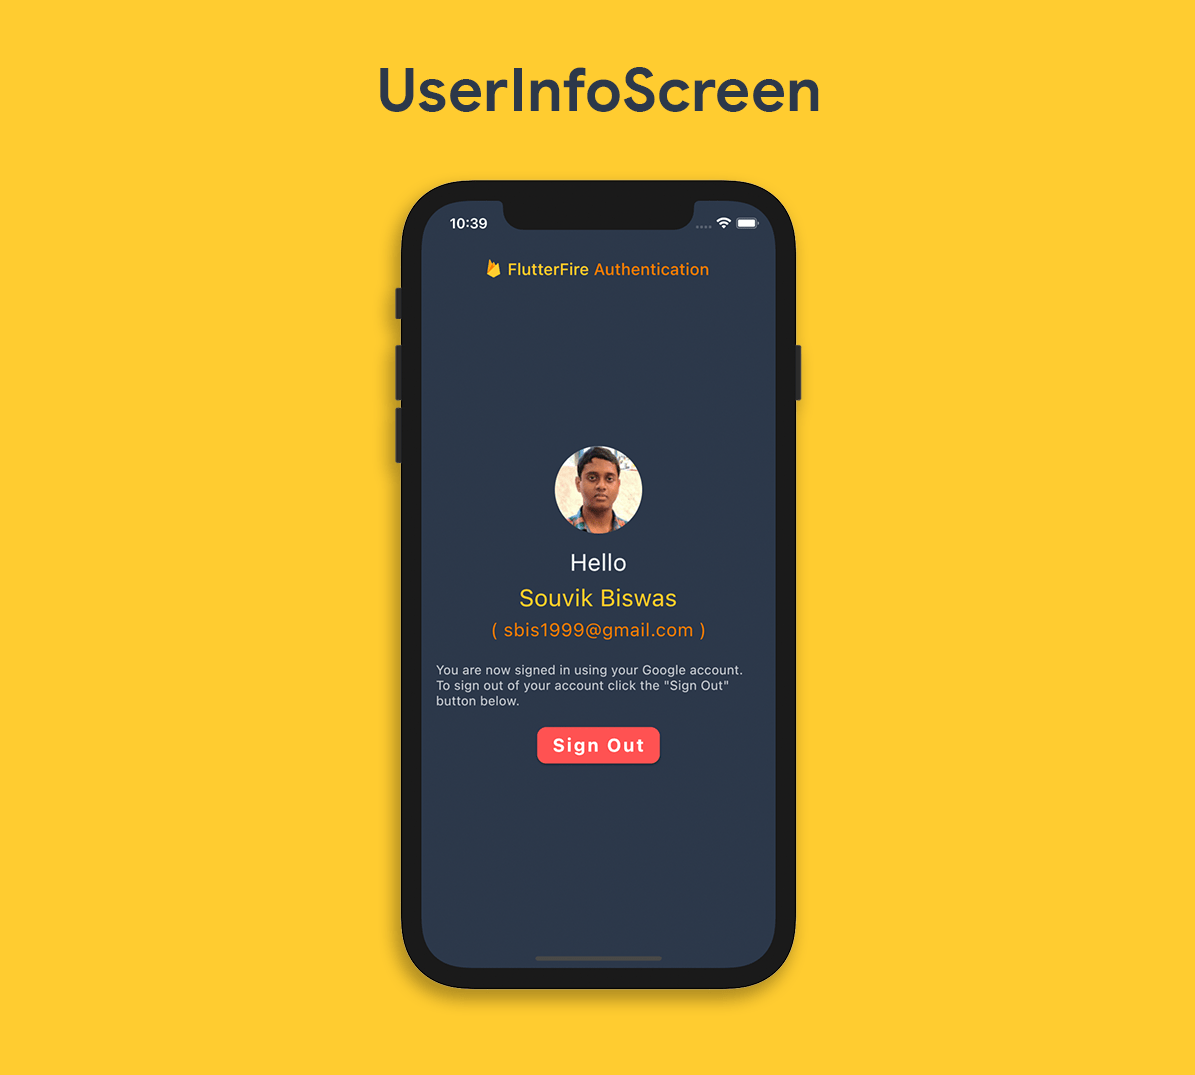
UserInfoScreenはステートフルウィジェットになっているはずで、ユーザー情報がサインアウトボタンと共に表示されます。
class UserInfoScreen extends StatefulWidget {
  const UserInfoScreen({Key? key, required User user})
      : _user = user,
        super(key: key);

  final User _user;

  @override
  _UserInfoScreenState createState() => _UserInfoScreenState();
}

class _UserInfoScreenState extends State<UserInfoScreen> {
  late User _user;
  bool _isSigningOut = false;

  Route _routeToSignInScreen() {
    return PageRouteBuilder(
      pageBuilder: (context, animation, secondaryAnimation) => SignInScreen(),
      transitionsBuilder: (context, animation, secondaryAnimation, child) {
        var begin = Offset(-1.0, 0.0);
        var end = Offset.zero;
        var curve = Curves.ease;

        var tween =
            Tween(begin: begin, end: end).chain(CurveTween(curve: curve));

        return SlideTransition(
          position: animation.drive(tween),
          child: child,
        );
      },
    );
  }

  @override
  void initState() {
    _user = widget._user;

    super.initState();
  }

  @override
  Widget build(BuildContext context) {
    return Scaffold(
      backgroundColor: CustomColors.firebaseNavy,
      appBar: AppBar(
        elevation: 0,
        backgroundColor: CustomColors.firebaseNavy,
        title: AppBarTitle(),
      ),
      body: SafeArea(
        child: Padding(
          padding: const EdgeInsets.only(
            left: 16.0,
            right: 16.0,
            bottom: 20.0,
          ),
          child: Column(
            mainAxisAlignment: MainAxisAlignment.center,
            children: [
              Row(),
              _user.photoURL != null
                  ? ClipOval(
                      child: Material(
                        color: CustomColors.firebaseGrey.withOpacity(0.3),
                        child: Image.network(
                          _user.photoURL!,
                          fit: BoxFit.fitHeight,
                        ),
                      ),
                    )
                  : ClipOval(
                      child: Material(
                        color: CustomColors.firebaseGrey.withOpacity(0.3),
                        child: Padding(
                          padding: const EdgeInsets.all(16.0),
                          child: Icon(
                            Icons.person,
                            size: 60,
                            color: CustomColors.firebaseGrey,
                          ),
                        ),
                      ),
                    ),
              SizedBox(height: 16.0),
              Text(
                'Hello',
                style: TextStyle(
                  color: CustomColors.firebaseGrey,
                  fontSize: 26,
                ),
              ),
              SizedBox(height: 8.0),
              Text(
                _user.displayName!,
                style: TextStyle(
                  color: CustomColors.firebaseYellow,
                  fontSize: 26,
                ),
              ),
              SizedBox(height: 8.0),
              Text(
                '( ${_user.email!} )',
                style: TextStyle(
                  color: CustomColors.firebaseOrange,
                  fontSize: 20,
                  letterSpacing: 0.5,
                ),
              ),
              SizedBox(height: 24.0),
              Text(
                'You are now signed in using your Google account. To sign out of your account, click the "Sign Out" button below.',
                style: TextStyle(
                    color: CustomColors.firebaseGrey.withOpacity(0.8),
                    fontSize: 14,
                    letterSpacing: 0.2),
              ),
              SizedBox(height: 16.0),
              _isSigningOut
                  ? CircularProgressIndicator(
                      valueColor: AlwaysStoppedAnimation<Color>(Colors.white),
                    )
                  : ElevatedButton(
                      style: ButtonStyle(
                        backgroundColor: MaterialStateProperty.all(
                          Colors.redAccent,
                        ),
                        shape: MaterialStateProperty.all(
                          RoundedRectangleBorder(
                            borderRadius: BorderRadius.circular(10),
                          ),
                        ),
                      ),
                      onPressed: () async {
                        setState(() {
                          _isSigningOut = true;
                        });
                        await Authentication.signOut(context: context);
                        setState(() {
                          _isSigningOut = false;
                        });
                        Navigator.of(context)
                            .pushReplacement(_routeToSignInScreen());
                      },
                      child: Padding(
                        padding: EdgeInsets.only(top: 8.0, bottom: 8.0),
                        child: Text(
                          'Sign Out',
                          style: TextStyle(
                            fontSize: 20,
                            fontWeight: FontWeight.bold,
                            color: Colors.white,
                            letterSpacing: 2,
                          ),
                        ),
                      ),
                    ),
            ],
          ),
        ),
      ),
    );
  }
}
ここでは、先に定義したAuthentication.signOut()メソッドを用いて、ユーザーをサインアウトしています。
_routeToSignInScreen()メソッドは、ユーザーがアカウントからサインアウトすると、UserInfoScreenから SignInScreenに戻る間に、スライド遷移アニメーション (左から右へ) を表示するためだけに使用されています。

アプリはほぼ完成しています。ただ、もうひとつだけ、議論が必要なことがあります。
自動ログイン
ユーザーがアプリにログインした後にアプリを閉じた場合、ユーザーがアプリに戻ったときに自動的にサインインするようにします(つまり、ユーザーがアプリに戻るたびに認証情報を要求しないようにします)。
これを実装するには、initializeFirebase() メソッドに残しておいた TODO を完成させればよいだけです。変更後のメソッドは以下のようになります:
static Future<FirebaseApp> initializeFirebase({
  required BuildContext context,
}) async {
  FirebaseApp firebaseApp = await Firebase.initializeApp();

  User? user = FirebaseAuth.instance.currentUser;

  if (user != null) {
    Navigator.of(context).pushReplacement(
      MaterialPageRoute(
        builder: (context) => UserInfoScreen(
          user: user,
        ),
      ),
    );
  }

  return firebaseApp;
}
CodemagicでFirebaseを構成
まず、明らかに、モバイルアプリ用のCI/CDツールであるCodemagicが必要です。まだCodemagicのユーザーでない方は、こちらからサインアップできます:
{{}}サインアップ{{}}
私たちのローカル環境では、google-services.jsonとGoogleService-Info.plistファイルをダウンロードし、それぞれFlutterアプリのandroidとiosディレクトリに保存しています。これらのファイルには、APIキーやアプリに関する情報など、機密性の高いデータが含まれています。これらのファイルは、バージョンコントロールにチェックインしたり、世間に公開したりしてはいけません。私たちは、機密データを保護するために、一定の措置を講じなければなりません。
バージョン管理システム内のファイルを無視
まず、google-services.json(フォルダandroid/app/に存在)とGoogleService-Info.plist(フォルダ ios/Runner/に存在) という2つのプライベートファイルを.gitignoreファイルに記述して、バージョン管理システム(例えば Git)にチェックインされないようにする必要があります。
2つのファイルを.gitignore に追加したら、.gitignoreファイルをコミットします。
ファイルをエンコード
この段階では、バージョン管理システムに機密ファイルをコミットしないことを保証しています。しかし、継続的インテグレーションサーバーは、Flutterアプリを正常にビルドするために、このファイルが見つかることを期待します。
ファイルをエンコードするには、Flutterプロジェクトのコードとしての構成(Configuration as code) セクションで、環境変数の暗号化(Encrypt environment variables) オプションに進みます。

あとは、暗号化したいファイルをドラッグ&ドロップするだけで、暗号化された文字列が生成されます。

生成された文字列をコピーし、プロジェクトの環境変数(Environment variables) セクションに追加します。
Codemagicで環境変数を追加
-
**環境変数(Environment variables)**タブを展開します。

-
ターミナルから生成された2つの暗号化文字列を次のように追加します:
-
ANDROID_FIREBASE_SECRET(変数名) ->google-services.json(変数値)のエンコードされた文字列 -
IOS_FIREBASE_SECRET(変数名) ->GoogleService-Info.plist(変数値)のエンコードされた文字列
-
-
変更を保存をクリックします。
ビルド前スクリプトの追加
-
Codemagicのプロジェクト設定で、ビルドステージの前にある**+*ボタンをクリックします。

-
ビルド前スクリプトに以下を追加します。
#!/bin/sh echo $ANDROID_FIREBASE_SECRET | base64 --decode > $CM_BUILD_DIR/android/app/google-services.json echo "Listing android Directory to confirm the google-services.json is there! " ls android/app/ echo $IOS_FIREBASE_SECRET | base64 --decode > $CM_BUILD_DIR/ios/Runner/GoogleService-Info.plist echo "\nListing iOS Directory to confirm the GoogleService-Info.plist is there! " ls ios/Runner/ -
変更を保存をクリックします。

ビルドを開始
**新規ビルドを開始(Start new build)**ボタンをクリックし、ビルドプロセスを開始します。

ビルドプロセスの実行中に **ビルド前(Pre-build)**タブをクリックすると、ビルド前スクリプトに追加したコードの出力が見れます。バージョン管理システムには追加していませんが、google-services.jsonとGoogleService-Info.plistという2つのファイルがあるのがわかります。それらはエンコードされた文字列から生成されます。

ビルドが正常に終了したら、成果物をダウンロードして実機でテストもできます。

アプリのリリースビルドを生成したい場合は、以下の記事をご参照ください:
-Androidアプリのリリースビルド
-iOSアプリのリリースビルド
依存関係キャッシュ
Firebaseの依存関係でビルドに時間がかかります。これを防ぐために、Codemagicでは依存関係キャッシュを使用して、ビルド時間を短縮できます。
GradleとCocoaPodsをキャッシュするには、依存関係キャッシュを有効にし、Codemagicのプロジェクト設定の**依存関係キャッシュ(Dependency caching)**セクションに、次の2つのパスを含めます:
$HOME/.gradle/caches

$HOME/Library/Caches/CocoaPods


よくある問題のトラブルシューティング
以下は、Firebaseを含むプロジェクトを扱う際に直面する最も一般的な問題の一部です:
Playストアへのリリース
Firebaseで完全に構成されたアプリがあっても、Playストアに公開する準備ができているとは限りません。Firebaseを含むアプリのリリースビルドを生成する際の最大のミスは、google-services.jsonファイルを更新していないことです。
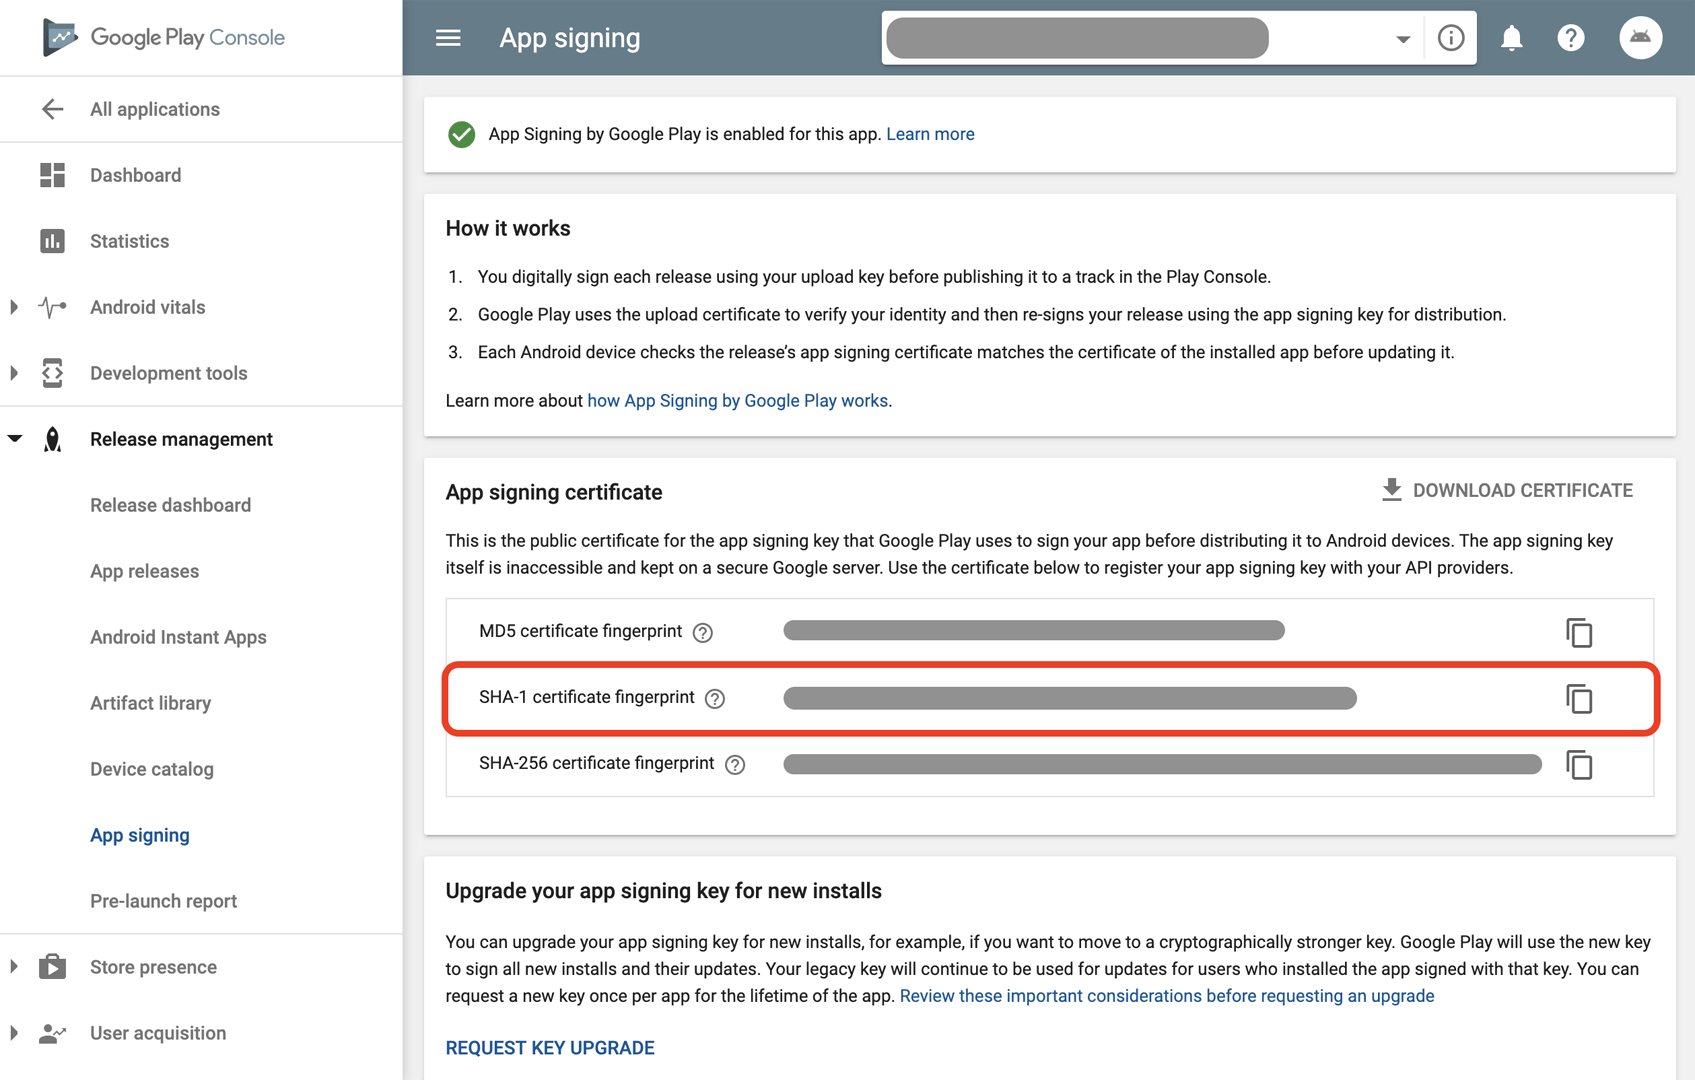
Play Consoleで新しいプロジェクトを作成すると、新しいSHA-1キーが生成されます。新しいSHA-1をコピーし、**Firebaseプロジェクト -> プロジェクト設定 -> **指紋の追加(Add fingerprint)**で新しいキーを追加します。

最新のgoogle-services.jsonファイルをダウンロードし、Flutterプロジェクトでこれと置き換えます。
iOS Podfileの問題
Podfileの形式はFlutterバージョン 1.20で変更されました(詳細はこちら)。もしFlutterプロジェクトをv1.20以降に作成した場合、Podfile is out of date(Podfileが最新ではありません)という警告やこれに関連する何かに直面するかもしれません。

Flutterが生成するデフォルトのPodfileに対してカスタム設定を変更していない場合は、かなり簡単に修正できます。
以下のステップに従うだけです:
-
Run Flutter clean:
flutter clean -
Run the following from the
ios/folder:pod repo update -
Delete
ios/Pods/,ios/Podfile.lockand/ios/Podfile
-その後Flutterのビルドを再度実行すると、問題が解決するはずです
もし、Podfileにカスタム設定がある場合は、上記のステップを踏んでから、カスタムの変更を再度含めてください。
Xcodeの署名識別子エラー
Flutterプロジェクトの作成時に(--orgフラグを使って)組織を設定しなかった場合、デフォルトに設定されます。しかし、iOS端末上でプロジェクトを実行するには、一意の署名識別子を使用する必要があります。そうでない場合は、以下のエラーが表示されます:

右クリックして、Open in Xcode(Xcodeで開く)を選択し、Xcodeでios/フォルダを開きます。ここで、Runnerを選択します。一般(General) タブで、一意のバンドル識別子(Bundle Identifier)を設定します。

また、**署名と機能(Signing & Capabilities)**タブを開き、「チーム」を選択し、「バンドル識別子」が正しいかどうかを確認します。

Xcodeを終了し、Flutterアプリを再度ビルドすると、この問題は解決するはずです。
結論
これでFlutterFire認証アプリが完成し、エンコードされたファイルでFirebaseを設定し、Codemagicでテストすることに成功しました。本記事で、何か有益な情報を見つけていただけましたら幸いです。
このプロジェクトのGitHubレポはこちらでご覧いただけます。
本記事はお役に立ちましたでしょうか? 🤔 こちらからお伝えください。