javaのIOに続いて、NIOについておさらい!!
NIOとは
簡単に言えば、既存のIOを改善したものです。
既存IOのよくない点
-
https://docs.oracle.com/javase/jp/8/docs/api/java/io/InputStream.html#read--
「入力データが読み込めるようになるか、ストリームの終わりが検出されるか、または例外が発生するまで、この__メソッドはブロック__されます。 」 -
効率がよくない
処理単位がbyte,charなので、効率がよくない。
hige level stream(PrintStreamとか)を使っても基底の処理単位は変わりません。
NIOのコアAPI
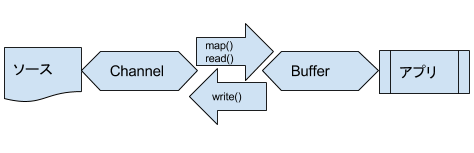
- Channel
- データソースとアプリを繋げるパイプのようなもの。
- Buffer
- ChannleがIOするための容器のようなもの。
- 本質は配列である。
Buffer
Bufferは抽象クラスであり、boolean以外の基本型に対応するサブクラスが存在する.
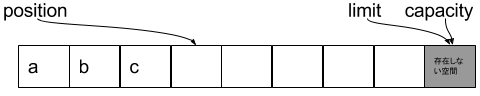
Buffer内の重要要素
| 要素名 | 説明 |
|---|---|
| capacity | Bufferのサイズを表す |
| limit | Bufferの__IO出来ない最初のINDEX__ |
| position | Bufferの__IOできる最初のINDEX__ |
| mark | Buffer内のmarkして、resetした際にpositionが戻す位置 |
上記4つの要素は下記を満足する
0 <= mark <= position <= limit <= capacity
Bufferの常用サブクラス
- ByteBuffer
- MappedByteBuffer
- CharBuffer
- ShortBuffer
- IntBuffer
- LongBuffer
- FolatBuffer
- DoubleBuffer
- ByteBufferは、set/get
- ByteBufferは、put/get
Bufferの常用メソッド
| メソッド | 説明 | CharBufferの実装 |
|---|---|---|
| Buffer flip() | 出力を準備する | limit = position positon = 0 mark = -1 |
| int capacity() | Bufferのcapacity返却 | return capacity |
| int limit() | Bufferのlimit返却 | return limit |
| int position() | Bufferのposition返却 | return position |
| int remaining() | positionとlimit間の要素数 | return limit - position |
| boolean hasRemaining() | positionとlimit間に要素あるか | return position < limit |
| Buffer position(int newPostion) | positionを設定する | 略 |
| Buffer mark() | 現在のpositionでmarkする | mark = position return this |
| Buffer reset() | positionをmarkへ戻す | int m = mark if (m < 0) throw new InvalidMarkException() position = m return this |
| Buffer rewind() | postionをBufferの先頭に戻し、markを取り消す | position = 0 mark = -1 return this |
| Buffer clear() | Buffer初期状態へ戻す | position = 0 limit = capacity mark = -1 return this |
CharBufferサンプル
※ CharBufferのtoString()は、return toString(position(), limit());
private static void showProperty(CharBuffer buffer) {
    System.out.println("capacity : " + buffer.capacity());
    System.out.println("limit : " + buffer.limit());
    System.out.println("position : " + buffer.position());
    System.out.println("toString() : " + buffer.toString());
}
CharBuffer buffer = CharBuffer.allocate(8);
System.out.println("-----生成後-----");
showProperty(buffer);
出力
-----生成後-----
capacity : 8
limit : 8
position : 0
toString() :

1. bufferの最後は8
2. IO開始位置(position)は0
3. toString()は、position ~ limitなので、null8個
```java:put()
buffer.put('a');
buffer.put('b');
buffer.put('c');
System.out.println("-----put後-----");
showProperty(buffer);
-----put後-----
capacity : 8
limit : 8
position : 3
toString() :
- put()三回したので、posiontは+3
- toString()は、position ~ limitなので、null5個
buffer.flip();
System.out.println("-----flip後-----");
showProperty(buffer);
-----flip後-----
capacity : 8
limit : 3
position : 0
toString() : abc
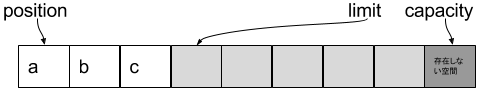
- IOできない最初のINDEX(limit)は3
- IO出来る最初のINDEX(position)開始位置は0
- toString()は、position ~ limitなので、
abc
buffer.get();
buffer.get();
System.out.println("-----get-----");
showProperty(buffer);
-----get後-----
capacity : 8
limit : 3
position : 2
toString() : c

- get()2回なので、positionは+2、
cを指す -
- toString()は、position ~ limitなので、
c
- toString()は、position ~ limitなので、
buffer.clear();
System.out.println("-----clear後-----");
showProperty(buffer);
System.out.println("get(2) : " + buffer.get(2));
-----clear後-----
capacity : 8
limit : 8
position : 0
toString() : abc
get(2) : c

- 初期位置に戻すので、position=0, limit,capacity=8
- ここで表示はしてないが、mark=-1
- clear()は位置を戻すだけで、bufferをクリアするものではないので、
clear()後でもget(2)でcが取得できる
おまけ
ByterBufferには、allocateDirect()でインスタンス取得するメソッドが用意されている。
IO効率が高いが、生成コストが高いので、使い捨てには向いてないそうです。
Channel
直接接点(HDD、ネット等)に繋げるパイプであり、全てのIOは__Bufferを通し__て行う。
| IOメソッド | 説明 |
|---|---|
| Channel#map | 開始、終了位置の範囲をBufferに入れる 読取り位置(Channel.position)は記録しない |
| Channel#read | ChannelからBufferに入れる 読取り位置は記録する |
| Channel#write | ChannelにBufferから入れる 書込み位置を記録する |
Channelの一部実装
- FileChannel
- Pipe.SinkChannel, Pipe.SourceChannle
- ServerSocketChannel
- SelectableChannel
- DatagramChannel
FileChannel
map(), write()
ab12あ
あい
ab12 = 4byte
ああい = 9byte
\r\n = 2byte
try (
    FileChannel channelIn = new FileInputStream(f).getChannel();
    FileChannel channelOut = new FileOutputStream("./NIO/channel-out.txt").getChannel()) {

    // map()
    MappedByteBuffer mappedByteBuffer = channelIn.map(
        FileChannel.MapMode.READ_ONLY, 0, f.length()
    );
    System.out.println("----channel#map----");
    System.out.println("buffer capacity : " + mappedByteBuffer.capacity());
    System.out.println("buffer limit : " + mappedByteBuffer.limit());
    System.out.println("buffer position : " + mappedByteBuffer.position());
    System.out.println("channel position : " + channelIn.position());

    // write
    channelOut.write(mappedByteBuffer);
    System.out.println("----channel#write----");
    System.out.println("buffer capacity : " + mappedByteBuffer.capacity());
    System.out.println("buffer limit : " + mappedByteBuffer.limit());
    System.out.println("buffer position : " + mappedByteBuffer.position());
    System.out.println("channel position : " + channelOut.position());
} catch (IOException ex) {
    System.out.println(ex.getMessage());
}
----channel#map----
buffer capacity : 15
buffer limit : 15
buffer position : 0
channel position : 0
----channel#write----
buffer capacity : 15
buffer limit : 15
buffer position : 15
channel position : 15
- map処理
-
getChannel()-> FileChannelインスタンス生成 -
0, f.length()-> 0~15byte取得 -
buffer position : 0-> flip()済み -
channel position-? ファイル内読取位置を保持しない
-
- write
-
out.write-> position ~ limitを書出す -
buffer position : 15-> 書出した分positionが移動された -
channel position : 15-> 次回はファイルindex = 15(16byte目)から書込みする
-
read()
File f = new File("./NIO/channel-in.txt");
try (
    FileChannel inChannel = new FileInputStream(f).getChannel()) {

    ByteBuffer byteBuffer = ByteBuffer.allocate(8);
    int hasRead = 0;

    System.out.println("----channel#read1回目----");
    hasRead = inChannel.read(byteBuffer);
    System.out.println("buffer capacity : " + byteBuffer.capacity());
    System.out.println("buffer limit : " + byteBuffer.limit());
    System.out.println("buffer position : " + byteBuffer.position());
    System.out.println("channel position : " + inChannel.position());
    System.out.println("hasRead : " + hasRead);

    byteBuffer.clear();

    System.out.println("----channel#read2回目----");
    hasRead = inChannel.read(byteBuffer);
    System.out.println("buffer capacity : " + byteBuffer.capacity());
    System.out.println("buffer limit : " + byteBuffer.limit());
    System.out.println("buffer position : " + byteBuffer.position());
    System.out.println("channel position : " + inChannel.position());
    System.out.println("hasRead : " + hasRead);
} catch (IOException ex) {
    System.out.println(ex.getMessage());
}
----channel#read1回目----
buffer capacity : 8
buffer limit : 8
buffer position : 8
channel position : 8
hasRead : 8
----channel#read2回目----
buffer capacity : 8
buffer limit : 8
buffer position : 7
channel position : 15
hasRead : 7
- read1回目
-
buffer position : 8-> 8byte読取った -
channel position : 8-> 次はfile index = 8(9byte目)から読取る
-
- read2回目
-
buffer position : 7-> 7byte読取った -
channel position : 15-> 次はfile index = 15(9byte目)から読取る
-
- flip()しないと、get()使えないね
Charset
javaはデフォルトでUnicodeを使うが、それ以外の文字コードを読取る際に文字化けが発生する可能性がある。
Charsetは、byteとcharの変換をするために提供されている。
| IOメソッド | 説明 |
|---|---|
| CharBuffer Charset#decode(ByteBuffer buf) | ByteBuffer to CharBuffer |
| ByteBuffer Charset#encode(CharBuffer buf) | CharBuffer to ByteBuffer |
| ByteBuffer Charset#encode(String str) | String to ByteBuffer |
javaがサポートするcharset取得
// Charset一覧
Charset.availableCharsets().entrySet().forEach(System.out::println);

// defalut
System.out.println("default charset : " + Charset.defaultCharset()); // UTF-8
・・・略
Shift_JIS=Shift_JIS
UTF-16=UTF-16
UTF-32=UTF-32
UTF-8=UTF-8
・・・略
ByteBuffer to CharBuffer
File f = new File("./NIO/file-sjis-in.txt");
try (
    FileChannel inChannel = new FileInputStream(f).getChannel()) {

    // FileChannel to ByteBuffer
    ByteBuffer byteBuffer = ByteBuffer.allocate(6);
    inChannel.read(byteBuffer);
    byteBuffer.flip();

    // Shift_JIS
    Charset sjis = Charset.forName("Shift_JIS");

    // decode buff with SJIS
    CharBuffer charBuffer = sjis.decode(byteBuffer);
    System.out.println("str : " + charBuffer.toString());
} catch (IOException ex) {
    System.out.println(ex.getMessage());
}
String to ByteBuffer
try (
    FileChannel outChannel = new FileOutputStream("./NIO/file-sjis-out.txt").getChannel()) {

    // unicode
    String str = "123あいう" + System.lineSeparator() + "SHIFT-JIS";
    // Shift_JIS
    Charset sjis = Charset.forName("Shift_JIS");
    // encode buff with SJIS
    ByteBuffer byteBuffer = sjis.encode(str);
    // write to file
    outChannel.write(byteBuffer);
} catch (IOException ex) {
    System.out.println(ex.getMessage());
}
か、
new String(byte[] xx, "Shift_JIS");
一つ不明点
utf-8(1byte ~ 6byte)のような、文字によってバイト数が異なる場合、
Bufferサイズはどうすればいいのか???
abあい
ab = 2byte
あい = 3byte + 3byte
ByteBuffer byteBuffer = ByteBuffer.allocate(6)にした場合、
abあ + いの1バイト目がbufferに入ってしまい、decodeしたらabあ�になる。
この場合、どうすればいいの???
-
文字セットの公倍数を使う。
「1,2,3,4,5,6」なので、60バイトの倍数をBufferサイズとして使う。 -
文字化けを判別し、Buffer先頭に入れてpositionを調整御、readする。
⇒ map()は、ブロック読み込み&file positionは維持しないね!
はやり文字化けしないサイズに指定しないといけないのか??
下記で一応解決。
| 制御 | 説明 |
|---|---|
| onMalformedInput | 不正入力エラー |
| onUnmappableCharacter | マップできない文字エラー |
| 種別 | 説明 |
|---|---|
| CodingErrorAction.IGNORE | エラー文字無視 |
| CodingErrorAction.REPLACE | エラー文字置き換え |
| CodingErrorAction.REPORT | エラー報告 |
CodingErrorAction.IGNORE
File f = new File("./a/file-utf8-in.txt");
try (
    FileChannel inChannel = new FileInputStream(f).getChannel()) {
    ByteBuffer byteBuffer = ByteBuffer.allocate(6);
    while (inChannel.read(byteBuffer) > -1) {
        // IO準備
        byteBuffer.flip();

        Charset utf8 = Charset.forName("UTF-8");
        CharsetDecoder decoder = utf8.newDecoder();

        CharBuffer charBuffer2 = decoder
            .onMalformedInput(CodingErrorAction.IGNORE)
            .decode(byteBuffer);
        System.out.print(charBuffer2.toString());
        byteBuffer.clear();
    }
} catch (IOException ex) {
    System.out.println(ex.getMessage());
}
abあ
いは無視された
CodingErrorAction.IGNORE
File f = new File("./a/file-utf8-in.txt");
try (
    FileChannel inChannel = new FileInputStream(f).getChannel()) {
    ByteBuffer byteBuffer = ByteBuffer.allocate(6);
    while (inChannel.read(byteBuffer) > -1) {
        // IO準備
        byteBuffer.flip();
        Charset utf8 = Charset.forName("UTF-8");
        CharsetDecoder decoder = utf8.newDecoder();
        CharBuffer charBuffer2 = decoder
            .onMalformedInput(CodingErrorAction.REPLACE).replaceWith("お")
            .decode(byteBuffer);
        System.out.print(charBuffer2.toString());
        byteBuffer.clear();
    }
} catch (IOException ex) {
    System.out.println(ex.getMessage());
}
abあおおお
いの1バイト目⇒お
いの2バイト目⇒お
いの3バイト目⇒お
CodingErrorAction.REPORT
IGNORE,REPALCEは元データを破壊する!!
File f = new File("./a/file-utf8-in.txt");
try (
    FileChannel inChannel = new FileInputStream(f).getChannel()) {
    ByteBuffer byteBuffer = ByteBuffer.allocate(6);
    while (inChannel.read(byteBuffer) > -1) {
        byteBuffer.flip();
        Charset utf8 = Charset.forName("UTF-8");
        CharsetDecoder decoder = utf8.newDecoder();
        try {
            CharBuffer charBuffer = decoder
                .onMalformedInput(CodingErrorAction.REPORT)
                .decode(byteBuffer);

            // 出力
            System.out.print(charBuffer.toString());
            byteBuffer.clear();
        } catch (MalformedInputException ex) {
            // エラー発生位置と終了位置
            int errorIndexStart = byteBuffer.position();
            int errorIndexEnd = byteBuffer.limit();

            // 正常位置まで出力
            byteBuffer.flip();
            CharBuffer charBuffer = decoder
                .decode(byteBuffer);
            System.out.print(charBuffer.toString());

            // エラー位置開始~終了をバッファ先頭へ移動
            byteBuffer.clear();
            for (int i = errorIndexStart; i < errorIndexEnd; i++) {
                byteBuffer.put(byteBuffer.get(i));
            }
        }
    }
} catch (IOException ex) {
    System.out.println(ex.getMessage());
}
abあい
- エラー発生時、まず正常位置まで出力する。
- エラー発生位置から最後までbufferの先頭へ移動させる
- 次の読み取りは、0からではなく、エラー発生長さの後ろから
- utf-8は、1バイト~6バイトなので、最小でもallocate(6)は必要だね?
本当にこれが最善なのか??
FileLock
ファイルに対するロックを表す
| FileChannelのロックメソッド | 説明 |
|---|---|
| FileChannel#lock() | lock(0L, Long.MAX_VALUE, false) |
| FileChannel#lock(long position, long size, boolean shared) | ロック範囲、共有ロック、排他ロック指定可能 |
| FileChannel#tryLock() | tryLock(0L, Long.MAX_VALUE, false) |
| FileChannel#tryLock(long position, long size, boolean shared) | ロック範囲、共有ロック、排他ロック指定可能 |
lock()とtryLock()の違い
lock()はロック取得までスレッドブロックする。
tryLockはロック取得できないとnullを返す。
lock()
try (FileChannel fileChannel = new FileOutputStream("file-lock-out.txt").getChannel();) {
    FileLock lock = fileChannel.lock();
    System.out.println("lock取得できた");
    System.out.println("60秒間lock維持");
    Thread.sleep(60 * 1000);
    lock.release();
} catch (IOException | InterruptedException ex) {
    System.out.println("1" + ex.getMessage());
}
上記を異なるjvmで2回実行した際
lock取得できた
60秒間lock維持
jvm2の出力は待機するので、出力なし。
tryLock()
try (FileChannel fileChannel = new FileOutputStream("file-lock-out.txt").getChannel();) {
    FileLock lock = fileChannel.tryLock();
    if (lock != null) {
        System.out.println("tryLock取得できた");
        Thread.sleep(60 * 1000);
        lock.release();
    } else {
        System.out.println("lock is null");
    }
} catch (IOException | InterruptedException ex) {
    System.out.println(ex.getMessage());
}
tryLock取得できた
lock is null
ほか
- lockはjvmが所持しているので、同じjvmで同じfileのlockはできない。
- プラットフォームによっては、FileChannelをクローズする際に、ロックをrelaseする。
なので、ロックされたファイルに対して複数FileChannelを開くのはよくない。 - プラットフォームによっては、ファイルロックは推奨であり、強制でないない。
⇒ ロックなしで読み書きできるってこと。
次はNIO.2