はじめに
mayaでツールを作る際に、ツール用のGUIを作ることがあります。
MELで作る場合はMELコマンドを使用して
Pythonで作る場合はPySideを使うかmaya.cmdsやpymelからMELを呼び出して作る感じかと思います。
ツイッターとかを見ているとPythonで書く場合はPySideを使う人が多いんですかね。
今回はニッチな層を狙ってmaya.cmdsを使ってGUIを作るときに
with構文とLayoutManagerを使うと便利だよ!というのをご紹介します。
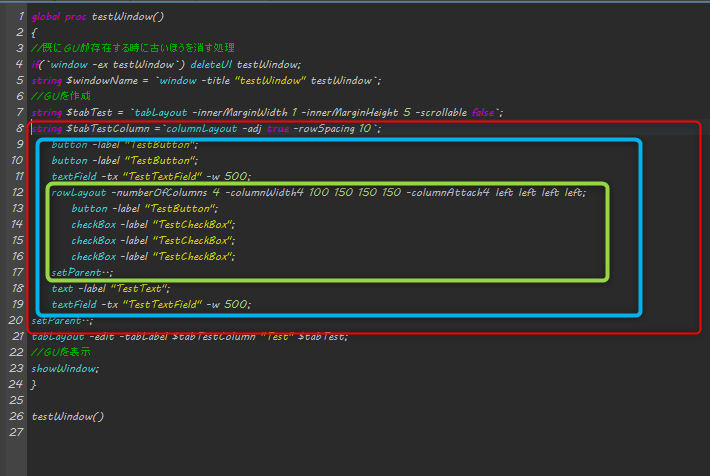
GUIの例(MEL)
maya.cmdsを使った例を説明する前にMELで作る場合は例えばこんな感じになります。
global proc testWindow()
{
//既にGUIが存在する時に古いほうを消す処理
if(`window -ex testWindow`) deleteUI testWindow;
string $windowName = `window -title "testWindow" testWindow`;
//GUIを作成
string $tabTest = `tabLayout -innerMarginWidth 1 -innerMarginHeight 5 -scrollable false`;
string $tabTestColumn =`columnLayout -adj true -rowSpacing 10`;
    button -label "TestButton";
    button -label "TestButton";
    textField -tx "TestTextField" -w 500;
    rowLayout -numberOfColumns 4 -columnWidth4 100 150 150 150 -columnAttach4 left left left left;
        button -label "TestButton";
        checkBox -label "TestCheckBox";
        checkBox -label "TestCheckBox";
        checkBox -label "TestCheckBox";
    setParent..;
    text -label "TestText";
    textField -tx "TestTextField" -w 500;
setParent..;
tabLayout -edit -tabLabel $tabTestColumn "Test" $tabTest;
//GUIを表示
showWindow;
}

testWindow()
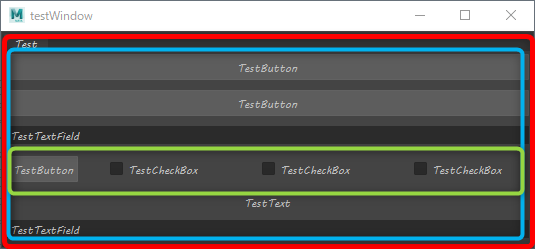
上記のMELを実行するとこんな感じのGUIが立ち上がります。
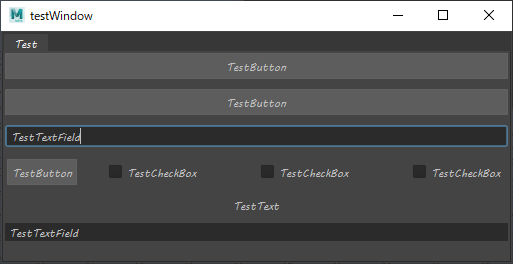
コードの中でGUIを作っている部分を色分けしてみます。
一番大きい赤枠がcolumnLayoutで(要素を縦に並べるレイアウトです)
青枠の所でcolumnLayout内にbuttonやtextFieldを上から順に配置していき
緑枠では一行の中にbuttonとcheckBox3つを配置しています。
MELで書く場合はGUIのレイアウト内の階層によってインデントを変えてやると
コードが見やすくなります。
GUIの例(maya.cmds)
次にmaya.cmdsの書いた例です。
# !/usr/bin/env python
# -*- coding: utf-8 -*-

import maya.cmds as cmds

def testWindow():
    #既にGUIが存在する時に古いほうを消す処理
    if cmds.window('testWindow', ex=1):
        cmds.deleteUI('testWindow')
    windowName = cmds.window('testWindow',title='testWindow')
    #GUIを作成
    tabTest=cmds.tabLayout(scrollable=False, innerMarginHeight=5, innerMarginWidth=1)
    tabTestColumn=cmds.columnLayout(adj=True, rowSpacing=10)
    cmds.button(label="TestButton")
    cmds.button(label="TestButton")
    cmds.textField(w=500, tx="TestTextField")
    cmds.rowLayout(numberOfColumns=4, columnAttach4=('left', 'left', 'left', 'left'), columnWidth4=(100, 150, 150, 150))
    cmds.button(label="TestButton")
    cmds.checkBox(label="TestCheckBox")
    cmds.checkBox(label="TestCheckBox")
    cmds.checkBox(label="TestCheckBox")
    cmds.setParent('..')
    cmds.text(label="TestText")
    cmds.textField(w=500, tx="TestTextField")
    cmds.setParent('..')
    cmds.tabLayout(tabTest, edit=1, tabLabel=(tabTestColumn, "Test"))
    #GUIを表示
    cmds.showWindow()

if __name__ == '__main__':
    testWindow()
maya.cmdsの場合(とうよりpythonの場合)インデントがずれるとエラーになるので
レイアウト内の階層に合わせてインデントを変えてやるということができません。
さらに言うとcmds.setParent('..')も何度も出てくるので消したいところです...
ということでここからが今回の本題です!
with構文とLayoutManagerを使用する
with構文とmayaの中にデフォルトであるLayoutManagerというモジュールを組み合わせて使用します。
with構文は主にファイルのオープンとクローズの時に使用するものです。
withを使わない場合は↓のように書きますが
f = open("test.txt", "r")
print(f.read())
f.close()
withを使うとf.close()の部分を省略することができます。
さらに都合の良いことにwith文の下の行はインデントを空ける決まりになっています。
with open("test.txt", "r") as f:
    print(f.read())
LayoutManagerはwith構文のこういった仕組みを利用して
インデントを自由に変えれるようにするモジュールです。
maya.common.uiのライブラリの中に含まれているので下記のようにしてインポートします。
from maya.common.ui import LayoutManager
LayoutManagerを使ってmaya.cmdsを使ったGUIの例を書き換えると下記のようになります。
# !/usr/bin/env python
# -*- coding: utf-8 -*-

import maya.cmds as cmds
from maya.common.ui import LayoutManager

def testWindow():
    #既にGUIが存在する時に古いほうを消す処理
    if cmds.window('testWindow', ex=1):
        cmds.deleteUI('testWindow')
    windowName = cmds.window('testWindow',title='testWindow')
    #GUIを作成
    tabTest=cmds.tabLayout(scrollable=False, innerMarginHeight=5, innerMarginWidth=1)
    with LayoutManager(cmds.columnLayout(adj=True, rowSpacing=10)) as tabTestColumn:
        cmds.button(label="TestButton")
        cmds.button(label="TestButton")
        cmds.textField(w=500, tx="TestTextField")
        with LayoutManager(cmds.rowLayout(numberOfColumns=4, columnAttach4=('left', 'left', 'left', 'left'), columnWidth4=(100, 150, 150, 150))):
            cmds.button(label="TestButton")
            cmds.checkBox(label="TestCheckBox")
            cmds.checkBox(label="TestCheckBox")
            cmds.checkBox(label="TestCheckBox")
        cmds.text(label="TestText")
        cmds.textField(w=500, tx="TestTextField")
    cmds.tabLayout(tabTest, edit=1, tabLabel=(tabTestColumn, "Test"))
    #GUIを表示
    cmds.showWindow()

if __name__ == '__main__':
    testWindow()
インデントの位置を変わったのとcmds.setParent('..')が
なくなったのでちょっとだけ見やすくなりました!
おわりに
PySide使うので要らないですとかインデント空けたほうが見にくいじゃん
と思われた方もいるかも知れませんが
ネットで検索してもLayoutManager出てこなかったのでご紹介させて頂きました。
そんなに便利な機能ではないですが良ければ使ってみてください!