まえがき
Unityで制作したモバイルアプリに広告を実装することで広告収入を得ることができるようになります。
ゲーム内で表示される広告には主に以下の3種類があります。
- バナー広告
- ゲーム中に画面下部など、画面の一部に表示される広告
- インタースティシャル広告
- 画面の遷移時などに画面に大きく表示される広告
- リワード広告
- 視聴することによってゲーム内で報酬を得ることが出来る広告
今回はこれらの広告の実装方法について説明していきます。
Google AdMobの登録
Google AdMobから自身のGoogleアカウントでログインして下さい。
すると、画面上部にこのような注意書きが表示されているので、修正ボタンを押して下さい。

指示に従って支払い情報と本人確認を済ませたら登録は完了です。
続いて、広告を実装したいアプリの登録をしていきます。
画面左側のアプリと書かれた項目からアプリの追加をクリックします。
指示に従ってアプリを登録することができたら、アプリの概要から広告ユニットの追加をしていきます。

広告ユニットを追加ボタンを押すと広告の種類が選べるので実装したい種類の広告を選択しましょう。
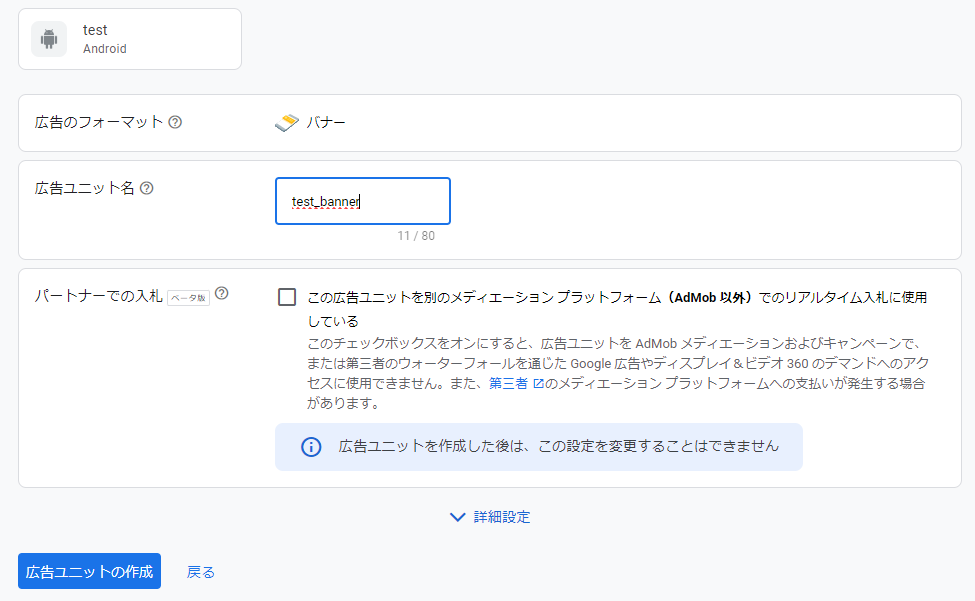
広告ユニット名を適当に決めて広告ユニットの作成ボタンを押せば完了です。他の実装したい広告に対しても同様に広告ユニットの作成を行って下さい。
GoogleMobileAdsパッケージの導入
Mobile Ads SDK からパッケージをインストールします。
少し下にスクロールすると次のような項目があるので、Import from GitHub をクリックして、1. Download ~ の中にある .unitypackage をクリックして下さい。

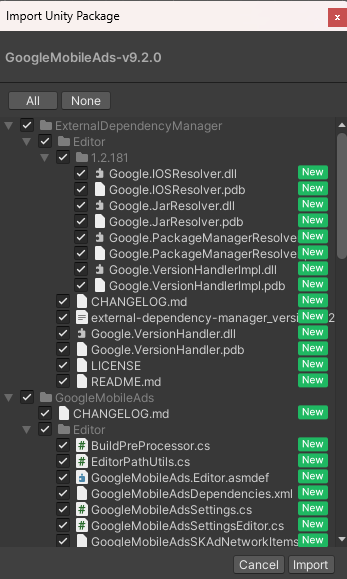
するとGitHubのページにリダイレクトされるので、一番上の GoogleMobileAds-vx.x.x.unitypackage (x.x.xの部分はバージョンによって変わります)をクリックしてパッケージのインストールを行って下さい。

UnityでProjectを開いた状態でインストールしたパッケージをダブルクリックするとImportできるので、Importを押してパッケージをインポートして下さい。
App IDの設定
Assets → Google Mobile Ads → Setting を選択して下さい。

するとInspectorが表示されるので、Google Mobile Ads App ID を設定します。
先ほどGoogle AdMobで追加したアプリのアプリIDを、アプリ一覧からコピーして入力、またはテスト用IDを入力します。AndroidまたはiOS一方のみ対応のアプリの場合は、片方だけ入力して下さい。
Androidテスト用AppID : ca-app-pub-3940256099942544~3347511713
iOSテスト用AppID : ca-app-pub-3940256099942544~1458002511
また、下3つのチェックボックスにすべてチェックを入れます。

Remote Configの設定
ストアにリリースする前の審査段階ではテスト広告の広告ユニットIDを使用していなければ広告が表示されないため、Google Admobで生成した広告ユニットIDを使用したまま審査に出してしまうとRejectされてしまいます。
しかし、審査が通った後に広告ユニットIDを差し替えて審査に出し直すと時間がかかってしまいます。
この問題を解決できるのがRemote Configで、Unity側で広告ユニットIDを差し替えるだけで実際に表示される広告も変動させることができます。
パッケージの導入
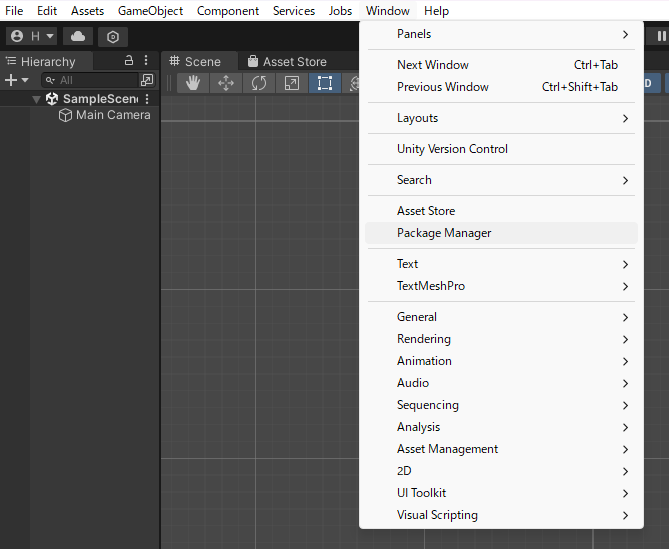
Unity側で Window → Package Manager を開きます。
画面上部の+マークの横にある項目から Packages: Unity Registry に切り替えて、Remoteと検索するとRemote Config というパッケージが出てくるので、Installボタンをクリックしてインストールします。

Unity Servicesの連携
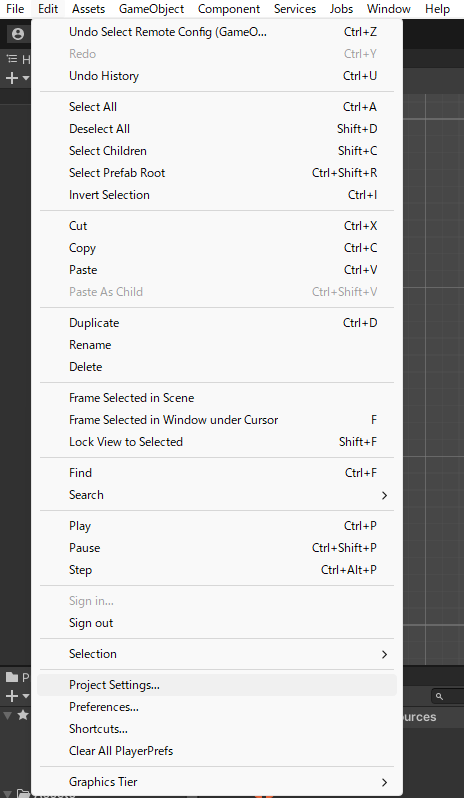
Edit → Project Settings... を開きます。
初めてRemote Configの設定を行う場合は、ServicesからOrganizationの選択とprojectの選択を行い、Link Unity project to cloud project を選択してRefreshして下さい。

広告IDの設定
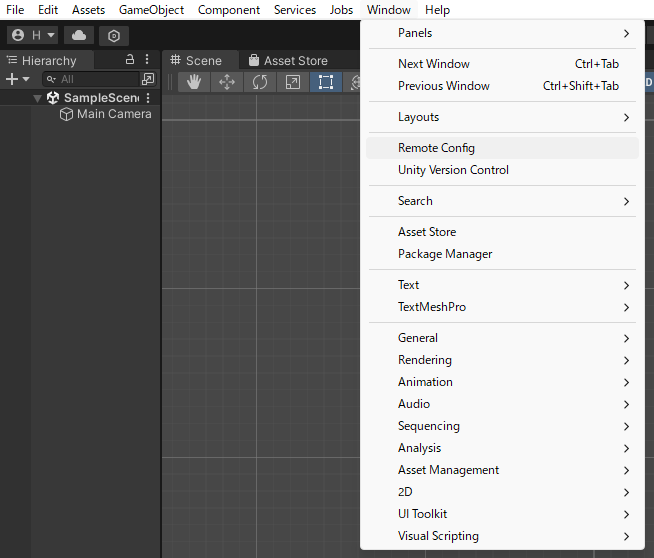
Window → Remote Configを選択します。
Add Settingから、使用したい広告に対応するkeyとvalueを設定します。keyの部分はkey_ad_(広告の種類)、TypeはString、valueは以下のテスト用広告IDを設定して下さい。
| 広告 | key | value |
|---|---|---|
| バナー広告 | key_ad_banner | ca-app-pub-3940256099942544/6300978111 |
| リワード広告 | key_ad_reward | ca-app-pub-3940256099942544/5224354917 |
| インタースティシャル広告 | key_ad_interstitial | ca-app-pub-3940256099942544/1033173712 |
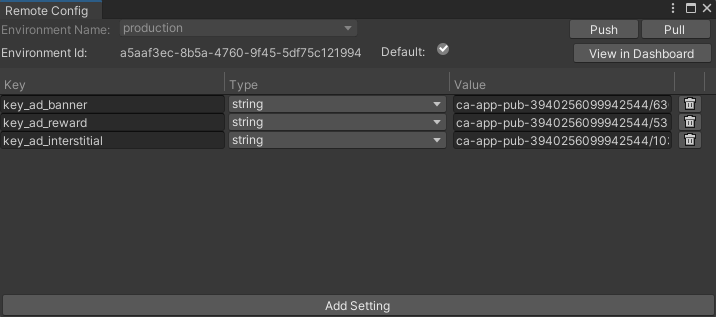
最後にPushを押して、処理が完了するのを待ちましょう。
これでリリースする際にValueの部分を実際に使用する広告IDに書き換えることで、Remote Configから広告を差し替えることが可能になりました。
Scriptの追加
AdmobManagerというScriptを作成して、中身を下のコードに書き換えてください。
AdmobManager (クリックして表示)
using UnityEngine;
using GoogleMobileAds.Api;
using Unity.Services.Authentication;
using Unity.Services.Core;
using Unity.Services.RemoteConfig;

public class AdmobManager : MonoBehaviour
{
    public static AdmobManager Instance
    {
        get
        {
            if (instance == null)
            {
                instance = FindObjectOfType<AdmobManager>();
            }
            return instance;
        }
    }
    public static AdmobManager instance;

    private bool isReady = false;
    public bool IsReady
    {
        get
        {
            return isReady;
        }
    }

    [SerializeField] private bool useRemoteConfig = false;

    // Create attributes classes
    private class UserAttributes { }
    private class AppAttributes { }

    async void Start()
    {
        if (this != Instance)
        {
            Destroy(gameObject);
            return;
        }
        else
        {
            DontDestroyOnLoad(gameObject);
            instance = this;
        }

        if (useRemoteConfig)
        {
            if (Utilities.CheckForInternetConnection())
            {
                await UnityServices.InitializeAsync();

                if (!AuthenticationService.Instance.IsSignedIn)
                {
                    await AuthenticationService.Instance.SignInAnonymouslyAsync();
                }

                // Create instances of user and app attributes
                var userAttributes = new UserAttributes();
                var appAttributes = new AppAttributes();

                // Fetch Remote Config data
                await RemoteConfigService.Instance.FetchConfigsAsync(userAttributes, appAttributes);
            }
        }

        MobileAds.RaiseAdEventsOnUnityMainThread = true;
        MobileAds.Initialize(initStatus =>
        {
            isReady = true;
            Debug.Log(initStatus);
        });
    }
}
コード7行目の public class AdmobManager : MonoBehaviour の AdmobManagerの部分がScript名と一致している必要があるので、Script名が間違っていないか確認して下さい。他のScriptについても同様です。
続いて、 AdmobUnitBaseというScriptを作成して、中身を下のコードに書き換えて下さい。
AdmobUnitBase (クリックして表示)
using System.Collections;
using UnityEngine;
using GoogleMobileAds.Common;
using Unity.Services.RemoteConfig;

public abstract class AdmobUnitBase : MonoBehaviour
{
    [SerializeField] private string unitIDAndroid;
    [SerializeField] private string unitIDIOS;

    protected string UnitID
    {
        get
        {
#if UNITY_ANDROID
            return unitIDAndroid;
#elif UNITY_IOS
            return unitIDIOS;
#else
            return "";
#endif
        }
    }

    [Header("Remote Config")]
    [SerializeField] private bool useRemoteConfig = false;
    public bool UseRemoteConfig => useRemoteConfig;
    [SerializeField] private string keyUnitIDAndroid = "unit_id_android";
    [SerializeField] private string keyUnitIDIOS = "unit_id_ios";

    private void OnAppStateChangedBase(AppState state)
    {
        Debug.Log("App State changed to : " + state);
        OnAppStateChanged(state);
    }

    private IEnumerator Start()
    {
        while (AdmobManager.Instance.IsReady == false)
        {
            yield return 0;
        }
        if (useRemoteConfig)
        {
            unitIDAndroid = RemoteConfigService.Instance.appConfig.GetString(keyUnitIDAndroid);
            unitIDIOS = RemoteConfigService.Instance.appConfig.GetString(keyUnitIDIOS);
        }
        Initialize();
    }
    protected virtual void Initialize()
    {
        // Call after initialization of AdsManager
    }
    protected virtual void OnAppStateChanged(AppState state)
    {
    }
}
最後に、実装する広告に応じて、AdmobUnitBanner、AdmobUnitReward、AdmobUnitInterstitialというScriptを作成して、それぞれの中身を下のコードに書き換えて下さい。
AdmobUnitBanner (クリックして表示)
using UnityEngine;
using GoogleMobileAds.Api;

public class AdmobUnitBanner : AdmobUnitBase
{
    private BannerView bannerView;

    protected override void Initialize()
    {
        ShowBanner();
    }

    public void ShowBanner()
    {
        if (bannerView != null)
        {
            Debug.Log("Destroying banner view.");
            bannerView.Destroy();
            bannerView = null;
        }

        // Create AdSize
        AdSize adaptiveSize = AdSize.GetCurrentOrientationAnchoredAdaptiveBannerAdSizeWithWidth(AdSize.FullWidth);

        // Designate AdSize as Argument
        bannerView = new BannerView(
            UnitID,
            adaptiveSize,
            AdPosition.Bottom);

        bannerView.OnBannerAdLoaded += () =>
        {
            Debug.Log("ロードされました - 表示します");
        };
        bannerView.OnBannerAdLoadFailed += (LoadAdError error) =>
        {
            Debug.LogError("ロード失敗しました");
        };

        // Generate Request
        var adRequest = new AdRequest();
        bannerView.LoadAd(adRequest);
    }

    private void UnitDestroy()
    {
        if (bannerView != null)
        {
            Debug.Log("Destroying banner view.");
            bannerView.Destroy();
            bannerView = null;
        }
    }

    private void OnDestroy()
    {
        UnitDestroy();
    }

}
AdmobUnitReward (クリックして表示)
using UnityEngine;
using GoogleMobileAds.Api;
using System;

public class AdmobUnitReward : AdmobUnitBase
{
    private RewardedAd rewardedAd;

    public bool IsReady
    {
        get
        {
            if (AdmobManager.Instance.IsReady == false)
            {
                return false;
            }
            return rewardedAd != null && rewardedAd.CanShowAd();
        }
    }
    protected override void Initialize()
    {
        LoadRewardAd();
    }

    public void LoadRewardAd()
    {
        if (IsReady)
        {
            Debug.Log("Reward ad is already loaded.");
            return;
        }

        // Clean up the old ad before loading a new one.
        if (rewardedAd != null)
        {
            rewardedAd.Destroy();
            rewardedAd = null;
        }

        var adRequest = new AdRequest();

        RewardedAd.Load(UnitID, adRequest,
            (RewardedAd ad, LoadAdError error) =>
            {
                if (error != null || ad == null)
                {
                    Debug.LogError("rewarded ad failed to load an ad " +
                        error?.ToString());
                    return;
                }

                rewardedAd = ad;
                RegisterEventHandlers(rewardedAd);
            });
    }

    public void ShowRewardAd(Action<Reward> onReward)
    {
        if (IsReady)
        {
            rewardedAd.Show((Reward reward) =>
            {
                Debug.Log("Reward ad completed successfully.");
                onReward?.Invoke(reward);
            });
        }
        else
        {
            Debug.Log("Reward ad is not ready yet.");
            onReward?.Invoke(null);
        }
    }

    private void RegisterEventHandlers(RewardedAd ad)
    {
        // Raised when the ad is estimated to have earned money.
        ad.OnAdPaid += (AdValue adValue) =>
        {
            Debug.Log(String.Format("Rewarded ad paid {0} {1}.",
                adValue.Value,
                adValue.CurrencyCode));
        };
        // Raised when an impression is recorded for an ad.
        ad.OnAdImpressionRecorded += () =>
        {
            Debug.Log("Rewarded ad recorded an impression.");
        };
        // Raised when a click is recorded for an ad.
        ad.OnAdClicked += () =>
        {
            Debug.Log("Rewarded ad was clicked.");
        };
        // Raised when an ad opened full screen content.
        ad.OnAdFullScreenContentOpened += () =>
        {
            Debug.Log("Rewarded ad full screen content opened.");
        };
        // Raised when the ad closed full screen content.
        ad.OnAdFullScreenContentClosed += () =>
        {
            Debug.Log("Rewarded ad full screen content closed.");
            LoadRewardAd();
        };
        // Raised when the ad failed to open full screen content.
        ad.OnAdFullScreenContentFailed += (AdError error) =>
        {
            Debug.LogError("Rewarded ad failed to open full screen content " +
                           "with error : " + error);
            LoadRewardAd();
        };
    }
}
AdmobUnitInterstitial (クリックして表示)
using UnityEngine;
using GoogleMobileAds.Api;
using System;
using UnityEngine.SceneManagement;

public class AdmobUnitInterstitial : AdmobUnitBase
{
    private InterstitialAd interstitialAd;
    private string nextSceneName;

    public bool IsReady
    {
        get
        {
            if (AdmobManager.Instance.IsReady == false)
            {
                return false;
            }
            return interstitialAd != null && interstitialAd.CanShowAd();
        }
    }

    protected override void Initialize()
    {
        LoadInterstitialAd();
    }

    public void ShowInterstitial(string sceneToLoad)
    {
        nextSceneName = sceneToLoad;
        if (IsReady)
        {
            interstitialAd.Show();
        }
        else
        {
            Debug.Log("Interstitial ad is not ready yet.");
            SceneManager.LoadScene(nextSceneName);  // Load scene immediately if ad is not ready
        }
    }

    private void LoadInterstitialAd()
    {
        // Clean up old ads before loading new ones
        if (interstitialAd != null)
        {
            interstitialAd.Destroy();
            interstitialAd = null;
        }

        var adRequest = new AdRequest();

        InterstitialAd.Load(UnitID, adRequest,
            (InterstitialAd ad, LoadAdError error) =>
            {
                if (error != null || ad == null)
                {
                    Debug.LogError("Interstitial ad failed to load an ad " +
                                   "with error : " + error);
                    return;
                }

                Debug.Log("Interstitial ad loaded with response : "
                          + ad.GetResponseInfo());

                interstitialAd = ad;
                RegisterEventHandlers(interstitialAd);
            });
    }

    private void RegisterEventHandlers(InterstitialAd interstitialAd)
    {
        // Called when the ad closes the full screen content
        interstitialAd.OnAdFullScreenContentClosed += () =>
        {
            Debug.Log("Interstitial ad full screen content closed.");
            LoadInterstitialAd();
            SceneManager.LoadScene(nextSceneName);  // Load scene after ads are closed.
        };
    }
}
また、リワード広告、インタースティシャル広告を使用する場合はTestReward、TestInterstitialというScriptも作成し、中身を下のコードに書き換えて下さい。
TestReward (クリックして表示)
using UnityEngine;
using UnityEngine.UI;

public class TestReward : MonoBehaviour
{
    public Button showRewardButton;

    public AdmobUnitReward admobUnitReward;

    private void Start()
    {
        showRewardButton.interactable = false;

        showRewardButton.onClick.AddListener(() =>
        {
            admobUnitReward.ShowRewardAd((reward) =>
            {
                if (reward != null)
                {
                    Debug.Log("Reward type: " + reward.Type);
                    Debug.Log("Reward received: " + reward.Amount);
                }
            });
            showRewardButton.interactable = false;
        });
    }

    private void Update()
    {
        showRewardButton.interactable = admobUnitReward.IsReady;
    }
}
TestInterstitial (クリックして表示)
using UnityEngine;
using UnityEngine.UI;

public class TestInterstitial : MonoBehaviour
{
    public Button showInterstitialButton;
    public AdmobUnitInterstitial admobUnitInterstitial;

    private void Start()
    {
        showInterstitialButton.interactable = true;

        showInterstitialButton.onClick.AddListener(() =>
        {
            string buttonTag = showInterstitialButton.tag;
            if (buttonTag == "retry")
            {
                admobUnitInterstitial.ShowInterstitial("game");
            }
            else if (buttonTag == "title")
            {
                admobUnitInterstitial.ShowInterstitial("title");
            }
            else
            {
                Debug.LogWarning("Button tag is not recognized.");
            }
            showInterstitialButton.interactable = true;
        });
    }

    private void Update()
    {
        showInterstitialButton.interactable = admobUnitInterstitial.IsReady;
    }
}
広告の表示
最後に、実際に広告を表示できるようにしていきましょう。
広告を表示したいSceneに移動して、AdmobManagerという空のオブジェクトを作成します。
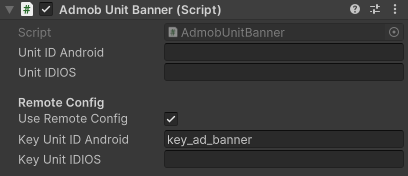
これに、AdmobManager のScriptをアタッチして、Inspectorで Use Remote Config にチェックを入れます。

また、実装する広告に応じて、AdmobUnitBanner、AdmobUnitReward、AdmobUnitInterstitialという空のオブジェクトを作成して、対応するScriptをアタッチして下さい。
Use Remote Configにチェックを入れ、下のKey Unit IDの部分に先ほどRemote Configで設定したvalueを広告の種類に応じて設定します。今回はAndroidのみ実装します。
他の種類の広告に対しても同様に操作して下さい。
バナー広告はこれで実際に表示されるようになります。Playを押してみて画面下部にバナーが表示されれば成功です。
リワード広告とインタースティシャル広告
リワード広告とインタースティシャル広告についてはボタンを押したら表示されるようにしたいので、追加の実装を行います。
実装する広告の種類に応じて、TestReward、TestInterstitialという名前の空のオブジェクトを作成します。
これに対応するScriptをアタッチして、Inspectorで設定を行います。
リワード広告の場合は広告を表示したら報酬がもらえるボタン、インタースティシャル広告は画面遷移を行うときのボタンのオブジェクトをShow Reward ButtonまたはShow Interstitial Buttonに設定して下さい。
Admob Unit RewardまたはAdmob Unit Interstitialの部分には対応するScriptを設定して下さい。

これでReward広告の実装は完了です。ボタンを押したら広告が表示されるのを確認しましょう。
実際に報酬が得られるようにするには、Google AdMobで作成したリワード広告の広告ユニットの設定から報酬の個数と報酬アイテムを設定しましょう。
インタースティシャル広告のボタン識別
また、インタースティシャル広告はボタンを識別して、広告がユーザーによって削除されたあとにそのボタンが押された処理を行うという実装になっているのでボタンを識別できるようにする必要があります。
TestInterstitialのScriptには、押されたボタンのTagが"retry"であれば"game"シーンをロード、押されたボタンのTagが"title"であれば"title"シーンをロードするようにしています。これは必要に応じて追加・編集して下さい。
TestInterstitialの一部
private void Start()
{
    showInterstitialButton.interactable = true;

    showInterstitialButton.onClick.AddListener(() =>
    {
        string buttonTag = showInterstitialButton.tag;
        if (buttonTag == "retry")
        {
            admobUnitInterstitial.ShowInterstitial("game");
        }
        else if (buttonTag == "title")
        {
            admobUnitInterstitial.ShowInterstitial("title");
        }
        else
        {
            Debug.LogWarning("Button tag is not recognized.");
        }
        showInterstitialButton.interactable = true;
    });
}
そのため、インタースティシャル広告を表示するボタンにTagをつければよいです。
ボタンのオブジェクトを選択し、Inspectorの上部からTagを設定することができます。Scriptで設定した"retry"や、"title"といったTagを作成し、それぞれのボタンに割り当てましょう。

実際にボタンを押してみて、広告を削除したら指定のシーンがロードされれば成功です。
以上でバナー広告、リワード広告、インタースティシャル広告の実装は完了です。お疲れ様でした。
あとがき
Google Admobを使用して広告の実装をしました。
審査が通ったらRemote Configのvalueをテスト広告IDから実際の広告ユニットIDに差し替えることをお忘れずに。