これは何?
所属しているチームのお隣のQAチームがテスト自動化ツールであるAppiumを使う機会があり、そこにちょっとだけ参加することになったので、お盆休みの勉強がてら環境構築とテストコードを書いてみました。
この記事は、そのときの手順を示しています。
Appiumについて
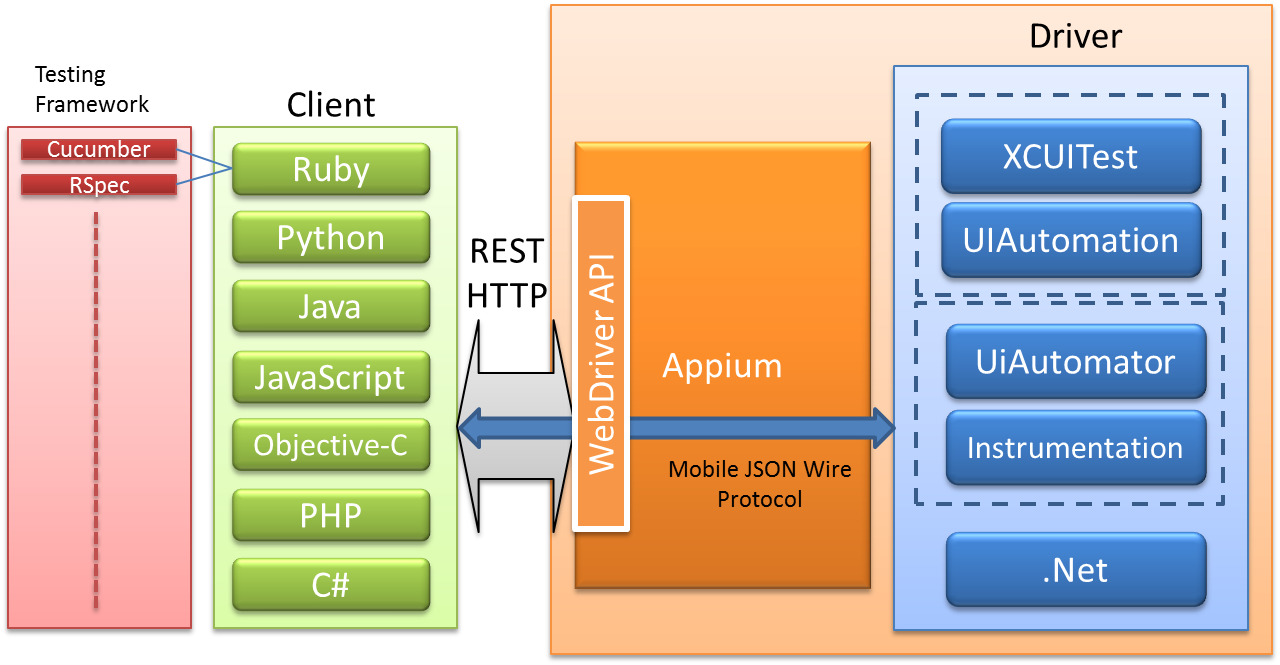
Appiumは、モバイルアプリ向けのUIテスト自動化ツール。
サーバクライアントモデルを採用しており、テストコード側からクライアントライブラリ等を介してWebDriver API(の拡張)を叩くと、APIサーバ側でそれを解釈して、プラットフォームごとにあるUIテスト自動化ツール(UIAutomatorやXCUITestなど)の命令に変換し、アプリ操作の自動化を実現している。
クライアントの部分をAppium Client、APIサーバをAppium Server、命令を変換する部分をDriverと呼んでいる。
誤解を恐れずに言えば、Seleniumのモバイルアプリ版。
アーキテクチャについては、下記記事内の図が非常にわかりやすいのでお借りします(2022/8/12閲覧)。
環境
- MacOS 12.4
- Open JDK 11.0.11
- Node.js 12.22.1
- NPM 8.7.0
- Homebrew 3.5.8
- Android Studio 2021.1.1
- Xcode 13.2
- Appium 1.12.1
- appium-docker 1.16.0
- appium-desktop v1.22.3-4
- appium-inspector 2022.7.1
- Appium Java Client: 8.1.1
やりたかったこと
- Appiumを使ってAndroidアプリのUI自動化テストコードを動かす
- Appiumはエミュレータと実機の両方で動作させることができるが、今回はエミュレータでの実行とする
- Appiumを使ってiOSアプリのUI自動化テストコードを動かす
- こちらも今回はシミュレータのみでの実行
- Android版と外部仕様がほぼ同じになることを想定
- テストコードはJavaで記述する。今後Javaを使うことになりそうなので
書いたコード
手順
テストをする際の流れとしては、おおむね以下のようになりそう。
- テストケースを設計する
- この時点で、ある程度自動化の実現性検証をしておく。特に、テストしたいアプリ内UIの要素をLocatorを用いて取得する部分のコードについては、かなりの職人芸を求められる。後述するAppium InspectorやAccessibility Inspector等を用いて、「こうすればできそう」というアタリを付けておく。必要であれば、ターゲットとなるアプリにAccessibility ID等を振ってもらい、テストしやすいようにしておく
- 実行するターゲットとなる端末を決める
a. エミュレータの場合であればエミュレータを起動しておく
b. 実機であれば実機を接続する - テストコードを書く
- テストコードを書く端末ごとのDesired Capabilitiesを作成し、実行環境ごとのDriverに渡す。指定したDesired CapabilitiesとDriverに応じて、Appium Server側でテスト可能な端末を探し出し、その端末でテストを実行する仕組みになっている。Capabilityについては https://appium.io/docs/en/writing-running-appium/caps/ を参照
- Locatorを用いてUI要素を取得する
- 必要に応じてActionを定義し、タップ、スワイプなどをテストコード上でシミュレートすることでアプリを操作する
- JUnit等のテストフレームワークで、UI要素の内容が期待通りであるかのアサーションを行う
やってみる。
Android
-
テスト用のAndroidアプリを用意する
https://github.com/lethe2211/android-webview-link-sample
このためだけにシンプルなAndroidアプリを書いてみた。
検索窓があり、そこに文字を入力すると、入力した文字をリンクとして画面に表示する仕様。下にビルドしたAPKファイルを置いたが、利用する際は自己責任で。
https://github.com/lethe2211/appium-java-template/blob/master/binary/android/app-release.apk
-
環境構築
構築手順は https://github.com/lethe2211/appium-java-template/blob/master/README.md にも書いているが、再掲しておく。
# Verify if node is installed
$ node -v
  # v12.22.1

# Verify if npm is installed
$ npm -v
  # 8.7.0

# Verify if JDK is installed
$ java -version
  # openjdk version "11.0.11" 2021-04-20
  # OpenJDK Runtime Environment AdoptOpenJDK-11.0.11+9 (build 11.0.11+9)
  # Eclipse OpenJ9 VM AdoptOpenJDK-11.0.11+9 (build openj9-0.26.0, JRE 11 Mac OS X amd64-64-Bit Compressed References 20210421_957 (JIT enabled, AOT enabled)
  # OpenJ9   - b4cc246d9
  # OMR      - 162e6f729
  # JCL      - 7796c80419 based on jdk-11.0.11+9)

# Verify if JAVA_HOME is set
$ echo $JAVA_HOME
  # /Users/$USER/.sdkman/candidates/java/current

# Verify if ANDROID_HOME is set
$ echo $ANDROID_HOME
 # /Users/$USER/Library/Android/sdk

# Install Appium server
$ npm install -g appium
$ npx appium -v
  # 1.22.3

# Verify if all of the above prerequisites are met by using appium-doctor
$ npm install -g appium-doctor
$ npx appium-docter --version
  # 1.16.0
$ npx appium-doctor --android
  # Check if "### Diagnostic for necessary dependencies completed, no fix needed. ##" is shown in the console

# Run the Appium server on 127.0.0.1:4723
$ npx appium
  # Check if the server really runs without any problem
基本的には、appium-doctor( https://github.com/appium/appium-doctor )が問題を報告しないようにいろいろ潰していけばよい。
また、Appium Serverをインストールする代わりに、Appium Desktop( https://github.com/appium/appium-desktop )をインストールしてAppium Serverを動かすこともできる。GUIを使いたい人はこちらがオススメ。
-
Androidエミュレータを起動する
https://developer.android.com/studio/run/managing-avds?hl=ja
テストを実行する前に、テストコード側のCapabilitiesに指定しているOSを搭載したエミュレータを起動しておく必要があることに注意(インストールするだけではダメ)。Android StudioのAVD Managerから目的にあったエミュレータのイメージを作成し、起動しておく。
# Verify if there's any Android emulator that runs with Android 12
$ $ANDROID_HOME/platform-tools/adb devices -l
  # If not, run it from Android Studio
今回は以下の
Pixel 5 API 32を使った。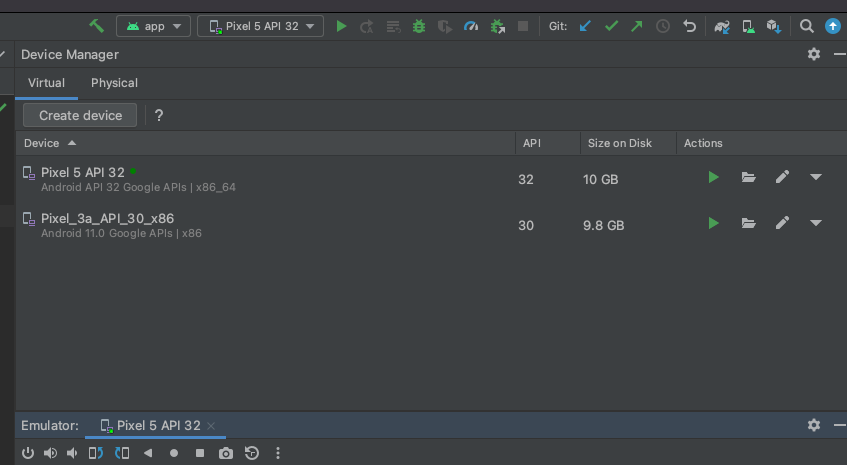
-
テストコードを書いてみる
今回は、前述したテスト用のアプリを用いて、- アプリ上部のツールバーのテキストが期待通り表示されている
- 検索窓に入力した文字列が下部にテキストとして表示されており、タップ可能になっている
の2点をテストすることとした。
DriverにはUIAutomator2 Driver( https://appium.io/docs/en/drivers/android-uiautomator2/ )、テストフレームワークにはJUnit 5を使った。
テストコードは https://github.com/lethe2211/appium-java-template/blob/master/src/test/java/com/example/sample/AndroidTest.java に記載している。
public class AndroidTest {
    private AndroidDriver driver;

    @BeforeEach
    public void setUp() throws MalformedURLException {
        // Please inject these env vars when you run these tests
        String apkFilePath = System.getenv("ANDROID_APK_FILE_PATH"); // Relative path to the APK file
        // String apkFilePath = "binary/android/app-release.apk";
        String packageName = System.getenv("ANDROID_PACKAGE_NAME"); // App package name described in AndroidManifest.xml
        // String packageName = "com.example.webviewlinksample";
        String launchActivityName = System.getenv("ANDROID_LAUNCH_ACTIVITY_NAME"); // Activity name where App is launched
        // String launchActivityName = ".MainActivity";

        File app = new File(apkFilePath);

        // Ref: https://appium.io/docs/en/writing-running-appium/caps/
        //
       // When you run the tests on Android Emulator,
        // you need to make sure there is a running emulator whose OS is the same as "appium:platformVersion"
        // $ $ANDROID_HOME/platform-tools/adb devices -l
        DesiredCapabilities desiredCapabilities = new DesiredCapabilities();
        desiredCapabilities.setCapability(MobileCapabilityType.AUTOMATION_NAME, "UiAutomator2");
        desiredCapabilities.setCapability(MobileCapabilityType.PLATFORM_NAME, MobilePlatform.ANDROID);
        desiredCapabilities.setCapability(MobileCapabilityType.PLATFORM_VERSION, "12");
        desiredCapabilities.setCapability(MobileCapabilityType.DEVICE_NAME, "Android Emulator");
        desiredCapabilities.setCapability(MobileCapabilityType.APP, app.getAbsolutePath());
        desiredCapabilities.setCapability(AndroidMobileCapabilityType.APP_PACKAGE, packageName);
        desiredCapabilities.setCapability(AndroidMobileCapabilityType.APP_ACTIVITY, launchActivityName);

        driver = new AndroidDriver(new URL("http://0.0.0.0:4723/wd/hub"), desiredCapabilities);
    }

    @AfterEach
    public void tearDown() {
        if (driver != null) {
            driver.quit();
        }
    }

    @Test
    @DisplayName("Toolbar has `WebViewLink Sample` as text")
    public void toolbarHasCorrectTitle() {
        String expected = "WebViewLink Sample";

        // Fetch the title of the toolbar
        // Note that androidx.appcompat.widget.Toolbar implicitly creates an element of android.widget.TextView as a child
        WebElement toolbar = driver.findElement(By.id("toolbar")).findElement(By.className("android.widget.TextView"));
        String actual = toolbar.getText();

        assertEquals(expected, actual);
    }

    @Test
    @DisplayName("The text you input in the search bar is shown in the below area as a link which is tappable")
    public void inputStringIsShownAsLink() {
        // Link text area
        WebElement linkText = driver.findElement(By.id("link_text"));

        // Verify no texts are input in the below text area
        String expectedBeforeInput = "";
        String actualBeforeInput = linkText.getText();

        assertEquals(expectedBeforeInput, actualBeforeInput);

        // Search button in the SearchView
        WebElement searchButton = driver.findElement(By.id("searchbar")).findElement(By.className("android.widget.ImageView"));

        // Tap the search button to get its focus
        searchButton.click();

        // Type some characters in the search bar
        Actions action = new Actions(driver);
        action.sendKeys("https://google.com").perform();

        // Verify the text it inputted to the search bar is really shown in the below text area
        String expectedAfterInput = "https://google.com";
        String actualAfterInput = linkText.getText();

        assertEquals(expectedAfterInput, actualAfterInput);

        // Tap the generated link
        linkText.click();
    }
}
実行してみる。
# Inject necessary env vars
$ export ANDROID_APK_FILE_PATH="binary/android/app-release.apk"
  # There is a test APK file in this repo
$ export ANDROID_PACKAGE_NAME="com.example.webviewlinksample"
$ export ANDROID_LAUNCH_ACTIVITY_NAME=".MainActivity"

$ ./gradlew test --tests "com.example.sample.AndroidTest"
iOS
-
テスト用のiOSアプリを用意する
https://github.com/lethe2211/ios-webview-link-sample
iOSについても、テスト用のアプリを用意した。
仕様はAndroidのものとほぼ揃えているが、一部UI要素について、SwiftUIの
View#accessibilityIdentifierを用いて、明示的にAccessibility IDを指定している。iOSの場合は、Xcode等によりビルドされた.appファイル、あるいは.ipaファイル(未検証)がアプリのバイナリと認識されるらしい。下記に.appファイルを配置した。
https://github.com/lethe2211/appium-java-template/tree/master/binary/ios/webviewlinksample.app
-
環境構築
これも https://github.com/lethe2211/appium-java-template/blob/master/README.md に記載した通り。appium-doctorの指示通りに設定する。
# Verify if node is installed $ node -v # v12.22.1 # Verify if npm is installed $ npm -v # 8.7.0 # Verify if JDK is installed $ java -version # openjdk version "11.0.11" 2021-04-20 # OpenJDK Runtime Environment AdoptOpenJDK-11.0.11+9 (build 11.0.11+9) # Eclipse OpenJ9 VM AdoptOpenJDK-11.0.11+9 (build openj9-0.26.0, JRE 11 Mac OS X amd64-64-Bit Compressed References 20210421_957 (JIT enabled, AOT enabled) # OpenJ9 - b4cc246d9 # OMR - 162e6f729 # JCL - 7796c80419 based on jdk-11.0.11+9) # Verify if Xcode is installed at a designated directory $ ls -l /Applications/Xcode.app/Contents/Developer $ open /Applications/Xcode.app/ # 13.2 # Install Xcode Command Line Tools $ xcode-select --install $ xcode-select -v # xcode-select version 2395. # Install Carthage $ brew install carthage $ carthage version # 0.38.0 # Install Appium server $ npm install -g appium $ npx appium -v # 1.22.3 # Verify if all of the above prerequisites are met by using appium-doctor $ npm install -g appium-doctor $ npx appium-docter --version # 1.16.0 $ npx appium-doctor --android # Check if "### Diagnostic for necessary dependencies completed, no fix needed. ##" is shown in the console # Run the Appium server on 127.0.0.1:4723 $ npx appium # Check if the server really runs without any problem -
iOSシミュレータが存在するかどうかチェックする
Androidとは異なり、iOS(というかXCUITest Driver?)では、シミュレータの起動は必須ではないらしい。Desired Capabitilitiesに記載したスペックのシミュレータがインストールされているかどうかだけをチェックしておく。
# [Only you want to run the tests with iOS simulator] # Verify if there's any iOS simulator whose spec matches with the capabilities we specified in the test class # If not, tweak the test code $ xcrun xctrace list devices -
テストコードを書いてみる
テスト観点については、Androidのものと同じとした。
Driverには、XCUITest Driver( https://appium.io/docs/en/drivers/ios-xcuitest/ )、テストフレームワークにはJUnit 5を使った。
public class IOSTest {
    private IOSDriver driver;

    @BeforeEach
    public void setUp() throws MalformedURLException {
        // Please inject these env vars when you run these tests
        String appFilePath = System.getenv("IOS_APP_FILE_PATH"); // Relative path to the .app directory
        // String appFilePath = "binary/ios/webviewlinksample.app";

        File app = new File(appFilePath);

        // Ref: https://appium.io/docs/en/writing-running-appium/caps/
        //
        // When you run the tests on iOS Simulator,
        // you need to choose the OS/device which is listed in the output of
        // $ xcrun xctrace list devices
        DesiredCapabilities desiredCapabilities = new DesiredCapabilities();
        desiredCapabilities.setCapability(MobileCapabilityType.AUTOMATION_NAME, "XCUITest");
        desiredCapabilities.setCapability(MobileCapabilityType.PLATFORM_NAME, MobilePlatform.IOS);
        desiredCapabilities.setCapability(MobileCapabilityType.PLATFORM_VERSION, "15.5");
        desiredCapabilities.setCapability(MobileCapabilityType.DEVICE_NAME, "iPhone 8");
        desiredCapabilities.setCapability(MobileCapabilityType.APP, app.getAbsolutePath());

        driver = new IOSDriver(new URL("http://0.0.0.0:4723/wd/hub"), desiredCapabilities);
    }

    @AfterEach
    public void tearDown() {
        if (driver != null) {
            driver.quit();
        }
    }

    @Test
    @DisplayName("Toolbar has `WebViewLink Sample` as text")
    public void toolbarHasCorrectTitle() {
        String expected = "WebViewLink Sample";

        // Fetch the title of the toolbar
        // Note that the title of NavigationBar will automatically be the same as its Accessibility ID and we don't have a control to change it from the code
        WebElement toolbar = driver.findElement(new AppiumBy.ByAccessibilityId("WebViewLink Sample"));

        // In case of iOS, toolbar (= NavigationBarTitle) is contained "name" attribute
        String actual = toolbar.getAttribute("name");

        assertEquals(expected, actual);
    }

    @Test
    @DisplayName("The text you input in the search bar is shown in the below area as a link which is tappable")
    public void inputStringIsShownAsLink() {
        // Link text area
        WebElement linkText = driver.findElement(By.id("link_text"));

        // Verify no texts are input in the below text area
        String expectedBeforeInput = "";
        String actualBeforeInput = linkText.getText();

        assertEquals(expectedBeforeInput, actualBeforeInput);

        // Search button
        // TODO: Get the locator in a more proper way
        WebElement searchButton = driver.findElement(By.xpath("//XCUIElementTypeTextField[@name=\"searchbar\"]"));

        // Tap the search button to get its focus
        searchButton.click();

        // Type some characters in the search bar
        Actions action = new Actions(driver);
        action.sendKeys("https://google.com").perform();

        // Verify the text it inputted to the search bar is really shown in the below text area
        String expectedAfterInput = "https://google.com";
        String actualAfterInput = linkText.getText();

        assertEquals(expectedAfterInput, actualAfterInput);

        // Tap the generated link
        linkText.click();
    }
}
実行してみる。
# Inject necessary env vars
$ export IOS_APP_FILE_PATH="binary/ios/webviewlinksample.app"

$ ./gradlew test --tests "com.example.sample.IOSTest"
その他Tips
Appium Inspectorを用いてUI要素のLocatorを探す
Appiumを用いたテストでは、テスト対象や操作対象としたいUI要素をLocatorと呼ばれるクエリで検索、取得する。
Webアプリでのテストと異なり、ネイティブアプリは各要素の識別子の命名に決まったルールがないため、要素の検索が格段に難しくなっている。
Appium Inspectorは、これを少し楽にしてくれる。
- Appiumの環境構築を行い、テストが実行できるようになった状態で、Appium Inspectorを開く
- "Remote Path"と"Desired Capabilities"を以下のように設定する
a. Android
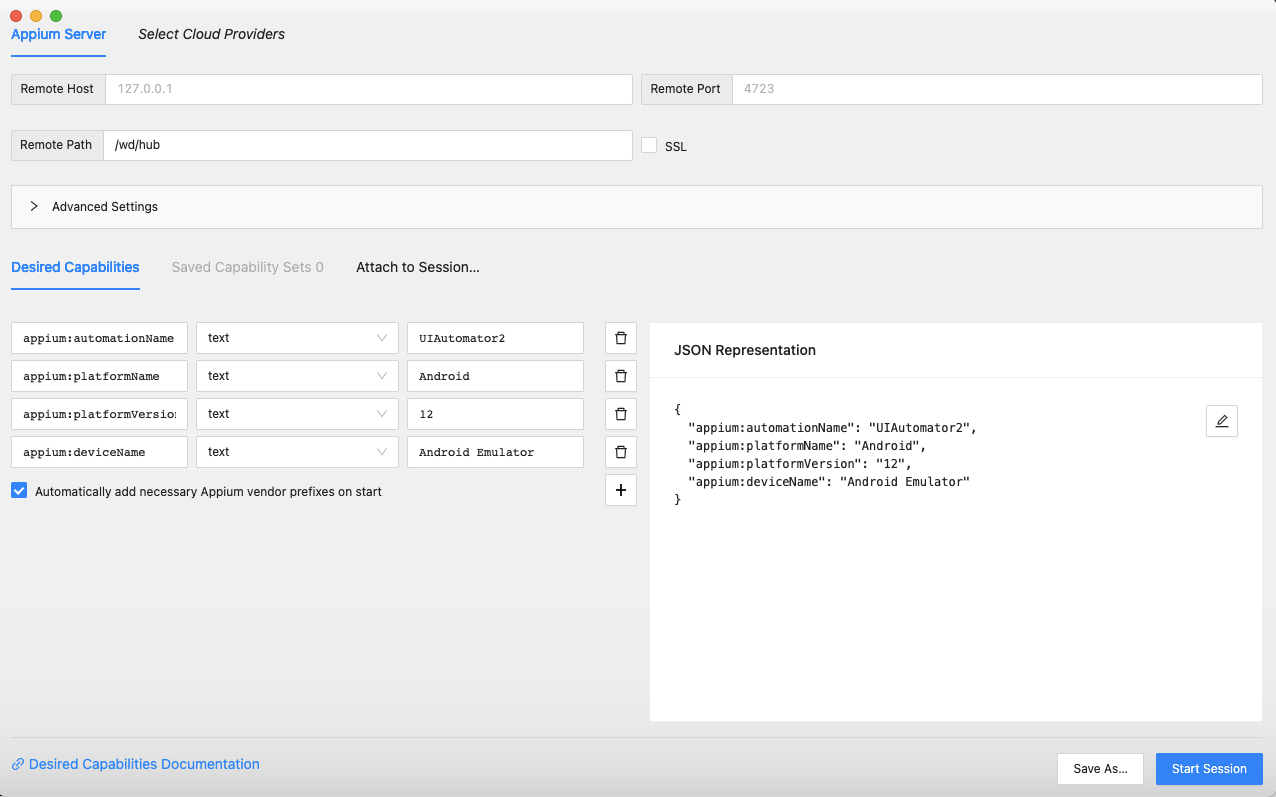
b. iOS
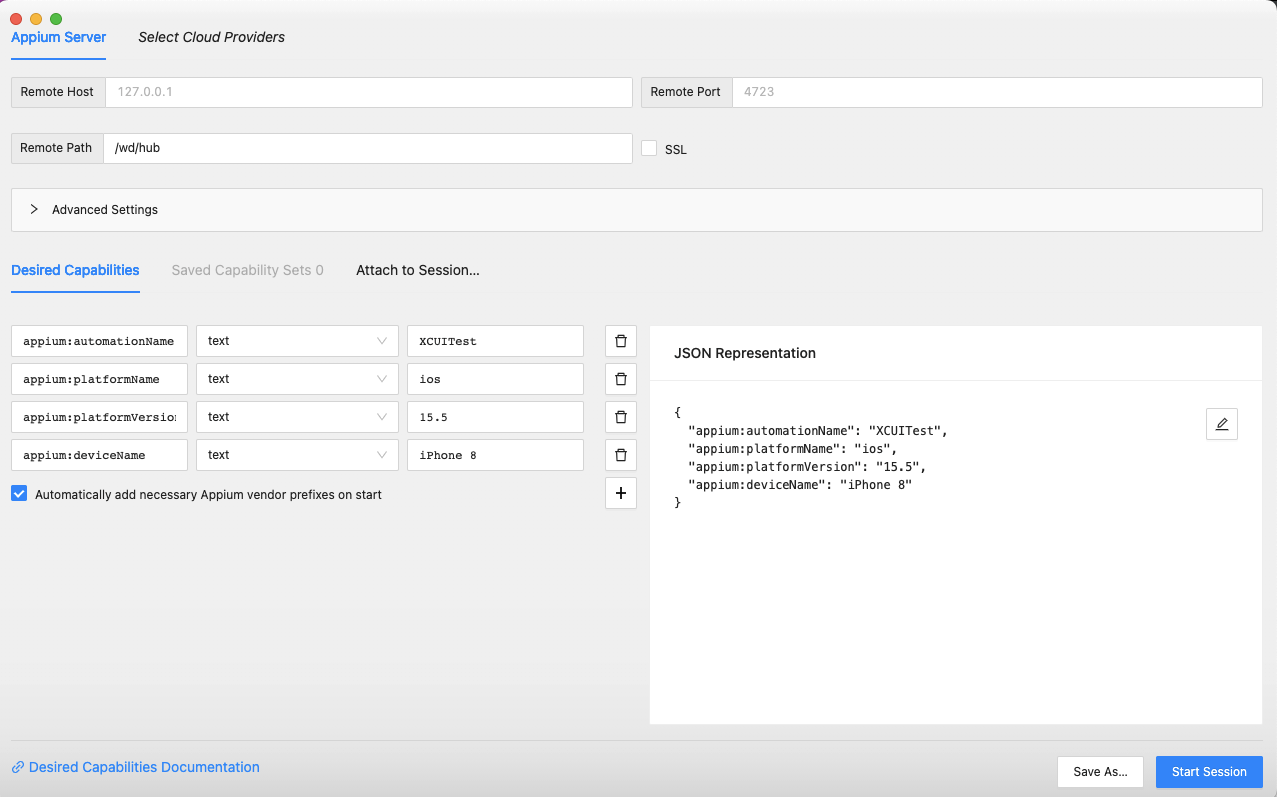
"Remote Path"を"/wd/hub"にすることに注意。これは、今回使っているAppiumのバージョン1と、新しくリリースが予定されているバージョン2の差分によるもの。
あとは、テストで利用しているものと同じCapability(アプリのバイナリに関連するものを除く)を入力すればよい。 - AndroidエミュレータやiOSシミュレータを操作し、テスト対象のアプリを開く。必要な要素を取得するのになにかアプリの操作が必要であれば、この時点で行っておく
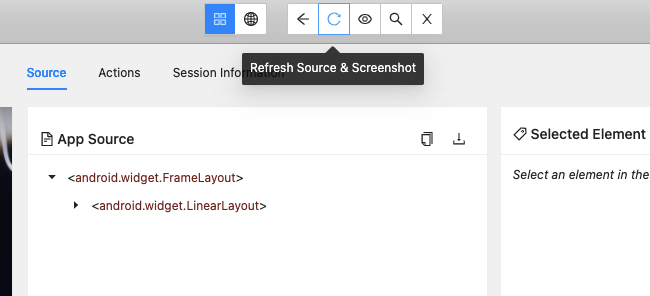
- Appium Inspectorの上部にある、"Reresh Source & Screenshot"をクリックし、エミュレータ/シミュレータの最新の状態を取得する
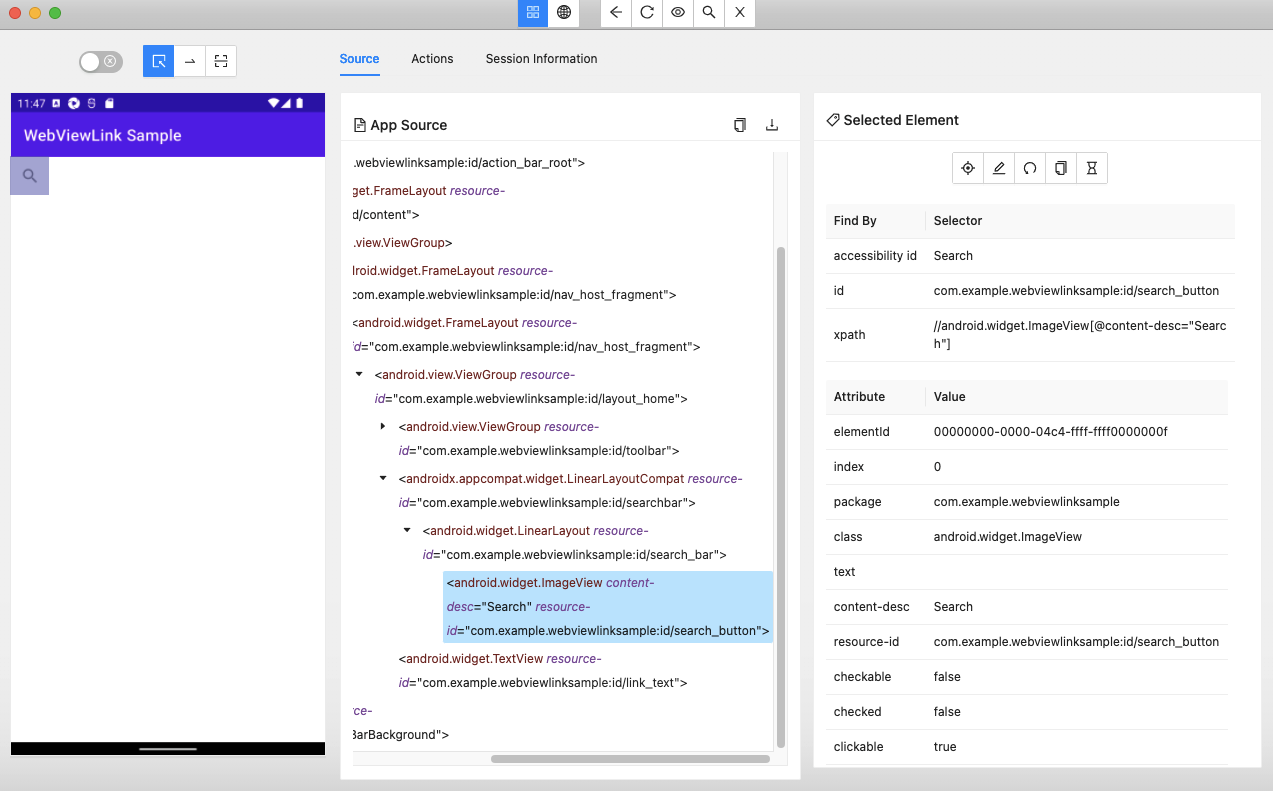
- "App Source"ペインから要素を探す。
a. Android
b. iOS

上記画像はアプリ内の検索ボタンを用途として取得したときのもの。ここにaccessbility idやid、xpathなどが記載されていれば、それをLocatorとしてテストコードに渡す(なければ他の要素から子要素をたどるか、アプリのコードを変更して明示的に渡す)。
感想
- うまくPage Object Patternとかにはめればテストコードの共通化も夢じゃない(?)
- 公式ドキュメントが薄すぎる。時間があればコントリビューションしたい
- テストの度に毎回UI要素のLocatorを探すの地獄では…
- 実機で動かすのはもっと難しそう
- Bitriseに載せてみたい
- 実際にテストのアーキテクチャ設計はどうするのがいいんだろう。OSごと/端末ごとにコードを分割すべきか、とか
参考文献
- https://www.lambdatest.com/blog/appium-inspector-for-apps/
- https://www.raywenderlich.com/7180554-ios-accessibility-in-swiftui-tutorial-part-1-getting-started
- https://support.magic-pod.com/hc/ja/articles/4408904655769-%E8%87%AA%E5%8B%95%E3%83%86%E3%82%B9%E3%83%88%E3%82%92%E7%B0%A1%E5%8D%98%E3%81%AB%E3%81%99%E3%82%8B%E3%81%9F%E3%82%81%E3%81%AE%E3%82%A2%E3%83%97%E3%83%AA%E5%AE%9F%E8%A3%85%E3%81%AE%E5%B7%A5%E5%A4%AB
- https://qiita.com/k5n/items/899cf40a0021a6a92efd
- https://developer.apple.com/library/archive/documentation/Accessibility/Conceptual/AccessibilityMacOSX/OSXAXTestingApps.html