この記事はWanoグループ Advent Calendar 2020の13日目の記事になります。
Vue 3+Typescript (classなし) コンポネント間のデータとイベントの受け渡し方法を整理してメモしておきたいです。
Vueネストコンポーネント
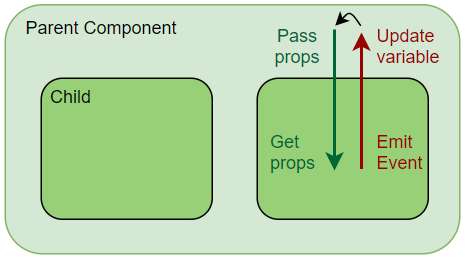
Vueのアプリケーションはネストされたコンポーネントのツリーの構成になっています。コンポーネントの階層の間データを受け渡す方法がいくつかあります。
Props
propsはプロパティの略、コンポーネントに登録できるカスタム属性です。Javascriptメソッドへ引数を渡すみたいにVueのコンポーネントへpropsを渡すことができます。
Propsの2つの特徴
- propsは下の階層のコンポーネントへ渡せる
- propsはread-only。更新したい場合は親のコンポーネントに新しい値を返して(emit event)親のコンポーネントで更新する必要がある
Propsを更新しないコンポネント
Propsを渡すのみone-wayの親と子コンポーネントの例です。
<template>
    <child-component
      :childStringProp="childString"
      :childObjectProp="childObject"
      :childObjectArrayProp="childObjectArray"
    />
</template>

<script lang="ts">
import { defineComponent } from "vue";
import ChildComponent from "@/components/ChildComponent.vue";
import ChildObject from "@/entity/ChildObject.vue";

export default defineComponent({
  components: {
    ChildComponent,
  },
  setup() {
    const childString = "string";
    const childObject: ChildObject = {
      test: "test"
    };
    const childObjectArray: ChildObject[] = [
      {
        test: "test",
      },
    ];
    return {
      // data
      childString,
      childObject,
      childObjectArray,
    };
  }
});
</script>
<template>
    {{ childString }}
    {{ childStringModified }}
    {{ childObject }}
    {{ childObjectArray }}
</template>

<script lang="ts">
import { defineComponent, computed, PropType} from "vue";
import ChildObject from "@/entity/ChildObject.vue";

export default defineComponent({
  props: {
    childString: String,
    childObject: ChildObject,
    childObjectArray: Array as PropType<ChildObject[]>,
  },
  setup(props) {
    // computed仕様の例も書いておきます
    const childStringModified = computed(() => {
      return props.childString + 'modified';
    });
    return {
      // computed
      childStringModified,
    };
  }
});
</script>
上の例の注意が必要なところは一つだけです。オブジェクトの配列を型を指定できないので、VueのPropTypeを使って型を指定できるようになります。
Propsを更新するコンポネント
子のコンポーネントにデータの更新が必要なときにpropsの更新ではなく親のコンポネントへ更新イベントをemitする必要があります。
やり方が主に2つあります。
- 親のコンポーネントにVueのv-modelを仕様する
- 親にイベントを設定してfunctionを呼び出す
v-modelのtwo-way受け渡しの例
<template>
    <child-component
      v-model:childStringProp="childString"
      v-model:childString2Prop="childString2Computed"
    />
</template>

<script lang="ts">
import { defineComponent } from "vue";
import ChildComponent from "@/components/ChildComponent.vue";

export default defineComponent({
  components: {
    ChildComponent,
  },
  setup() {
    // refを使用したら変数がreactiveになり更新されたらUI上も表示が変わる
    const childString = ref<string>("string");
    const childString2 = ref<string>("string2");

    // getter&setterの使用の例、setterにemitして上のコンポーネントに返すこともできる
    const childString2Computed = computed({
      get: () => childObject.value,
      set: val => {
        childObject.value = val
      }
    });

    return {
      // data
      childString,
      childString2Computed,
    };
  }
});
</script>
<template>
    <input
    :value="childString"
    @input="$emit("update:childStringProp", e.target.value)"
  />
    <input
    :value="childString2"
    @input="childString2Update"
  />
</template>

<script lang="ts">
import { defineComponent} from "vue";

export default defineComponent({
  emits: ["update:childStringProp", "update:childString2Prop"],
  props: {
    childString: String,
    childString2: String,
  },
  setup({emit}) {
    function childString2Update(e: any) {
      this.$emit("update:childString2Prop", e.target.value);
    }
    return {};
  }
});
</script>
注意するところはVue 3のref<>の使用することのとcomputedにgetter&setterの設定のことです。
子コンポーネントのイベントを受け取る
も1つのtwo-wayデータ受け渡し方法はコンポーネント間のイベントです。
<template>
    <child-component
      childStringProp="childString"
      @updateChildStringProp="updateChildStringFunc"
    />
</template>

<script lang="ts">
import { defineComponent } from "vue";
import ChildComponent from "@/components/ChildComponent.vue";

export default defineComponent({
  components: {
    ChildComponent,
  },
  setup() {
    const childString = ref<string>("string");

    function updateChildStringFunc(val: string) {
      childString.value = val
    }
    return {
      // data
      childString,

      // func
      updateChildStringFunc,
    };
  }
});
</script>
<template>
    <input
    :value="childString"
    @input="childStringUpdate"
  />
</template>

<script lang="ts">
import { defineComponent, PropType} from "vue";
import ChildObject from "@/entity/ChildObject.vue";

export default defineComponent({
  emits: ["updateChildStringProp"],
  props: {
    childString: String,
  },
  setup() {
    function childStringUpdate(e: any) {
      this.$emit("updateChildStringProp", e.target.value);
    }
    return {};
  }
});
</script>
まとめ
Vueのネスト構成は2-3階層の場合propsとemitは適切ですが、コンポーネントの階層が増えるたびに深いコンポネントまでたどり着くと可読性と保守性が落ちてきます。
また、ループの中のコンポーネントとIDに依存しているコンポーネントにもpropsの受け渡しは難しくなります。
繁雑なアプリにpropsではなくVuexやVue3のreactive storeなどのコンポーネント間にデータをシェアと管理できるツールを実装すればいいと思います。