0. 前準備
※Google Cloud SDKの導入まで済んでいる前提です。
未導入な場合、拙記事で申し訳ないですが以下が参考になるかもしれません。
また、作業を進めるにはPython3.7の環境が必要です。pyenvについては以下の記事がとても参考になります。
1. 雛形の作成
$ ls
LICENSE                 deploy.sh               main.py
app.yaml                gunicorn.conf.py        requirements.txt
以下を参考に、ファイル構成が上記のようになるようにします。
1-2. ファイルの中身
main.pyはサーバのコードです。
単純なJSONレスポンスを返すだけのルートを作っておきます。
from flask import Flask
import json

app = Flask(__name__)


@app.route('/')
def hello():
    return json.dumps({'key': 'value'})


if __name__ == '__main__':
    app.run()
app.yamlはデプロイ用の設定ファイル。
- serviceはデプロイする際のサービス名(ネームスペースのようなもの)を指します。
- 任意の文字列を指定できますが、defaultサービスのインスタンスが1個以上生成されていることが条件になります。
- max_instancesはスケールアウト時の最大インスタンス数です。推奨設定では何も書かなくて良いですが、意図しない課金を防ぎたい場合は1や0 (0は最大1になるが、アイドル時は0になる) にしておきます。
runtime: python37
service: default
entrypoint: gunicorn -b :$PORT main:app --config gunicorn.conf.py

automatic_scaling:
  max_instances: 1
gunicornを利用するので、gunicorn用の設定ファイルを用意。
import multiprocessing

# Worker Processes
workers = 2
worker_class = 'sync'

# Logging
loglevel = 'info'
logconfig = None
必要なライブラリリスト。
pip install Flask gunicorn としてから、 pip freeze > requirements.txt としても良いです。
Flask
gunicorn
デプロイ用のスクリプト。
--project プロジェクト名 は省略しても構いません。
--version を指定するとデプロイされたインスタンスのバージョン名を指定できます。
これにより、複数のバージョンがAppEngine上で作られないようにできます(インスタンスを最大1に保つため)。
gcloud app deploy --project <PROJECT_NAME: プロジェクト名> --version main
1.3 デプロイ
上記で作成した deploy.sh を実行すればデプロイができます。
gcloud app browse を実行すると、gcloudの設定情報に読み込まれたプロジェクト名を使ってページを開くことができます。
$ ./deploy.sh
Services to deploy:

descriptor:      [/path/to/server-root/app.yaml]
source:          [/path/to/server-root]
target project:  [<プロジェクト名>]
target service:  [default]
target version:  [main]
target url:      [https://<プロジェクト名>.appspot.com]
Do you want to continue (Y/n)?  y

Beginning deployment of service [default]...
╔════════════════════════════════════════════════════════════╗
╠═ Uploading 4 files to Google Cloud Storage                ═╣
╚════════════════════════════════════════════════════════════╝
File upload done.
Updating service [default]...done.
Setting traffic split for service [default]...done.
Deployed service [default] to [https://<プロジェクト名>.appspot.com]

You can stream logs from the command line by running:
  $ gcloud app logs tail -s default

To view your application in the web browser run:
  $ gcloud app browse
GCPコンソールの AppEngineで、サービス名 default 、バージョン名 main でインスタンスが作られていることを確認します。
2. 認証、エンドポイントの追加
上記でAPIサーバの雛形は完成していますが、実際に利用する際に必要な手順も進めておきます。
2-1. Digest認証
https://qiita.com/msrks/items/7de68cde6c3ab9d5e177 を参考にさせていただきました。
ライブラリを追加します。 requirements.txt の更新を忘れずに。
pip3 install flask_httpauth
pip3 freeze > requirements.txt
そして、サーバのソースコードを以下のように書き換えます。
import json
import os

from flask import Flask
from flask_httpauth import HTTPDigestAuth

app = Flask(__name__)

app.config['SECRET_KEY'] = os.environ['SECRET_KEY']
auth = HTTPDigestAuth()

# キーがID, バリューがパスワードになります。書き換え推奨
users = {
    'user': 'passwowrd'
}


@auth.get_password
def get_pw(username):
    if username in users:
        return users.get(username)
    return None


@app.route('/')
@auth.login_required
def index():
    return json.dumps({'authenticate': 'success'})


if __name__ == '__main__':
    app.run()
os.environ['SECRET_KEY'] は、環境変数 SECRET_KEY から値を取得するという意味です。
app.yamlに env_variables キーを追加することで、環境変数を読ませることができます。
runtime: python37
service: default
entrypoint: gunicorn -b :$PORT main:app --config gunicorn.conf.py

automatic_scaling:
  max_instances: 1

env_variables:
  SECRET_KEY: <SECRET_KEY>
また、ローカルで起動する場合、対象の環境変数がない場合はエラーになってしまうので、以下のようなシェルスクリプトを使って、起動する際に SECRET_KEY がセットされている状態にしておきましょう。
export SECRET_KEY=<SECRET_KEY>
gunicorn -b :8000 main:app --config gunicorn.conf.py
ローカル、あるいはデプロイされたURLを開いて、ID/PASSを求められるウィンドウが出たら成功です。
- パスワードは
main.pyで設定したものを入力して下さい。 - 認証のID、パスワードについても環境変数にしておくのがおすすめです。
2-2. POSTメソッドに対応する
GET以外のメソッドに対応するには、 @app.route に methods キーを追加します。(省略するとGETメソッドのみになります)
main.py を以下のように書き換えます。
app.route で指定している関数名がかぶってしまうとエラーになるので、違う名前をつけましょう。(以下では index_get, index_post に変更している)
import json
import os

from flask import Flask
from flask_httpauth import HTTPDigestAuth

app = Flask(__name__)

app.config['SECRET_KEY'] = os.environ['SECRET_KEY']
auth = HTTPDigestAuth()

users = {
    'user': 'password',
}


@auth.get_password
def get_pw(username):
    if username in users:
        return users.get(username)
    return None


@app.route('/get')
@auth.login_required
def index_get():
    data = {
        'authenticate': 'success',
        'requestType': 'get',
    }
    return json.dumps(data)

@app.route('/post', methods=['POST'])
@auth.login_required
def index_post():
    data = {
        'authenticate': 'success',
        'requestType': 'post',
    }
    return json.dumps(data)


if __name__ == '__main__':
    app.run()
作成した index_post に実際にアクセスできるかを確認します。
コマンドラインからでも確認できますが、このような場合は Postman というツールが非常に便利です。
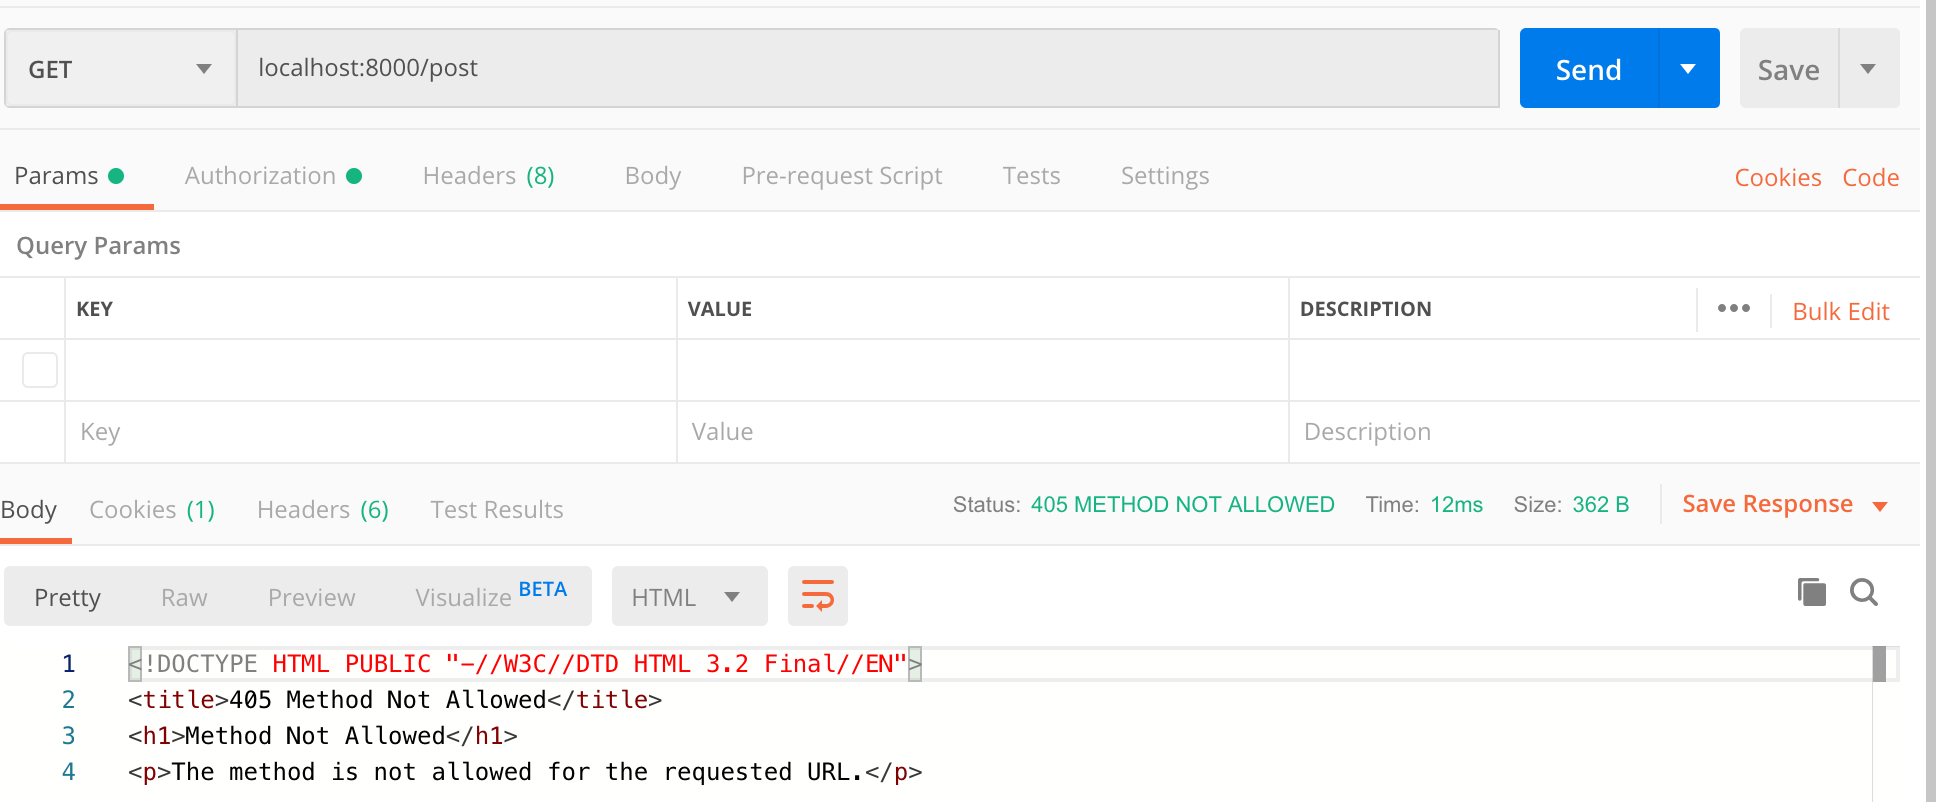
postのエンドポイントに対してGETを試みると、 405 エラーが取得できました。これは Method Not Allowed エラーで、文字通り「このエンドポイントでは GET は許可されていないよ、という意味です。
methods キーには複数のメソッドも追加できるので、例えば以下のようにすると同じエンドポイントでもHTTPメソッドによって処理を変更できます。
# requestのインポートを追加
from flask import Flask, request, abort

@app.route('/post', methods=['POST', 'GET', 'PUT', 'DELETE', 'PATCH'])
def restful():
    if request.method == 'GET':
        _get()
    elif request.method == 'POST':
        _post()
    elif request.method == 'PUT':
        _put()
    elif request.method == 'DELETE':
        _delete()
    elif request.method == 'PATCH':
        _patch()
    # (書かなくても良い) それ以外はMethod not allowed
    abort(405)
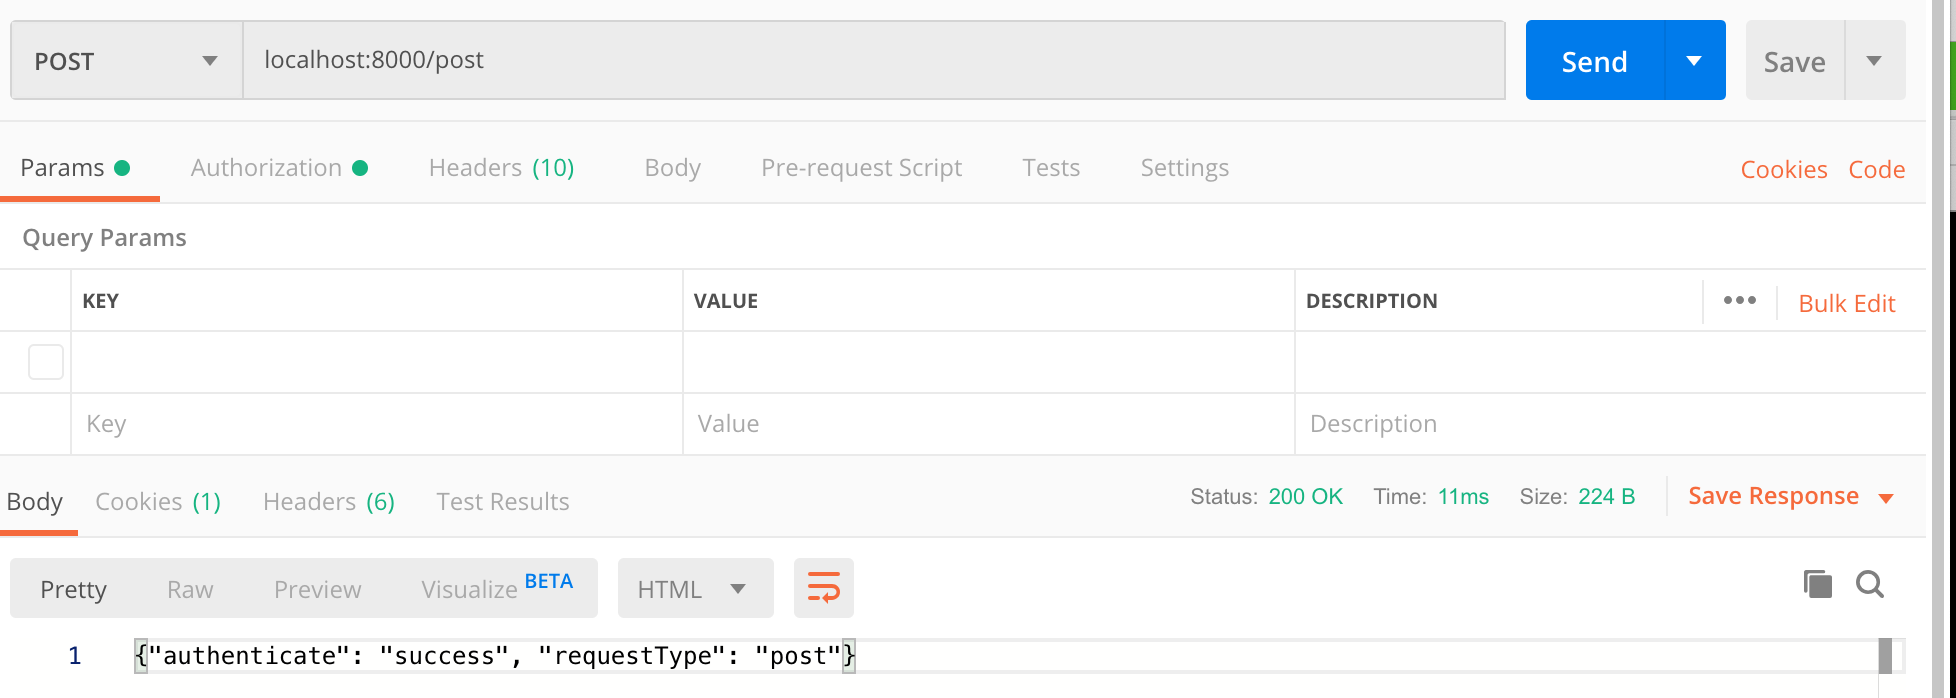
HTTPメソッドをPOST(URL入力バーの左側にあるボタン)に変更してSendを押すと、今度は想定するレスポンスが得られました。
3. パラメータの処理
3-1. クエリパラメータ
https://..../?a=b のようなパラメータを取得する場合、 request.args を利用します。
importに request を追加するのを忘れずに。
from flask import request

def index_get():
    # "?q=b"のbを取得, 存在しなかったら空文字として対処する
    param = request.args.get('q') or ''
3-2. リクエストボディ
リクエストボディを処理する場合、 request.get_data() を利用します。
- 参考にさせていただきました。 https://qiita.com/fetaro/items/97c4054dafa8aac10541
import json

@app.route('/post', methods=['POST'])
@auth.login_required
def post():
    param = request.get_data().decode()
    body = json.loads(param)
    # 辞書として扱える
    key = body.get('key') or ''
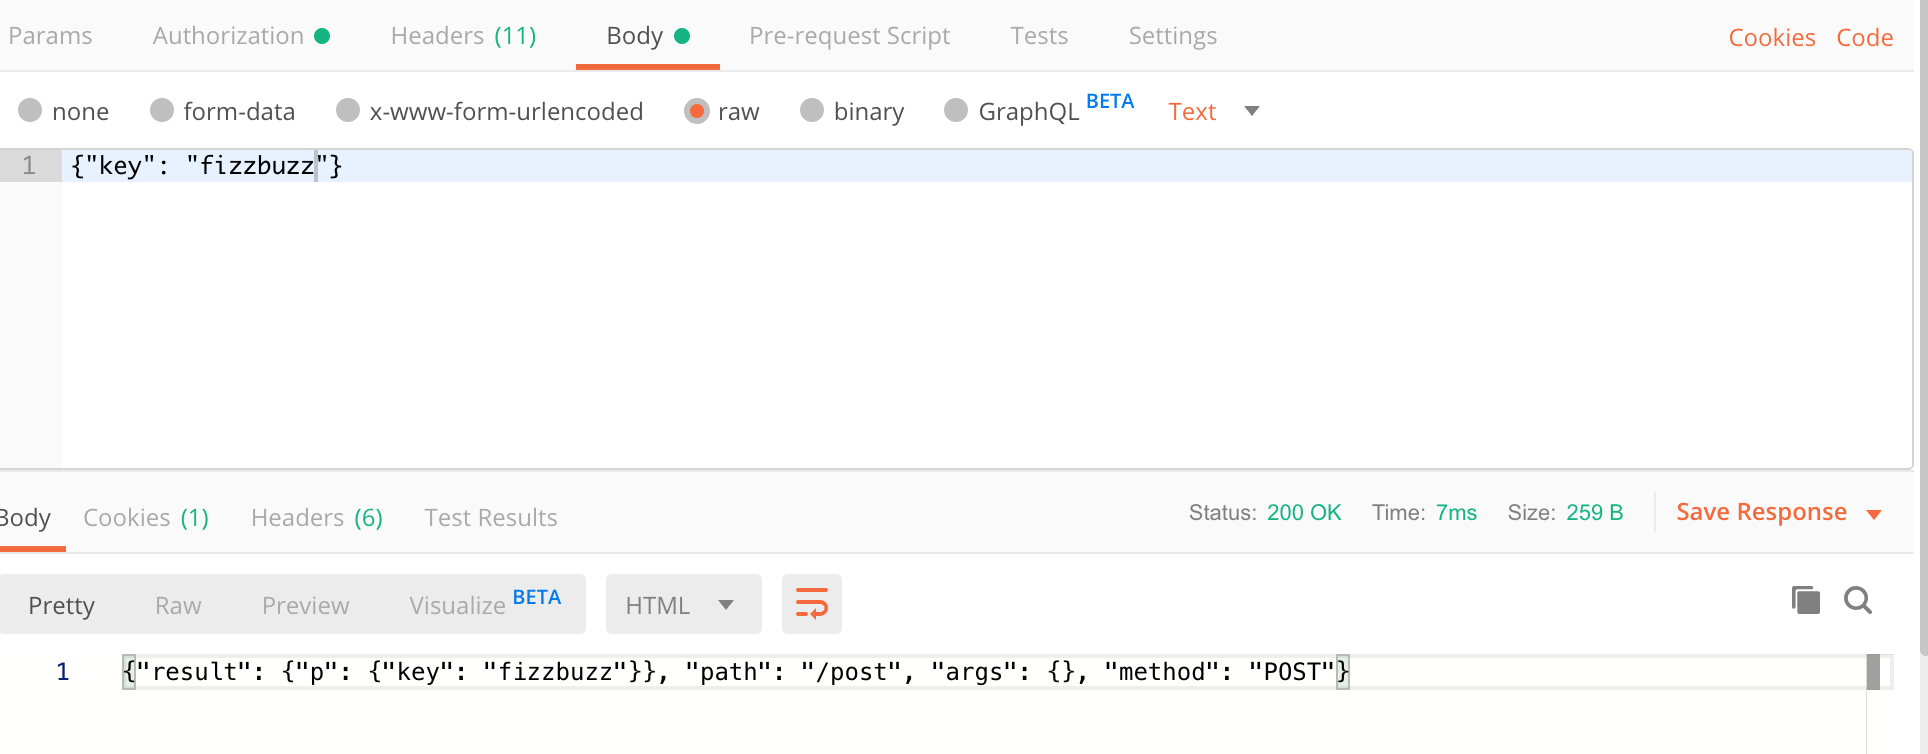
Postman側で試すと、取得できていることがわかります。
まとめ
Flaskを利用してAPIサーバを構築し、GAEのデプロイまで実施できるようにしました。


