Meteor はじめの一歩 Pert 2
今回はMeteorでアンケートアプリを作成していきます。
Meteorのセットアップがまだの方は前回記事を参照してください。
また、最新のNodeJSとMongoDBがインストールされている必要があります。
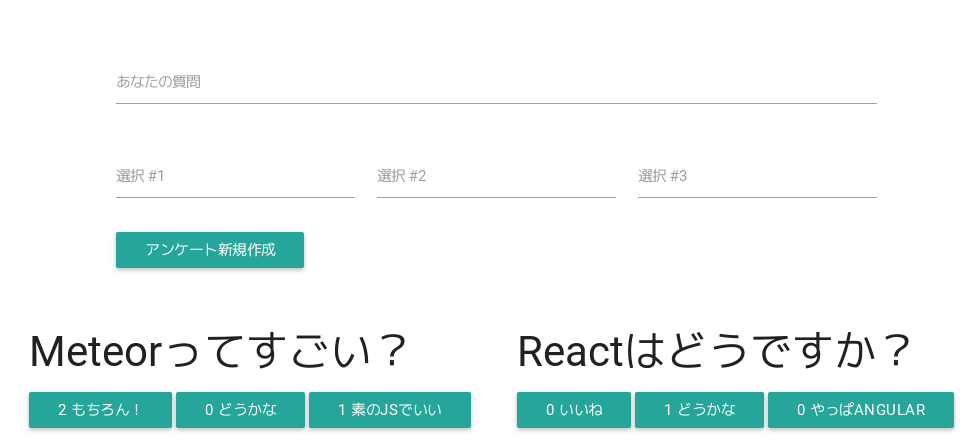
以下のようなアプリを作ります。
インストール
$ meteor create polling

$ cd polling

$ meteor
http://localhost:3000/
3つのファイルが生成されていますが、もう既に動作してますね!
Meteorは嬉しいことに、開発中にファイルの変更があったら、自動でサーバを再起動してブラウザを更新してくれます。
ディレクトリ構成
Meteorは以下のディレクトリ構成でデザインされていて、それぞれのディレクトリには役割が振られています。
- client/: クライアントサイドで参照されるファイルがストアされるディレクトリです。CSSやJSファイルがバンドルされブラウザより参照されます。
- server/: サーバサイドのファイルがストアされるディレクトリです。クライアントから参照されては困るロジックが含まれるファイルを設置できます。
- public/: デフォルトでMenteorは public ディレクトリに設置されたCSS、JSファイルを参照します。同じように画像ファイルも参照でき public/images/foobar.jpg はHTMLコードで
<img src="images/foobar.jpg">のように参照できます。 - private/: このディレクトリにあるファイルはサーバからAPIとしてだけ参照されます。今回は使用しません。
では、このデザインを利用してアンケートアプリのディレクトリ構成を考えてみます。
今回は以下のディレクトリ構成でアプリ作成します。
|~client/
| |~components/
| | |-poll-form.css
| | |-poll-form.html
| | |-poll-form.js
| | |-poll.css
| | |-poll.html
| | `-poll.js
| |-app.body.html
| |-app.css
| |-app.head.html
| `-app.js
|~collections/
| `-polls.js
|~server/
| `-bootstrap.js
Mongo コレクションの設定
MongoDBとの接続を設定します。
collections/polls.jsを編集します。
Polls = new Mongo.Collection('polls');
たったこれだけです。簡単ですね。
collectionフォルダを作成した理由は、client,serverどちらからも参照することになるからです。
サンプルデータの投入
クライアントサイドのコーディングに入る前に、サンプルデータをMongoDBへ投入します。
server/bootstrap.jsで作業します。
// run this when the meteor app is started
Meteor.startup(function() {

  // if there are no polls available create sample data
  if (Polls.find().count() === 0) {

    // create sample polls
    var samplePolls = [
      {
        question: 'Meteorってすごい?',
        choices: [
          { text: 'もちろん!', votes: 0 },
          { text: 'どうかな', votes: 0 },
          { text: '素のJSでいい', votes: 0 }
        ]
      },
      {
        question: 'Reactはどうですか?',
        choices: [
          { text: 'いいね', votes: 0 },
          { text: 'どうかな', votes: 0 },
          { text: 'やっぱAngular', votes: 0 }
        ]
      }
    ];

    // loop over each sample poll and insert into database
    _.each(samplePolls, function(poll) {
      Polls.insert(poll);
    });

  }

});
Meteor.startupコマンドを使用するとサーバが起動したときに実行されます。これを利用しDBにpollsが存在しなかったらデータを投入するコードを作成します。
Note: もし作成したデータをクリアしたくなった場合は、単に以下のコマンドを実行するとデータがクリアできます。
$ meteor reset
前出したように既にMeteorコマンドでサーバを起動しています。ファイルやフォルダ構成を編集しているのでサーバが自動でリスタートしています。
もちろんbootstrap.js内のMetero.startupが実行されサンプルデータが投入されています。
ブラウザでデータを確認できるので見てみましょう。
Polls.find().fetch()
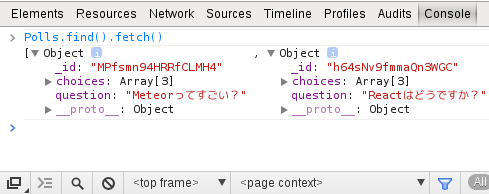
データが投入されています。これで一通りの開発環境が整いました。
フロントエンドのメインテンプレート作成
Meteorはclientフォルダ内に存在するHTMLファイルの
を探索しコンバインします。app.body.htmlを編集します。
<body>

  <!-- PULL IN THE POLL CREATION FORM -->
  <div class="container">
    <div class="row">
      <div class="col-md-6 col-md-offset-3">
        {{ >pollForm }}
      </div>
    </div>
  </div>

  <!-- LOOP OVER POLLS AND SHOW EACH -->
  <div class="polls">
      {{ #each polls }}
          {{ >poll }}
      {{ /each }}
  </div>

</body>
{{ >pollForm }}は何となく分かりますね。<template name="pollForm>なファイルを読み込みます。
{{ #each polls }}はループですね。
app.head.htmlを編集しましょう。
<head>
  <meta charset="utf-8">
  <title>My Polling App!</title>

  <!-- CSS IS AUTOMATICALLY BUILT AND LOADED -->
</head>
特に説明はいりませんね。シンプルなヘッダーです。
ただ一点違うのは、Meteorが自動でCSS、JSを注入してくれる点です。すばらしい!
アンケート用のフォーム部品作成
components/poll-form.htmlを編集します。
<template name="pollForm">

<form>
    <div class="row">
      <div class="input-field col s12">
        <input id="question" name="question" type="text" class="validate">
        <label for="question">あなたの質問</label>
      </div>
    </div>
    <div class="row">
      <div class="input-field col s4">
        <input id="choice1" type="text" class="validate">
        <label for="choice1">選択 #1</label>
      </div>
      <div class="input-field col s4">
        <input id="choice2" type="text" class="validate">
        <label for="choice2">選択 #2</label>
      </div>
      <div class="input-field col s4">
        <input id="choice3" type="text" class="validate">
        <label for="choice3">選択 #3</label>
      </div>
    </div>
    <button type="submit" class="waves-effect waves-light btn">アンケート新規作成</button>
</form>

</template>
poll-form.cssを編集します。
.question-group   {
  margin-bottom:20px;
  background:#EEE;
  padding:20px;
}
.question-group label   {
  font-size:18px;
}
poll.htmlも編集しましょう。
<template name="poll">

<div class="poll well well-lg" data-id="{{ _id }}">

    <h3>{{ question }}</h3>

    {{ #each indexedArray choices }}
        <a href="#" class="vote btn btn-primary btn-block" data-id="{{ _index }}">
            <span class="votes pull-right">{{ votes }}</span>
            <span class="text">{{ text }}</span>
        </a>
    {{ /each }}

</div>
</template>
参照先はapp.body.htmlの{{ #each polls }}です。
data-idエレメントに_indexを設定することで、それぞれの投票を参照できるようにします。
では、DBからデータを取得出きるようにapp.jsを編集しましょう。
app.js
Template.body.helpers({

  polls: function() {
    return Polls.find();
  }

});
body内でループ出きるように配列を設定します。
// adds index to each item
UI.registerHelper('indexedArray', function(context, options) {
  if (context) {
    return context.map(function(item, index) {
      item._index = index;
      return item;
    });
  }
});
これで、body に投票オブジェクトを表示出きるようになりました。
投稿機能の実装
poll-form.jsを編集します。
Template.pollForm.events({

  // handle the form submission
  'submit form': function(event) {

    // stop the form from submitting
    event.preventDefault();

    // get the data we need from the form
    var newPoll = {
      question: event.target.question.value,
      choices: [
        {  text: event.target.choice1.value, votes: 0 },
        {  text: event.target.choice2.value, votes: 0 },
        {  text: event.target.choice3.value, votes: 0 }
      ]
    };

    // create the new poll
    Polls.insert(newPoll);
  }

});
submit formイベントを設定することで投稿出きるようになりました。
またevent.target.{input_name}.valueでそれぞれのフォームに入力されたデータを取得しています。
データを取得した後、Polls.insert()でDBにインサートしています。
投票機能の実装
では次に作成されたアンケートに投票できる機能を実装しましょう。
poll.jsにイベントを設定します。
// attach events to our poll template
Template.poll.events({

  // event to handle clicking a choice
  'click .vote': function(event) {

    // prevent the default behavior
    event.preventDefault();

    // get the parent (poll) id
    var pollID = $(event.currentTarget).parent('.poll').data('id');
    var voteID = $(event.currentTarget).data('id');

    // create the incrementing object so we can add to the corresponding vote
    var voteString = 'choices.' + voteID + '.votes';
    var action = {};
    action[voteString] = 1;

    // increment the number of votes for this choice
    Polls.update(
      { _id: pollID },
      { $inc: action }
    );

  }

});
各アンケートを特定するためにjQueryのparentエレメントを使用しています。
また、MongoDBの$incオペレータでDBをアップデートしています。
ここでパッケージのスタイル摘要の前にCSSを微調整しておきましょう。
app.cssを編集します。
body  {
  padding-top:50px;
}
.polls  {
  display:flex;
  flex-flow:row wrap;
  justify-content:center;
}
.poll   {
  width:40%;
  margin:20px;
}
.vote{
  padding:0 1rem;
}
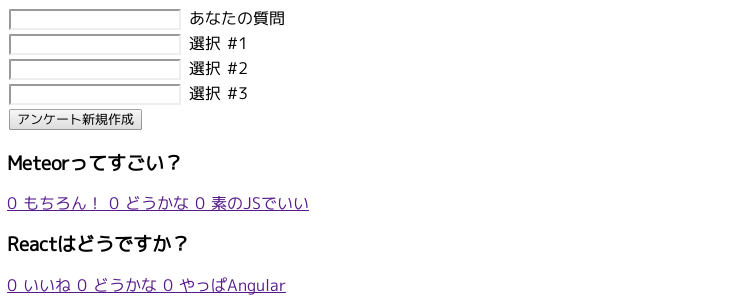
ここまでで既にリアルタイムに投票結果を確認出きるようになっているはずです。
パッケージを利用しよう!
そっけないスタイルですのでMaterializeのスタイルを適用しましょう。
普通は、MaterializeをダウンロードしてCSSが参照できる場所に設置したりとマニュアルで適用しますが、Meteorはコマンド一発でそれを可能とします。
Atmosphereというパッケージ管理のサービスからMaterializeのそれを探しだしたら、以下のコマンドを実施します。
( もちろんTwitter Bootstrapとかもあります。)
$ meteor add materialize:materialize
Materializeスタイルが適用されました!
デプロイ
Meteorが用意してくれているfree testing serverへ公開できます。以下のコマンドでデプロイできます。
サブドメインは、既に使用されていないものであれば、好きなものを設定できます。
$ meteor deploy pollin-app.meteor.com