Fancytreeの使い方の備忘録
Fancytree
良い感じにTree構造を作ってくれる
オリジナルのページはこちら
https://github.com/mar10/fancytree/
ソースコード
Dockerで動作するようにしてある
https://github.com/legacyworld/fancytree_test
NGINXとFlaskのコンテナが立ち上がる
NGINXにはhtml/jsファイルを置いてある
FlaskはJSONファイルをAjaxで持って来るためのもの
環境
Docker for Desktop on Windows10
とりあえず
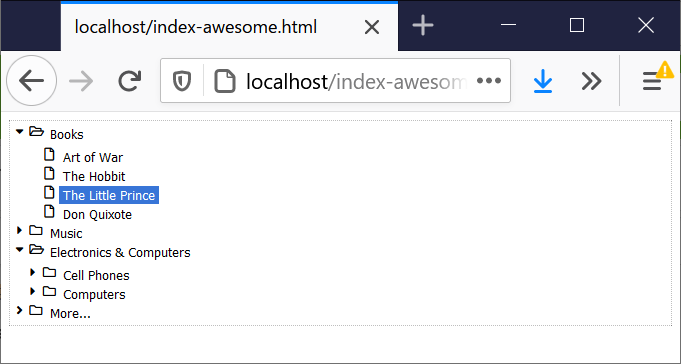
git cloneしてdocker-composeでビルドした後、localhostにアクセスすればとりあえず次のページが表示される

fancytreeにはWindows風に見せるSkinや、fontawesomeを利用できるSkinがあり、それを簡単に切り替えられる
まずは最も簡単にできるWin8 Skinから説明していく
Win8 Skin
<!DOCTYPE html>
<html>
  <head>
    <meta charset="UTF-8">
    <script src="/static/js/jquery.min.js"></script>
    <script src="/static/js/test.js"></script>
    <link rel="stylesheet" href="/static/css/skin-win8/ui.fancytree.min.css">
    <script src="/static/js/jquery.fancytree-all-deps.min.js"></script>
  </head>

  <body>
    <div id="id_tree1"></div>

  <script>
      fancytree_test1()
  </script>
  </body>
</html>
必要なものはJQueryぐらい。
Javascriptはこんな感じ
let fancytree_test1 = function () {
    $("#id_tree1").fancytree({
        source: [
            {
                "title": "Books", "expanded": true, "folder": true, "children": [
                    { "title": "Art of War", "type": "book", "author": "Sun Tzu", "year": -500, "qty": 21, "price": 5.95 }
                ]
            },
            {
                "title": "Music", "folder": true, "children": [
                    { "title": "Nevermind", "type": "music", "author": "Nirvana", "year": 1991, "qty": 21, "price": 5.95 }
                ]
            },
            {
                "title": "Electronics & Computers", "expanded": true, "folder": true, "children": [
                    {
                        "title": "Cell Phones", "folder": true, "children": [
                            { "title": "Moto G", "type": "phone", "author": "Motorola", "year": 2014, "qty": 21, "price": 224.99 },
                        ]
                    },
                    {
                        "title": "Computers", "folder": true, "children": [
                            { "title": "ThinkPad", "type": "computer", "author": "IBM", "year": 1992, "qty": 21, "price": 749.90 },

                        ]
                    }
                ]
            }
        ]
    })
}
このようにJSONをベタで書くことも出来る。
何もオプションを書かずにsourceだけ書くとこのようになる

SkinでWin8を読み込んでいるのでこのようになる。
Ajax
AjaxでJSONを取ってくるのが楽。
let fancytree_test2 = function () {
    $("#id_tree1").fancytree({
        source: {
            url: "/api/v1/getList"
        }
    })
}
Flask側はこうなっている
from flask import Flask, jsonify, request, make_response, send_from_directory
import json
app = Flask('test')


@app.route('/api/v1/getList/', methods=['GET'])
def test():
    with open('./ajax-tree-products.json') as f:
        d = json.load(f)
    return jsonify(d),200

if __name__ == '__main__':
    app.run()
Font Awesome
Font Awesomeで好きなアイコンで表示したいこともある。
Win8と違いちょっと手数が増える
<!DOCTYPE html>
<html>

<head>
  <meta charset="UTF-8">
  <script src="/static/js/jquery.min.js"></script>
  <script src="/static/js/test.js"></script>
  <link rel="stylesheet" href="/static/css/skin-awesome/ui.fancytree.min.css">
  <script src="/static/js/jquery.fancytree-all-deps.min.js"></script>
  <script src="/static/js/jquery.fancytree.glyph.js"></script>
  <script src="https://kit.fontawesome.com/e84a7fa652.js" crossorigin="anonymous"></script>
</head>

<body>
  <div id="id_tree1"></div>

  <script>
    fancytree_test3()
  </script>
</body>

</html>
jquery.fancytree.glyph.jsの読み込みがまず必要。
fontawesomeも当然
let fancytree_test3 = function () {

    var glyph_opt = {
        preset: "awesome5",
        map: {}
    }
    $("#id_tree1").fancytree({
        extensions: ["glyph"],
        glyph: glyph_opt,
        source: {
            url: "/api/v1/getList"
        }
    })
}
ここでextensionsという仕組みが登場する。
https://github.com/mar10/fancytree/wiki/ExtensionIndex
glyphは好きなアイコンを使うためのものである。
なのでまずextensionsでglyphを指定する。
次に何を使うかを指定する(ここではglyph_opt)
fancytreeでは以下のものがpresetされて使える。
"awesome3", "awesome4", "awesome5", "bootstrap3", "material"
presetを使わないのであればmapに全て書けばよい
        map: {
            doc: 'fa fa-file-o',
            docOpen: 'fa fa-file-o',
            checkbox: 'fa fa-square-o',
            checkboxSelected: 'fa fa-check-square-o',
            checkboxUnknown: 'fa fa-square',
            dragHelper: 'fa arrow-right',
            dropMarker: 'fa long-arrow-right',
            error: 'fa fa-warning',
            expanderClosed: 'fa fa-caret-right',
            expanderLazy: 'fa fa-angle-right',
            expanderOpen: 'fa fa-caret-down',
            folder: 'fa fa-folder-o',
            folderOpen: 'fa fa-folder-open-o',
            loading: 'fa fa-spinner fa-pulse',
        }
ちなみにbootstrap3はpresetされているが、mapに書かないと動かないようだ。
カスタマイズ
ここから使えそうなカスタマイズをいくつか紹介
let fancytree_test4 = function (){
    var glyph_opt = {
        preset: "awesome5",
        map: {
            folder: 'fas fa-book-open'
        }
    }
    $("#id_tree1").fancytree({
        extensions: ["glyph","wide"],
        glyph: glyph_opt,
        icon: function(event,data){
            if(data.node.data.author == "Sony"){
                return "fas fa-mobile"
            }
        },
        activate: function(event,data){
            t = "<p>Author:"+data.node.data.author+"</p>"
            $('#id_details').html(t)
        },
        collapse: function(event,data){
            var t = $.ui.fancytree.getTree("#id_tree1")
            if(t.activeNode != null){t.activeNode.setActive(false)}
        },
        source: {
            url: "/api/v1/getList"
        }
    })
}
wide extensions
クリックしたときにバックグラウンドの色が変わるが、それをどこまで変えるかという設定
Wide無し

アイコンマッピング変更
presetされたものを上書きで変更できる
        map: {
            folder: 'fas fa-book-open'
        }
folderを閉じているときのアイコンを本のアイコンに変えている

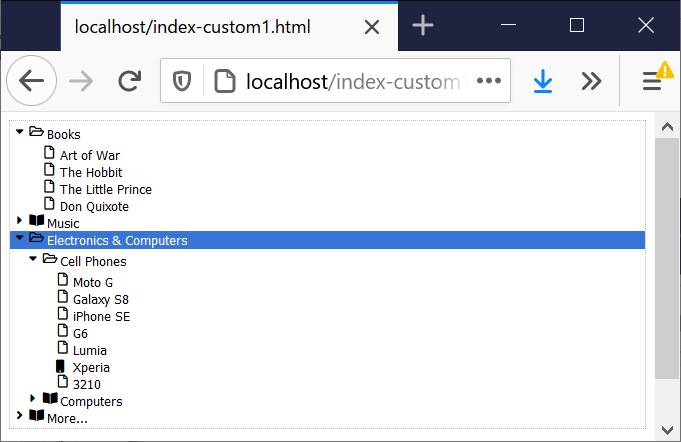
開いているBooksはフォルダのアイコンだが、閉じている他のフォルダのアイコンが本に変わっている
独自データ
JSONにkey:valueを書いていくが、keyはいくつかがfancytreeで使い方が決まっている
例えばfolder:trueとすれば、Expand/Collapseが可能になる。
予約されていないkeyは全て独自データとみなされ、data.node.dataでアクセスできるようになっている
例えばこの部分
        icon: function(event,data){
            if(data.node.data.author == "Sony"){
                return "fas fa-mobile"
            }
        }
これはauthorがSonyだったらアイコンをモバイルにする、というもの

Xperiaだけアイコンが変わっている
activate
何かを選択したときにアクションを起こせる
        activate: function(event,data){
            t = "<p>Author:"+data.node.data.author+"</p>"
            $('#id_details').html(t)
        }
このように星の王子様(The Little Prince)を選ぶと作者であるサン・テグジュペリが表示される
collapse
フォルダを閉じた時にアクションを起こす
        collapse: function(event,data){
            var t = $.ui.fancytree.getTree("#id_tree1")
            if(t.activeNode != null){t.activeNode.setActive(false)}
        }
どこかフォルダを閉じたらactive(=選ばれている)ものを非activeにする


