ゼロトラストセキュリティモデルに移行することが、従来のVPNの使用をやめる理由になるとは限りませんが、ゼロトラストのアプローチはVPNに頼る従来のセキュリティモデルとは異なる重要な特徴を持っています。
ゼロトラスト・アーキテクチャに関してはなかなかボリュームのある内容なのでここでは触れませんが、VerifiedAccessはエンドユーザーのデバイスのコンテキストとIDに基づいてアクセスポリシーを適用し、特定のAWSリソースへのアクセスを許可または拒否するのでリソースやアプリケーションレベルでのアクセス制御に焦点を当てているサービスという認識です。
VerifiedAccessとMicrosoft EntraIDによるユーザ認証の運用について
- VerifiedAccessは、ユーザーが安全かつ簡単にアクセスするために設計されています。
- EntraIDは、高度な認証機能でセキュリティの強化を実現するID管理ツールです。
この組み合わせによって、ユーザーはVerifiedAccessで接続する際に、EntraIDの高い認証基準を満たす必要があります。特に、二段階認証などのEntraIDの機能は、不正アクセスのリスクを軽減しています。
Verified Accessの特徴
Verified Accessは、専用のFQDNを使用して接続します。
認証プロセスにはEntraIDを採用し、安全かつ迅速な接続を実現します。
従来のVPN接続時の待機時間や、VPNクライアントのアップデート、設定変更といった追加の手間が不要です。これにより、ユーザーはよりスムーズにセキュアな接続を確立できます。
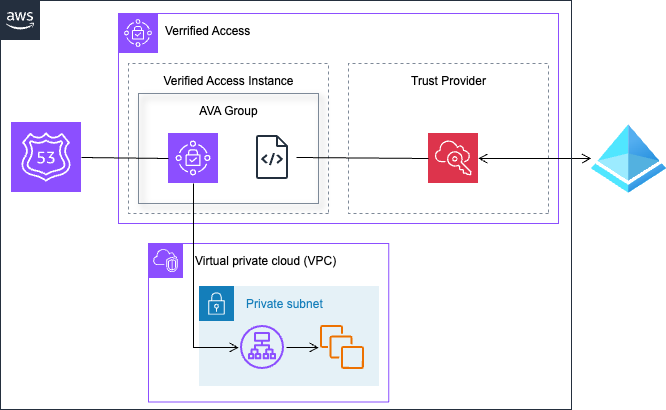
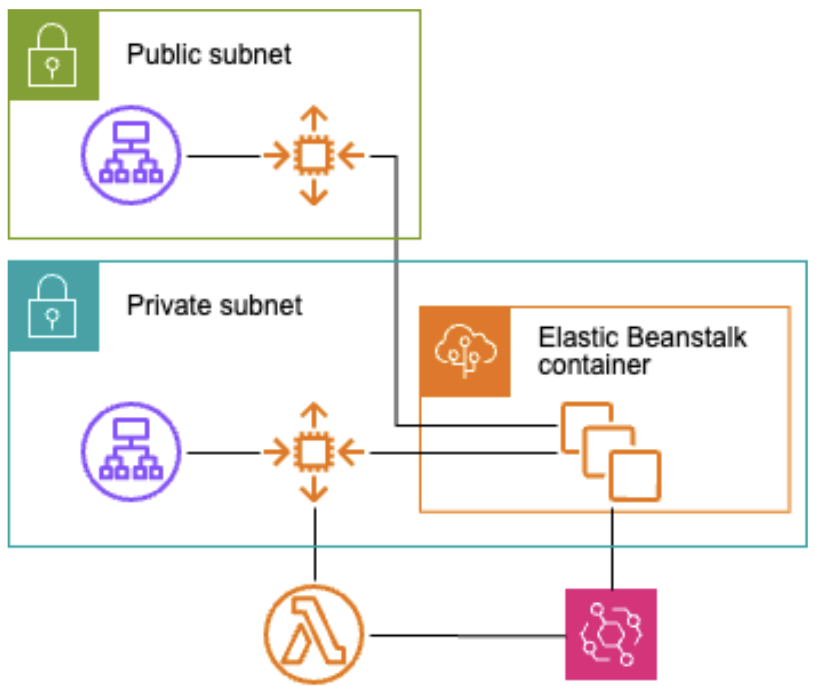
スケールアウト・インの同期について
eventbridgeとlambdaを使用して、VerifiedAccess用AutoscallingGroupをアプリケーション用のAutoscallingGroupに同期させることで、インスタンスの増減にも対応させています。
既存プロダクトへの適用について
-
独自のFQDNを採用
Verified Accessは専用のFQDNを使用しています。これにより、既存のアプリケーションの構成や運用に変更を加えることなく、新たな接続方式を導入できます。 -
高度なアクセス制限
Verified AccessはEntraIDと連携し、接続制限が設定された特定のグループに属するユーザーのみがアプリケーションへアクセス可能となります。これにより、不正アクセスのリスクを一層低減できるとともに、指定されたユーザー群のアクセス管理が簡易化されます。
設定
EntraID
- applicationを新規登録します

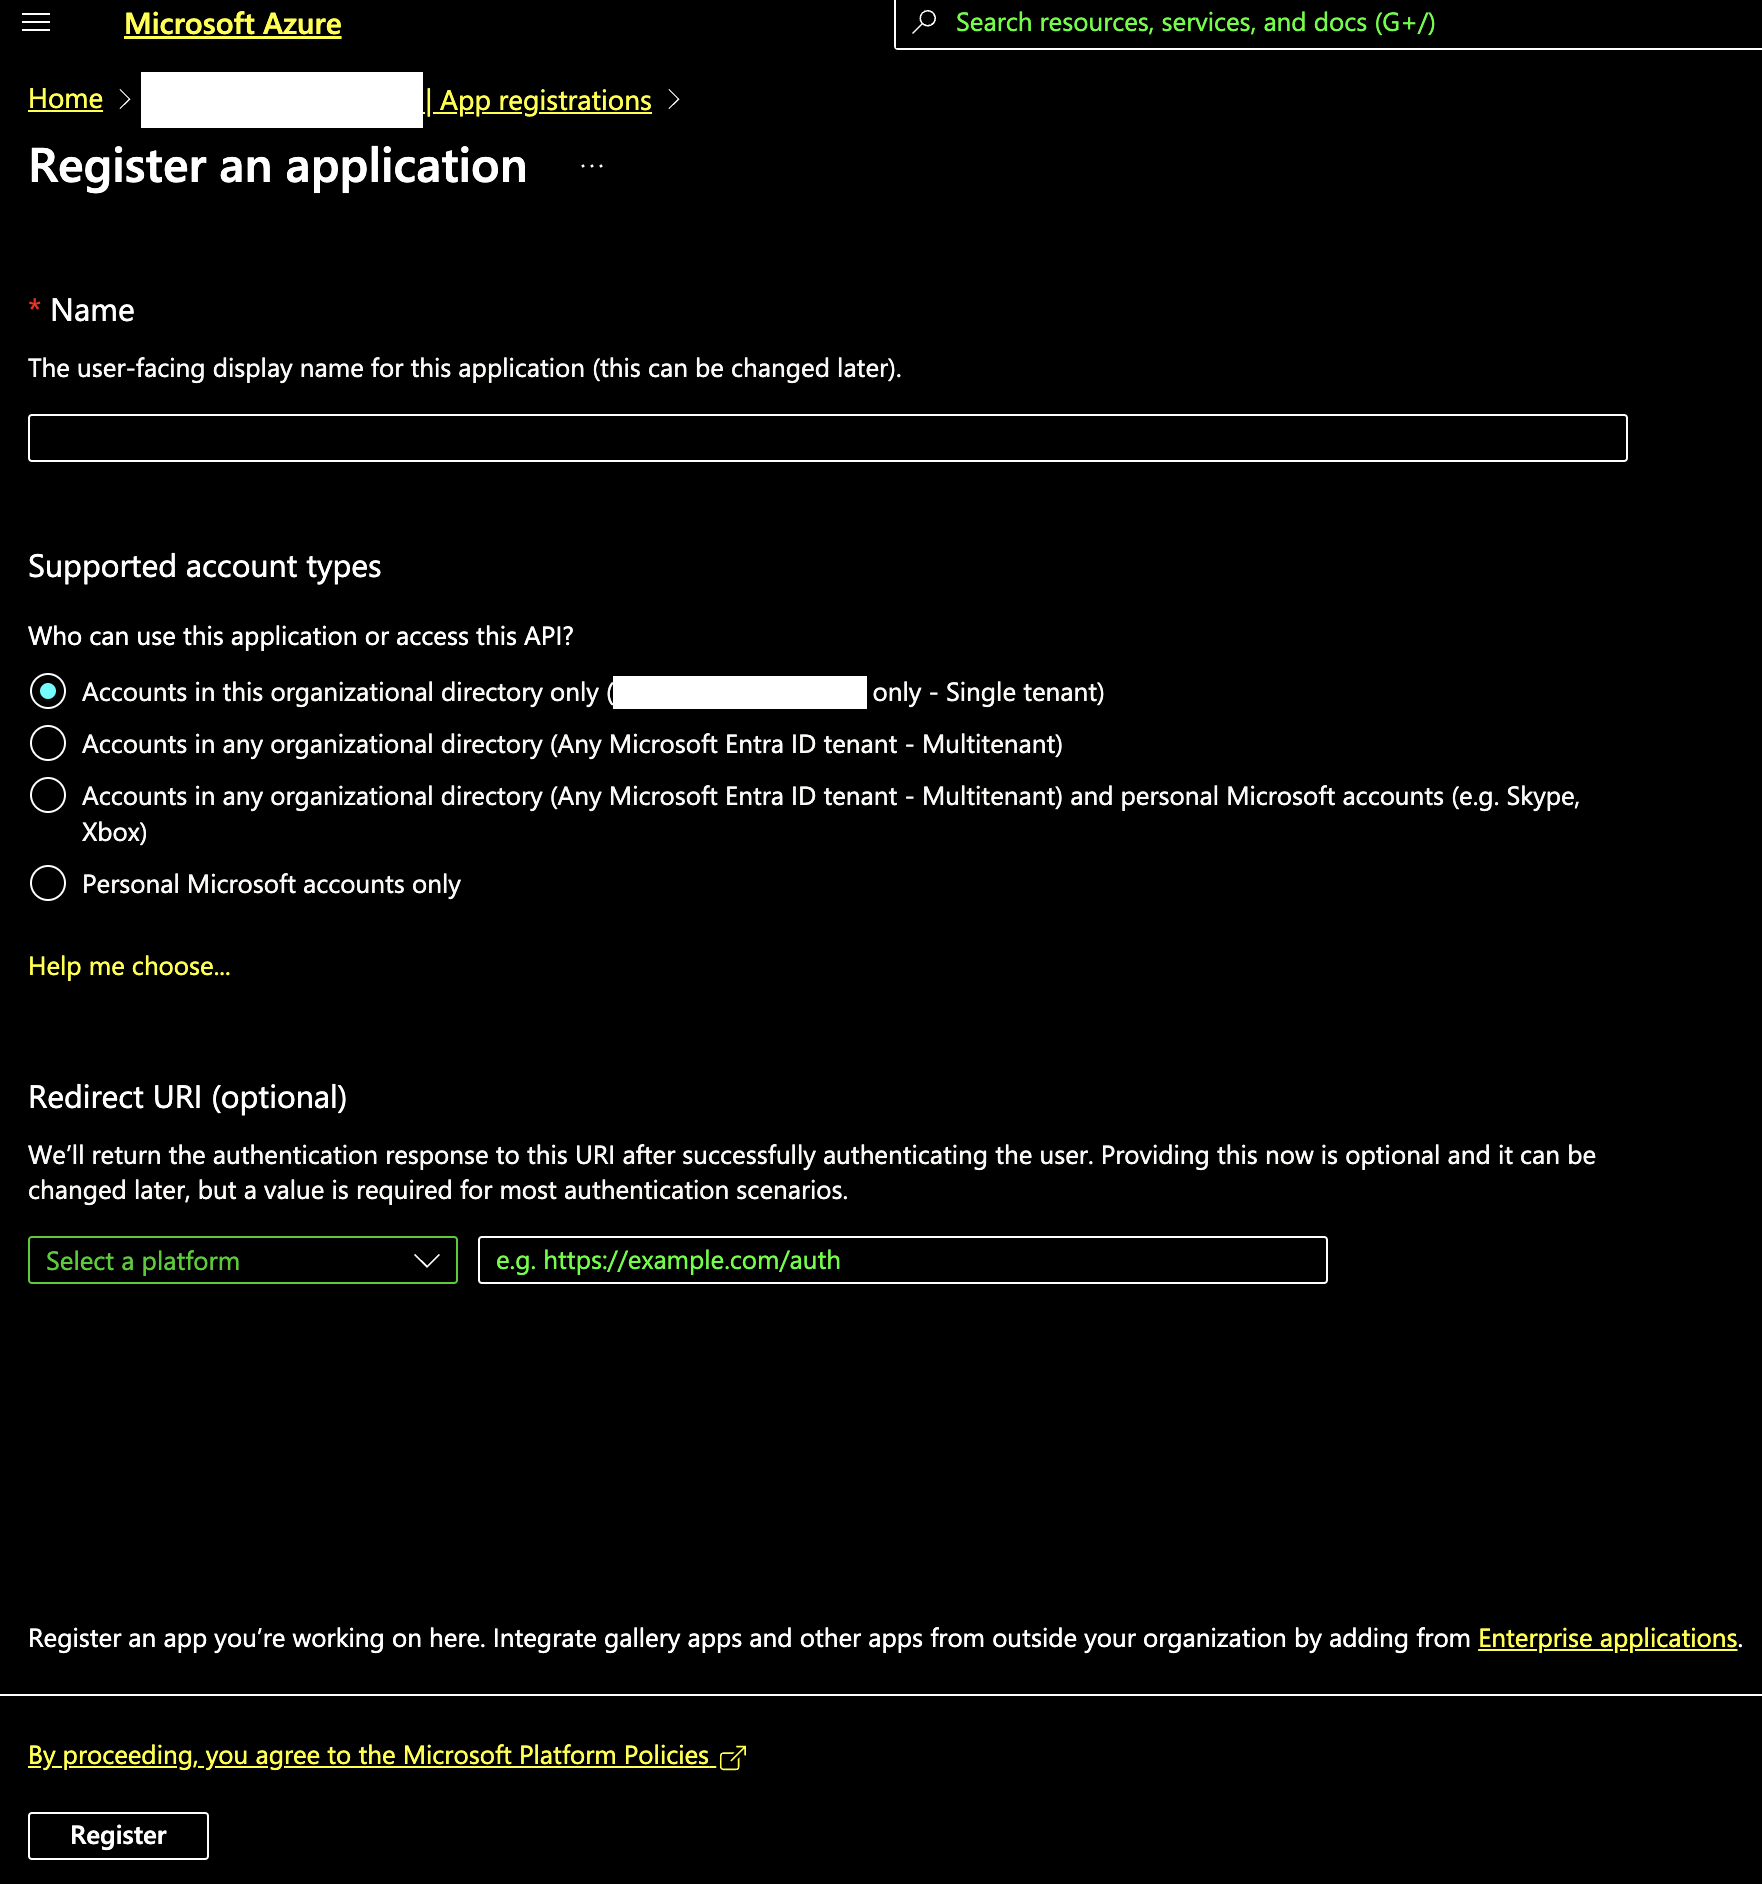
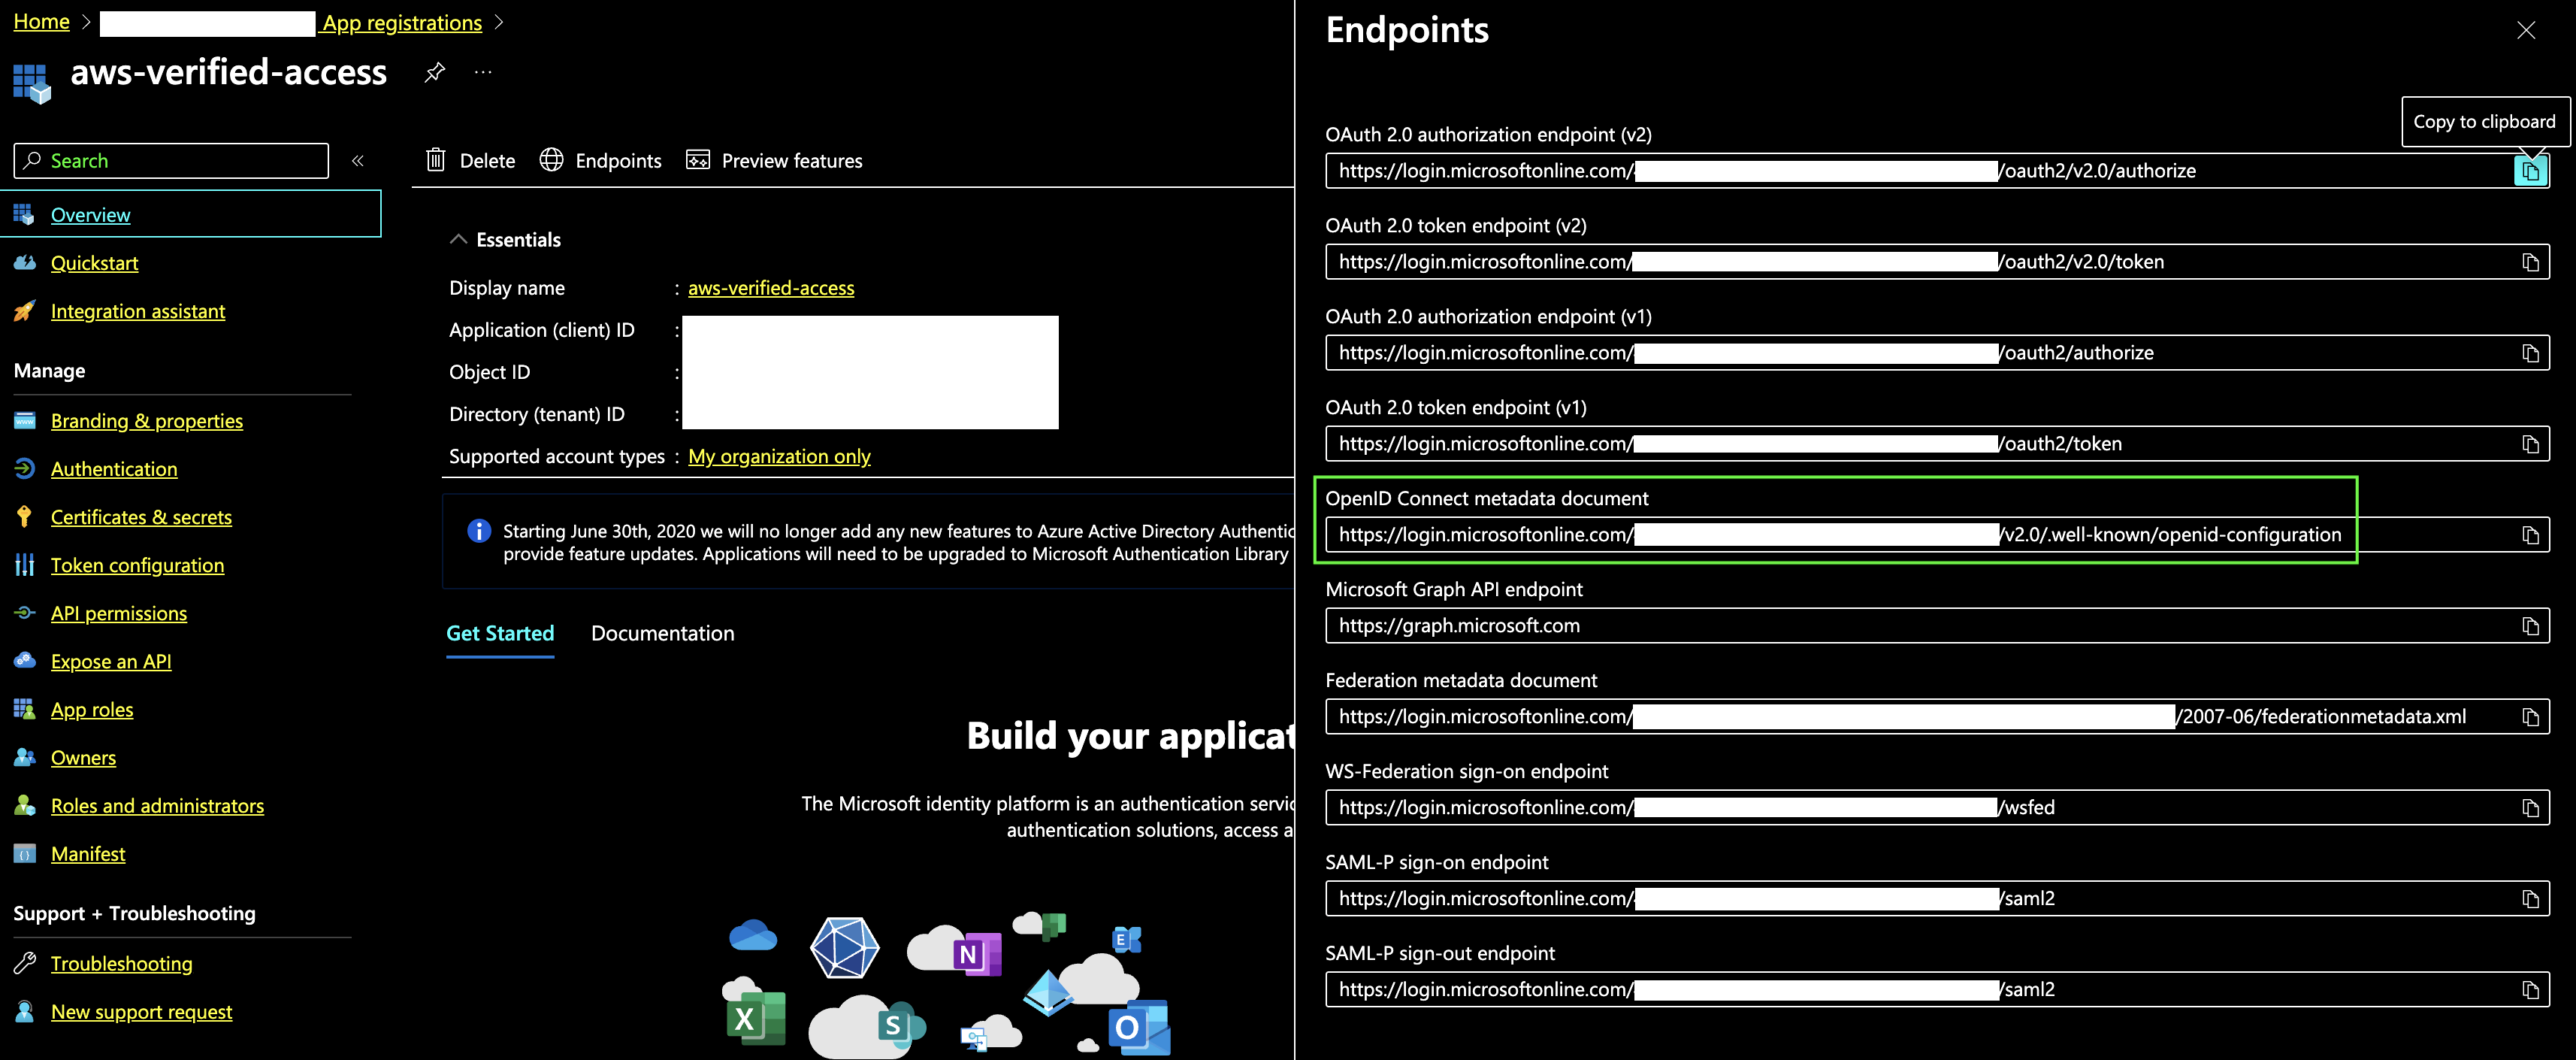
- metadateを取得します
% curl https://login.microsoftonline.com/xxxxxxxxxxxx/v2.0/.well-known/openid-configuration | jq
  % Total    % Received % Xferd  Average Speed   Time    Time     Time  Current
                                 Dload  Upload   Total   Spent    Left  Speed
100  1753  100  1753    0     0  35332      0 --:--:-- --:--:-- --:--:-- 39840
{
  "token_endpoint": "https://login.microsoftonline.com/xxxxxxxxxxxx/oauth2/v2.0/token",
  "token_endpoint_auth_methods_supported": [
    "client_secret_post",
    "private_key_jwt",
    "client_secret_basic"
  ],
  "jwks_uri": "https://login.microsoftonline.com/xxxxxxxxxxxx/discovery/v2.0/keys",
  "response_modes_supported": [
    "query",
    "fragment",
    "form_post"
  ],
  "subject_types_supported": [
    "pairwise"
  ],
  "id_token_signing_alg_values_supported": [
    "RS256"
  ],
  "response_types_supported": [
    "code",
    "id_token",
    "code id_token",
    "id_token token"
  ],
  "scopes_supported": [
    "openid",
    "profile",
    "email",
    "offline_access"
  ],
  "issuer": "https://login.microsoftonline.com/xxxxxxxxxxxx/v2.0",
  "request_uri_parameter_supported": false,
  "userinfo_endpoint": "https://graph.microsoft.com/oidc/userinfo",
  "authorization_endpoint": "https://login.microsoftonline.com/xxxxxxxxxxxx/oauth2/v2.0/authorize",
  "device_authorization_endpoint": "https://login.microsoftonline.com/xxxxxxxxxxxx/oauth2/v2.0/devicecode",
  "http_logout_supported": true,
  "frontchannel_logout_supported": true,
  "end_session_endpoint": "https://login.microsoftonline.com/xxxxxxxxxxxx/oauth2/v2.0/logout",
  "claims_supported": [
    "sub",
    "iss",
    "cloud_instance_name",
    "cloud_instance_host_name",
    "cloud_graph_host_name",
    "msgraph_host",
    "aud",
    "exp",
    "iat",
    "auth_time",
    "acr",
    "nonce",
    "preferred_username",
    "name",
    "tid",
    "ver",
    "at_hash",
    "c_hash",
    "email"
  ],
  "kerberos_endpoint": "https://login.microsoftonline.com/xxxxxxxxxxxx/kerberos",
  "tenant_region_scope": "AS",
  "cloud_instance_name": "microsoftonline.com",
  "cloud_graph_host_name": "graph.windows.net",
  "msgraph_host": "graph.microsoft.com",
  "rbac_url": "https://pas.windows.net"
}
Terraform設定ファイル
verified-access
├── acm_certificate
│   ├── main.tf
│   ├── output.tf
│   └── variables.tf
├── cloudwatch_autoscaling_events
│   ├── main.tf
│   ├── output.tf
│   └── variables.tf
├── endpoint
│   ├── main.tf
│   ├── output.tf
│   └── variables.tf
├── group
│   ├── main.tf
│   ├── output.tf
│   └── variables.tf
├── instance
│   ├── main.tf
│   ├── output.tf
│   └── variables.tf
├── lambda_autoscaling_events
│   ├── main.tf
│   ├── output.tf
│   └── variables.tf
├── lambda_iam
│   ├── main.tf
│   ├── output.tf
│   └── variables.tf
├── load_balancer
│   ├── main.tf
│   ├── output.tf
│   └── variables.tf
├── route53_records
│   ├── main.tf
│   └── variables.tf
└── trust_provider
    ├── main.tf
    ├── output.tf
    └── variables.tf

10 directories, 30 files
重要な設定箇所
provider作成
- 取得したmetadataを設定します
resource "aws_verifiedaccess_trust_provider" "entraid" {
  description           = "entraid-verified-access-trust-provider"
  policy_reference_name = "entraid"
  tags = {
    "Name" = "entraid-verified-access-trust-provider"
  }
  trust_provider_type      = "user"
  user_trust_provider_type = "oidc"

  oidc_options {
    authorization_endpoint = "metadataで取得したauthorization_endpoint"
    client_id              = "xxxxxxxxxxx"
    client_secret          = data.aws_secretsmanager_secret_version.verifiedaccess_integration.secret_string
    issuer                 = "metadataで取得したissuer"
    scope                  = "openid"
    token_endpoint         = "metadataで取得したtoken_endpoint"
    user_info_endpoint     = "metadataで取得したuser_info_endpoint"
  }
}
スケールアウト・インに対応する
- TARGET_GROUP_ARNに作成したtargetgroupを指定します
resource "aws_lambda_function" "autoscaling_events" {
  function_name    = "sync_asg_with_elb_targetgroup"
  handler          = "sync_asg_with_elb_targetgroup.handler"
  runtime          = "python3.8"
  role             = aws_iam_role.lambda_exec.arn
  source_code_hash = filebase64sha256("sync_asg_with_elb_targetgroup.zip")
  filename         = "sync_asg_with_elb_targetgroup.zip"

  environment {
    variables = {
      TARGET_GROUP_ARN = aws_lb_target_group.verified_access_endpoint.arn
    }
  }
}
- EC2インスタンスの起動と終了に応じて、ターゲットグループ(TARGET_GROUP_ARN)にインスタンスを登録または登録解除する役割を果たします。
import boto3
import os
import logging
import json

logger = logging.getLogger()
logger.setLevel(logging.INFO)

elbv2 = boto3.client('elbv2')
TARGET_GROUP_ARN = os.environ['TARGET_GROUP_ARN']

def handler(event, context):
    # Log the received event
    logger.info("Received event: " + json.dumps(event, indent=2))

    try:
        # Check if 'detail' key exists
        detail = event.get('detail')
        if not detail:
            raise ValueError("No 'detail' key found in event")

        # Check if 'EC2InstanceId' is included
        instance_id = detail.get('EC2InstanceId')
        if not instance_id:
            raise ValueError("No 'EC2InstanceId' key found in event detail")

        # Actions depending on instance launch or termination
        lifecycle_transition = detail.get('LifecycleTransition')
        # Corrected indentation for this block
        if event['detail-type'] == 'EC2 Instance Launch Successful':
            # Register the instance
            response = elbv2.register_targets(
                TargetGroupArn=TARGET_GROUP_ARN,
                Targets=[{'Id': instance_id}]
            )
            logger.info(f"Registered instance {instance_id} with target group: {response}")
        elif lifecycle_transition == 'autoscaling:EC2_INSTANCE_TERMINATE':
            # Deregister the instance
            # elbv2.deregister_targets(...)  # Similar to register_targets call
            logger.info(f"Instance {instance_id} will be deregistered")

    except Exception as e:
        logger.error(f"Error processing event: {str(e)}")
        raise
構成が多いのでモジュール化しておくと便利です。
root_module
├── acm_certificate.tf
├── cloudwatch_event_rule.tf
├── data.tf
├── iam_role.tf
├── lambda.tf
├── lb.tf
├── locals.tf
├── main.tf
├── route53_record.tf
├── security_group.tf
├── sync_asg_with_elb_targetgroup.zip
└── verifiedaccess.tf

0 directories, 12 files
確認
- 作成したFQDNにWebブラウザで接続するとEntraIDと連携できることを確認できます
