はじめに
kintone Advent Calendar 2年目の参加になります。去年に引き続いて、今年もプラグイン関連の記事にしたいと思います。
概要
- ふつう、kintone プラグインを更新するには Zip ファイルの再アップロードが必要で、面倒だよね
- kintone プラグインは JS ファイルを同梱せずに、外部ホストして読み込ませることができるよ
- プラグインファイルを Github で管理すれば、Github Actions をつかって簡単にホスティングできるよ
- この仕組みをつかえば、Github で管理されているプラグインファイルを更新するだけで自動的に更新されるプラグインがつくれるよ
必要なもの/知識
- kintone プラグインの基本
- kintone JS カスタマイズの基本
- ローカルに Node 環境がインストールされていること/npm の使いかたの基本
- Git/Github の基本的な使いかたを知っていること
- Github アカウント
サンプルプラグインの作成方法
Cybozu さんが提供されているサンプルを素材に、自動更新できるプラグインの作成手順を説明します。
リポジトリの作成
Github でリポジトリを作成して、ローカルに clone します。
注:以下、org-name は Github の組織名/ユーザ名に、repo-name はリポジトリ名に読み替えてください。
git clone https://github.com/org-name/repo-name.git
clone したプロジェクトのルートディレクトリに移動します。
cd repo-name
サンプルプラグインのファイルをコピー
プロジェクトのルートディレクトリに src ディレクトリを作成します。
Cybozu さんが下記でオープンソースのサンプルプラグインを提供されていますので、好きなものを選んで、サブディレクトリの中身を src ディレクトリにコピーします。
https://github.com/kintone-samples/plugin-samples/tree/master/examples
ここでは checkvalue サブディレクトリの「入力値チェックプラグイン」を使わせていただきます。
https://github.com/kintone-samples/plugin-samples/tree/master/examples/checkvalue
「入力値チェックプラグイン」の解説はこちら:
https://developer.cybozu.io/hc/ja/articles/203501094-%E5%85%A5%E5%8A%9B%E5%80%A4%E3%83%81%E3%82%A7%E3%83%83%E3%82%AF%E3%83%97%E3%83%A9%E3%82%B0%E3%82%A4%E3%83%B3
ルートディレクトリに以下のようにフォルダとファイルが配置されていればOKです。
- src
- css
- 51-modern-default.css
- check_config
- html
- check_config.html
- image
- check.png
- js
- check_sample.js
- config.js
- kintone-config-helper.js
- manifest.json
- css
Github Actions の準備
ルートディレクトリに.github(先頭に . がつきます)フォルダを作成し、その中に workflows (. はつきません)フォルダを作成します。
workflows フォルダの中に以下の内容でファイル publish.yml を作成します。
# This is a basic workflow to help you get started with Actions
name: publish-kintone-plugin-js-to-gh-pages

# Controls when the action will run. Triggers the workflow on push or pull request
# events but only for the master branch
on:
  push:
    branches: [ master ]

# A workflow run is made up of one or more jobs that can run sequentially or in parallel
jobs:
  # This workflow contains a single job called "build"
  build:
    # The type of runner that the job will run on
    runs-on: ubuntu-latest

    # Steps represent a sequence of tasks that will be executed as part of the job
    steps:
      # Checks-out your repository under $GITHUB_WORKSPACE, so your job can access it
      - uses: actions/checkout@v2
      # Runs a set of commands using the runners shell
      - name: GitHub Pages action
        uses: peaceiris/actions-gh-pages@v3.6.4
        with:
          github_token: ${{ secrets.GITHUB_TOKEN }}
          publish_dir: ./src/js
以下のようにファイルが配置されていればOKです。
- .github
- workflows
- publish.yml
- workflows
詳細な説明は省略しますが、この設定ファイルにより Github は master ブランチへの push 操作を検知するたびに src/js フォルダのファイルを Github Pages にデプロイします。
ファイルパスの調整
ルートディレクトリの manifest.json の config/js のエントリを以下のとおり修正します。
プラグインから参照するJSファイルの指定を、相対パスから Github Pages にデプロイされたURLに書き換えています。./src/js 以下を Github Pages にデプロイしているため、パスに src や js が含まれていない点に注意してください。
        "js": [
            "https://js.cybozu.com/jquery/1.11.1/jquery.min.js",
            "https://org-name.github.io/repo-name/kintone-config-helper.js",
            "https://js.cybozu.com/jsrender/1.0.6/jsrender.min.js",
            "https://org-name.github.io/repo-name/config.js"
        ],
コードの commit と push
コードの準備ができたので、修正を commit します。
git add .
git commit -m 'first commit'
コミットした修正を Github リポジトリに push します。
git push origin master
Github Actions の動作を確認する
Github リポジトリのページを開き、Actions タブをクリックします。
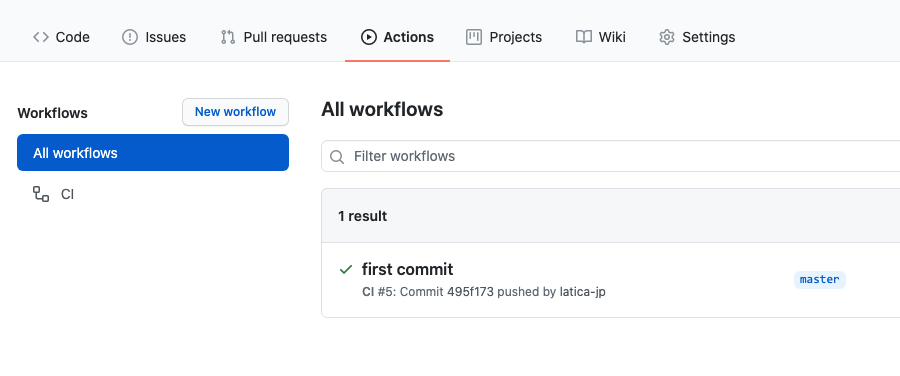
上記の画像のように、All workflows に Workflow の実行結果が緑のチェックボックスとともに表示されていれば、JS ファイルの Github Pages へのデプロイは成功しています。なお、緑のチェックボックスではなく黄土色の回転アイコンが表示されている場合は実行中ですので、実行完了まで待ちます。
Github Pages を有効にする
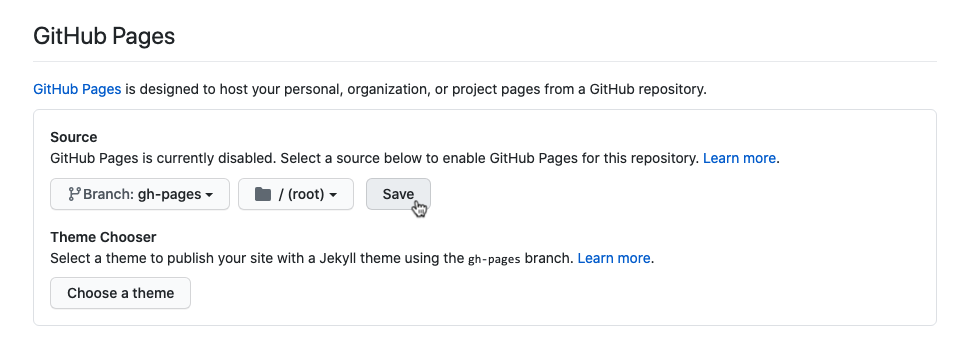
Github リポジトリのページで上部のタブから Settings を選択します。

左メニューで Options を選択、Github Pages で以下のとおりブランチを gh-pages に変更して Save をクリックします。
さきほど manifest.json に設定したURLにWebブラウザでアクセスしてみて、JSファイルの内容が表示されれば正常にデプロイされています。
プラグインのパッケージング
以下のページを参照して、プラグインのパッケージングを行います。
上記ページを読むのが面倒な方は、ルートディレクトリで下記のコマンドを実行すればOKです。
npm install -g @kintone/kintone-plugin-packer
kintone-plugin-packer src
ルートディレクトリにプラグインファイル plugin.zip が作成されていますので、kintone にアップロードして動作を確認します。
サンプルプラグインを修正してみる
サンプルプラグインのコードに簡単な修正を加えて、実際に Zip ファイルをアップロードさせずにプラグインに反映させてみます。
src/js/config.js を開きます。
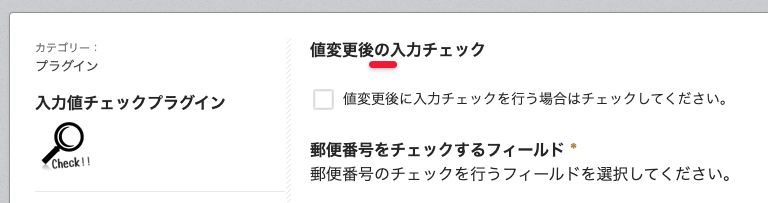
terms という変数に設定画面に表示するラベルの文言を格納していますので、ここを修正してみます。
  var terms = {
    'ja': {
      'checkValue_label': '値変更後の入力チェック', // <-- 「の」を挿入
修正をブランチを切らずに master に commit して、Github リポジトリに push します。
前述の説明にしたがって、Github Actions が正常に実行されたことを確認してください。
プラグインの設定ページを表示して、文言が修正されていれば、成功です。
おわりに
それではみなさま、よきプラグイン開発ライフを!