今年9月のShibuya.lisp lispmeetup #68で「Interceptors: Into the Core of Pedestal」と題してClojureのサービス/API開発ライブラリ"Pedestal"を簡単に紹介する発表をしました。
最近、Webアプリ開発の仕事でプロジェクトの基盤構築にDuct、API機能開発にPedestalという構成でClojureによるREST APIを開発していて、個人的にもなかなか便利だと感じています。
そこで今回はこのPedestalについて、ちょうど日本語情報も見当たらないので簡単にまとめてみます。
Pedestalとは
GitHubリポジトリのREADMEには
Pedestal is a set of libraries written in Clojure that aims to bring both the language and its principles (Simplicity, Power and Focus) to server-side development.
とあります。
また、公式サイトトップページには以下のように書かれています。
There are a lot of tools in that space, so why did we build Pedestal? We had two main reasons:
- Pedestal is designed for APIs first. Most web app frameworks still focus on the "page model" and server side rendering. Pedestal lets you start simple and add that if you need it.
- Pedestal makes it easy to create "live" applications. Applications must respond with immediate feedback even while some back-end communication goes on. Pedestal makes it easy to deliver server-sent events and asynchronous updates.
位置付けとしてはRubyのSinatra、PythonのFlaskに近い、Clojureらしいシンプルなマイクロフレームワークと言っても良いかもしれません。
アーキテクチャ面では、ClojureのHTTPサーバ抽象Ringを基礎としつつも"middleware"ではなく"interceptor"という異なるパターンでカスタマイズ可能になっている点が特徴的です(詳しくは後述します)。
機能的には(Clojure言語と同じく)極めて実用志向で、パフォーマンスやセキュリティも重視されているようです。
例えば、reititというルーティングライブラリに関する記事Reitit, Data-Driven Routing with Clojure(Script)のパフォーマンス比較(中規模のREST APIのルート解決所要時間: 単位ns)によると、ルーティング機能に関してAtaraxy, bidi, Compojureに大きく差を付けてreititに次ぐ性能を発揮しうるようです。

Pedestalの始め方
Clojure CLIで手軽に始める
まずはClojure CLIを利用して最小構成でコンパクトにPedestalを試してみましょう。
以下のようにディレクトリ/ファイルを配置し、
$ tree pedestal-getting-started
pedestal-getting-started
├── deps.edn
└── src
    └── pedestal_getting_started
        └── core.clj

2 directories, 2 files
Clojure CLIの設定ファイル deps.edn でPedestal本体io.pedestal/pedestal.serviceとサーバのアダプタio.pedestal/pedestal.jetty1を依存ライブラリとして指定し、
{:deps {org.clojure/clojure          {:mvn/version "1.10.0"}
        io.pedestal/pedestal.service {:mvn/version "0.5.5"}
        io.pedestal/pedestal.jetty   {:mvn/version "0.5.5"}}}
HTTPハンドラ関数、ルーティング定義、サーバを起動する -main 関数を書けば準備完了です。
(ns pedestal-getting-started.core
  (:require [io.pedestal.http :as http]))

(defn respond-hello [request]
  {:status 200
   :body   "Hello, world!"})

(def routes
  #{["/greet" :get `respond-hello]})

(defn -main []
  (-> {::http/routes routes
       ::http/port   8890
       ::http/type   :jetty}
      http/create-server
      http/start))
clj -m <-main関数の定義されている名前空間> でサーバを起動してみると、
$ cd pedestal-getting-started/
$ clj -m pedestal-getting-started.core
SLF4J: Failed to load class "org.slf4j.impl.StaticLoggerBinder".  # ロガーの設定をしていないので警告が表示される
SLF4J: Defaulting to no-operation (NOP) logger implementation
SLF4J: See http://www.slf4j.org/codes.html#StaticLoggerBinder for further details.
エンドポイント /greet へのHTTP GETリクエストに対するレスポンスが期待通りに返ってくることが確認できます。
$ curl http://localhost:8890/greet
Hello, world!
Leiningenテンプレートでプロジェクトを生成する
Clojure CLIで本格的な開発を進めることも十分可能ですが、各種ツールの充実度を考えるとLeiningenを利用するのが便利です。
PedestalではLeiningenテンプレートpedestal-serviceが提供されているので、これを基礎としてプロジェクト構成を整えることができます。
例えば、
$ lein new pedestal-service hello-pedestal
Generating a pedestal-service application called hello-pedestal.
とすると、以下のようなプロジェクトhello-pedestalが生成されます。
$ tree hello-pedestal
hello-pedestal
├── Capstanfile
├── Dockerfile
├── README.md
├── config
│   └── logback.xml
├── project.clj
├── src
│   └── hello_pedestal
│       ├── server.clj
│       └── service.clj
└── test
    └── hello_pedestal
        └── service_test.clj

5 directories, 8 files
lein run でサーバを起動し、
$ cd hello-pedestal/
$ lein run
INFO  org.eclipse.jetty.util.log  - Logging initialized @8921ms to org.eclipse.jetty.util.log.Slf4jLog

Creating your server...
INFO  org.eclipse.jetty.server.Server  - jetty-9.4.10.v20180503; built: 2018-05-03T15:56:21.710Z; git: daa59876e6f384329b122929e70a80934569428c; jvm 10.0.2+13
INFO  o.e.j.server.handler.ContextHandler  - Started o.e.j.s.ServletContextHandler@72ba8111{/,null,AVAILABLE}
INFO  o.e.jetty.server.AbstractConnector  - Started ServerConnector@1079496c{HTTP/1.1,[http/1.1, h2c]}{localhost:8080}
INFO  org.eclipse.jetty.server.Server  - Started @9354ms
http://localhost:8080 にアクセスしてみると、
$ curl http://localhost:8080
Hello World!
サーバが正常に動作していることが確認できます。
Pedestalの基本構成要素
ここからはPedestalの基本的な構成要素を順に見ていきましょう。
ルーティング定義
Pedestalにおけるルーティング定義は、ルーティングライブラリbidiやAtaraxyなどと同様にClojureのデータとして表現します。
簡潔な記法から冗長な記法まで複数のルーティングシンタックスがサポートされていますが、いずれも io.pedestal.http.route/expand-routes で冗長で効率的に処理される形式に展開されます。
基本的には以下のように [<パス文字列> <HTTPメソッド> <インターセプタ or ハンドラ関数>] という形式のベクターのセットとして定義します。
src/hello_pedestal/service.clj#L23-L36
;; Tabular routes
(def routes #{["/" :get (conj common-interceptors `home-page)]
              ["/about" :get (conj common-interceptors `about-page)]})
同等のルーティング定義は、ネストしたマップや
;; Map-based routes
(def routes `{"/" {:interceptors [(body-params/body-params) http/html-body]
                   :get home-page
                   "/about" {:get about-page}}})
ネストしたベクターによって記述することもできます。
;; Terse/Vector-based routes
(def routes
  `[[["/" {:get home-page}
      ^:interceptors [(body-params/body-params) http/html-body]
      ["/about" {:get about-page}]]]])
公式ドキュメント
- guides/defining-routes: ルーティング定義のチュートリアル
- reference/routing-quick-reference: ルーティング機能のリファレンス
- reference/table-syntax: Table Syntaxのリファレンス
サービスマップ(service map)
Pedestalの「サービスマップ」とは、サーバについての設定情報を持つマップのことです。
先ほどのルーティング定義を含むこのマップを関数 io.pedestal.http/create-server に渡すことで必要な初期化処理を経てサーバのインスタンスを構築し、 io.pedestal.http/start でサーバを起動することができます。
pedestal-serviceテンプレートでは、プロダクション環境向けのサービスマップを service として定義し、
src/hello_pedestal/service.clj#L39-L79
;; Consumed by hello-pedestal.server/create-server
;; See http/default-interceptors for additional options you can configure
(def service {:env :prod
              ;; You can bring your own non-default interceptors. Make
              ;; sure you include routing and set it up right for
              ;; dev-mode. If you do, many other keys for configuring
              ;; default interceptors will be ignored.
              ;; ::http/interceptors []
              ::http/routes routes

              ;; Uncomment next line to enable CORS support, add
              ;; string(s) specifying scheme, host and port for
              ;; allowed source(s):
              ;;
              ;; "http://localhost:8080"
              ;;
              ;;::http/allowed-origins ["scheme://host:port"]

              ;; Tune the Secure Headers
              ;; and specifically the Content Security Policy appropriate to your service/application
              ;; For more information, see: https://content-security-policy.com/
              ;;   See also: https://github.com/pedestal/pedestal/issues/499
              ;;::http/secure-headers {:content-security-policy-settings {:object-src "'none'"
              ;;                                                          :script-src "'unsafe-inline' 'unsafe-eval' 'strict-dynamic' https: http:"
              ;;                                                          :frame-ancestors "'none'"}}

              ;; Root for resource interceptor that is available by default.
              ::http/resource-path "/public"

              ;; Either :jetty, :immutant or :tomcat (see comments in project.clj)
              ;;  This can also be your own chain provider/server-fn -- http://pedestal.io/reference/architecture-overview#_chain_provider
              ::http/type :jetty
              ;;::http/host "localhost"
              ::http/port 8080
              ;; Options to pass to the container (Jetty)
              ::http/container-options {:h2c? true
                                        :h2? false
                                        ;:keystore "test/hp/keystore.jks"
                                        ;:key-password "password"
                                        ;:ssl-port 8443
                                        :ssl? false}})
開発環境向けのサービスマップは service の設定を merge で適宜上書きするようになっています。
src/hello_pedestal/server.clj#L16-L25
      (merge {:env :dev
              ;; do not block thread that starts web server
              ::server/join? false
              ;; Routes can be a function that resolve routes,
              ;;  we can use this to set the routes to be reloadable
              ::server/routes #(route/expand-routes (deref #'service/routes))
              ;; all origins are allowed in dev mode
              ::server/allowed-origins {:creds true :allowed-origins (constantly true)}
              ;; Content Security Policy (CSP) is mostly turned off in dev mode
              ::server/secure-headers {:content-security-policy-settings {:object-src "'none'"}}})
公式ドキュメント
- reference/service-map: サービスマップのリファレンス
インターセプタ(interceptor)
「インターセプタ」は、ClojureScriptフロントエンドフレームワークre-frameやルーティングライブラリreititでも採用されている仕組みです。
ある関数の前後に任意の処理を挟み込むパターンであり、「ミドルウェア」(middleware)というパターンにもよく似ています。
Pedestalでは、HTTPハンドラ関数の前後に処理を追加するためにインターセプタが使われるほか、HTTPに限らずより一般的に入出力データに対する処理を拡張するためのメカニズムとしてインターセプタの仕組みが活用されています。
ここでは、HTTPハンドラ関数に対するインターセプタについて見てみましょう。
Ringのリクエストマップ・レスポンスマップ・ハンドラ関数
前提知識としてRing (cf. Ring Spec)では、サーバに対するHTTPリクエストが決まった形式のマップデータに変換され、
;; リクエストマップの例
{:server-port 8080
 :server-name "localhost"
 :remote-addr "127.0.0.1"
 :uri "/hello"
 :query-string "name=World"
 :scheme :http
 :request-method :get
 :headers {"Accept" "application/json"}
 :body nil}

;; clojure.specによる表現
(s/def ::request
  (s/keys :opt-un [::server-port ::server-name ::remote-addr
                   ::uri ::query-string ::scheme
                   ::request-method ::headers ::body
                   ,,,]))
マップデータがHTTPレスポンスに変換されて処理結果が返されます。
;; レスポンスマップの例
{:status 200
 :headers {"Content-Type" "application/json"}
 :body {:greeting "Hello, World!"}}

;; clojure.specによる表現
(s/def ::response
  (s/keys :opt-un [::status ::headers ::body]))
そして、リクエストマップ(request map)を受け取ってレスポンスマップ(response map)を返すような関数のことをハンドラ関数(handler function)と呼んでいます。
例えば、次の関数 hello は、リクエストマップのパラメータ :name の値を利用してJSONデータをレスポンスマップとして返すハンドラ関数です。
;; ハンドラ関数の例
(defn hello [request]
  (let [name (get-in request [:params :name])]
    {:status 200
     :headers {"Content-Type" "application/json"}
     :body {:greeting (str "Hello, " name "!")}}))

;; clojure.specによる表現
(s/def ::handler
  (s/fspec :args (s/cat :request ::request)
           :ret ::response))
Ringの「ミドルウェア」
ハンドラ関数に共通の機能を追加するために使われるのが「ミドルウェア」です。
例えば、リクエストマップの :params のマップデータについてハンドラ関数に到達する前にあらかじめキーを文字列からキーワードに変換しておく wrap-keyword-params というミドルウェアは、以下のように略式実装できます。
高階関数 wrap-keyword-params* が返すのは、受け取った request の :params のキーをキーワードにしてから handler を呼び出すハンドラ関数です。
;; ミドルウェアの例
(defn wrap-keyword-params* [handler]
  (fn [request]
    (handler (update request :params
                     #(->> %
                           (map (fn [[k v]] [(keyword k) v]))
                           (into {}))))))

;; clojure.specによる表現
(s/def ::middleware
  (s/fspec :args (s/cat :handler ::handler)
           :ret ::handler))
一般に、Ringのミドルウェアとはハンドラ関数を受け取ってハンドラ関数を返す高階関数であり、ハンドラ関数の呼出し前後に任意の処理を実行することができます。
;; 基本形
(defn some-middleware [handler]
  (fn [request]
    (let [response (handler (f request))]
      (g response))))
ミドルウェアの命名によく使われる"wrap"が表現しているように、複数のミドルウェアを重ねて適用すると元のハンドラ関数を包み込む層のように関数が合成されていくため、以下の図のような構造になります。
次のようなミドルウェアが適用された関数(全体としてハンドラ関数)は、 middleware1, 2, 3のhandler呼出し前の処理、handlerの処理、middleware3, 2, 1のhandler呼出し後の処理という順序で動作します。
(-> handler
    middleware3
    middleware2
    middleware1)
Pedestalの「インターセプタ」
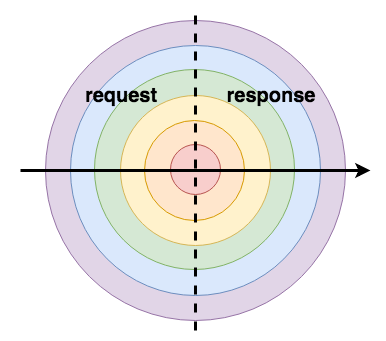
これに対してPedestalでは、リクエストマップ、レスポンスマップ、制御用のキュー(queue)と終了条件(terminators)などを持つ「コンテキストマップ」(context map)を扱う特殊なデータとして「インターセプタ」を定義します。
;; コンテキストマップの例
{:request {:protocol "HTTP/1.1", :async-supported? true,
           :remote-addr "127.0.0.1", ,,,},
 :response nil,
 :io.pedestal.interceptor.chain/terminators (#object[io.pedestal.http.impl.servlet_interceptor$terminator_inject$fn__15706 0x25766941 "io.pedestal.http.impl.servlet_interceptor$terminator_inject$fn__15706@25766941"]),
 :io.pedestal.interceptor.chain/queue #object[clojure.lang.PersistentQueue 0x37f89872 "clojure.lang.PersistentQueue@72c17787"],
 ,,,}

;; clojure.specによる表現
(s/def ::context
  (s/keys :opt-un [::request ::response]
          :opt [:io.pedestal.interceptor.chain/queue
                :io.pedestal.interceptor.chain/terminators
                ,,,]))
例えば、上述のミドルウェア wrap-keyword-params に相当するインターセプタ keyword-params は以下のように略式実装できます。
これは、受け取った context のパス [:request :params] のキーをキーワードに変換したコンテキストマップを返す関数をキー :enter として持つマップデータです。
;; インターセプタの例
(def keyword-params*
  {:name ::keyword-params*
   :enter (fn [context]
            (update-in context [:request :params]
                       #(->> %
                             (map (fn [[k v]] [(keyword k) v]))
                             (into {}))))})

;; clojure.specによる表現
(s/def ::enter
  (s/fspec :args (s/cat :context ::context)
           :ret ::context))
(s/def ::leave
  (s/fspec :args (s/cat :context ::context)
           :ret ::context))
(s/def ::interceptor
  (s/keys :opt-un [::name ::enter ::leave ::error]))
一般に、Pedestalのインターセプタとはコンテキストマップに対する任意の変換処理を制御フローの上りで実行する関数 :enter 、下りで実行する関数 :leave を持つマップであり、ハンドラ関数の呼出し前後に任意の処理を実行することができます。
;; 基本形
(def some-interceptor
  {:name ::some-interceptor
   :enter (fn [context]
            (f context))
   :leave (fn [context]
            (g context))})
複数のインターセプタを並べると、 :enter の関数を順にコンテキストに適用し、ハンドラ関数で折り返して:leave の関数を逆順にコンテキストに適用するように動作する2ので、以下の図のような構造になります。
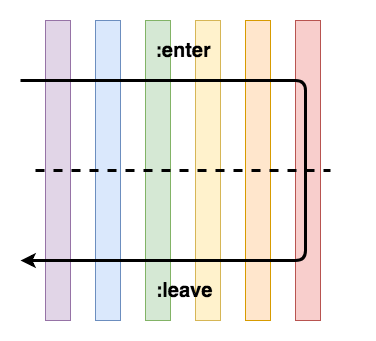
次のようなインターセプタを組み合わせたシーケンス(全体としてインターセプタ)は、interceptor1, 2, 3の :enter の処理、handlerの処理、 interceptor3, 2, 1の :leave の処理という順序で動作します。
[interceptor1 interceptor2 interceptor3 handler]
基本的な機能にミドルウェアもインターセプタも大きな差異はありませんが、単なる関数の組み合わせであるミドルウェアに対して、関数を含むマップのシーケンスを実行するインターセプタでは特に非同期処理やエラーの扱い方に大きな違いがあります。
ミドルウェア方式ではなくインターセプタという方式を採用するメリット・デメリットについてはWhy interceptors?という記事によくまとめられています。
サンプルプロジェクトhello-pedestalでは、インターセプタのベクター common-interceptors として (io.pedestal.http.body-params/body-params) と io.pedestal.http/html-body が設定されていることから、 ["/" :get (conj common-interceptors `home-page)] というルーティング定義ではハンドラ関数 home-page の前後にリクエストのbodyパラメータを変換する処理とレスポンスを Content-Type: text/html にする処理が走ることが分かります。
src/hello_pedestal/service.clj#L21
(def common-interceptors [(body-params/body-params) http/html-body])
また、デフォルトで便利なインターセプタが関数 io.pedestal.http/default-interceptors 、開発時に有用なインターセプタが関数 io.pedestal.http/dev-interceptors を介してまとめて設定できるようになっています(pedestal-serviceテンプレートではあらかじめ組み込まれています)。
src/hello_pedestal/server.clj#L27-L28
      server/default-interceptors
      server/dev-interceptors
公式ドキュメント
- guides/what-is-an-interceptor: インターセプタのチュートリアル
- reference/interceptors: インターセプタ全般についてのリファレンス
- reference/servlet-interceptor: Servletインターセプタについて
- reference/default-interceptors: デフォルトインターセプタについて
reloaded workflow
pedestal-serviceテンプレートがデフォルトで用意してくれる開発環境でもservice-toolsなどを活用するとリロード可能なREPL駆動開発 ("reloaded workflow")が不可能ではないようですが、公式ドキュメントのguides/pedestal-with-componentでも解説されているように、Component, Integrantなどのアプリケーション状態/ライフサイクル管理ライブラリを導入すると開発が非常に捗ります。
- 導入例
また、別の記事ClojureサーバサイドフレームワークDuctガイドで詳しく解説しているマイクロフレームワークDuctを基礎として利用し、サーバ部分をPedestalで開発することもできます。
Pedestalのサービスマップのデフォルト設定とサーバの起動/停止機能をDuctモジュールduct.module.pedestalとしてライブラリ化してみたので、興味のある方は試してみてください。
- duct.module.pedestalの利用例
- lagenorhynque/aqoursql: Duct + Pedestal + LaciniaのGraphQL APIサンプル実装
- lagenorhynque/clj-rest-api: lagenorhynque/aqoursqlと同一のDBに対するDuct + PedestalのREST APIサンプル実装
- lagenorhynque/route-guide: Duct + Pedestal + ProtojureのgRPC APIサンプル実装
Further Reading
Clojure/ClojureScript関連リンク集 > Webサーバサイド (Clojure)
-
ここではJettyのアダプタを指定していますが、Immutantのio.pedestal/pedestal.immutantとTomcatのio.pedestal/pedestal.tomcatも標準提供されています。 ↩
-
こうした動作は、Pedestalがコンテキストマップが持つキューとスタックを操作することで実現されています: The Queue and the Stack ↩