先日AngularDartがついに1.0、メジャーリリースを果たしました。 しかし公式のチュートリアルやサンプルコードは0.10系(1.0の前は0.14まであった)で止まっているので、 一部(と呼ぶには広すぎますが)のコードは動かなかったり、非推奨になっていたりします。なので、APIドキュメントの方を頼りになんとかAngularDartの1系らしいサンプルコードで基本的な使い方を紹介します。
[15/03/06 追記]
1.1.0に対応しました。
公式チュートリアルが1.*系に対応している(と書いている)のですが、一部古い記述もあるのでやはりAPIリファレンスや、その他の情報を合わせて書くしかないです。
この内容をまとめたサンプルプロジェクトはこちらです。ご自由にお使いください。
Step 0: セットアップ
コード書く前にAngularDartを使えるプロジェクトを用意しましょう。今回はあとでShadowDOMを使うので、依存パッケージにweb_componentsも加えます。
name: angular_sample
dependencies:
  browser: any
  angular: ">=1.1.0 <1.2.0"
  web_components: any
transformers:
- angular
[追記]
1.0→1.1の変更も大きかったので安全のために1.1固定したほうがいいと思います。
pubspecを書いたら忘れずに>pub getしてください。
Step 1: エントリポイントの作成
Webページ上でAngularDartを動かすために、エントリポイントを作成します。AngularJSと違い、エントリポイントで明示的にアプリケーションを実行しなければAngularDartは動きません。
まずはHTMLファイルから。web/index.htmlはこのように書きます。
<!DOCTYPE html>
<html ng-app>
<head lang="ja">
    <meta charset="UTF-8">
    <title></title>
    <script src="packages/web_components/webcomponents.min.js"></script>
    <script src="packages/web_components/dart_support.js"></script>
</head>
<body>
<h3>Hello {{name}}!</h3>
Name: <input type="text" ng-model="name">
<script type="application/dart" src="index.dart"></script>
<script type="text/javascript" src="packages/browser/dart.js"></script>
</body>
</html>
[追記]
web_components/platform.jsはweb_components/webcomponents.jsに名前が変わりました。役割がわかりやすくなって良くなりましたが、DartiumやChromeではもともとWeb Componentsに対応していてこの変更によるエラーに気付きにくいので注意です。
<head>にある2つのスクリプトはWebComponentsのポリフィルです。<body>にあるのは自分のスクリプトと、Dart2JS用のポリフィルです。<html>にng-appを書き足すのを忘れないようにしてください。
次はindex.dartを書きます。
import "package:angular/angular.dart";
import "package:angular/application_factory.dart";

void main() {
  applicationFactory().run();
}
ここで注意ですが、 必ず angular/angular.dart と angular/application_factory.dart の両方をimportしてください。 2つともimportしなければAngularDartは動作しません。
ここまで出来たら、>pub serveしてDartiumやChromeなどでプレビューしてみましょう。inputにいれたテキストがバインディングされているはずです。
Angularの基本はここまでで完了です。ng-repeatやng-ifなどのng-*系の機能はAngularJSのほうにたくさん記事があると思うので割愛します。
Step 2: Componentを使う
Google I/Oでは AngularComponentとも呼ばれたこの機能は、WebComponentsをAngularDartで実装したものです。別のWebComponents実装であるPolymerよりも、Angularの強力なインジェクション機能のお陰でスムーズにコードが書けます。
WebComponentsの4大要素(本当は5だけど)は
- Custom Elements (独自elementの定義)
- HTML Import (外部htmlのインポート)
- Templates (Stylingのスコープ化)
- ShadowDOM (DOMの隠蔽)
です。これらをすべて使って、Step1の簡単なアプリケーションを書きなおしてみます。
まずは独自elementとして<name>をlib/name_component.dartで定義します。
library angular_sample.name_component;

import "package:angular/angular.dart";

@Component(
  selector: 'name',
  templateUrl: 'packages/angular_sample/name.html',
  useShadowDom: true,
  map: const {
    'name-attr': '@name',
    'color': '@color'
  },
  cssUrl: 'packages/angular_sample/name_component.css'
)
class NameComponent {

  String name;
  String color;
}
@Componentを付けられたクラスが一つの独自要素になります。
- selector : 要素名(name)
- templateUrl : テンプレートのHTML(packages/angular_sample/name.html)
- useShadowDom : ShadowDomを使うかどうか(true)
publishAs : テンプレート内でのインスタンス名(self)- map : Domでの属性とクラスメンバとのマッピング(name-attrをnameに関連付け)
- cssUrl : テンプレートに適用するCSS(packages/angular_sample/name_component.css)
publishAsはあってもなくても良いですがあったほうが見通しがよくなります。ただし使う場合はクラスのほうでthisを返すgetterを作ってあげないといけません。
[追記]
publishAsは現在Deprecatedされています。後方互換性のために残されていますが実際の処理は何も行われていません。現在は何もしなくても@Componentのオブジェクトが暗黙のルートスコープになっています。
mapの@nameという書き方はバインディングの形式によって他にも<=>や=>などいろいろありますが、今回は割愛します。詳しくはこちらのドキュメントを御覧ください。
次はテンプレートであるlib/name.htmlです
<h3 ng-class="color">Hello {{name}}!</h3>
Name: <input type="text" ng-model="name">
新たにng-class属性が追加されました。
CSSはこのように書きます。今回は黒と赤の2種類です。
.black {
    color: #000000;
}
.red {
    color: #fa000f;
}
これで独自要素nameは定義できました。これをAngularDart側に登録する必要がありますが、直接Componentを登録することは出来ず、一旦 モジュールにバインドして、そのモジュールをアプリケーションに追加します。
lib/main_module.dartは次のように書きます
library angular_sample.main_module;

import "package:angular/angular.dart";

import "package:angular_sample/name_component.dart";

class MainModule extends Module {

  MainModule() {
    bind(NameComponent);
  }
}
モジュールはModuleクラスを継承します。コンストラクタでバインドしたいクラスをbind()で登録します。
アプリケーションにモジュールを追加します。
import "package:angular/angular.dart";
import "package:angular/application_factory.dart";

import "package:angular_sample/main_module.dart";

void main() {
  applicationFactory()
  .addModule(new MainModule())
  .run();
}
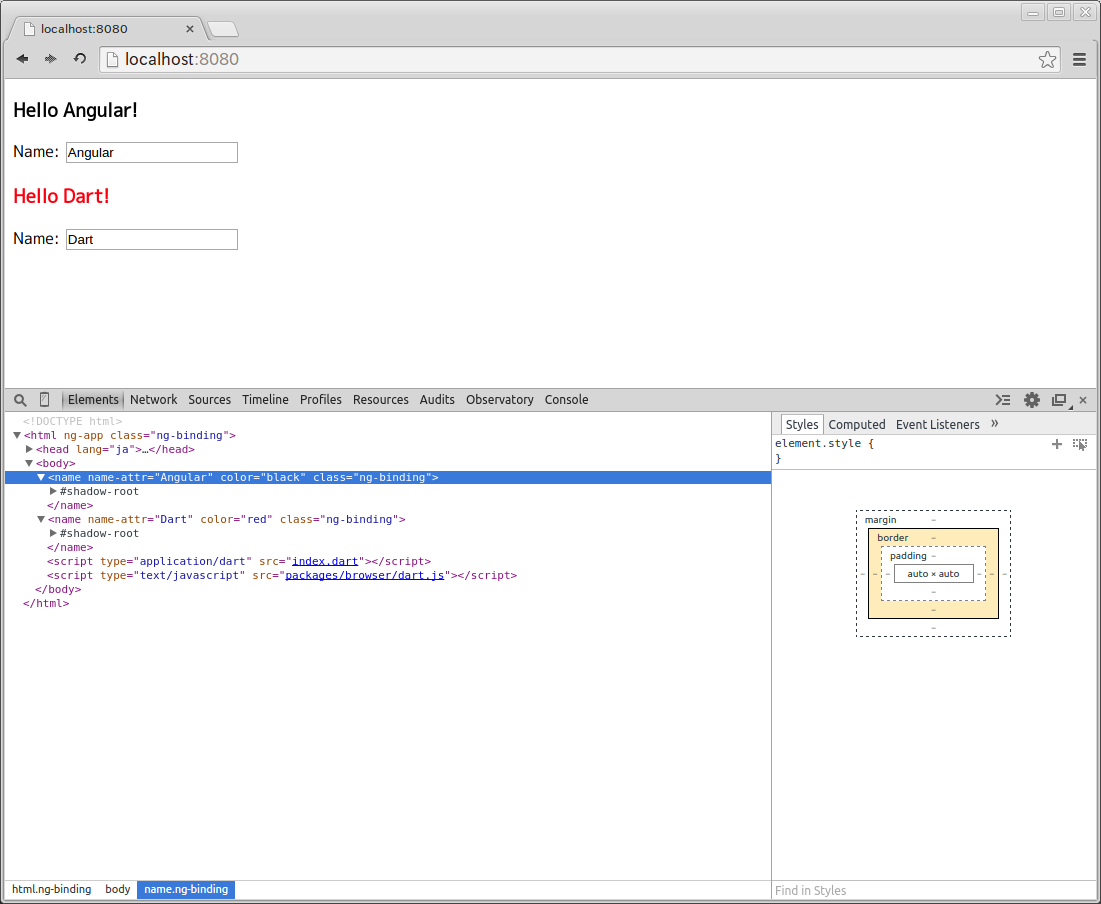
ここまで出来たらあとはHTMLに独自要素nameを置くだけです。
<!DOCTYPE html>
<html ng-app>
<head lang="ja">
    <meta charset="UTF-8">
    <title></title>
    <script src="packages/web_components/webcomponents.min.js"></script>
    <script src="packages/web_components/dart_support.js"></script>
</head>
<body>
<name name-attr="Angular" color="black"></name>
<name name-attr="Dart" color="red"></name>
<script type="application/dart" src="index.dart"></script>
<script type="text/javascript" src="packages/browser/dart.js"></script>
</body>
</html>
HTML側には自分で定義した要素を置くだけで、Polymerのようにheadにインポート文を書く必要はありません。すべてはAngularDartがやってくれます。
これでページを表示すると、2つのnameが独立したスタイリングで表示されるのがわかると思います。Chromeのデベロッパーコンソールなどで見るとDOMは隠蔽されているはずです。
基本的なバインディングと、Componentの使い方については以上です。公式ドキュメントができるのが先か私がAPIドキュメントを理解するのが先かはわかりませんが、次は独自属性とTemplate(旧Decorator)について書こうと思います。
間違いの指摘や質問等あればどんどんコメントください。
