どうも、らこです。先日主催したイベントで「Angular 2の*記号が何の意味があるのかわからなくて気持ち悪い」という声を聞き、意外に知られてないと思ったので一度きちんと書いておこうと思います。みなさんのAngular 2への理解の手助けになれば幸いです。
なお、本記事はAngular 2 Beta.14時点でのものです。
Angular 2におけるディレクティブ
Angular 2は基本的にコンポーネント志向であり、アプリケーションはコンポーネントで組み立てます。ただし、Angular 1と同じようにHTML要素やコンポーネントを修飾するためにディレクティブを使うことができます。
次のmyDirectiveディレクティブは、付与した要素のスタイルを変更し、colorをredにします。
import {Component, Directive, ElementRef, Renderer} from 'angular2/core'

@Directive({
  selector: "[myDirective]"
})
class MyDirective {

  constructor(
    private el: ElementRef,
    private renderer: Renderer
  ) {}

  ngOnInit() {
    this.renderer.setElementStyle(this.el.nativeElement, "color", "red");
  }
}

@Component({
  selector: 'my-app',
  template: `
    <div myDirective>Hello {{name}}</div>
  `,
  directives: [MyDirective]
})
export class App {
  constructor() {
    this.name = 'Angular2'
  }
}
ディレクティブにもコンポーネントと同じようにライフサイクルのメソッドフックが存在します。コンストラクタのDIで得たインスタンスをngOnInitで使用しています。
また、ディレクティブのselectorメタデータはmyDirective要素でも[myDirective]属性でも、もちろん.myDirectiveクラスでもかまいません。(あまり知られていませんしオススメもしませんが、実はコンポーネントのselectorも要素である必要はありません。)
*シンタックス:テンプレート化
ディレクティブの基本的なことをおさらいした上で、*記号について解説します。まずは上述のmyDirectiveディレクティブが実際にどのようなDOMを生成しているかを確認しましょう。Chromeの開発者ツールでみると、次のような構成になっています。my-app要素の中にテンプレートが展開され、その中でmydirective属性が付与されたdiv要素にスタイルが適用されています。
直感的だし、何も違和感のないDOM構造です。ここで、myDirectiveディレクティブに*記号を付けて実行するとどうなるか見てみましょう。
@Component({
  selector: 'my-app',
  template: `
    <div *myDirective>Hello {{name}}</div>
  `,
  directives: [MyDirective]
})
export class App {
  constructor() {
    this.name = 'Angular2'
  }
}
なんと、 <!--template bindings={}-->という謎のコメントを残してdiv要素が消えてしまいました!
要素の「テンプレート化」
myDirectiveに*プレフィックスをつけるとdiv要素が消えてしまいました。これは単に消えたのではなく、 「テンプレート化された」 のです。「テンプレート化」とは、要素をテンプレートとして保存し、いつでも複製できるようにする仕組みのことです。
わかりやすい例として、ngIfディレクティブのソースコードを見てみましょう。
@Directive({selector: '[ngIf]', inputs: ['ngIf']})
export class NgIf {
  private _prevCondition: boolean = null;

  constructor(private _viewContainer: ViewContainerRef, private _templateRef: TemplateRef) {}

  set ngIf(newCondition: any /* boolean */) {
    if (newCondition && (isBlank(this._prevCondition) || !this._prevCondition)) {
      this._prevCondition = true;
      this._viewContainer.createEmbeddedView(this._templateRef);
    } else if (!newCondition && (isBlank(this._prevCondition) || this._prevCondition)) {
      this._prevCondition = false;
      this._viewContainer.clear();
    }
  }
}
angular/ng_if.ts at master · angular/angular
ngIfディレクティブは、ngIfに与えられた値newConditionをもとに、要素を生成したり、削除したりします。この「生成」を行うためにテンプレートが必要なのです。つまり、*ngIfが付与された要素をテンプレートとしてngIfディレクティブが保持していて、そのテンプレートをもとに新しい要素を複製して表示しています。
これと同じ仕組みで*ngForも動作しています。ngForディレクティブの場合は生成する数が複数になるだけで、本質的にはngIfと何も変わりません。
*ngIfや*ngForのように、そのディレクティブが付与された要素そのものをテンプレートとして用いるときに、*シンタックスによるテンプレート化が必要なのです。
ViewContainerRefとTemplateRef
先ほどmyDirective要素に*プレフィックスをつけた際に要素が消えてしまったのは、テンプレート化しただけでそのテンプレートを元に要素を作っていなかったからです。myDirectiveでもテンプレートを使えるようにしてみましょう!
テンプレート化された要素はTemplateRefというクラスのインスタンスとしてDIできます。TemplateRefは*プレフィックスが付けられていないとDIできないので、基本的にはディレクティブはTemplateRefを使用するか、しないかのどちらかを決める必要があります。(※オプショナルなDIを使って切り替えることも可能)
テンプレートだけでは要素は生成できないので、テンプレートを元に要素を作ってくれるものもDIする必要があります。それがViewContainerRefです。ViewContainerRefはディレクティブが付与された要素「があった場所」をコンテナとして使うためのクラスです。ViewContainerRefとTemplateRefを使うことで、コンテナの中にテンプレートから生成された要素を配置することができます。
次の例ではmyDirectiveディレクティブを使って、同じ要素を2個生成するようにしています。
import {Component, Directive, ViewContainerRef, TemplateRef} from 'angular2/core'

@Directive({
  selector: "[myDirective]"
})
class MyDirective {

  constructor(
    private _template: TemplateRef,
    private _viewContainer: ViewContainerRef
  ) {}

  ngOnInit() {
    for(let i = 0; i < 2; i++) {
      this._viewContainer.createEmbeddedView(this._template);
    }
  }
}

@Component({
  selector: 'my-app',
  template: `
    <div *myDirective>Hello {{name}}</div>
  `,
  directives: [MyDirective]
})
export class App {
  constructor() {
    this.name = 'Angular2'
  }
}
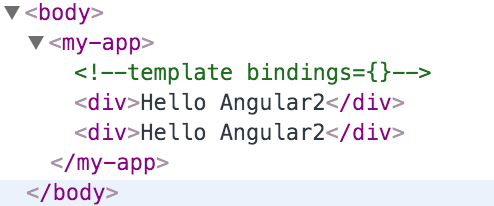
ViewContainerRefクラスのcreateEmbeddedViewメソッドにTemplateRefのインスタンスを渡すと、そのテンプレートを元に要素を生成し、コンテナに埋め込んでくれます。上記コードで生成されるDOMは次のようになります。
ご覧のとおり、my-appのテンプレートHTMLとはまったく違う構造になっています。テンプレート化を用いたディレクティブはコンポーネント側で定義したDOM構造を容易に破壊できてしまいます。なので明示的に*シンタックスを使わないかぎりTemplateRefは得られないようになっているのです。
<template>を使う方法
余談ですが、*シンタックスはtemplate要素で置き換えることができます。つまり、template要素によってテンプレート化が可能だということです。
先程の*myDirectiveを使った例はtemplate要素を使うと次のように書けます。
@Component({
  selector: 'my-app',
  template: `
    <template myDirective>
      <div>Hello {{name}}</div>
    </template>
  `,
  directives: [MyDirective]
})
export class App {
  constructor() {
    this.name = 'Angular2'
  }
}
template要素に*プレフィックスのないmyDirectiveを付与し、その中にテンプレート化したいHTMLを記述します。これで先ほどとまったく同じテンプレート化が可能です。
まとめ
Angular 2の*シンタックスはHTML要素のテンプレート化のためのものであり、*ngIfや*ngForなどの組み込みのディレクティブだけではなく、独自に使うことができる便利な機能です。ただし使いこなすのは簡単ではないので、コンポーネントによるビューの組み立てを身につけた後に習得して欲しい中級者向けのテクニックです。
今回のサンプルコードは Plunkerにあります。


