【追記】2022年4月12日に、Create-react-app v5.0.1がリリースされました。
Create-react-app V5.0.1では、
- @types/react v18.0.4
- @types/react-dom v18.0.0
にアップデートされています。
【記事投稿日】2022年4月8日現在です。
React 18が、2022年3月29日にリリースされました。
また、React 18用のtypescript定義ファイルも2022年4月7日にリリースされました。
最新の環境を「create-react-app」とゼロからで構築し比較してみます。
create-react-app
npx create-react-app r18 --template typescript
で、環境構築します。
package.jsonは、以下の通りです。@types/reactは、最新版ではなくReact17用です。
 "dependencies": {
    "@testing-library/jest-dom": "^5.16.4",
    "@testing-library/react": "^12.1.4",
    "@testing-library/user-event": "^13.5.0",
    "@types/jest": "^27.4.1",
    "@types/node": "^16.11.26",
    "@types/react": "^17.0.44",
    "@types/react-dom": "^17.0.15",
    "react": "^18.0.0",
    "react-dom": "^18.0.0",
    "react-scripts": "5.0.0",
    "typescript": "^4.6.3",
    "web-vitals": "^2.1.4"
  },
eslintは、以下の通り最新版の8.13.0です。
❯ npm ls eslint
r18@0.1.0
└─┬ react-scripts@5.0.0
  ├─┬ eslint-config-react-app@7.0.0
  │ ├─┬ @babel/eslint-parser@7.17.0
  │ │ └── eslint@8.13.0 deduped
  │ ├─┬ @typescript-eslint/eslint-plugin@5.18.0
  │ │ ├─┬ @typescript-eslint/type-utils@5.18.0
  │ │ │ └── eslint@8.13.0 deduped
  │ │ ├─┬ @typescript-eslint/utils@5.18.0
  │ │ │ └── eslint@8.13.0 deduped
  │ │ └── eslint@8.13.0 deduped
  │ ├─┬ @typescript-eslint/parser@5.18.0
  │ │ └── eslint@8.13.0 deduped
  │ ├─┬ eslint-plugin-flowtype@8.0.3
  │ │ └── eslint@8.13.0 deduped
  │ ├─┬ eslint-plugin-import@2.26.0
  │ │ └── eslint@8.13.0 deduped
  │ ├─┬ eslint-plugin-jest@25.7.0
  │ │ ├─┬ @typescript-eslint/experimental-utils@5.18.0
  │ │ │ └── eslint@8.13.0 deduped
  │ │ └── eslint@8.13.0 deduped
  │ ├─┬ eslint-plugin-jsx-a11y@6.5.1
  │ │ └── eslint@8.13.0 deduped
  │ ├─┬ eslint-plugin-react-hooks@4.4.0
  │ │ └── eslint@8.13.0 deduped
  │ ├─┬ eslint-plugin-react@7.29.4
  │ │ └── eslint@8.13.0 deduped
  │ ├─┬ eslint-plugin-testing-library@5.2.1
  │ │ └── eslint@8.13.0 deduped
  │ └── eslint@8.13.0 deduped
  ├─┬ eslint-webpack-plugin@3.1.1
  │ └── eslint@8.13.0 deduped
  ├─┬ eslint@8.13.0
  │ └─┬ eslint-utils@3.0.0
  │   └── eslint@8.13.0 deduped
  └─┬ react-dev-utils@12.0.0
    └─┬ fork-ts-checker-webpack-plugin@6.5.1
      └── eslint@8.13.0 deduped
webpackは5.72.0と、こちらも最新版です。
❯ npm ls webpack
r18@0.1.0
└─┬ react-scripts@5.0.0
  ├─┬ @pmmmwh/react-refresh-webpack-plugin@0.5.5
  │ └── webpack@5.72.0 deduped
  ├─┬ babel-loader@8.2.4
  │ └── webpack@5.72.0 deduped
  ├─┬ css-loader@6.7.1
  │ └── webpack@5.72.0 deduped
  ├─┬ css-minimizer-webpack-plugin@3.4.1
  │ └── webpack@5.72.0 deduped
  ├─┬ eslint-webpack-plugin@3.1.1
  │ └── webpack@5.72.0 deduped
  ├─┬ file-loader@6.2.0
  │ └── webpack@5.72.0 deduped
  ├─┬ html-webpack-plugin@5.5.0
  │ └── webpack@5.72.0 deduped
  ├─┬ mini-css-extract-plugin@2.6.0
  │ └── webpack@5.72.0 deduped
  ├─┬ postcss-loader@6.2.1
  │ └── webpack@5.72.0 deduped
  ├─┬ react-dev-utils@12.0.0
  │ └─┬ fork-ts-checker-webpack-plugin@6.5.1
  │   └── webpack@5.72.0 deduped
  ├─┬ sass-loader@12.6.0
  │ └── webpack@5.72.0 deduped
  ├─┬ source-map-loader@3.0.1
  │ └── webpack@5.72.0 deduped
  ├─┬ style-loader@3.3.1
  │ └── webpack@5.72.0 deduped
  ├─┬ terser-webpack-plugin@5.3.1
  │ └── webpack@5.72.0 deduped
  ├─┬ webpack-dev-server@4.8.1
  │ ├─┬ webpack-dev-middleware@5.3.1
  │ │ └── webpack@5.72.0 deduped
  │ └── webpack@5.72.0 deduped
  ├─┬ webpack-manifest-plugin@4.1.1
  │ └── webpack@5.72.0 deduped
  ├── webpack@5.72.0
  └─┬ workbox-webpack-plugin@6.5.2
    └── webpack@5.72.0 deduped
ゼロから構築
まずは、プロジェクト用のフォルダを作成します。
mkdir zero-start-react18
cd zero-start-react18
nodeプロジェクト開始
作成したフォルダに移動して、以下のコマンドでnodeプロジェクトを開始します。
npm init -y
エンターキーにて以下のレスポンスが返ります。
Wrote to /Users/yaruo-react-redux/zero-start-react18/package.json:

{
  "name": "yaruo-start-template-react18",
  "version": "1.0.0",
  "description": "",
  "main": "index.js",
  "scripts": {
    "test": "echo \"Error: no test specified\" && exit 1"
  },
  "keywords": [],
  "author": "",
  "license": "ISC"
}
ここまでは、以下から取得できます。
git clone -b 01_start-node-project https://github.com/yaruo-react-redux/yaruo-start-template-react18.git
webpackのインストール
webpackは、
- javascript
- cssファイル
- 画像ファイル
などをすべて JavaScript ファイルとして扱い、インストールしているライブラリファイ
ルなどもすべて含めて 1 つのファイルとして出力するバンドラー (まとめる) です。
実際には、画像、cssファイルはブラウザが並行ダウンドロードするので分割した方が効率が良いのでプラグインで分割します。
最近はViteが使われたりしているようです。ViteとWebpackを比較した良記事は、こちらにあります。
それでは、webpackをインストールします。
npm install -D webpack webpack-cli webpack-dev-server
- -D は、開発用にインストールしリリース用ビルドには含まれないようにするオプション
- webpack-cliは、コマンドラインインターフェイス用パッケージ
- webpack-dev-serverは開発用PC上で動作するwebサーバー
動作確認
webpackの動作を確認するために、プロジェクトフォルダ内に
- srcフォルダ
- distフォルダ
を作成します。
動作確認のために、lodashをインストールします。
lodashとは?
配列操作、オブジェクト操作、数値操作など、いろいろな機能をまとめているJavaScriptのライブラリです。
npm install lodash
srcフォルダ内に、「index.js」ファイルを作成し、以下のコードを追加します。
import _ from 'lodash';

function component() {
  const element = document.createElement('div');
  // Lodash, now imported by this script
  element.innerHTML = _.join(['webpack', '動いてるお〜'], ' ');
  return element;
}

document.body.appendChild(component());
distフォルダ内に、「index.html」ファイルを作成し、以下のコードを追加します。
<!DOCTYPE html>
<html>
  <head>
    <meta charset="utf-8" />
    <title>Getting Started</title>
  </head>
  <body>
    <script src="main.js"></script>
  </body>
</html>
ターミナルでプロジェクトフォルダへ移動し以下のコマンドを入力します。
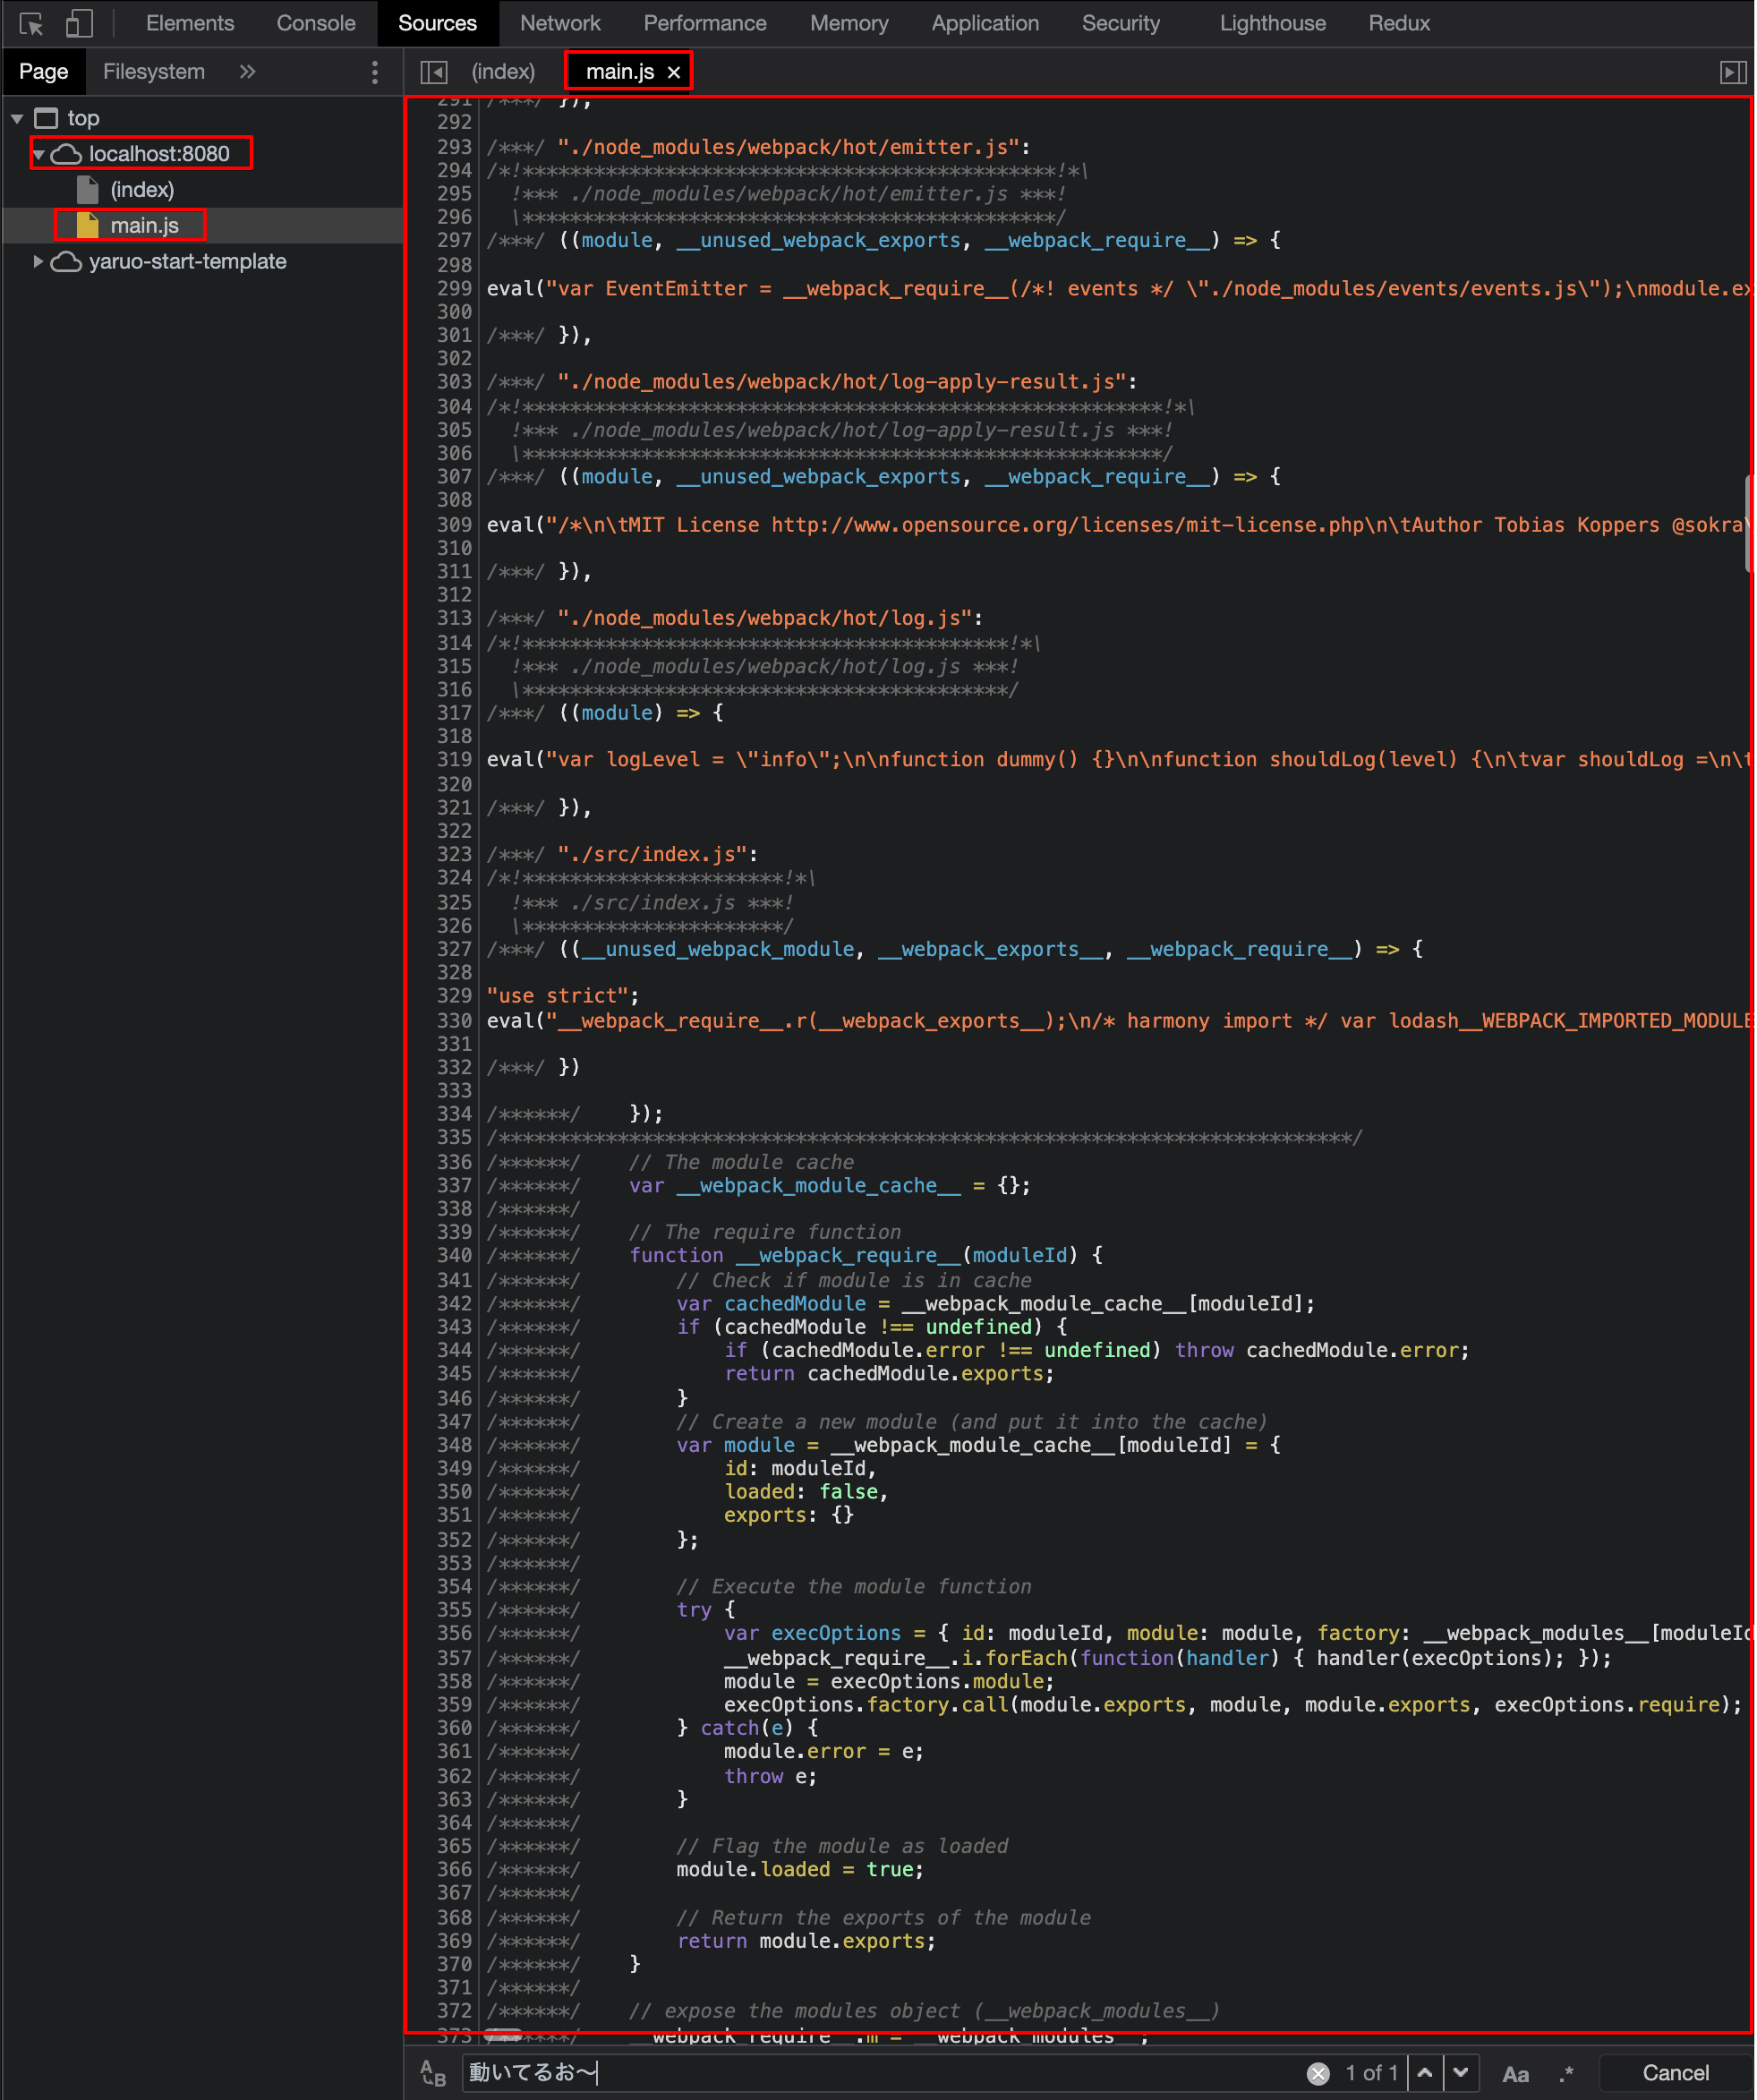
npx webpack serve --open --static-directory dist --mode=development;
既定のブラウザが開き、コードが実行され「webpack 動いてるお〜」と表示されます。devToolsを開くと、沢山のモジュールに分割されていたものがmain.jsファイルにまとめてあるのを確認できます。
npx webpack build
を実行すると、distフォルダに「main.js」が作成され圧縮されているのを確認できます。
以上で、インストールしたwebpackの動作確認ができました。ここまでは、以下から取得することができます。
git clone -b 02_webpack-install https://github.com/yaruo-react-redux/yaruo-start-template-react18.git
WebPack設定ファイルの作成
動作確認で作成されたmain.jsファイルには、プロジェクトに現時点では含まれていない「画像ファイル」「cssファイル」は含まれていませんが、もし画像などが含まれていれば、纏められてしまいます。
現在のブラウザは効率を上げるため、HTMLファイルを取得した後、表示に必要な「javascriptファイル」「画像ファイル」「CSSファイル」を並行してダウンロードします。
そのために、webpackにも、画像、CSSファイルなどを別ファイルとして出力するように設定ファイルを作成します。
Webpack設定ファイル作成手順
- コマンドで雛形を作成
- 作成された雛形を編集
- 必要なプラグインをインストール
- 開発用、リリース版、共用版に分ける
1. コマンドで雛形を作成
以下のコマンドを入力すると、質問が表示されますので順番に答えていきます。
npx webpack-cli init
この作業をするために「@webpack-cli/generators」パッケージが必要なのでインストールしますか?
と聞かれますので、エンターキーを押します。
パッケージのインストールが終了すると質問が開始されますので、選択枝がある場合には上下カーソルキーで選択し、「Y/n」などはエンターキー(既定の選択枝ー大文字)または、キーボードで文字を入力します。
完了するとプロジェクトフォルダに、「webpack.config.js」「tsconfig.json」(typescriptを使用するを選択した場合)が作成されます。
「tsconfig.json」ファイルは、後ほどtypescriptをインストールしたときに改めて作成しますので削除します。
作成された「webpack.config.js」
// Generated using webpack-cli https://github.com/webpack/webpack-cli

const path = require("path");
const HtmlWebpackPlugin = require("html-webpack-plugin");
const MiniCssExtractPlugin = require("mini-css-extract-plugin");

const isProduction = process.env.NODE_ENV == "production";

const stylesHandler = MiniCssExtractPlugin.loader;

const config = {
  entry: "./src/index.ts",
  output: {
    path: path.resolve(__dirname, "dist"),
  },
  devServer: {
    open: true,
    host: "localhost",
  },
  plugins: [
    new HtmlWebpackPlugin({
      template: "index.html",
    }),

    new MiniCssExtractPlugin(),

    // Add your plugins here
    // Learn more about plugins from https://webpack.js.org/configuration/plugins/
  ],
  module: {
    rules: [
      {
        test: /\.(ts|tsx)$/i,
        loader: "ts-loader",
        exclude: ["/node_modules/"],
      },
      {
        test: /\.css$/i,
        use: [stylesHandler, "css-loader"],
      },
      {
        test: /\.s[ac]ss$/i,
        use: [stylesHandler, "css-loader", "sass-loader"],
      },
      {
        test: /\.(eot|svg|ttf|woff|woff2|png|jpg|gif)$/i,
        type: "asset",
      },

      // Add your rules for custom modules here
      // Learn more about loaders from https://webpack.js.org/loaders/
    ],
  },
  resolve: {
    extensions: [".tsx", ".ts", ".js"],
  },
};

module.exports = () => {
  if (isProduction) {
    config.mode = "production";
  } else {
    config.mode = "development";
  }
  return config;
};
2.作成された雛形を編集
作成された「webpack.config.js」を編集します。
- entry: "./src/index.ts" -->entry: "./src/index.js"
- path: path.resolve(__dirname, "dist") --> path: path.resolve(__dirname, "public")
プロジェクトフォルダ内の「src」フォルダを削除し「public」フォルダを作成します。
3.必要なプラグインをインストール
以下のwebpackプラグインをインストールします。
- uglify-js
- リリース版出力時にconsole関数を除去するため
- terser-webpck-plugin
- uglify-jsを使用するために必要
- css-minimizer-webpack-plugin
- CSSファイルを圧縮する
- webpack-merge
- 開発用、リリース用、共用に設定ファイルを分けた場合に、共用とそれぞれを合わせるため
インストールは、ターミナルから以下のコマンドを実行します。
npm install -D uglify-js terser-webpack-plugin css-minimizer-webpack-plugin webpack-merge
ここまでは、以下から取得できます。
git clone -b 03_webpack-config-file https://github.com/yaruo-react-redux/yaruo-start-template-react18.git
この記事での各項目での動作確認方法などを詳しく解説した本を以下で販売しています。