はじめに
恥ずかしながら、WebSocketを自分でやってみたことが無かった。
Node.jsもおそらくやったこと無かった。
そんな中、ここ最近は検証用にスマートフォン(iPhone/Android)のアプリを書くことが増えていて、つまりは手元のPC上のVMにアクセスするというのはいろいろ面倒もあり、Cloud上のランタイムを使用することが増えてきた。
ということで、タイトルの通り、Node.jsでWebSokectをやってみるに当たって、環境は手元がEclipseで、実稼働はBluemixというのをやってみようと思った。
やったことの流れ
1. Node.jsをインストールする
2. Eclipse(Luna)をインストールする
3. EclipseのPlug-inをインストールする(Node.js用)
4. EclipseのPlug-inをインストールする(Bluemix用)
5. プロジェクトの作成とコードを書く
6. Bluemixで稼働させる
こんな流れです。WindowsでもMacでも全く同じ流れで、同じことをしてともに動作しました。以下は、Macでの実行例。
Node.jsをインストールする
普通のことなので、特に記載しませんが、公式サイトからご自身の環境用のイメージをダウンロードして、インストールするのみ。
Eclipse(Luna)をインストールする
これも普通のことなので、特に記載しません。
こちらからどうぞ。
EclipseのPlug-inをインストールする(Node.js用)
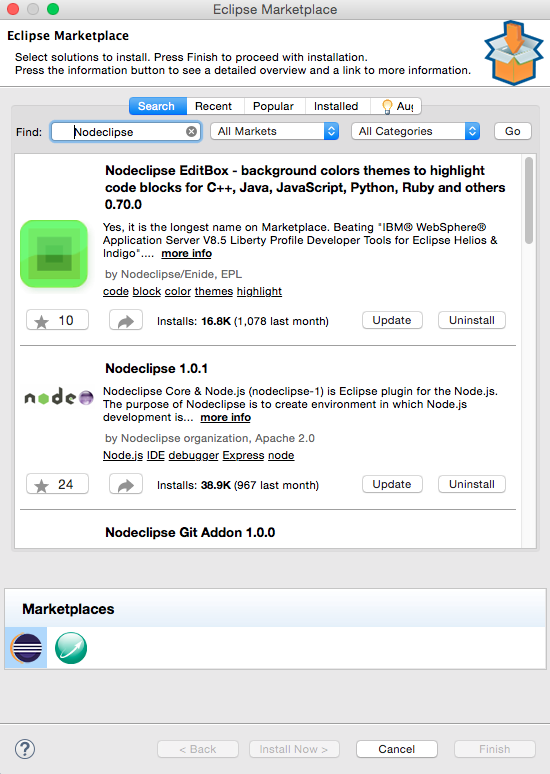
まずはEclipseを起動し、メニューのHelp>Eclipse Marcketplace...をクリック。
Nodeclipseを検索して、インストール。
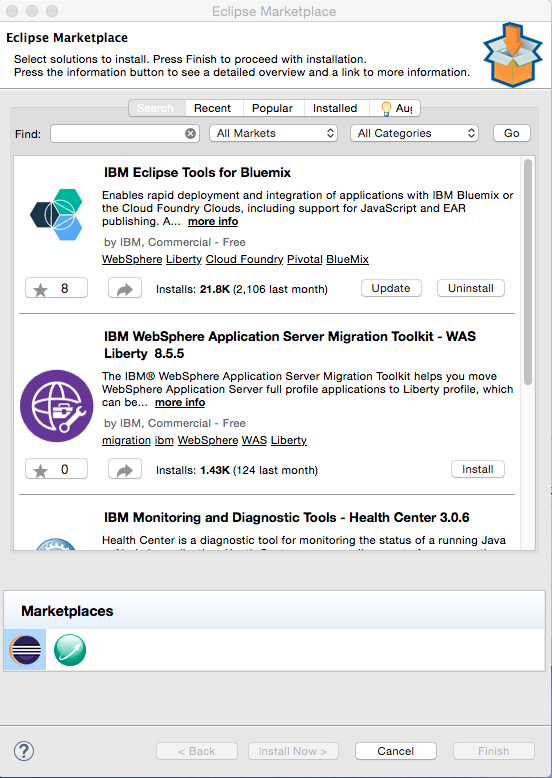
EclipseのPlug-inをインストールする(Bluemix用)
おなじく、IBM Eclipse Tools for Bluemixを検索してインストール。
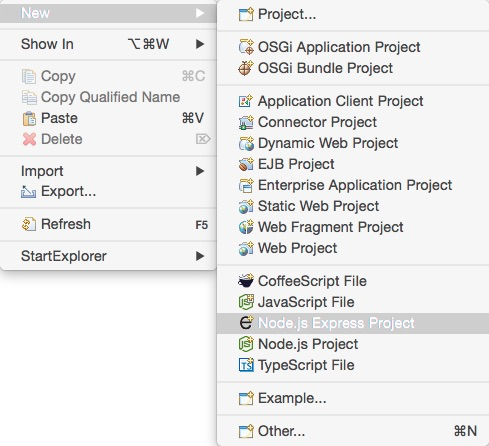
プロジェクトの作成とコードを書く
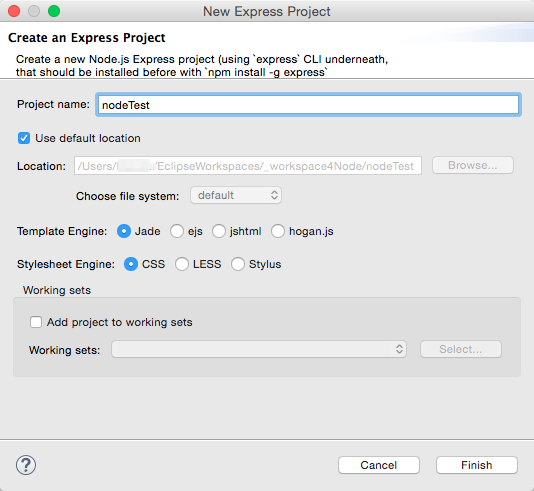
まずはプロジェクトの作成。今回はExpressを使うことにしました。
名前を入力してFinish。
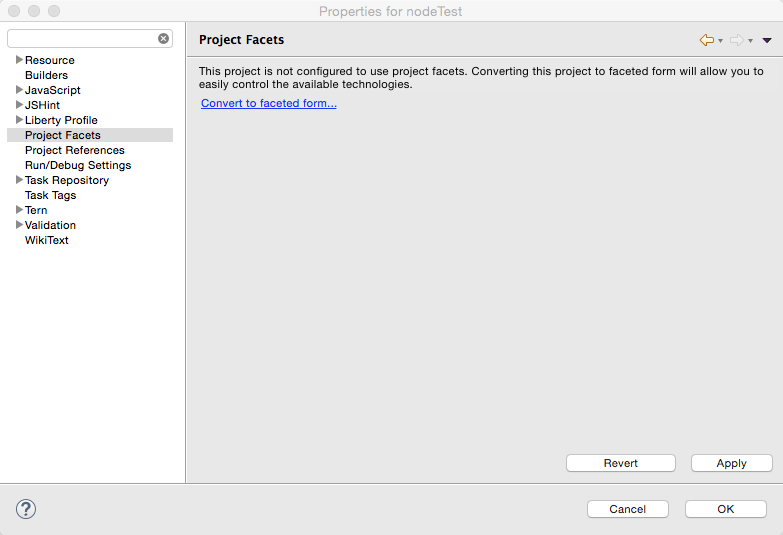
Bluemixで使えるようにおまじないをかけるため、プロジェクトを選択後、右クックしてPropertiesをクリック。

Project Facetsを選択後、Convert to faceted from...をクリック。
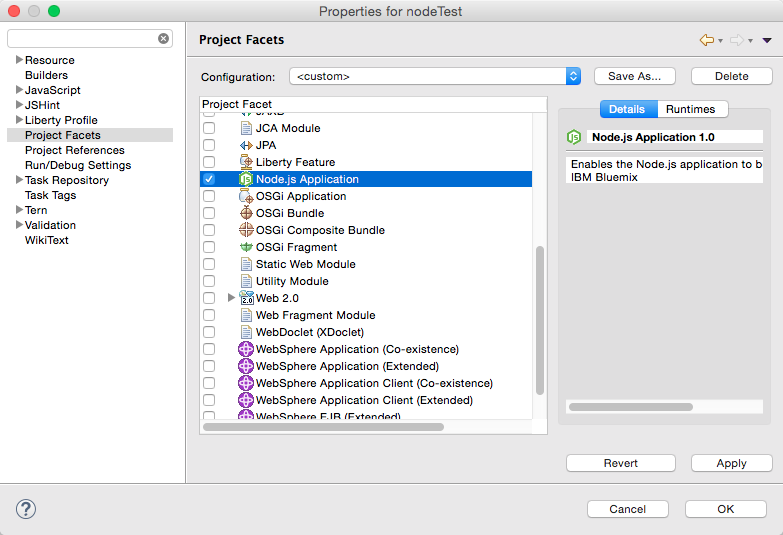
Node.js Applicationを選択しOKボタンクリック。
(チェックボックスだけで無く、行自体も選択すると以下のスクリーンショットの状態に。)
ここでやっとコードを書く。自動生成されているapp.jsを開く。
まずは、WebSocket用のモジュールを追加する。
var express = require('express')
  , routes = require('./routes')
  , user = require('./routes/user')
  , http = require('http')
  , path = require('path')
  , webSocket = require('ws');
元からあるHTTPをListenするステートメントは一旦コメント化して、http://~ と ws://~ の両方を同じポートでListenし、WebSocket用のコードを挿入する。
//http.createServer(app).listen(app.get('port'), function(){
//  console.log('Express server listening on port ' + app.get('port'));
//});

var server = http.createServer(app);

var WebSocketServer = webSocket.Server;
var wss = new WebSocketServer({server: server});

var connections = [];

wss.on('connection', function (ws) {
    connections.push(ws);
    ws.on('close', function () {
        connections = connections.filter(function (conn, i) {
            return (conn === ws) ? false : true;
        });
    });
    ws.on('message', function (message) {
        console.log('message:', message);
        ws.send(JSON.stringify(message));
    });
});

server.listen(app.get('port'), function(){
  console.log('Express server listening on port ' + app.get('port'));
});
これだけだと動作確認できないので、publicディレクトリにindex.htmlを作成する。
JavaScriptも一緒に埋め込む。
<!DOCTYPE html>
<html>
<head>
<meta charset="UTF-8">
<title>Insert title here</title>
</head>
<body>

<div>
	<input id='message' type='text' />
</div>
<div>
	<input type='submit' value='send' onclick='send()' />
</div>
<div id='messages'> </div>
<script>

console.log(window.document.location.host);
var webSocket = new WebSocket('ws://' + window.document.location.host);

webSocket.onerror = function(event) {
	alert(event.data);
};

webSocket.onopen = function(event) {
	console.log('onOpen');
	document.getElementById('messages').innerHTML = 'Connection Established';
};

webSocket.onmessage = function(event) {
	console.log('onMessage/event.data: ' + event.data);
	document.getElementById('messages').innerHTML += '<br />' + event.data;
};

webSocket.onclose = function(event) {
	document.getElementById('messages').innerHTML += 'Connection Closed!!!';
};

function send() {
	console.log('send');
	var text = document.getElementById('message').value;
	webSocket.send(text);
	return false;
};
</script>

</body>
</html>
これで、ローカルで動くはず。
app.jsを右クリックして、Run As > Node Application で稼働させる。
ブラウザで、http://localhost:3000/index.html へアクセスする。
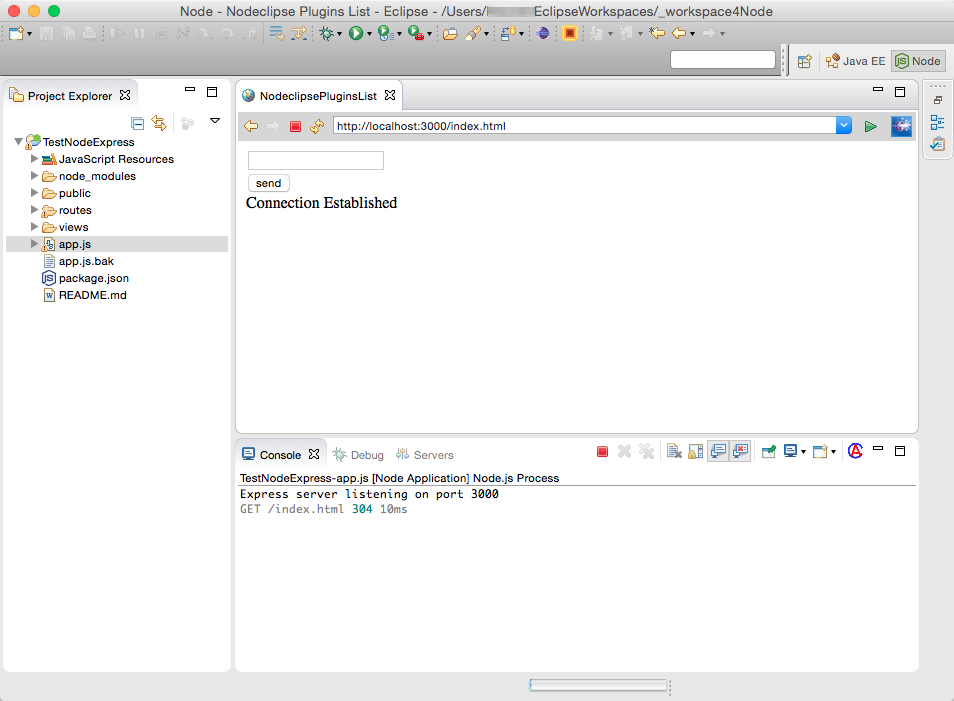
送ったメッセージが全クライアントへ送信される方が例としてはよかったかな?と今更ながら...
Node.jsを終わらせるのを忘れて、もう一度起動すると3000番ポートが使えないので怒られてしまう。使わなくなったら赤いボタンで終了すること。
Bluemixで稼働させる
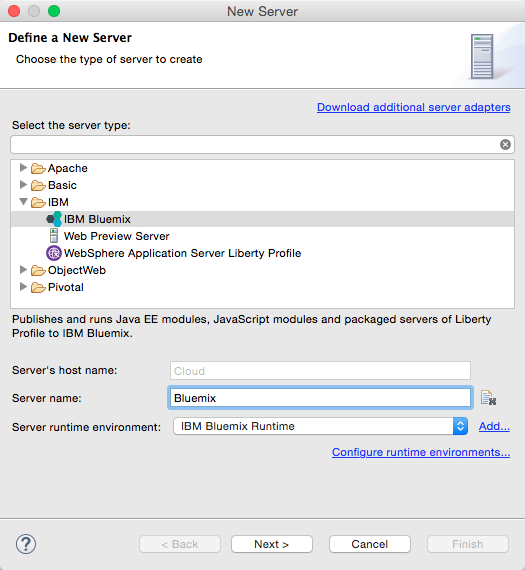
他の方の記録では、app.js自体を右クリックしてRun as > Run On Serverをクリックする流れを残されている方もいらっしゃいましたが、私の環境ではその流れはとれなかったので以下の方法をとりました
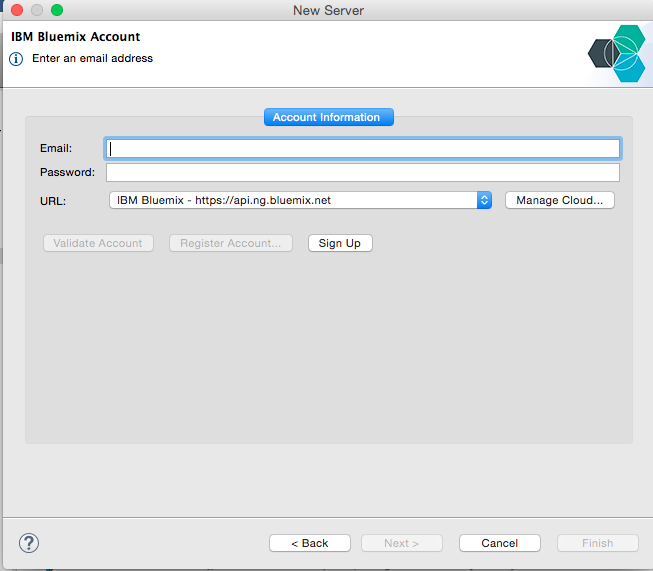
サーバー・ビューで右クリックして、New > ServerからBluemixサーバーをEclipse上に構成する。
IDとパスワードを入力して、Nextをクリック
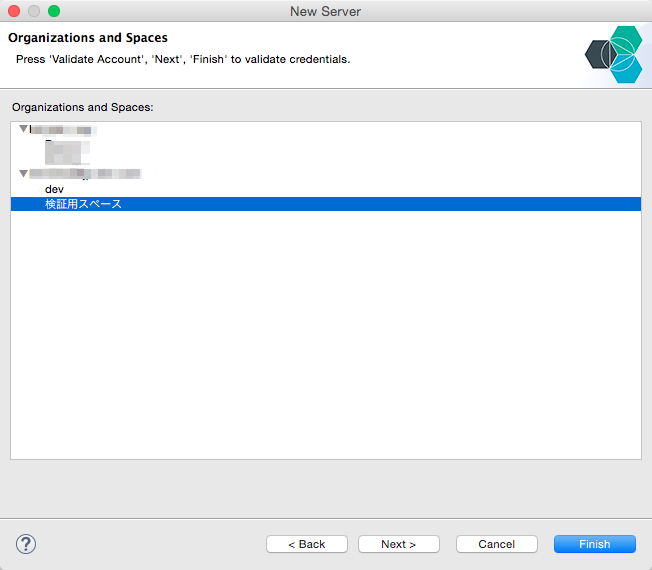
スペースを選択してFinishをクリック
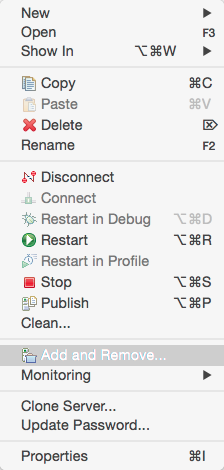
作成したServerを右クリックして、Add and Removeをクリック
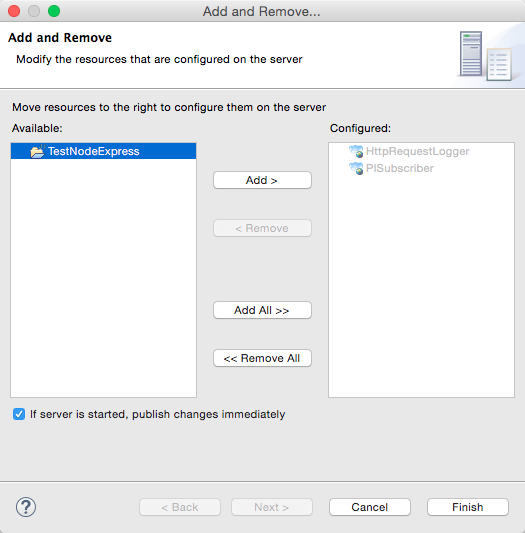
作成したプロジェクトを選択してAddをクリック、Fishishをクリック
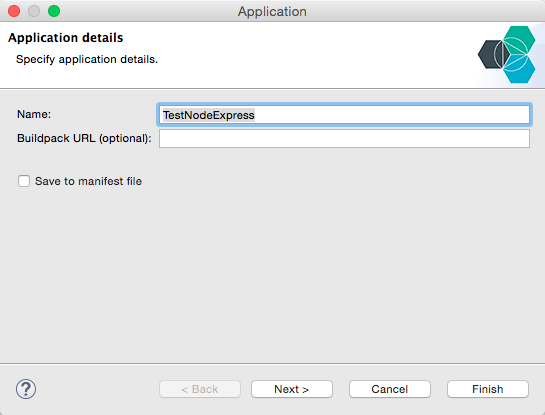
Nameを入力してNextをクリック
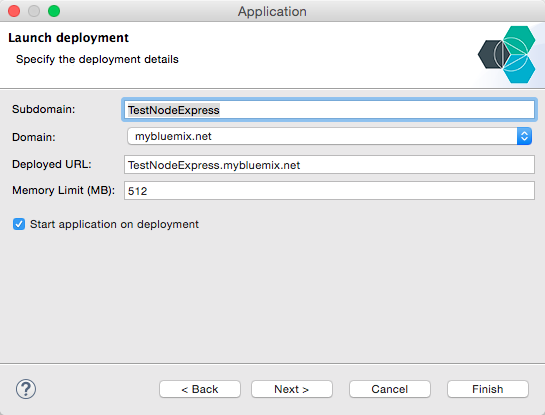
Finishをクリック
これでBluemix上に配置されたので、実際にアクセスしてみる。
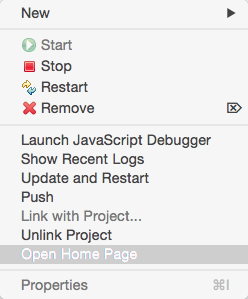
サーバー・ビューでアプリを選択して右クリックし、Open Home Pageでアクセス。
URLにindex.htmlを付加する。

最後に
BluemixへアプリをPushするタイミングでエラーとなることがある。特にアプリ起動が実行されたあと、すぐに停止してしまうようなことがある。そもそもローカル環境では問題が起こっている場合はそこで解決策を探るべきだが、手元では起こっていない場合はやっかいである。
Bluemixはアプリが起動していないときにログが見えないからだ。
そんなときは、Plug-inの機能を試してみるとよい。
サーバービューでアプリを右クリックし、Show Recent Logsをクリックすると、見たかったログが見える。是非参考にしてほしい。