はじめに
MNISTの手書き数字画像を利用して,簡単な超解像をやってみました。
全体のコードはGitHubにアップロードしました。
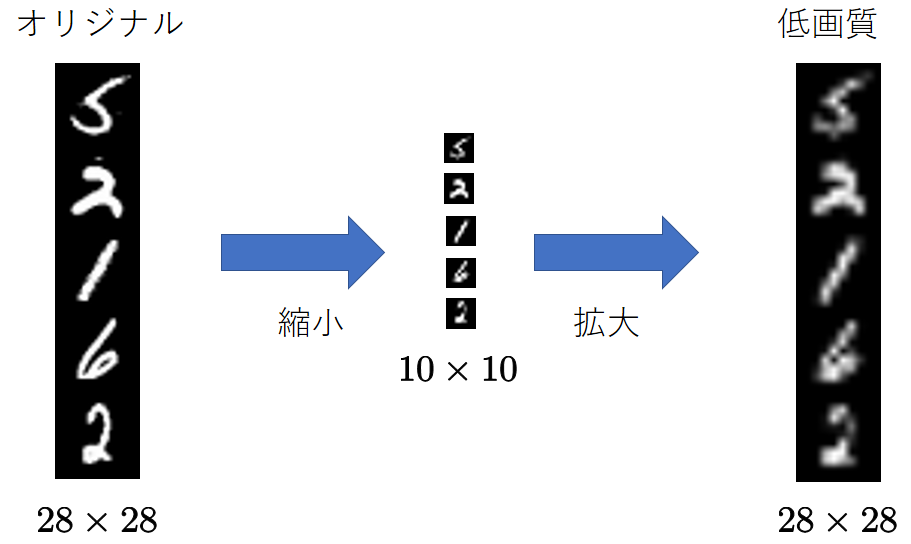
低画質データの作成
$28\times 28$の手書き数字画像を$10\times 10$に縮小します。
これをまた$28\times 28$に拡大します。

縮小した際に情報が失われるので,当然ぼやけたような画像になっています。
高解像化モデル
ぼやけた低画質画像を入力するとオリジナルに近い画像が出力されるように学習します。
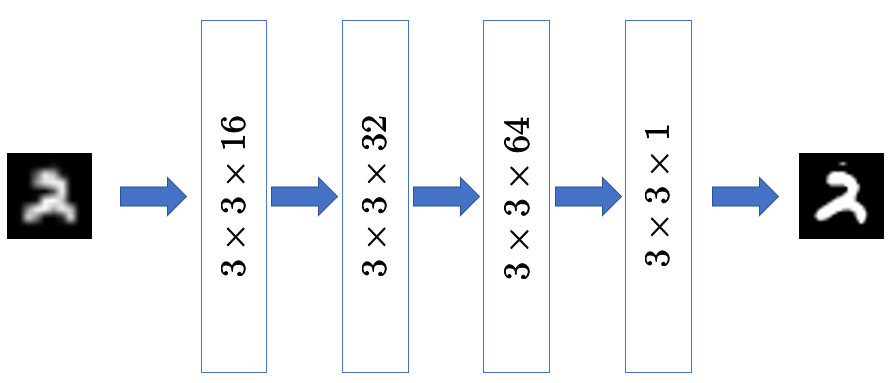
4層の畳み込みニューラルネットワークを使いました。
中間層の活性化関数はReLUとし,出力層のみ各画素値を$[0,1]$に収めるためにシグモイド関数を使用しています。
また,各層にBatch normalizationを適用しました。
以下にモデル定義部分のコードを示します。
実装はChainerで行いました。
import cv2
import numpy as np
import chainer
from chainer.backends import cuda
from chainer import Function, gradient_check, report, training, utils, Variable
from chainer import datasets, iterators, optimizers, serializers
from chainer import Link, Chain, ChainList
import chainer.functions as F
import chainer.links as L
from chainer.training import extensions

class CNNAE(Chain):
	def __init__(self):
		super().__init__()
		with self.init_scope():
			N = 16
			kwds = {"ksize": 3, "stride": 1, "pad": 1, "nobias": True}
			self.conv1 = L.Convolution2D(1, N, **kwds)
			self.bn1 = L.BatchNormalization(N)
			self.conv2 = L.Convolution2D(N, N*2, **kwds)
			self.bn2 = L.BatchNormalization(N*2)
			self.conv3 = L.Convolution2D(N*2, N*4, **kwds)
			self.bn3 = L.BatchNormalization(N*4)
			self.conv4 = L.Convolution2D(N*4, 1, ksize=3, stride=1, pad=1)

	def forward(self, x):
		# 低画質画像をもとに戻す
		h = F.relu(self.bn1(self.conv1(x)))
		h = F.relu(self.bn2(self.conv2(h)))
		h = F.relu(self.bn3(self.conv3(h)))
		h = F.sigmoid(self.conv4(h))

		return h

	def __call__(self, x, t):
		# 高解像度化
		h = self.forward(x)
		# オリジナルとの誤差を算出
		loss = F.mean_squared_error(h, t)
		report({"loss": loss}, self)
		return loss
学習
モデルの出力とオリジナル画像の平均二乗誤差が小さくなるように学習します。
つまり,以下の損失関数をモデルのパラメータ$\theta$について最小化します。
{\cal L}(\theta)=\mathbb{E}\left[ \| y-f(x;\theta) \|^2 \right]
ただし,$f(\cdot;\theta)$がモデル,$x$が入力画像(低画質),$y$がオリジナル画像を表します。
最適化アルゴリズムはAdam,バッチサイズは64としました。
以下に学習部分のコードを示します。
# MNISTデータセットの取得
train, test = datasets.get_mnist(withlabel=False, ndim=3)

# 入力画像を作成する
# 10x10に縮小してからもとのサイズに拡大して低画質化
train_boke = F.resize_images(train, (10,10))
train_boke = F.resize_images(train_boke, (28,28)).array
test_boke = F.resize_images(test, (10,10))
test_boke = F.resize_images(test_boke, (28,28)).array

# 低画質画像とオリジナル画像のペアにする
train = datasets.TupleDataset(train_boke, train)
train_iter = iterators.SerialIterator(train, 64, shuffle=True, repeat=True)
test = datasets.TupleDataset(test_boke, test)
test_iter = iterators.SerialIterator(test, 64, shuffle=False, repeat=False)

model = CNNAE()	# 超解像モデル作成
opt = optimizers.Adam()	# 最適化アルゴリズムとしてAdamを選択
opt.setup(model)

# 学習の準備
updater = training.updaters.StandardUpdater(train_iter, opt)
trainer = training.Trainer(updater, (10,"epoch"))
# テストの設定
evaluator = extensions.Evaluator(test_iter, model)
trainer.extend(evaluator)
# 学習経過の表示設定
trainer.extend(extensions.LogReport())
trainer.extend(extensions.PrintReport(["epoch", "main/loss", "validation/main/loss"]))
trainer.extend(extensions.ProgressBar())

# 学習開始
trainer.run()
結果
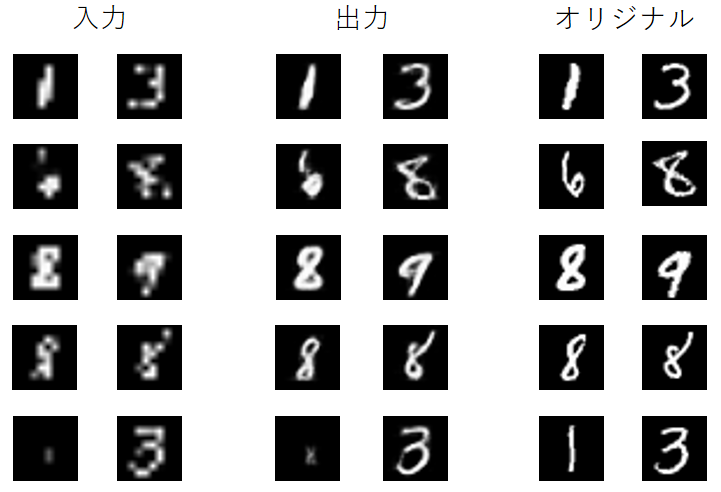
以下に10エポック学習したモデルでテストデータを入力した結果を示します。

一見何の数字か分からないような入力も,オリジナルに近く復元できています!
(さすがに完全に潰れているとダメですが・・・)
おわりに
MNISTを題材にして超解像を試しました。
今回行ったのは,ぼやけた画像とオリジナル画像のペアで教師あり学習するという単純なものですが,そこそこ復元できました。
大きな画像や一般物体のようなバリエーションの多い画像だと工夫しなければここまで上手くは行かないと思いますが,入門としては面白いと思います。
