はじめに
awsのCodeBuildを使ってlambda(node.js環境)をテスト→デプロイする方法について記載する。
CodeBuildとはビルド、テスト、デプロイを目的としたサーバー環境をクラウド上に用意してくれるawsフルマネージドサービスで、awsの各種サービスと連携しやすいように作られたJenkinsサーバ的なイメージ。
CodeBuildを使ったデプロイ動作の流れ
CodeBuildを使った動作の流れは以下の通り。
- ソースリポジトリからコードを取得
- ビルド
- テスト
- デプロイ
以下詳細を説明する。
今回は、
ソースリポジトリはaws CodeCommit、
テストはmocha、
デプロイはaws cli経由でaws CloudFormationを使用する。
以下作業の順に説明する。
(1)CodeCommitにリポジトリを用意する
(2)CodeBuildのプロジェクト(テストのみ)を作成する
(3)CodeBuildのプロジェクト(テストのみ)を実行する
(4)CodeBuildのプロジェクト(テスト→デプロイ)を作成する
(5)CodeBuildのプロジェクト(テスト→デプロイ)を実行する
(1)CodeCommitにリポジトリを用意する
CodeCommitにnode.jsプロジェクトを用意する
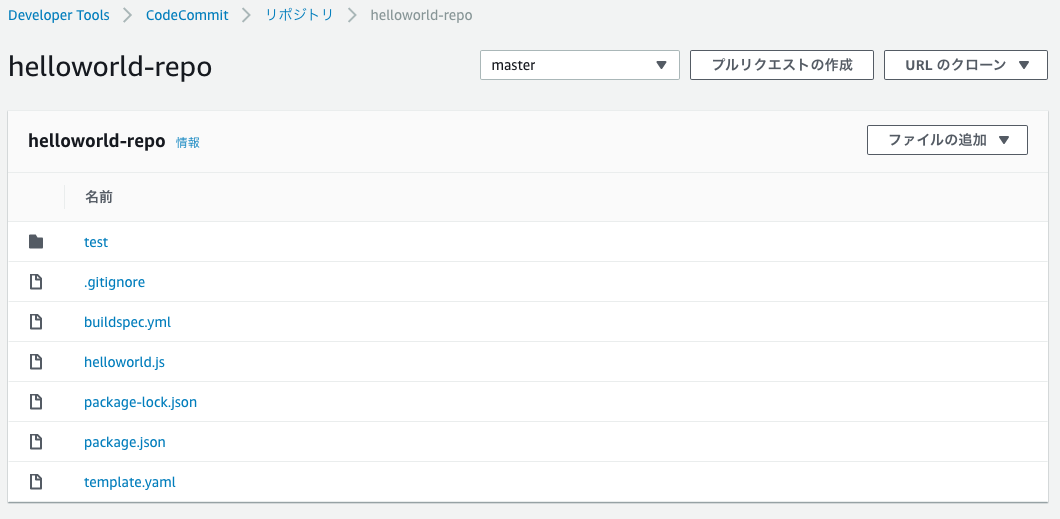
CodeBuildの設定に入る前に、CodeCommitにリポジトリを作成し、node.jsのコードをコミットしておく。
リポジトリ名は helloworld-repo。
npm installでmochaとexpectをインストール。
テストモジュールはmochaを使用。
※なおnode.js、npm、mochaの使い方等に関する説明は本題から外れるため割愛する
以下にpackage.json、helloworld.js、test/helloworld.test.jsを記載する。
{
  "name": "helloworld-repo",
  "version": "1.0.0",
  "description": "",
  "main": "index.js",
  "scripts": {
    "test": "mocha"
  },
  "repository": {
    "type": "git",
    "url": "https://git-codecommit.ap-northeast-1.amazonaws.com/v1/repos/helloworld-repo"
  },
  "author": "",
  "license": "ISC",
  "devDependencies": {
    "expect": "^23.6.0",
    "mocha": "^5.2.0"
  }
}
function hello() {
    return 'hello world';
}

module.exports = hello;
const expect = require('expect');
const hello = require('../helloworld');

describe('hello world test', () => {
    it('func hello() return value', () => {
        expect(hello()).toBe('hello world');
    });
});
CodeBuildのビルド仕様(buildspec.yml)を記述する
buildspec.ymlとはCodeBuildを使ってどのようにビルドしていくかを定義するビルド仕様ファイルである。デフォルトではリポジトリのルート直下に配置することになっている。
ビルド仕様記述に関するリファレンスは以下参照。
https://docs.aws.amazon.com/ja_jp/codebuild/latest/userguide/build-spec-ref.html
今回は以下のようにビルド仕様を記載。
version: 0.2

phases:
  install:
    runtime-versions:
      nodejs: 8
    commands:
      - npm install
  pre_build:
    commands:
      - npm test
versionの記載は必須。
CodebuildのDocker イメージにUbuntu Standard Image 2.0 以降を使用する場合は、上記runtime-versionsの記述が必要になります。**そうでなければ不要。**詳細は公式Doc参照(2019/09/03追記)。
Ubuntu Standard Image 2.0 以降を使用して、runtime-versionsを指定しないと以下のエラーが出ます(2019/09/03追記)。
YAML_FILE_ERROR Message: This build image requires selecting at least one runtime version.
buildspec.ymlの説明に戻ります。
phasesはinstall, pre_build, build, post_buildがあり、フェーズを区切って実行したい処理を書いていく。
どのコマンドが使えるか分からないよ、実行環境が知りたいよという場合は以下を参照。
https://docs.aws.amazon.com/ja_jp/codebuild/latest/userguide/build-env-ref-available.html
CodeBuildのサーバイメージとして、各言語ごとにubuntuのDockerイメージが用意されており、試すことができる。
今回はinstallフェーズでnpm installを実行し、pre_buildでnpm testを実行するようbuildspec.ymlに記載。
(2)CodeBuildのプロジェクトを作成する
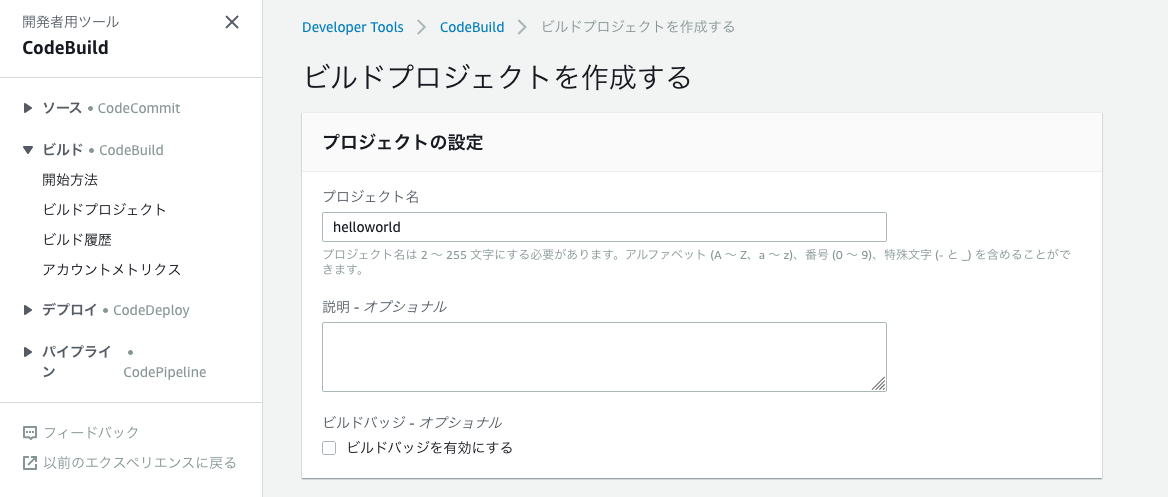
CodeBuildコンソールを開き、プロジェクトの作成を選択すると、プロジェクトの設定画面が開く。
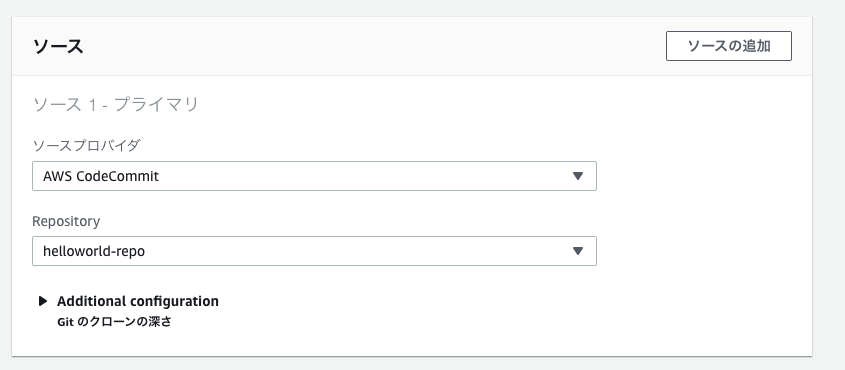
ソースプロバイダはCodeCommit、Repositoryはさきほど作成したhelloworld-repoとする。
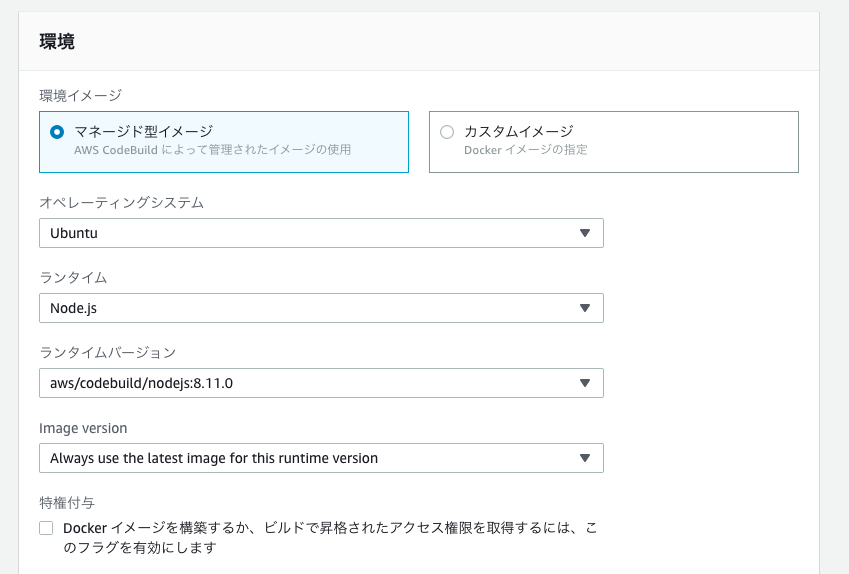
環境は、ランタイムnode.js、ランタイムバージョンはnode.js 8.10とする。
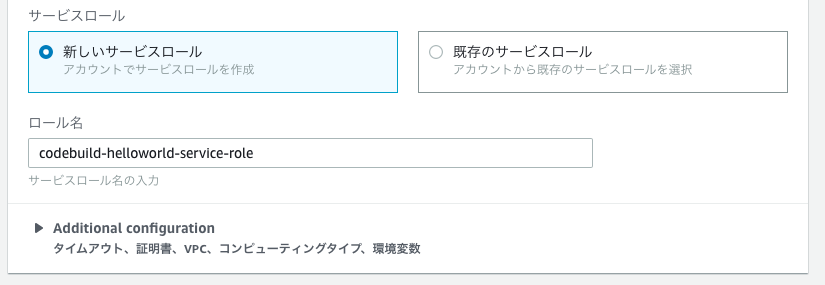
サービスロールはデフォルト。
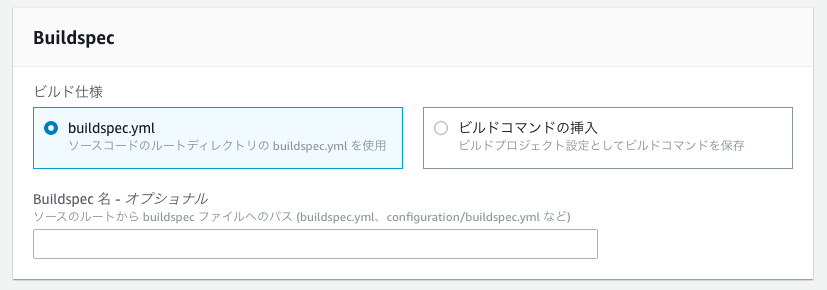
Buildspecに関してもデフォルト。リポジトリのルート直下にあるbuildspec.ymlを使う。
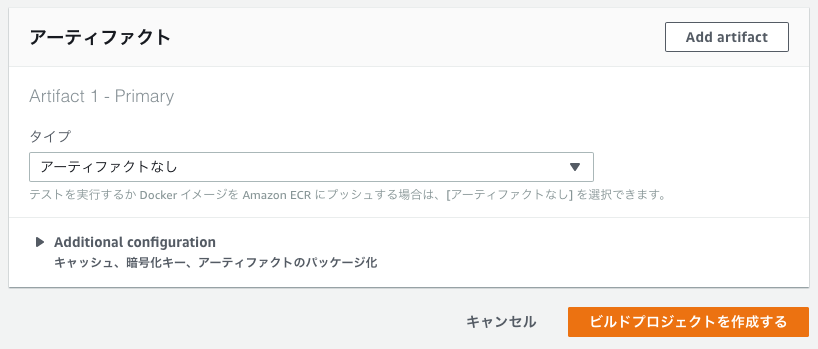
アーティファクトもデフォルトのままで、ビルドプロジェクトを作成する。
(3)CodeBuildのプロジェクトを実行する
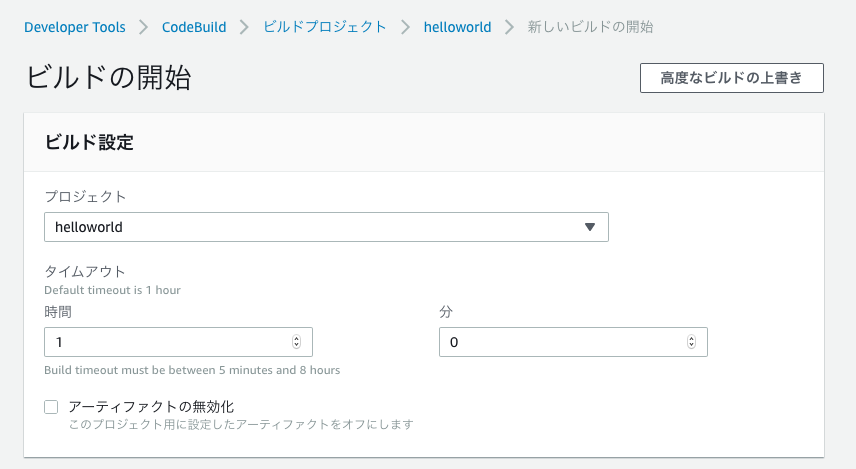
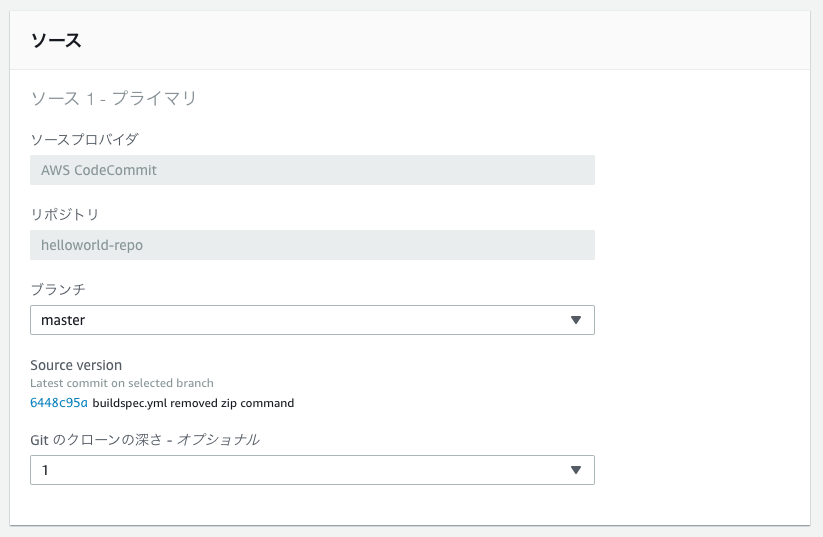
CodeBuildのコンソールで「ビルドの開始」を選択する。
ビルド設定とソースの設定は必要に応じて修正する(今回はデフォルトのまま)。
実行すると以下のログが出る。
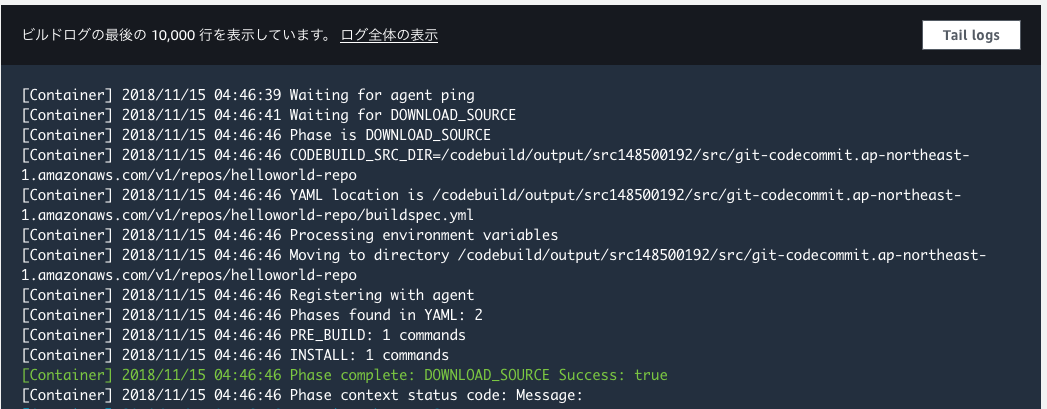
CodeCommitの指定したリポジトリからソースをダウンロードしたことが確認できる。
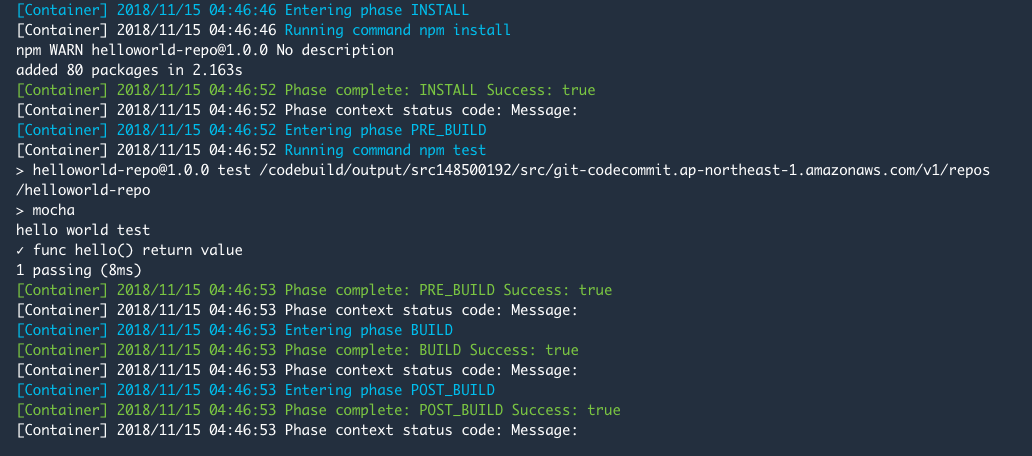
installフェーズでnpm install、pre_buildフェーズでnpm testが実行され、テスト結果に問題がないことが確認できる。
(4)CodeBuildのプロジェクト(テスト→デプロイ)を作成する
(3)まではCodeBuildのサーバ上でソースを取得してテストを実行するだけだった。ここからはnode.jsプロジェクトをlambdaにデプロイする方法を説明する。
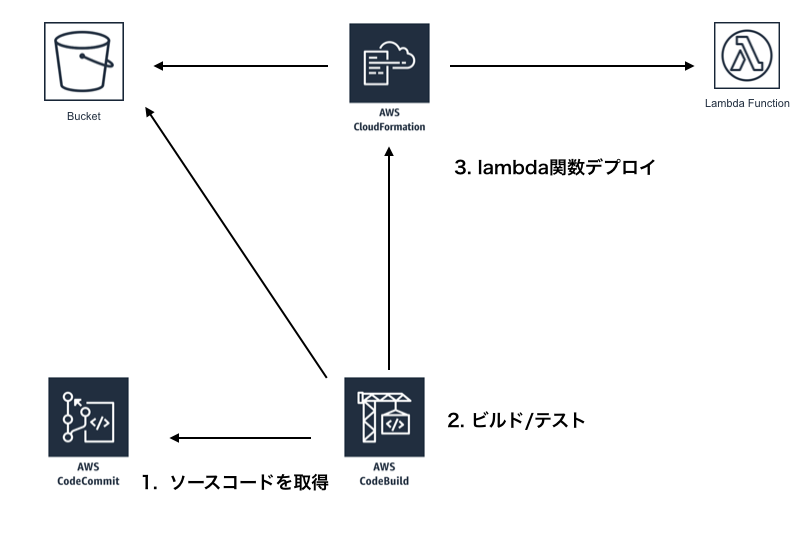
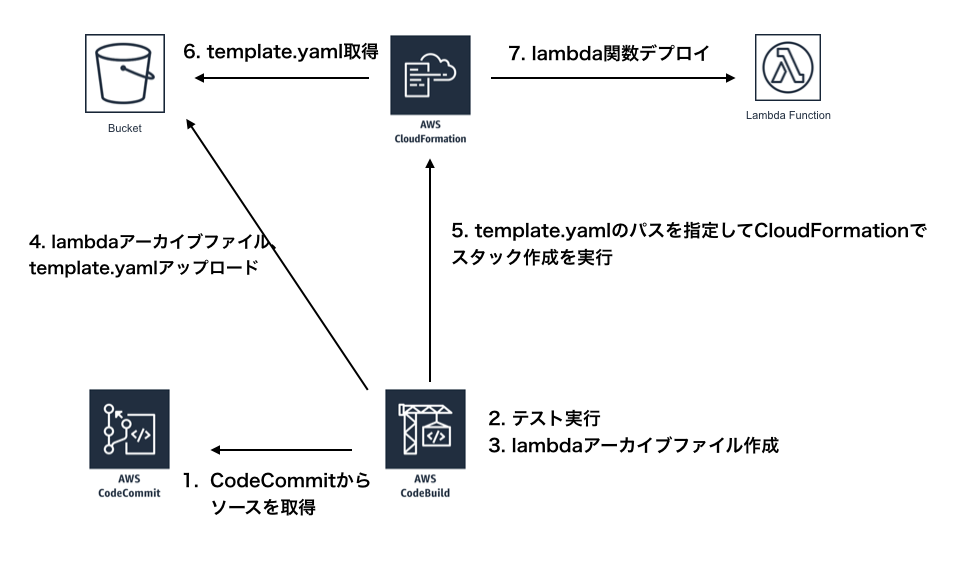
デプロイ実行までの一連の流れを以下の図に示す。
- CodeBuildがCodeCommitリポジトリからソース(コード)を取得する
- リポジトリのルート配下にあるbuildspec.ymlに基づきCodeBuild上で処理が走る。テスト実行。
- テスト結果に問題なければlambdaアーカイブファイル作成
- デプロイの準備として、s3にlambdaアーカイブファイルとCloudFormationで使用するテンプレートファイル(template.yaml)をアップロードする
- aws cliでCloudFormationのスタック作成を実行する
- CloudFormationは指定されたs3上のパスからテンプレートファイルを読み込む
- テンプレートファイルの記述に従ってlambda関数がデプロイされる
上記をやる前に以下記事の通り、CloudFormationでlambda関数をデプロイできるように準備しておく。
CloudFormationを使ってlambda(node.js)環境を構築する
またCodeBuildからs3にファイルをアップロードしたり、CloudFormationを操作するためには、CodeBuildプロジェクト作成時に、それらの権限(ポリシー)を付けたロールをCodeBuildに付与する必要がある。
以下の順に説明する。
- CodeBuild用のIAMロール作成
- CodeBuildプロジェクトの作成
- CloudFormationで使用するtemplate.yamlの作成
- buildspec.ymlの作成
- lambdaから呼び出されるindex.jsの作成
CodeBuild用のIAMロール作成
ロールの作成はIAMコンソールで行なう。IAMコンソール→ロール→ロールの作成。
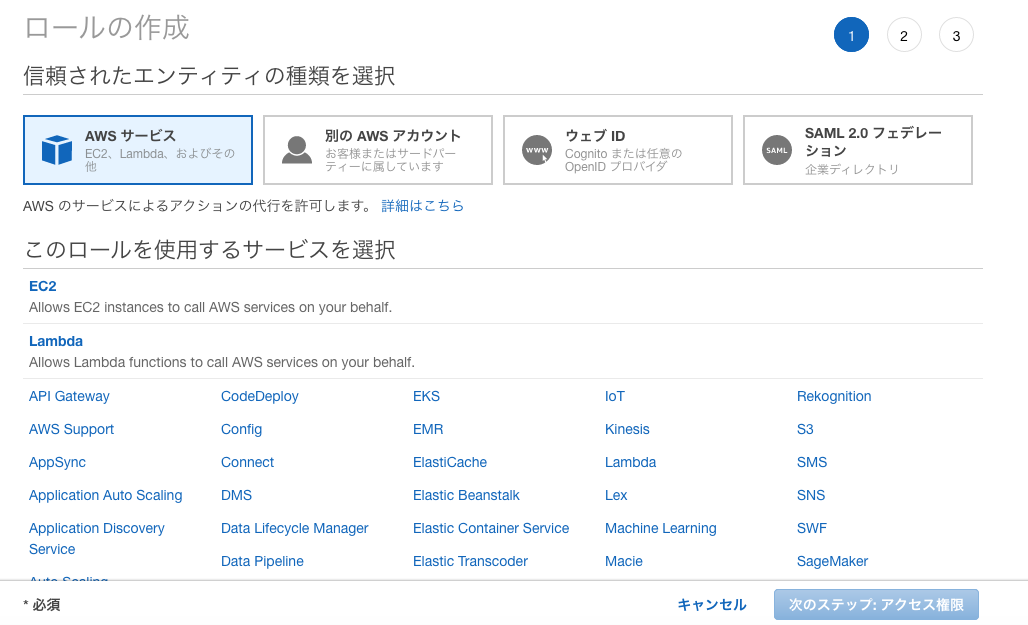
「このロールを使用するサービスを選択」でCodeBuildを選択して、次のステップへ。
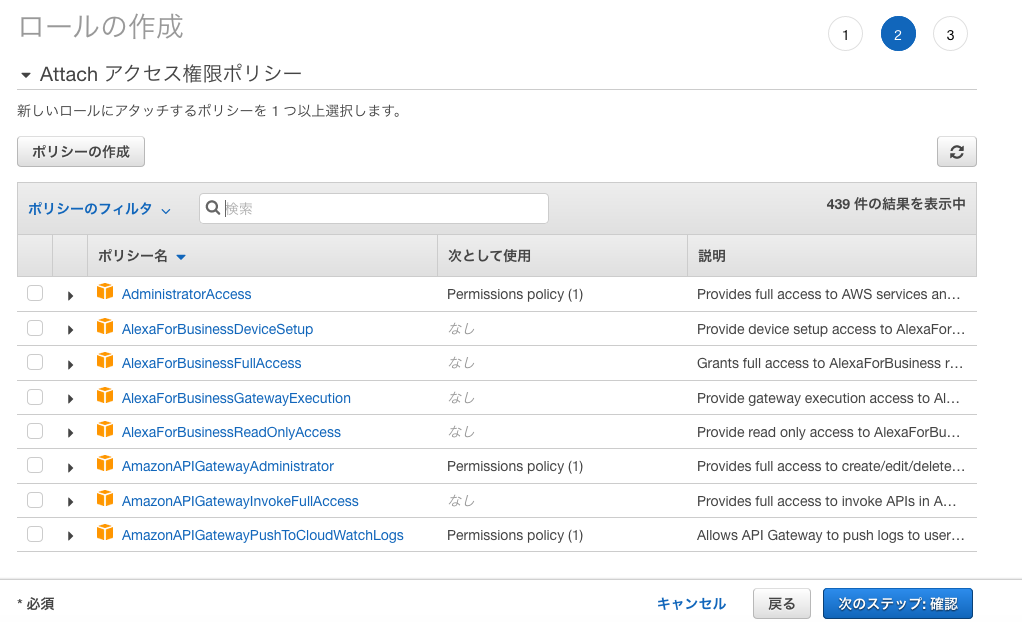
「ロールの作成」画面では、以下ポリシーを付与した"RoleForCodeBuild"を作成する。
- AmazonS3FullAccess
- UseCloudFormation(ポリシーの作成で以下アクションを付与したカスタムポリシー)
- cloudformation:DescribeStacks
- cloudformation:DeleteStack
- cloudformation:CreateStack
- cloudformation:UpdateStack
- DeployLambda(ポリシーの作成で以下アクションを付与したカスタムポリシー)
- lambda:GetFunction
- lambda:CreateFunction
- lambda:DeleteFunction
- IamPassRole(ポリシーの作成で以下アクションを付与したカスタムポリシー)
- iam:PassRole
以上でCodeBuild用のロール"RoleForCodeBuild"が作成できたので、このロールを指定したCodeBuildプロジェクトを作成していく。
CodeBuildプロジェクトの作成
CodeBuildプロジェクトを作り直すので、上記で作成したhelloworldプロジェクトとは別名で新たにCodeBuildプロジェクトの作成を選択。
※上記で作成したhelloworldプロジェクトを一旦削除してすぐに同一名称で作り直すと「The policy was not attached to role RoleForCodeBuild」エラーとなって作成できない
最初のhelloworldプロジェクトと異なる点は「環境」で「既存のサービスロール」を選択し、ロール名にさきほど作成した"RoleForCodeBuild"を指定する点である。
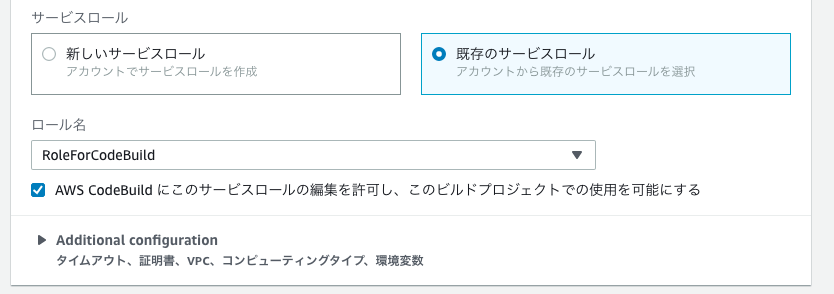
それ以外は同一設定で構わない。
以上でCodeBuildプロジェクトは作成されたので、続けて各種設定ファイルの作成を行なう。
CloudFormationで使用するtemplate.yamlの作成
上述したようにCloudFormationに関しては以下参照。
CloudFormationを使ってlambda(node.js)環境を構築する
今回は以下の通りとする。
AWSTemplateFormatVersion: 2010-09-09
Resources:
  CreateLambdaFunction:
    Type: AWS::Lambda::Function
    Properties:
      FunctionName: helloworld
      Handler: index.handler
      Role: arn:aws:iam::1234567890:role/LambdaRole
      Runtime: nodejs8.10
      Timeout: 10
      Code:
        S3Bucket: sample-bucket
        S3Key: helloworld/deploy/lambda.zip
      Tags:
        -
          Key: COST
          Value: helloworld-lambda
buildspec.ymlの作成
buildspec.yamlには上述のものに対して、lambdaデプロイ用のアーカイブファイルとaws cliを使ってs3へのアップロードならびにCloudFormationの操作を追記する。
version: 0.2

phases:
  install:
    commands:
      - npm install
  pre_build:
    commands:
      - npm test
  build:
    commands:
      - zip lambda.zip *.js *.json -r node_modules -q
  post_build:
    commands:
      - aws s3 cp lambda.zip s3://sample-bucket/helloworld/deploy/
      - aws s3 cp template.yaml s3://sample-bucket/helloworld/template/
      - aws s3 ls s3://sample-bucket/helloworld/template/
      - aws cloudformation delete-stack --stack-name helloworld
      - aws cloudformation wait stack-delete-complete --stack-name helloworld
      - aws cloudformation create-stack --stack-name helloworld --template-url https://s3-ap-northeast-1.amazonaws.com/sample-bucket/helloworld/template/template.yaml --tags Key=COST,Value=cf-helloworld --region ap-northeast-1
      - aws cloudformation wait stack-create-complete --stack-name helloworld
      - aws cloudformation describe-stacks --stack-name helloworld
buildフェーズにlambdaアーカイブファイル作成コマンドを、post_buildフェーズにデプロイ操作を記述した。
なお以下公式ドキュメントに記載がある通り、pre_buildでエラーが発生するとそれ以降のフェーズは実行されない。そのためテストで失敗した場合はデプロイは実行されないので、テスト不合格のものをデプロイしてしまうことを防ぐことができる。
https://docs.aws.amazon.com/ja_jp/codebuild/latest/userguide/view-build-details.html#view-build-details-phases
lambdaから呼び出されるindex.jsの作成
index.jsを作成していなかったので、以下のように作成する。
let hello = require('./helloworld');

exports.handler = (event, context, callback) => {
    console.log(hello());
};
作成したファイルを全てCodeCommitにコミット/プッシュする。
以上で準備完了である。
(5)CodeBuildのプロジェクト(テスト→デプロイ)を実行する
上記で作成したCodeBuildプロジェクトを実行すると以下のようになる(buildフェーズ以降を抜粋)。
[Container] 2018/11/15 06:49:26 Entering phase BUILD
[Container] 2018/11/15 06:49:26 Running command zip lambda.zip *.js *.json -r node_modules -q

[Container] 2018/11/15 06:49:26 Phase complete: BUILD Success: true
[Container] 2018/11/15 06:49:26 Phase context status code:  Message:
[Container] 2018/11/15 06:49:26 Entering phase POST_BUILD
[Container] 2018/11/15 06:49:26 Running command aws s3 cp lambda.zip s3://sample-bucket/helloworld/deploy/
Completed 256.0 KiB/1.2 MiB (2.6 MiB/s) with 1 file(s) remaining
Completed 512.0 KiB/1.2 MiB (4.8 MiB/s) with 1 file(s) remaining
Completed 768.0 KiB/1.2 MiB (7.0 MiB/s) with 1 file(s) remaining
Completed 1.0 MiB/1.2 MiB (9.0 MiB/s) with 1 file(s) remaining
Completed 1.2 MiB/1.2 MiB (7.3 MiB/s) with 1 file(s) remaining
upload: ./lambda.zip to s3://sample-bucket/helloworld/deploy/lambda.zip

[Container] 2018/11/15 06:49:27 Running command aws s3 cp template.yaml s3://sample-bucket/helloworld/template/
Completed 454 Bytes/454 Bytes (6.1 KiB/s) with 1 file(s) remaining
upload: ./template.yaml to s3://sample-bucket/helloworld/template/template.yaml

[Container] 2018/11/15 06:49:27 Running command aws s3 ls s3://sample-bucket/helloworld/template/
2018-11-15 04:52:51          0
2018-11-15 06:49:28        454 template.yaml

[Container] 2018/11/15 06:49:28 Running command aws cloudformation delete-stack --stack-name helloworld

[Container] 2018/11/15 06:49:28 Running command aws cloudformation wait stack-delete-complete --stack-name helloworld

[Container] 2018/11/15 06:49:59 Running command aws cloudformation create-stack --stack-name helloworld --template-url https://s3-ap-northeast-1.amazonaws.com/sample-bucket/helloworld/template/template.yaml --tags Key=COST,Value=cf-helloworld --region ap-northeast-1
{
    "StackId": "arn:aws:cloudformation:ap-northeast-1:1234567890:stack/helloworld/abab0ce0-e8a2-11e8-b41e-500c44f24c1e"
}

[Container] 2018/11/15 06:49:59 Running command aws cloudformation wait stack-create-complete --stack-name helloworld

[Container] 2018/11/15 06:50:30 Running command aws cloudformation describe-stacks --stack-name helloworld
{
    "Stacks": [
        {
            "StackId": "arn:aws:cloudformation:ap-northeast-1:1234567890:stack/helloworld/abab0ce0-e8a2-11e8-b41e-500c44f24c1e",
            "Tags": [
                {
                    "Value": "cf-helloworld",
                    "Key": "COST"
                }
            ],
            "EnableTerminationProtection": false,
            "CreationTime": "2018-11-15T06:49:59.794Z",
            "StackName": "helloworld",
            "NotificationARNs": [],
            "StackStatus": "CREATE_COMPLETE",
            "DisableRollback": false,
            "RollbackConfiguration": {}
        }
    ]
}

[Container] 2018/11/15 06:50:30 Phase complete: POST_BUILD Success: true
[Container] 2018/11/15 06:50:30 Phase context status code:  Message:
CloudFormationのスタックが無事作成され、Lambdaコンソールを見るとhelloworld関数が作成されていることが確認できる。
なおテストでエラーが起きると以下のように、pre_buildフェーズまでで処理が中断され、デプロイは実行されない。
[Container] 2018/11/15 07:17:50 Entering phase PRE_BUILD
[Container] 2018/11/15 07:17:50 Running command npm test

> helloworld-repo@1.0.0 test /codebuild/output/src466496698/src/git-codecommit.ap-northeast-1.amazonaws.com/v1/repos/helloworld-repo
> mocha


  hello world test
    1) func hello() return value


  0 passing (12ms)
  1 failing

  1) hello world test
       func hello() return value:
     Error: expect(received).toBe(expected) // Object.is equality

Expected: "hello world"
Received: "hello world!!!!"
      at Context.it (test/helloworld.test.js:6:25)


npm ERR! Test failed.  See above for more details.

[Container] 2018/11/15 07:17:51 Command did not exit successfully npm test exit status 1
[Container] 2018/11/15 07:17:51 Phase complete: PRE_BUILD Success: false
[Container] 2018/11/15 07:17:51 Phase context status code: COMMAND_EXECUTION_ERROR Message: Error while executing command: npm test. Reason: exit status 1
まとめ
以上、CodeBuildを使ってリポジトリからソースコードを取得、テスト実施、lambda関数をデプロイする手順について記載した。
awsで開発作業を自動化するのまとめ記事
本記事はawsで開発作業を自動化するシリーズの1つです。その他の記事については以下を参照ください。
aws環境でnode.js、lambda、CodeCommit、CodeBuild、CloudFormation、CodePipelineを使って開発作業を自動化する
