scratch-storage を触って見ましょう。
Scratch-Storage には、 プロジェクトやAssetsを読み込むのに使用します。
コードは以下で公開されています。
https://github.com/LLK/scratch-storage
プロジェクトの中身は json
Scratchで作成したプロジェクトにて、「手元のコンピューターにダウンロード」を選択すると、ScratchのProjectをローカルにダウンロードできます。
「Untitled.sb2」を、「Untitled.sb2.zip」 としてみましょう。
解凍アプリで 解凍してみると、
unzip Untitled.sb2.zip
find ./Untitled.sb2
./Untitled.sb2/0.png
./Untitled.sb2/0.wav
./Untitled.sb2/1.svg.
./Untitled.sb2/1.wav
./Untitled.sb2/2.svg
./Untitled.sb2/3.png
./Untitled.sb2/project.json
というデーターが出来上がります。
今回は、これらのデーターを、APIで手に入れてみます。
Project.json
画像データと音声データ以外の、全てがここに書かれています。
Scratchのスクリプトだとか、Spriteや背景の情報など
jsonというテキストのフォーマットで書かれています。
試しに、project.json をテキストEditor で開いて見ましょう。
{
 "objName": "Stage",
 "sounds": [{
   "soundName": "pop",
   "soundID": 1,
   "md5": "83a9787d4cb6f3b7632b4ddfebf74367.wav",
   "sampleCount": 258,
   "rate": 11025,
   "format": ""
  }],

 "costumes": [{
   "costumeName": "backdrop1",
   "baseLayerID": 3,
   "baseLayerMD5": "739b5e2a2435f6e1ec2993791b423146.png",
   "bitmapResolution": 1,
   "rotationCenterX": 240,
   "rotationCenterY": 180
  }],

 "currentCostumeIndex": 0,
 "penLayerMD5": "5c81a336fab8be57adc039a8a2b33ca9.png",
 "penLayerID": 0,
 "tempoBPM": 60,
 "videoAlpha": 0.5,
 "children": [{
   "objName": "Sprite1",
   "sounds": [{
     "soundName": "meow",
     "soundID": 0,
     "md5": "83c36d806dc92327b9e7049a565c6bff.wav",
     "sampleCount": 18688,
     "rate": 22050,
     "format": ""
    }],

   "costumes": [{
     "costumeName": "costume1",
     "baseLayerID": 1,
     "baseLayerMD5": "09dc888b0b7df19f70d81588ae73420e.svg",
     "bitmapResolution": 1,
     "rotationCenterX": 47,
     "rotationCenterY": 55
    },

    {
     "costumeName": "costume2",
     "baseLayerID": 2,
     "baseLayerMD5": "3696356a03a8d938318876a593572843.svg",
     "bitmapResolution": 1,
     "rotationCenterX": 47,
     "rotationCenterY": 55
    }],

   "currentCostumeIndex": 0,
   "scratchX": 0,
   "scratchY": 0,
   "scale": 1,
   "direction": 90,
   "rotationStyle": "normal",
   "isDraggable": false,
   "indexInLibrary": 1,
   "visible": true,
   "spriteInfo": {
   }
  }],

 "info": {
  "swfVersion": "v459.1",
  "userAgent": "Mozilla\/5.0 (Macintosh; Intel Mac OS X 10_13_1) AppleWebKit\/537.36 (KHTML, like Gecko) Chrome\/63.0.3239.84 Safari\/537.36",
  "flashVersion": "MAC 28,0,0,126",
  "projectID": "194253022",
  "videoOn": false,
  "scriptCount": 0,
  "hasCloudData": false,
  "spriteCount": 1
 }
}
と、行ったデーターが展開されます。
各種Project データをダウンロードしてみよう
scratch-storage.js を利用して、各種データーをダウンロードして見ましょう。
scratch-jsonは、ScratchStorageクラスを持つ
https://github.com/LLK/scratch-storage/blob/develop/webpack.config.js
のentry を見てみよう。
./src/index.js から始まることがわかりました。
https://github.com/LLK/scratch-storage/blob/develop/src/index.js
で、module.exportsしているところを見てみよう
ScratchStorage クラスを利用できることが解りました。
https://github.com/LLK/scratch-storage/blob/develop/src/ScratchStorage.js
を開いて見ましょう。
load (assetType, assetId, dataFormat)
と、データーを読み込むメソッドがありますね。
使い方は、利用しているコードを参考にしよう
例えば、
downloadProjectId() などで、Project を ダウンロードしていますね。
書いて、試してみよう
scratch-storage.js を生成する
git clone https://github.com/LLK/scratch-storage.git
cd scratch-storage
npm install
npm run build
./dist/ 配下に、jsファイルが生成されます
> find ./dist -type f -name "*.js"
./dist/node/scratch-storage.js
./dist/web/scratch-storage.js
./dist/web/scratch-storage.min.js
scratch-storage.js を使ってみる
cd ./dist/node
emacs main.js
const storage = require('./scratch-storage.js');


console.log(JSON.stringify(storage.AssetType.Project));
var storageObj = new storage();

const ASSET_SERVER = 'https://cdn.assets.scratch.mit.edu/';
const PROJECT_SERVER = 'https://cdn.projects.scratch.mit.edu/';

const getProjectUrl = function (asset) {
    const assetIdParts = asset.assetId.split('.');
    const assetUrlParts = [PROJECT_SERVER, 'internalapi/project/', assetIdParts[0], '/get/'];
    if (assetIdParts[1]) {
        assetUrlParts.push(assetIdParts[1]);
    }
    return assetUrlParts.join('');
};


const getAssetUrl = function (asset) {
    const assetUrlParts = [
        ASSET_SERVER,
        'internalapi/asset/',
        asset.assetId,
        '.',
        asset.dataFormat,
        '/get/'
    ];
    return assetUrlParts.join('');
};


storageObj.addWebSource([storage.AssetType.Project], getProjectUrl);
storageObj.addWebSource([storage.AssetType.ImageVector, storage.AssetType.ImageBitmap, storage.AssetType.Sound], getAssetUrl);


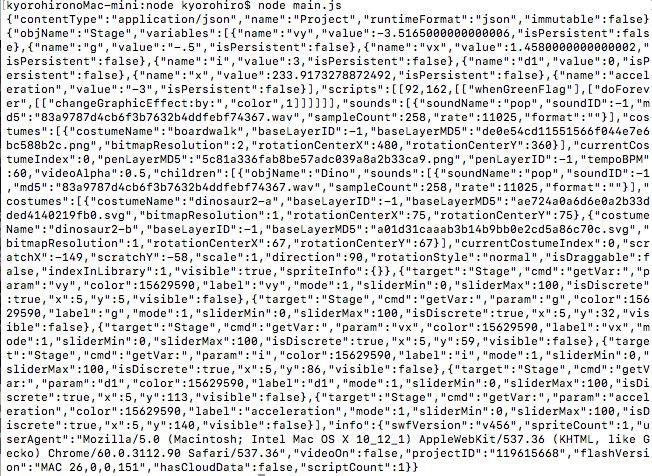
var id = '119615668';

const promise = storageObj.load(storage.AssetType.Project, id);
promise.then(projectAsset => {
 return projectAsset.decodeText();
}).then(jsonSrc =>{
    console.log(jsonSrc);
});
の、project.json が表示されます
つづく
..
..
..
PS
今回のコードは以下
以下の場所でも、アレコレ書いていきます。
Scratch3.0 自分専用機 を作ろう!!
(0)Scratch 3.0 自分専用機 を作ろう!! (0)
(1) Scratch3.0をビルドしてみよう
(2) Scratch3.0 を Androidアプリとして動作させてみよう (1)
(3) Scratch3.0 を Androidアプリとして動作させてみよう (2)
(4) Scratch3.0 を Androidアプリとして動作させてみよう (3)
(5) Webpack とは)
(6) Scratch3.0 の package.jsonを読んでみよう
(7) scratch-gui を インストールしてみよう
(8) scratch-vm に利用されている、scratch-xxx を触ってみよう
(9) Babel を触ってみよう
(10) scratch-render.js で 何か作って触ってみよう
(11) scratch-storage.js を触ってみよう
Scratch2.0 入門

火の型 With Scratch 2.0 (プログラム入門) 第00巻
火の型 With Scratch 2.0 (プログラム入門) 第01巻
炎の型 With Scratch 2.0 (ゲームプログラム入門)
