XHProfをインストールしたので、
今回はXHProfのプロファイリング結果を可視化するXHGUIをインストールしたいと思います。
環境
| CentOS | 6.7 |
|---|---|
| PHP | 5.4.45 |
| VCCW | 2.21 |
XHGUIのインストール
githubからソースコードをダウンロード(vagrant内)
githubからソースコードをダウンロードして、wordpressディレクトリに置きます。
$ vagrant ssh
$ cd /usr/local/src
$ sudo wget https://github.com/preinheimer/xhprof/archive/master.zip
$ sudo unzip master.zip
$ cp -r /usr/local/src/xhprof-master /vagrant/www/wordpress/xhgui
wordpress.confの編集(vagrant内)
VCCWではwordpressの公開ディレクトリに関する設定は
/etc/httpd/sites-available/wordpress.confに記述されています。
wordpress.confに「php_admin_value auto_prepend_file "/var/www/wordpress/xhgui/external/header.php"」
を追加します。
<VirtualHost *:80>
  ServerName test.example
  DocumentRoot /var/www/wordpress
+ php_admin_value auto_prepend_file "/var/www/wordpress/xhgui/external/header.php"
</VirtualHost>
xhgui/external/header.phpの編集
//Determine wether or not to profile this URL randomly
- if ($_xhprof['doprofile'] === false)
+ if (! strpos($_SERVER['REQUEST_URI'], 'xhprof_html') && $_xhprof['doprofile'] === false)
{
    //Profile weighting, one in one hundred requests will be profiled without being specifically requested
-    if (rand(1, $weight) == 1)
-    {
        $_xhprof['doprofile'] = true;
        $_xhprof['type'] = 0;
-    }
}
データベースの作成(vagrant内)
データベースを作成します。
VCCWではwordpress用に作成されたユーザーではデータベースを作成できないので、
rootユーザーで作成します。 パスワードは「wordpress」でいけると思います。
$ mysql -u root -p
mysql > create database xhprof;
mysql >  CREATE TABLE `details` (
 `id` char(17) NOT NULL,
 `url` varchar(255) default NULL,
 `c_url` varchar(255) default NULL,
 `timestamp` timestamp NOT NULL default CURRENT_TIMESTAMP on update CURRENT_TIMESTAMP,
 `server name` varchar(64) default NULL,
 `perfdata` MEDIUMBLOB,
 `type` tinyint(4) default NULL,
 `cookie` BLOB,
 `post` BLOB,
 `get` BLOB,
 `pmu` int(11) unsigned default NULL,
 `wt` int(11) unsigned default NULL,
 `cpu` int(11) unsigned default NULL,
 `server_id` char(3) NOT NULL default 't11',
 `aggregateCalls_include` varchar(255) DEFAULT NULL,
 PRIMARY KEY  (`id`),
 KEY `url` (`url`),
 KEY `c_url` (`c_url`),
 KEY `cpu` (`cpu`),
 KEY `wt` (`wt`),
 KEY `pmu` (`pmu`),
 KEY `timestamp` (`timestamp`)
 ) ENGINE=MyISAM DEFAULT CHARSET=utf8;
configファイルの作成
サンプルのコンフィグファイルをコピーします。
$ cd [DocumentRoot]/xhgui/xhprof_lib/
$ cp config.sample.php config.php
$ vi config.php
こちらはご自身の環境に合わせてください。
$_xhprof['dbtype'] = 'mysql';
$_xhprof['dbhost'] = 'localhost';
$_xhprof['dbuser'] = 'root';
$_xhprof['dbpass'] = 'wordpress';
$_xhprof['dbname'] = 'xhprof';
$_xhprof['dbadapter'] = 'Mysql';
$_xhprof['servername'] = 'myserver';
$_xhprof['namespace'] = 'myapp';
$_xhprof['url'] = 'http://test.example/xhgui/xhprof_html';
httpdの再起動
$ sudo service httpd restart
[エラー] You do not have permission to view this page.
ブラウザで確認したところ
http://test.example/xhgui/xhprof_html/index.php
「You do not have permission to view this page.」というエラーが出ました。
[対処法] IPアドレスの許可
vagrantを作成する際に指定したIPアドレスを許可するか
$controlIPs = falseにしてしまえば、対処できます。
VCCWの場合は、default.ymlまたはsite.ymlでIPアドレスを指定しているかと思います。
デフォルトは「192.168.33.10」だったかと思います。
//Control IPs allow you to specify which IPs will be permitted to control when profiling is on or off within your application, and view the results via the UI.
// $controlIPs = false; //Disables access controlls completely.
$controlIPs = array();
$controlIPs[] = "127.0.0.1";   // localhost, you'll want to add your own ip here
$controlIPs[] = "::1";         // localhost IP v6
+ $controlIPs[] = "192.168.33.10";
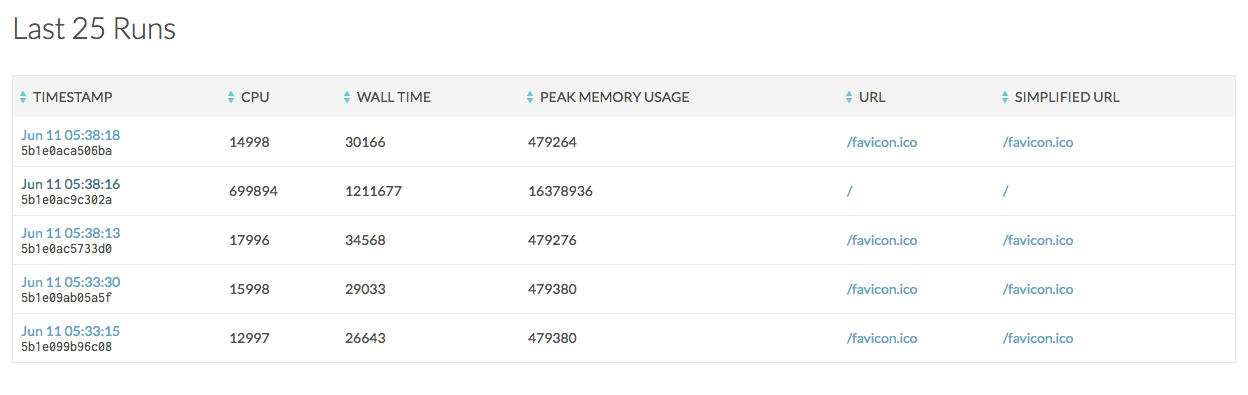
確認
ブラウザで確認します。
http://test.example/xhgui/xhprof_html/index.php
参考
xhprofを使ってみた(XHGUIとCallgraphインストール編)
Php/速度改善/XHGui - 初心者エンジニアの簡易メモ